
In our previous post, we discussed how tight hamstrings can produce hyperflexion of the lumbar spine in forward bends such as Uttanasana. We also illustrated how releasing the hamstrings can aid to prevent this problem. Today we’ll show you a simple, yet powerful technique for using a spinal cord reflex arc to create length in the hamstrings.
Spinal Cord Reflex Arcs
Spinal cord reflex arcs are composed of a sensory nerve receptor located at or near the muscle, its connection via a nerve to the spinal cord, an interneuron within the spinal cord, and an afferent nerve back to the muscle. The reflex arc we want to use to gain length involves the Golgi tendon organ. This receptor is located at the muscle-tendon junction and senses changes in muscle tension. The Golgi tendon organ signals the spinal cord when tension increases. The spinal cord then tells the muscle to relax. In essence, this reflex arc creates “slack” to relieve tension at the muscle-tendon junction and helps to prevent the tendon from tearing.
Spinal cord reflex arcs are composed of a sensory nerve receptor located at or near the muscle, its connection via a nerve to the spinal cord, an interneuron within the spinal cord, and an afferent nerve back to the muscle. The reflex arc we want to use to gain length involves the Golgi tendon organ. This receptor is located at the muscle-tendon junction and senses changes in muscle tension. The Golgi tendon organ signals the spinal cord when tension increases. The spinal cord then tells the muscle to relax. In essence, this reflex arc creates “slack” to relieve tension at the muscle-tendon junction and helps to prevent the tendon from tearing.

Proprioceptive Neuromuscular Facilitation (PNF)
Sports medicine experts long ago perceived that this particular reflex arc could be carefully manipulated to lengthen muscles. Using this knowledge, they invented a technique called proprioceptive neuromuscular facilitation (PNF), or facilitated stretching. It is the most powerful method for gaining length in muscles to improve flexibility. Yoga uses stretching, so why not use PNF in our practice to deepen the asanas?
It is important to remember that any powerful tool, including yoga itself, is a double-edged sword (like a surgeon’s scalpel). If used carelessly, it can cause injury. This is also true of facilitated stretching. The key to using techniques like this is to apply them slowly and with care. They are like a tincture of medicine, so use less muscular force rather than more.
Facilitated stretching works as follows: after warming up, we take the target muscle into a moderate stretch. This establishes the muscle’s “set length”—a measure in the brain of how far the muscle can lengthen. Stretching a muscle produces tension at the muscle-tendon junction and stimulates the Golgi tendon organs located there. The key to PNF is to then gently contract the same muscle that we are stretching. This combines the biomechanical event of positioning the body into a stretch and the physiological event of intentionally contracting the stretching muscle to amplify the tension at the muscle-tendon junction. The Golgi tendon organs fire more intensively, producing a powerful relaxation response. We then stop contracting the target muscle and “take up the slack” by going deeper into the stretch. The net effect is a new set length.
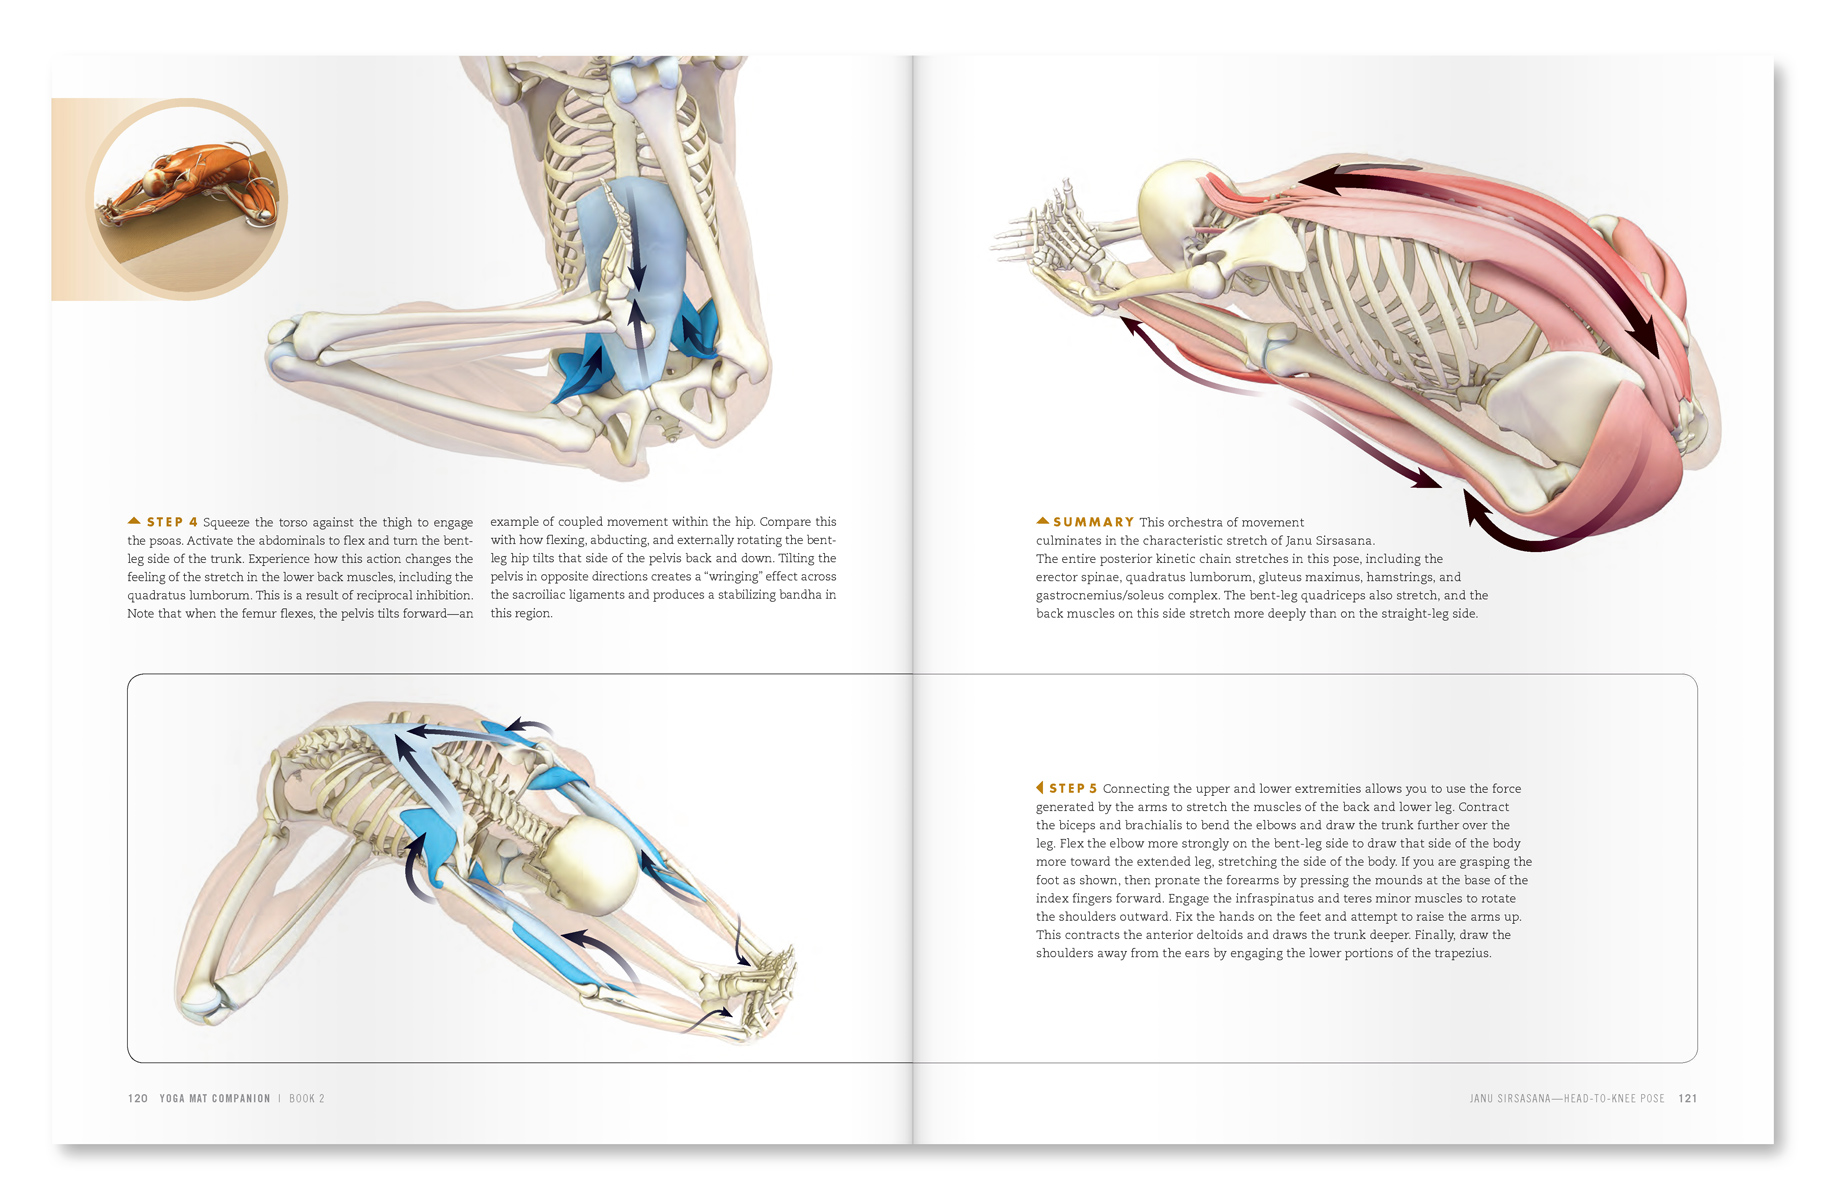
Apply PNF in Janu Sirsasana
Here we use Janu Sirsasana to demonstrate specific guidelines for using PNF to lengthen the hamstrings. Warm up first with a few sun salutations to prepare your muscles. Then take Janu Sirsasana. Bend the trunk over your straight leg and engage the quadriceps to acclimate the hamstrings for the stretch. Next, bend the knee about 20 degrees. Although this takes some of the stretch out of the hamstrings, and thus some of the tension out of the muscle-tendon junction, bending the knee allows us to generate more force during the contractile phase of facilitated stretching.
Here we use Janu Sirsasana to demonstrate specific guidelines for using PNF to lengthen the hamstrings. Warm up first with a few sun salutations to prepare your muscles. Then take Janu Sirsasana. Bend the trunk over your straight leg and engage the quadriceps to acclimate the hamstrings for the stretch. Next, bend the knee about 20 degrees. Although this takes some of the stretch out of the hamstrings, and thus some of the tension out of the muscle-tendon junction, bending the knee allows us to generate more force during the contractile phase of facilitated stretching.

Then press the heel of the forward leg into the mat (as if you were trying to bend the knee). This cue causes the hamstrings to contract. Build the pressure gradually and top it off at no more than 20 percent of your maximum strength. Steadily engage the hamstrings for five even breaths, and then gradually release the contraction over a second or two. This will have produced the relaxation response. Now take up the slack by straightening the knee with the quadriceps and gently draw yourself deeper into the pose. Engaging the quadriceps not only straightens the knee, but also amplifies the relaxation response through reciprocal inhibition of the hamstrings. Repeat on the other side. Relax for a moment and then take Uttanasana, sequentially applying each of the cues illustrated in the last week of posts. Feel how your pose has changed.
Go slowly with facilitated stretching. Allow about 48 hours of recovery time before re-applying PNF to any given muscle group.
 |
| An excerpt from "Yoga Mat Companion 2 - Anatomy for Hip Openers and Forward Bends". |
 |
| An excerpt from "Yoga Mat Companion 4 - Anatomy for Arm Balances and Inversions". |
Thanks for stopping by and we’ll see you next week when we’ll shift gears a bit and go over how yoga works with the mind—body connection (and how to use scientific techniques to enhance this connection).
Namasté,
My husband and I are enjoying a beautiful morning in the desert. He with his Daily Kos and me with the Daily Bandha. Thanks so much for this invaluable information in such a neat, tidy format. My only comment is to perhaps make the info a bit more user friendly and playful. I am not great on anatomy, thus my reason for subscribing. The graphics help but more word pictures and analogous stories would really serve those of us a bit more dense in this department. Thanks.
ReplyDeletehi Belle--thanks for the suggestion. will work on this. sounds great to be in the desert--I'm in a snowstorm!!
ReplyDeletebest,
Ray
I absolutely love the drawings. They are excellent. The best I have even seen in any yoga books.
ReplyDeleteI LOVE this newsletter! I'm a physical therapist and certified yoga instructor. I have been using techniques of PNF and reciprocal inhibition for years; however, with your descriptions it is easier for me to simplify it and explain it to my students. I have purchased your books not only for myself but to share with my students and my patients! The visuals are excellent and my patients can truly see the connection of one body part to another.
ReplyDeleteThank you so much.
Kim MSPT, RYT, DPT
Thanks Kim--much appreciated!
ReplyDeleteRay
I am drawn to your books because of the diagrams and anatomical naming. I purchased the Standing Poses book. Excellent. I am YogaFit certified and I think this covers so much that isn't covered in the "weekend certification". It's my job as an instructor to be as well versed in anatomy and useful techniques (such as PNS) to promote safe alignment and moves. Thank you for backing us up with the DailyBandha!!!
ReplyDeleteHello Als, Great to hear that you enjoy our work and are using it. I believe this type of knowledge is a key element in excelling as a yoga teacher and practitioner. It opens many avenues for creativity as well in the practice. Knowledge of anatomy and biomechanics adds great credibility with your students and gives confidence in teaching. All the Best to you and YogaFit! Ray
DeleteHi, thanks for a great post. I have just started yoga (3months) and practice a 6 day week. I am constantly sore but have not been sure if I should back off or work through it. (Read various suggestions...) Am I correct in my understanding of your article that perhaps a 3 day week would be better for me? Some days I seem to be able to do way more and others I feel stiffer than when I first started yoga o.0 Kind regards from Norway :)
ReplyDelete