Hi Folks,
In our last post, we discussed joint rhythm for the shoulders. In this blog post I want to share some of my recent investigations on the biomechanics of the shoulder joint, with some specific tips for Down Dog. Shoulder pain is one of the problems that comes up in yoga, especially with folks who are doing Vinyasa based practice. The underlying cause of the pain can be multifactorial, but it is frequently related to impingement of the rotator cuff and subsequent inflammation of the cuff tendon (specifically the supraspinatus muscle). Inflammation of the tendon, in turn, affects function of the shoulder. Weakness or instability in the shoulder can then lead to abnormal pressures at the wrist, causing pain there as well. Thus, stabilizing the shoulders has beneficial effects beyond the shoulders. is a complex process involving strengthening the core and then linking the strong core to the shoulders.
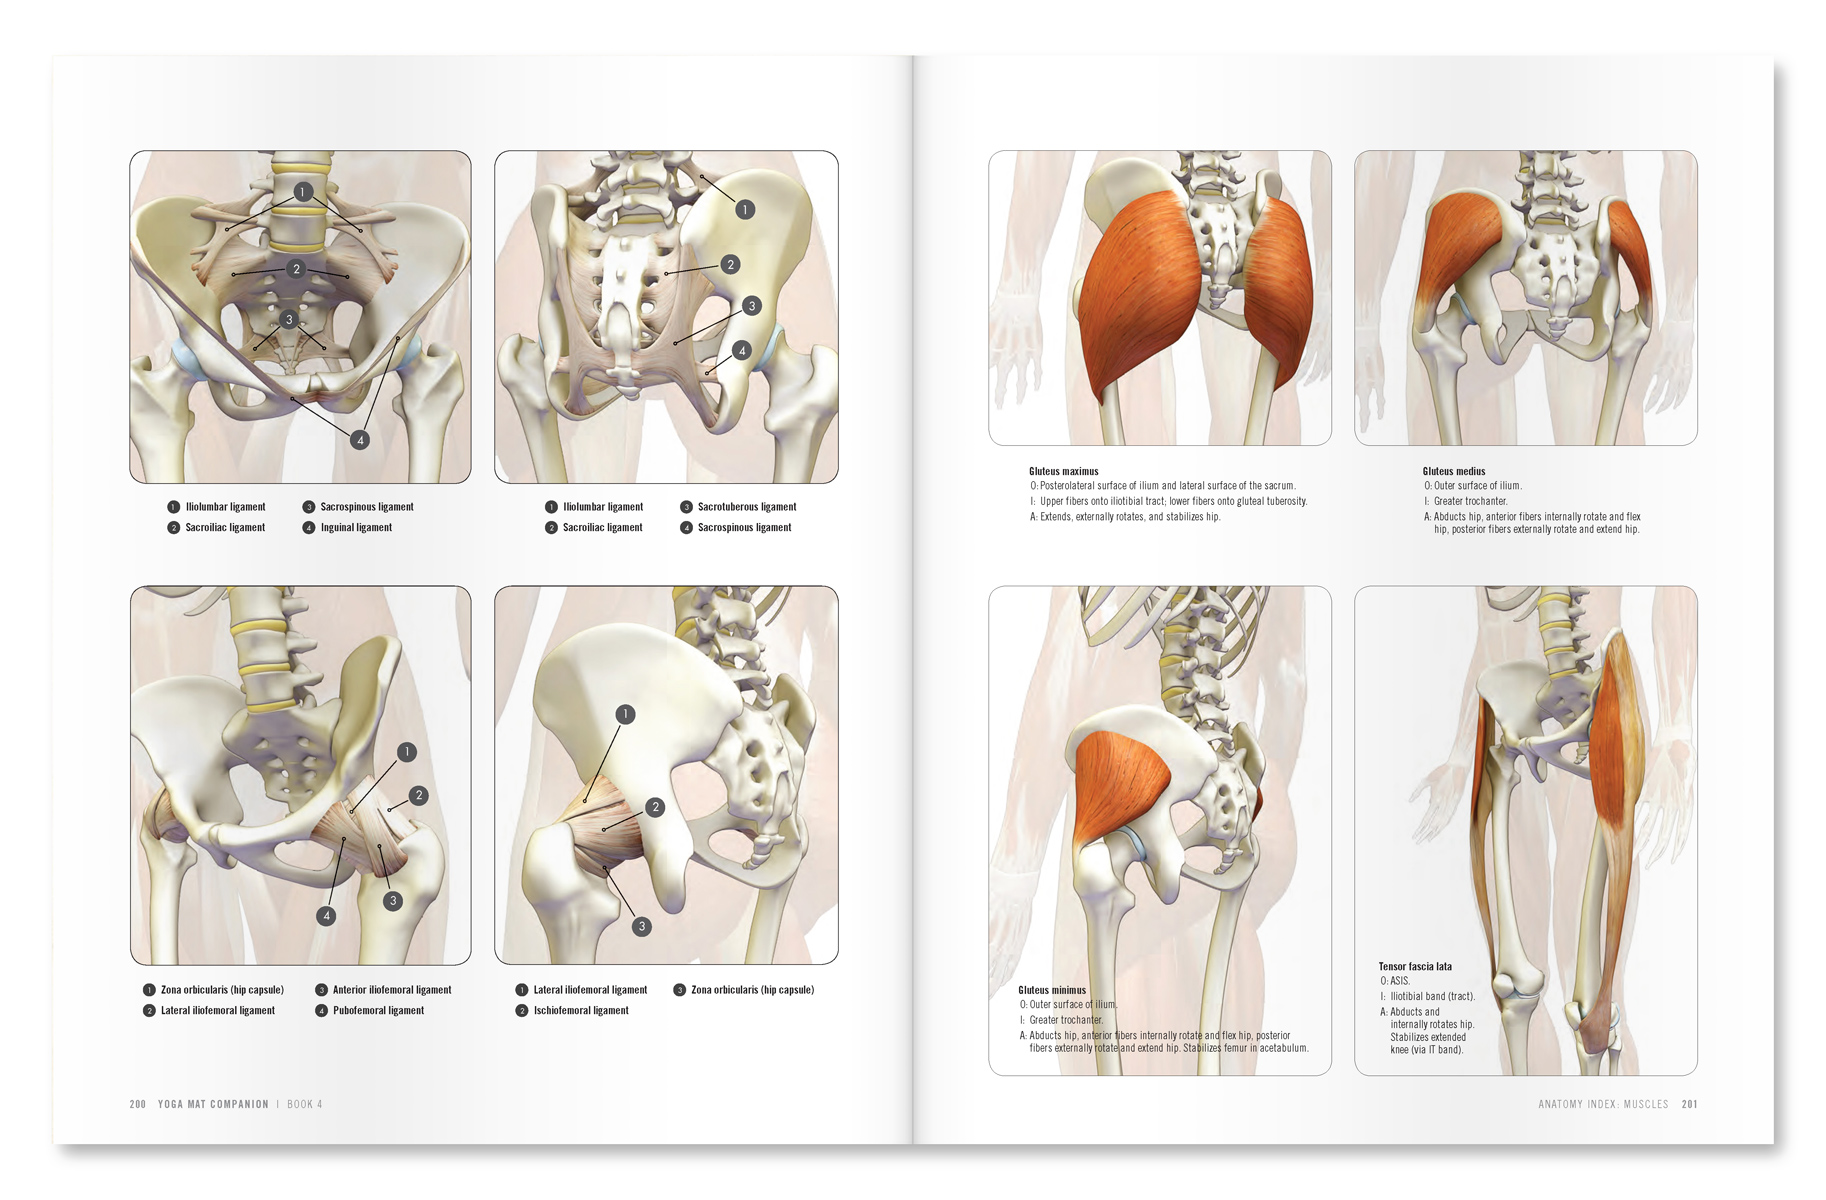
With this in mind, let’s look at one of the key factors in shoulder impingement, namely, the acromio-humeral interval. This refers to the distance between the undersurface of the acromion and the humeral head, as measured using radiology intruments (x-ray, ultrasound, mri). The acromion is a shelf of bone on the scapula, above the spine (seen in Figure 1). It serves as the attachment for the deltoid muscle. The humeral head articulates with the shoulder joint and serves as the attachment for the muscles of the rotator cuff (on the greater and lesser tuberosities). Factors that decrease the space between the acromion and humeral head can lead to inflammation of the cuff tendon due to compression between the two bones.
Research has shown that contracting the main adductor muscles of the shoulder serves to increase the acromio-humeral distance. These include the pectoralis major and latissimus dorsi. Co-contracting the biceps and triceps muscles when the arms are overhead can also draw the humerus away from the glenoid, as shown in Figure 2. Finally, externally rotating the shoulder humerus moves the vulnerable area of the supraspinatus tendon away from the area where it would impinge on the acromion (click here to learn more).
Here’s the cue…
Warm up first a bit. Then, take Downward Dog pose. I use three steps for the shoulders. Go slowly and use gentle engagements.
Figure 3 illustrates the various muscles involved in these cues.
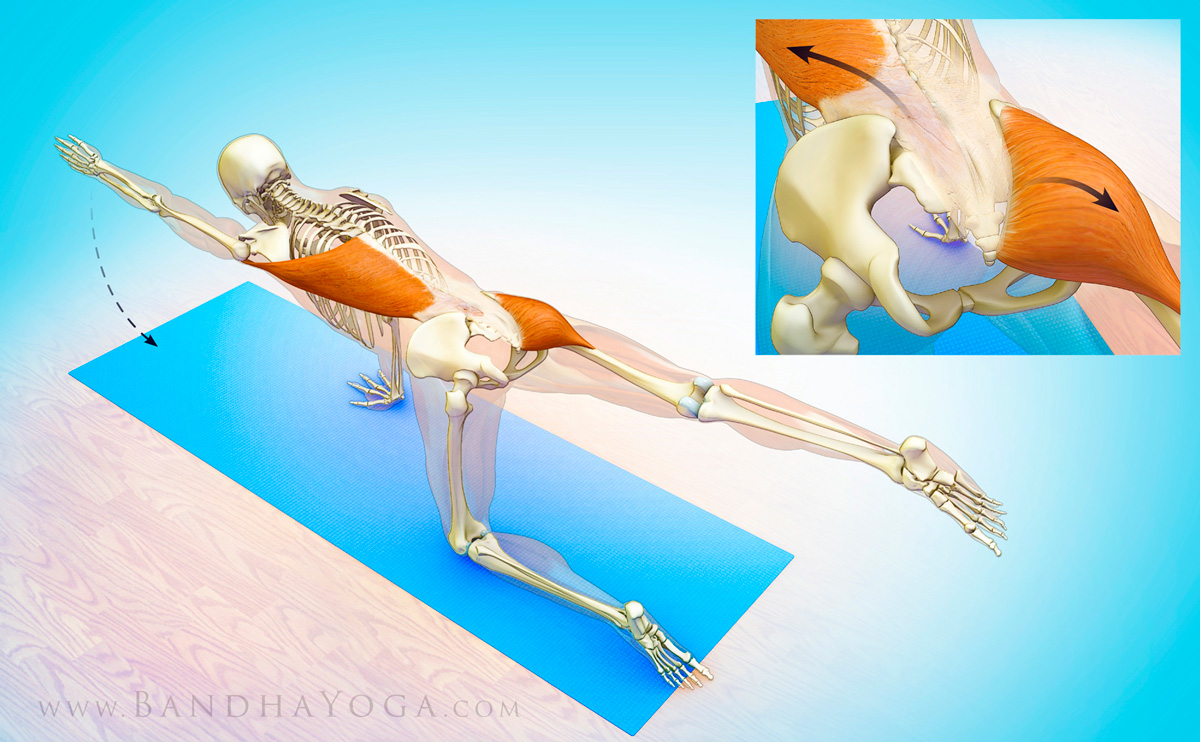
As a final adjustment, I like to link the action of the shoulders to the lower extremities. The cue for this is to engage your lower gluteus max and adductor magnus muscles by drawing in with the upper inner thighs and then attempt to drag your feet away from the hands. Feel how this stabilizes your pose. See Figure 4 for the graphics.
Bear in mind that shoulder stability is a complex process. The shoulders are linked to the core; so building a strong core leads to stable shoulders. Stable shoulders help to protect the wrists, and so on. Click here to read more on your core. If you would like to learn more anatomic sequencing to improve your poses, click here to take a tour of The Yoga Mat Companion Series.
Thanks for stopping by—see you in a couple of weeks for another post on combining anatomy, biomechanics and yoga.
All the Best,
Ray Long, MD
References:
In our last post, we discussed joint rhythm for the shoulders. In this blog post I want to share some of my recent investigations on the biomechanics of the shoulder joint, with some specific tips for Down Dog. Shoulder pain is one of the problems that comes up in yoga, especially with folks who are doing Vinyasa based practice. The underlying cause of the pain can be multifactorial, but it is frequently related to impingement of the rotator cuff and subsequent inflammation of the cuff tendon (specifically the supraspinatus muscle). Inflammation of the tendon, in turn, affects function of the shoulder. Weakness or instability in the shoulder can then lead to abnormal pressures at the wrist, causing pain there as well. Thus, stabilizing the shoulders has beneficial effects beyond the shoulders. is a complex process involving strengthening the core and then linking the strong core to the shoulders.
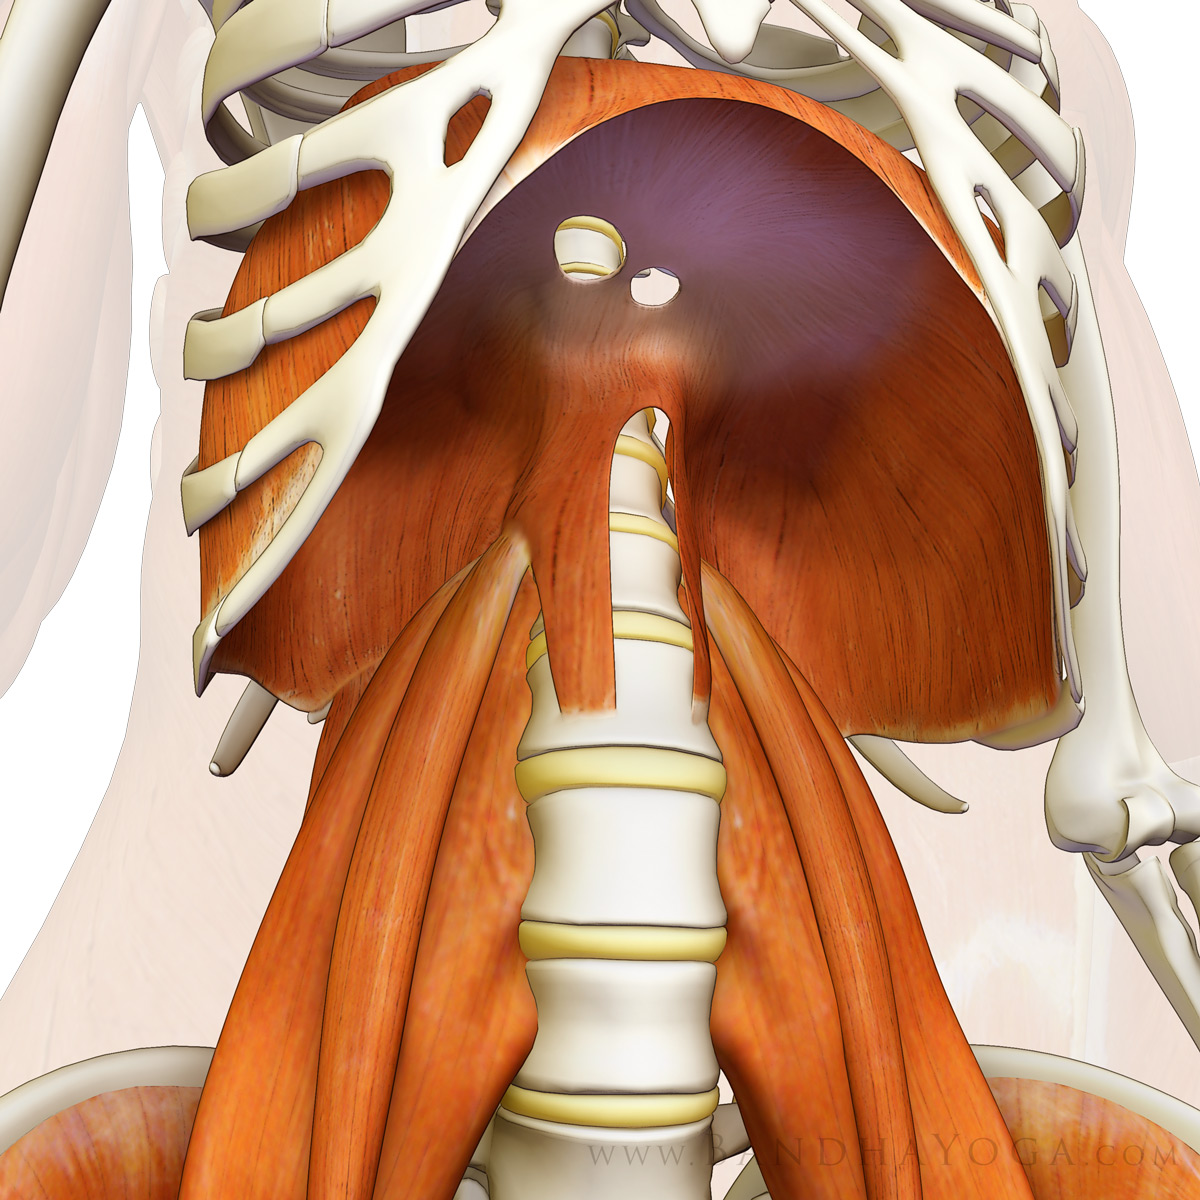
With this in mind, let’s look at one of the key factors in shoulder impingement, namely, the acromio-humeral interval. This refers to the distance between the undersurface of the acromion and the humeral head, as measured using radiology intruments (x-ray, ultrasound, mri). The acromion is a shelf of bone on the scapula, above the spine (seen in Figure 1). It serves as the attachment for the deltoid muscle. The humeral head articulates with the shoulder joint and serves as the attachment for the muscles of the rotator cuff (on the greater and lesser tuberosities). Factors that decrease the space between the acromion and humeral head can lead to inflammation of the cuff tendon due to compression between the two bones.
 |
| Figure 1: The acromio-humeral interval. |
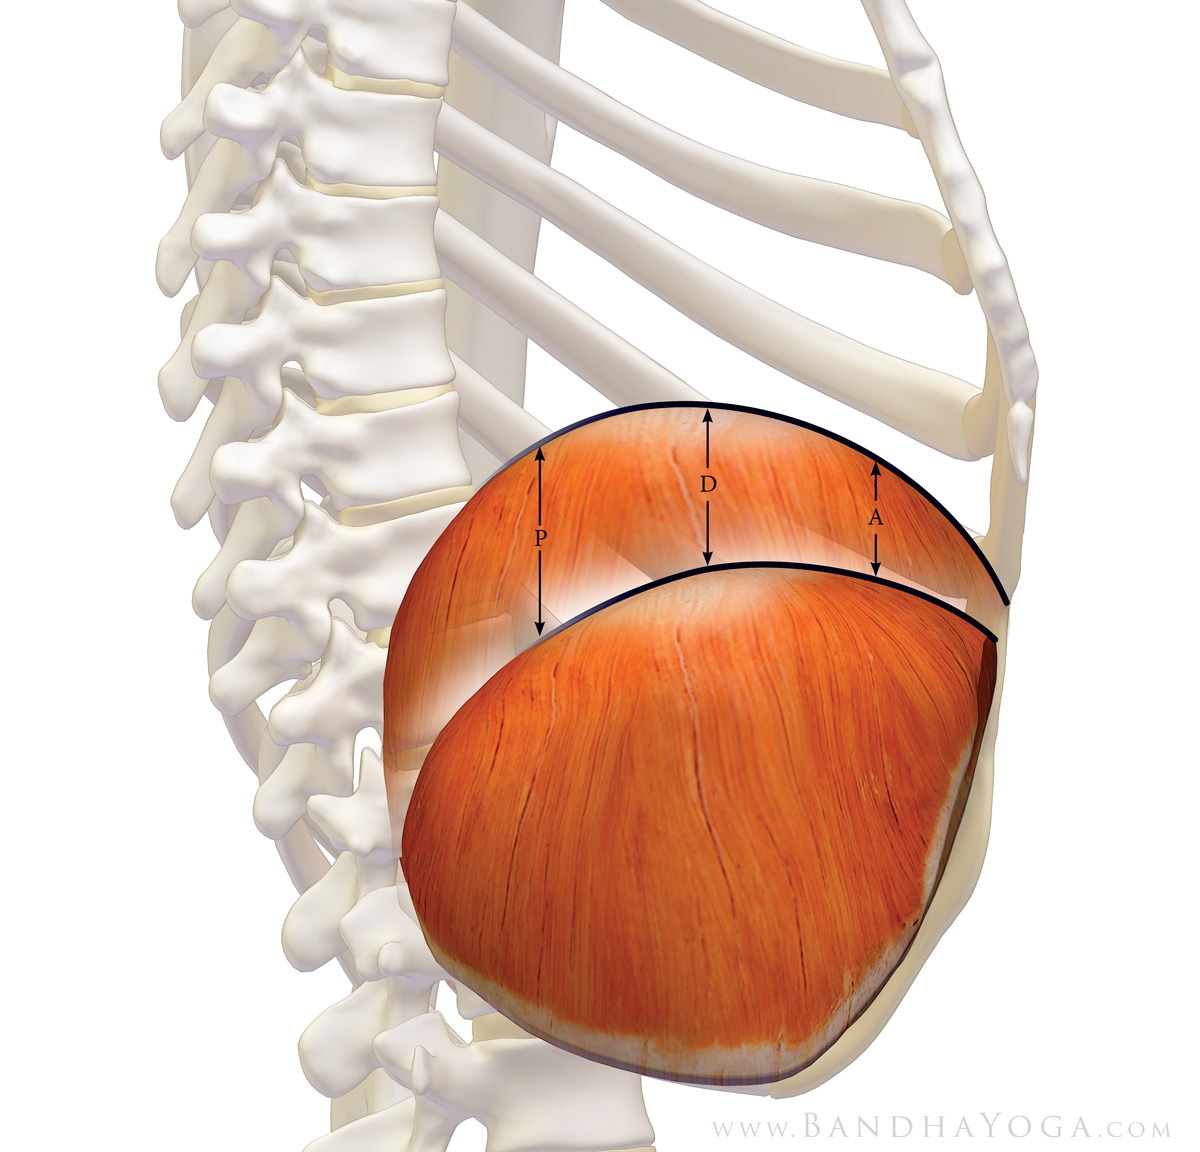
Research has shown that contracting the main adductor muscles of the shoulder serves to increase the acromio-humeral distance. These include the pectoralis major and latissimus dorsi. Co-contracting the biceps and triceps muscles when the arms are overhead can also draw the humerus away from the glenoid, as shown in Figure 2. Finally, externally rotating the shoulder humerus moves the vulnerable area of the supraspinatus tendon away from the area where it would impinge on the acromion (click here to learn more).
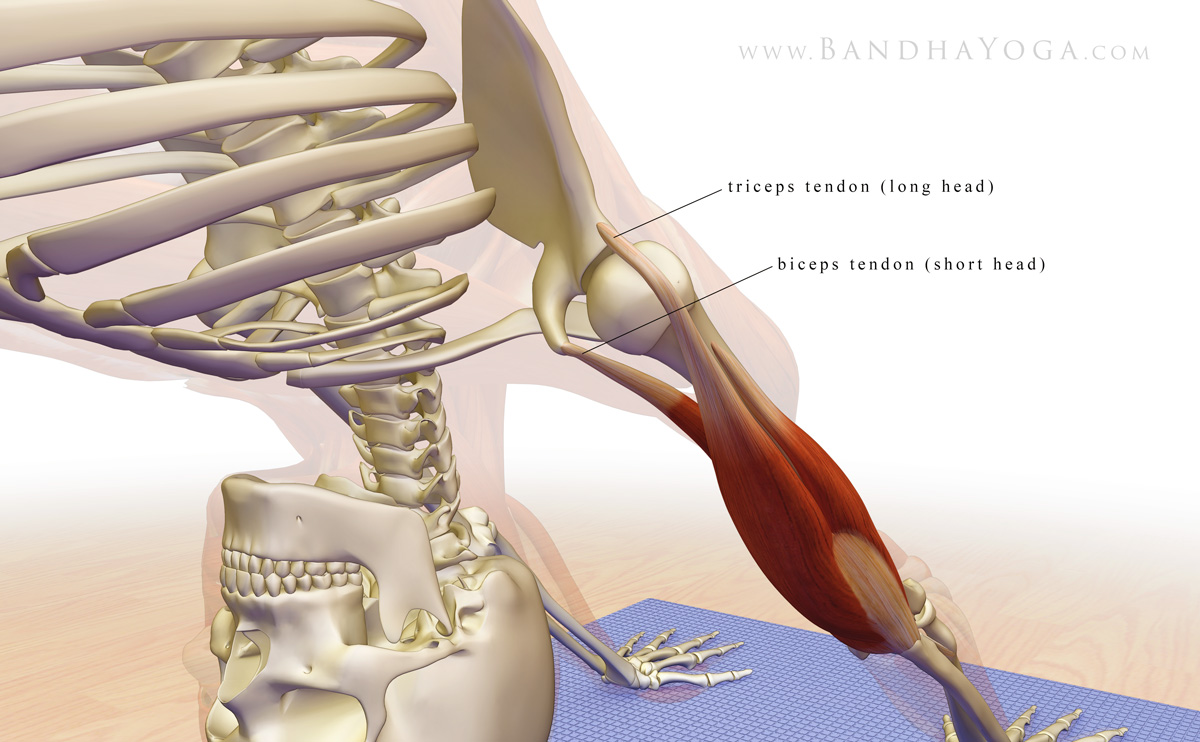 |
| Figure 2: The long head of the triceps and short head of the biceps in relation to the gleno-humeral joint with the arms overhead. |
Here’s the cue…
Warm up first a bit. Then, take Downward Dog pose. I use three steps for the shoulders. Go slowly and use gentle engagements.
- Contract the triceps to straighten your elbows. Then, press the mound at the base of your index fingers into your mat to engage the forearm pronator muscles.
- Next, fix your palms into the mat and try to drag the hands towards each other. This engages the adductor muscles of the shoulders as well as the biceps.
- Finally, gently roll the shoulders outward. This externally rotates the humerus bone and helps to bring the greater tuberosity away from the undersurface of the acromion.
Figure 3 illustrates the various muscles involved in these cues.
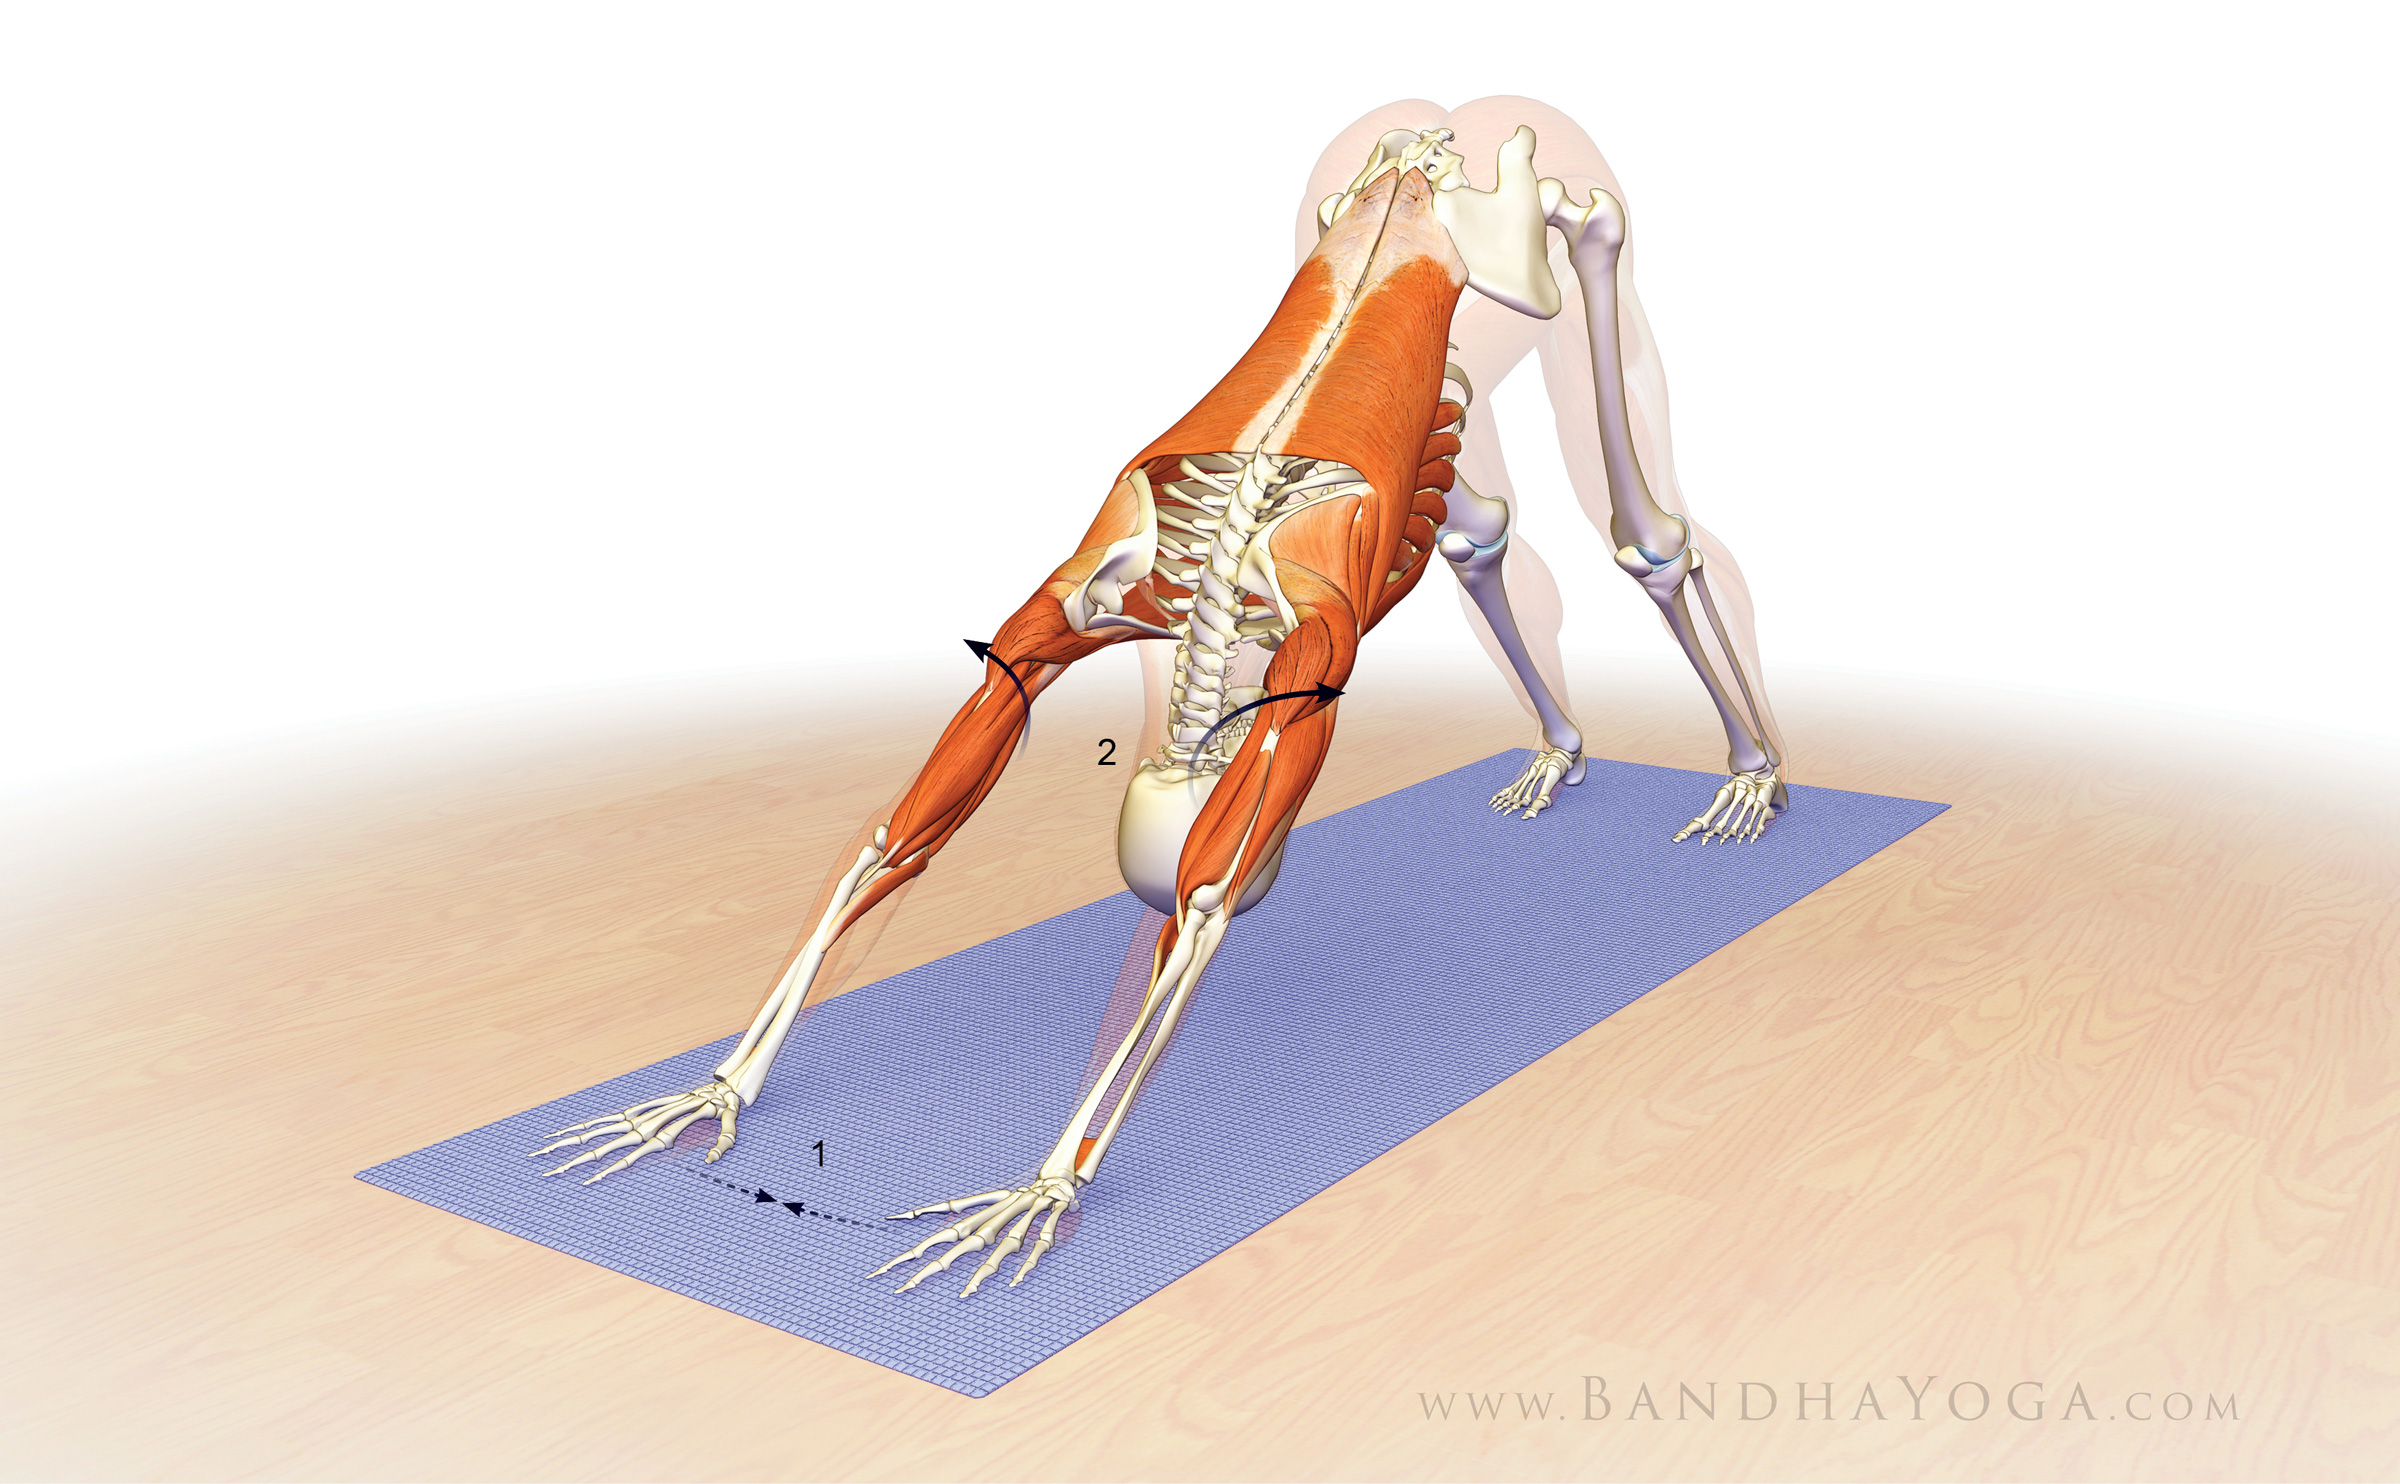 |
| Figure 3: Attempt to drag the hands towards one another. This engages the shoulder adductors. Then externally rotate the shoulders. |
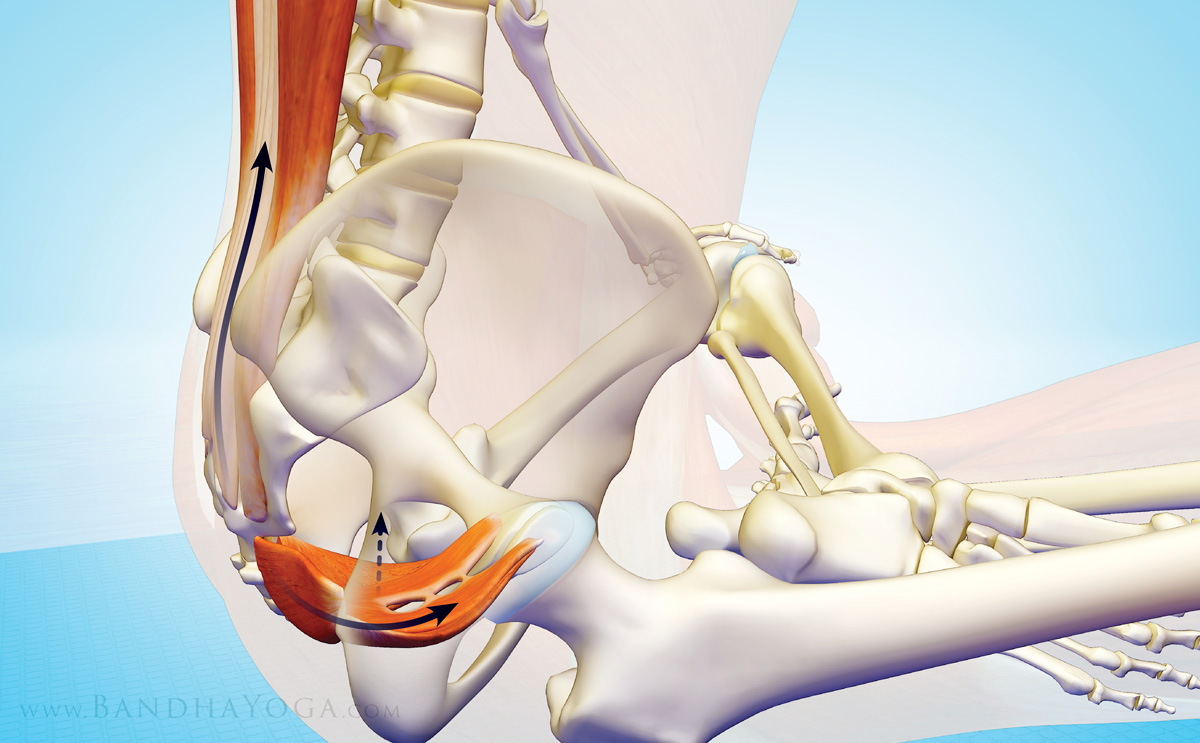
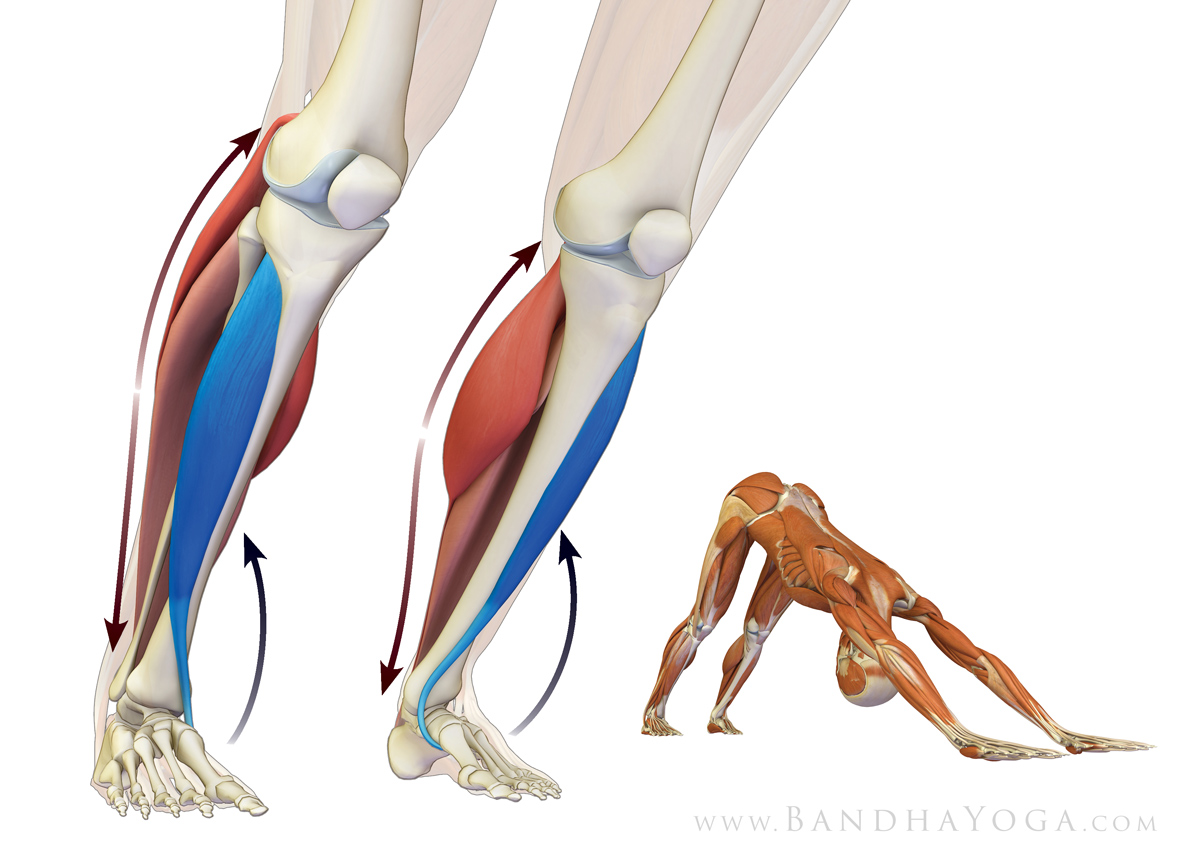
As a final adjustment, I like to link the action of the shoulders to the lower extremities. The cue for this is to engage your lower gluteus max and adductor magnus muscles by drawing in with the upper inner thighs and then attempt to drag your feet away from the hands. Feel how this stabilizes your pose. See Figure 4 for the graphics.
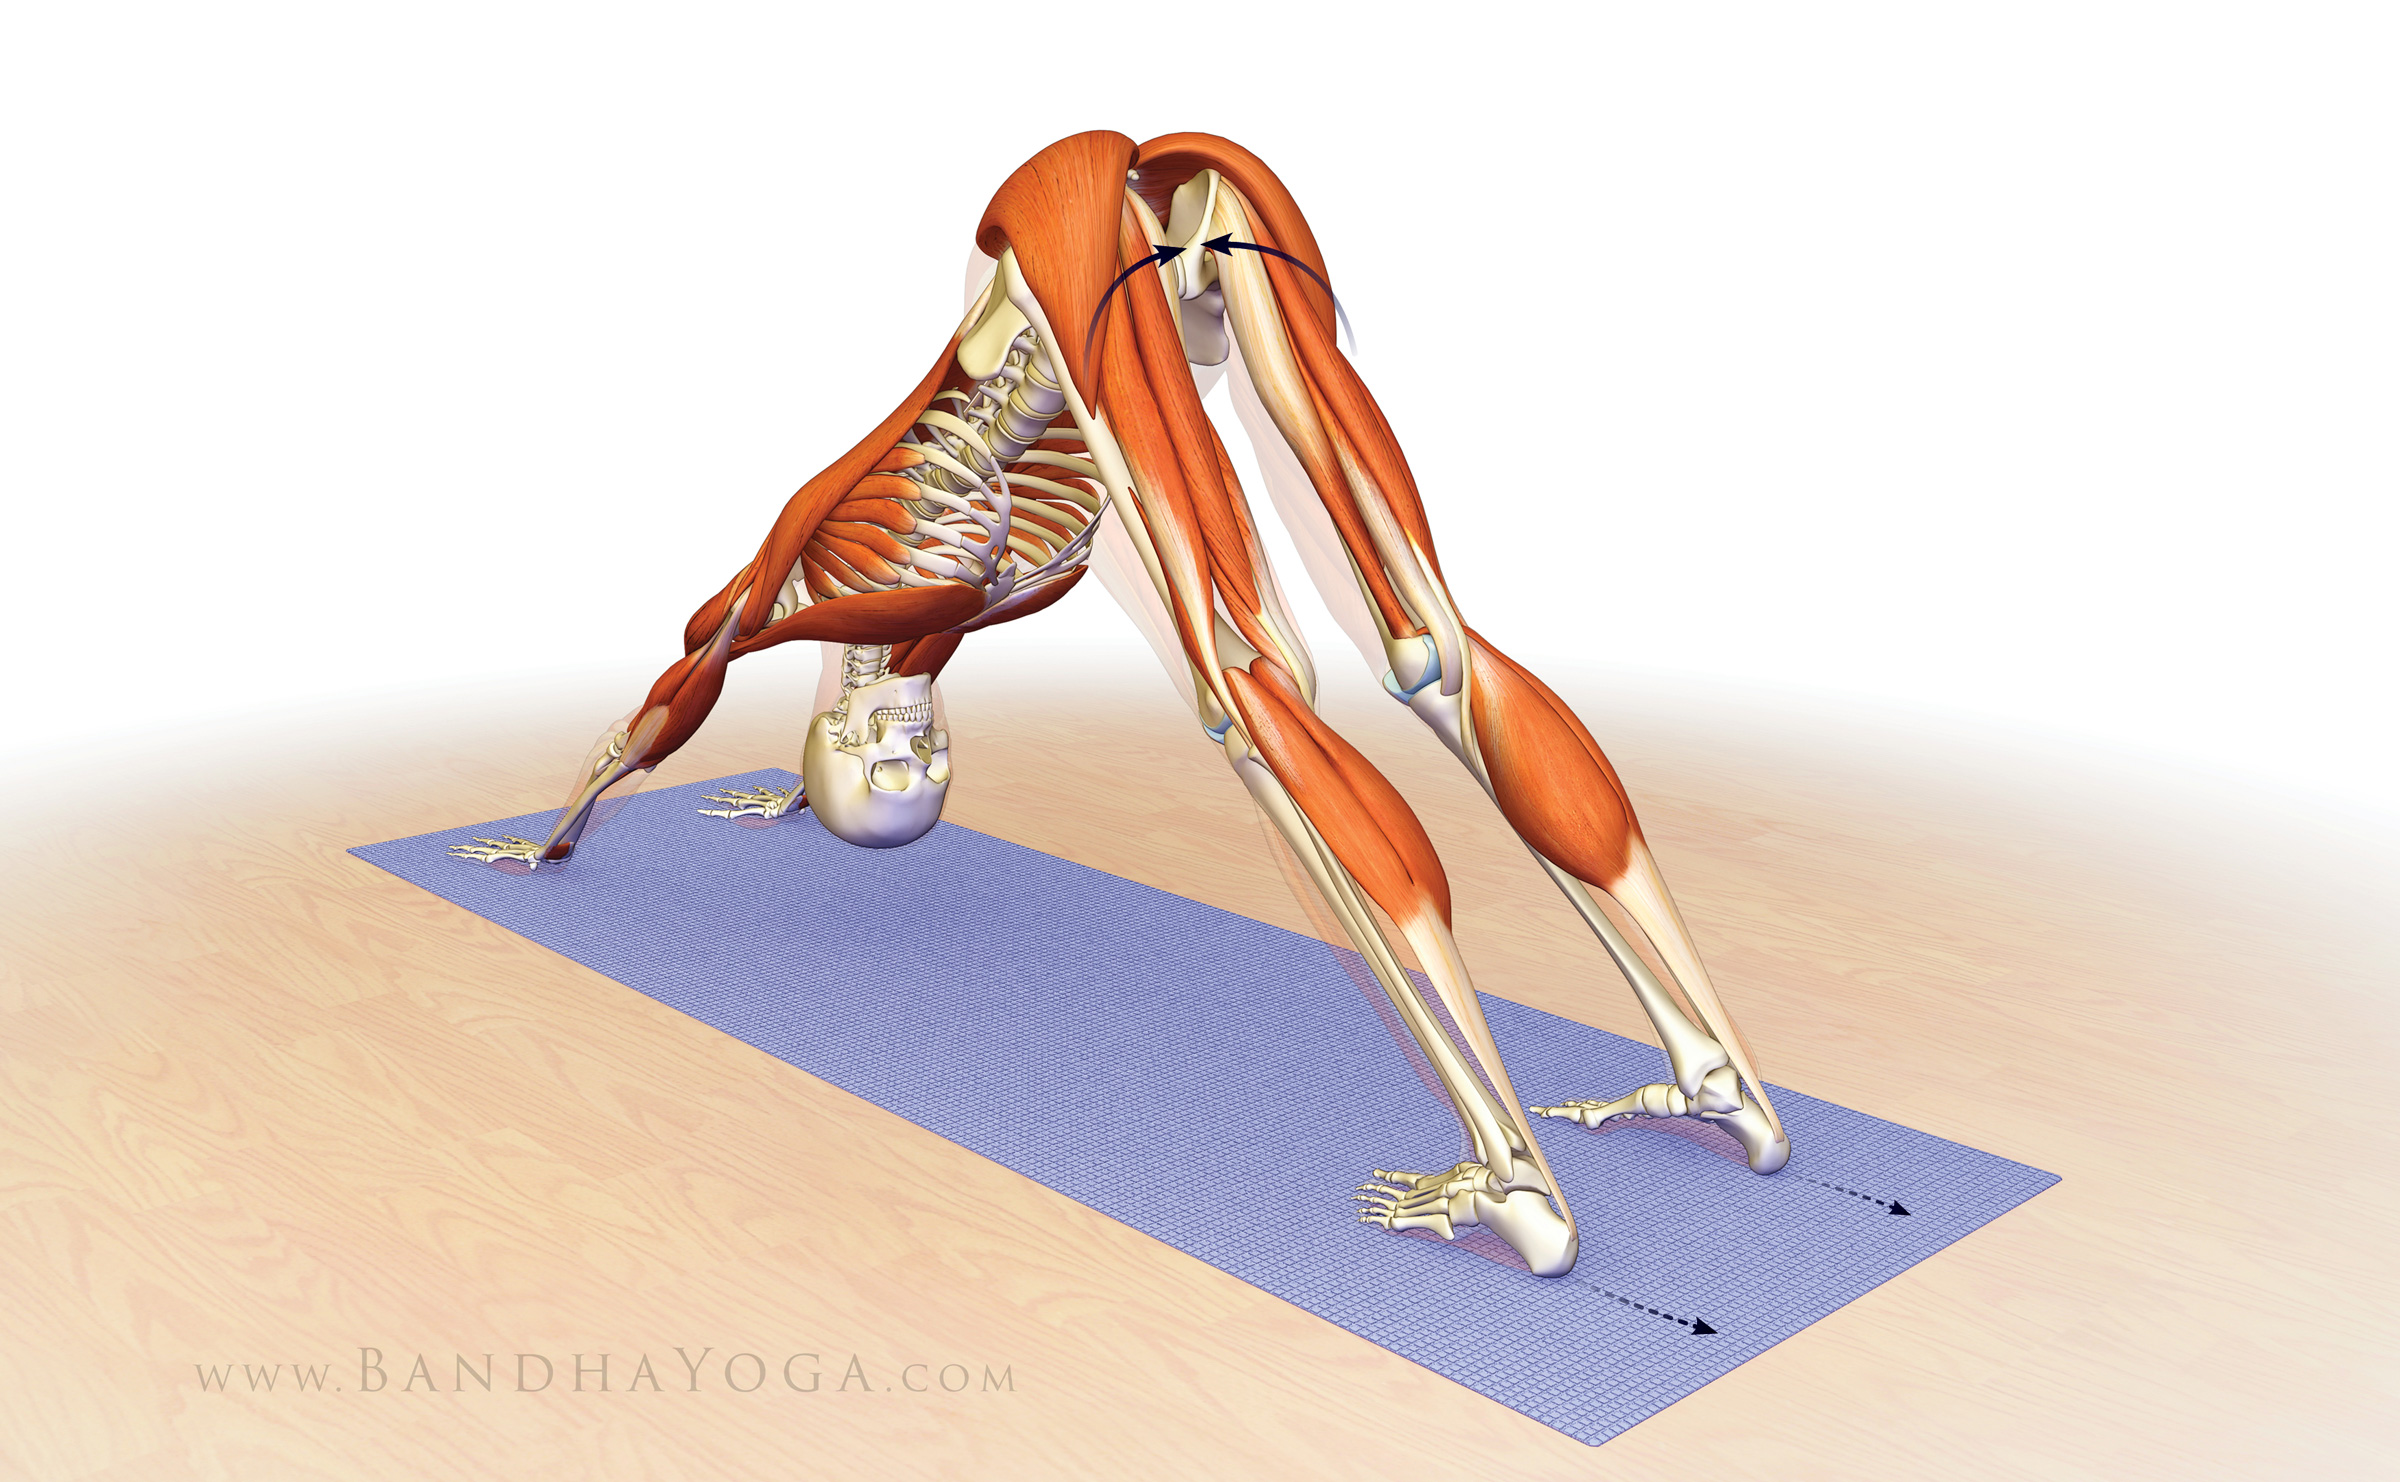 |
| Figure 4: Engage the lower parts of the gluteus maximus and adductor magnus as you attempt to drag the feet away from the hands to stabilize the pose. |
Bear in mind that shoulder stability is a complex process. The shoulders are linked to the core; so building a strong core leads to stable shoulders. Stable shoulders help to protect the wrists, and so on. Click here to read more on your core. If you would like to learn more anatomic sequencing to improve your poses, click here to take a tour of The Yoga Mat Companion Series.
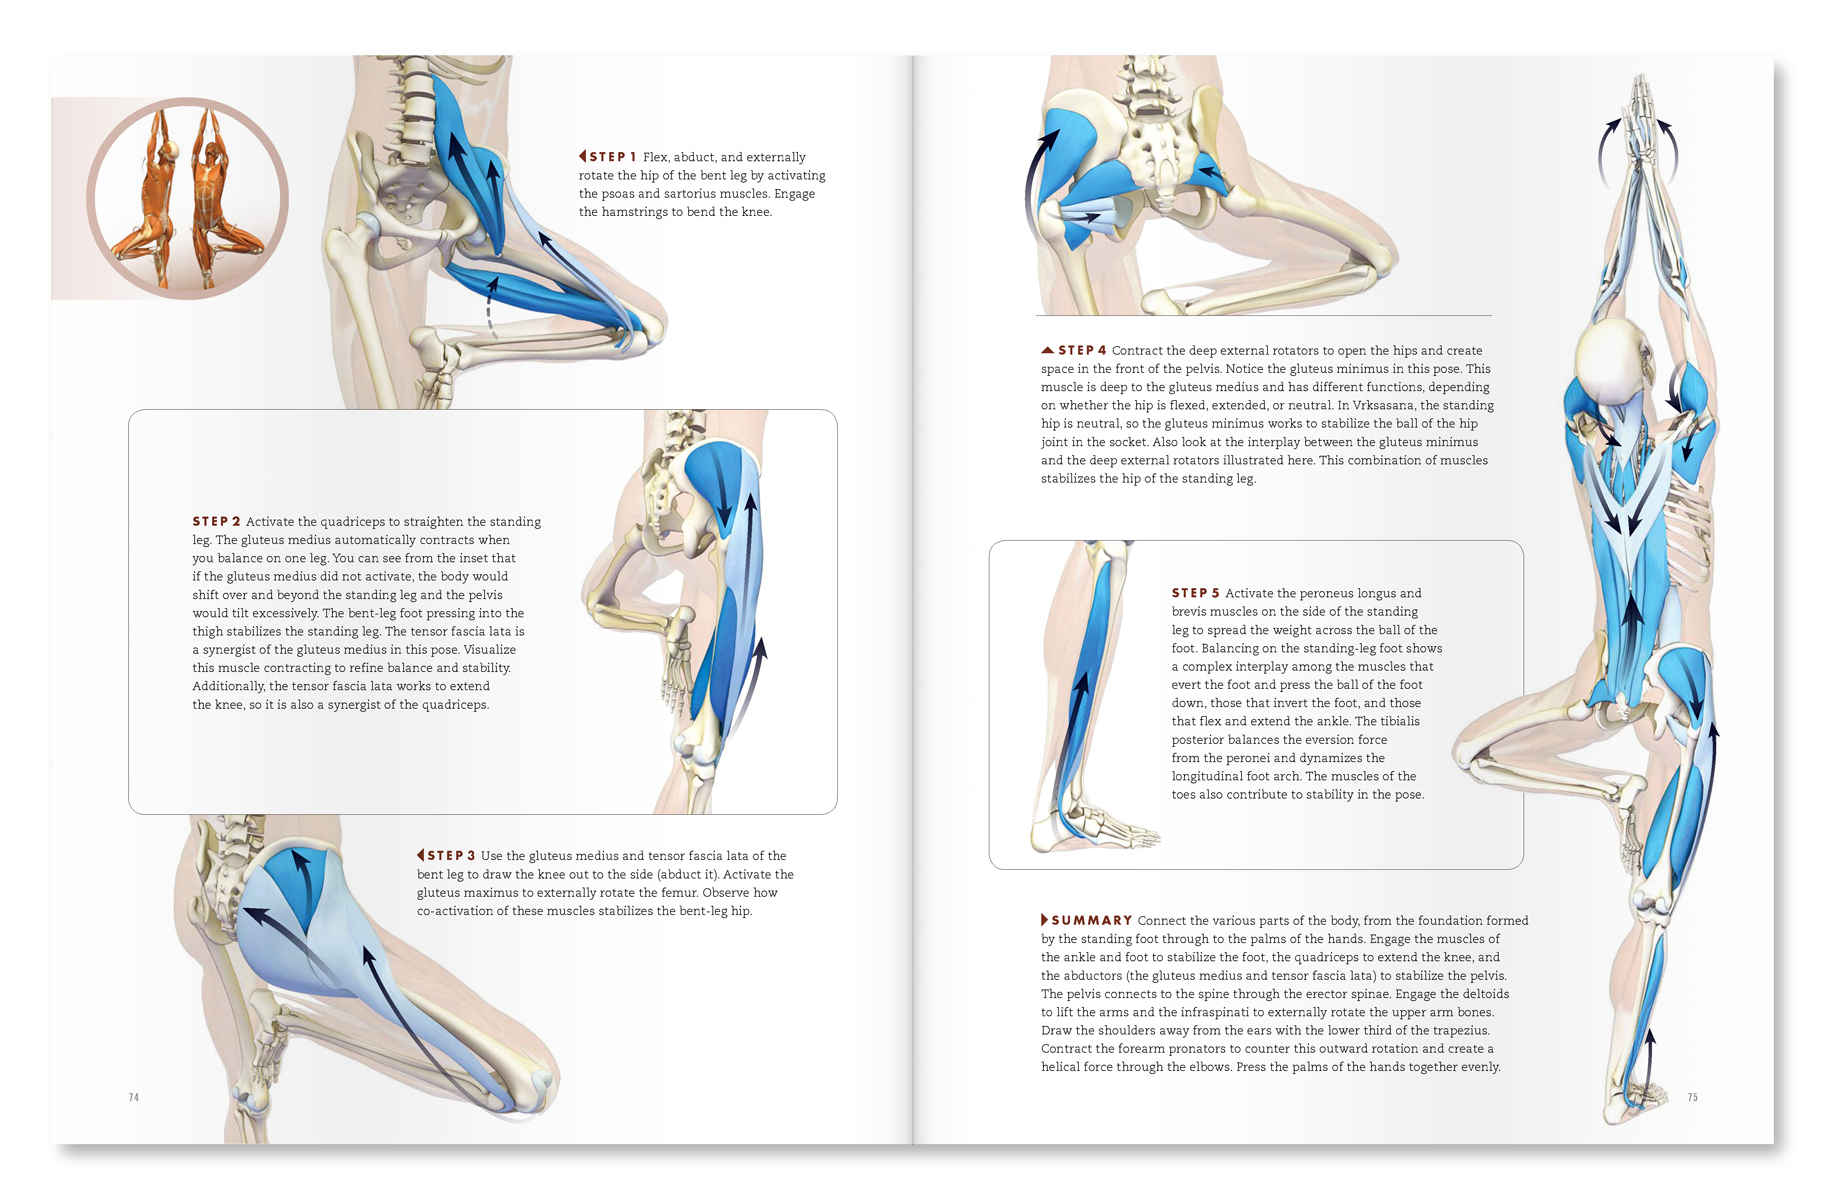
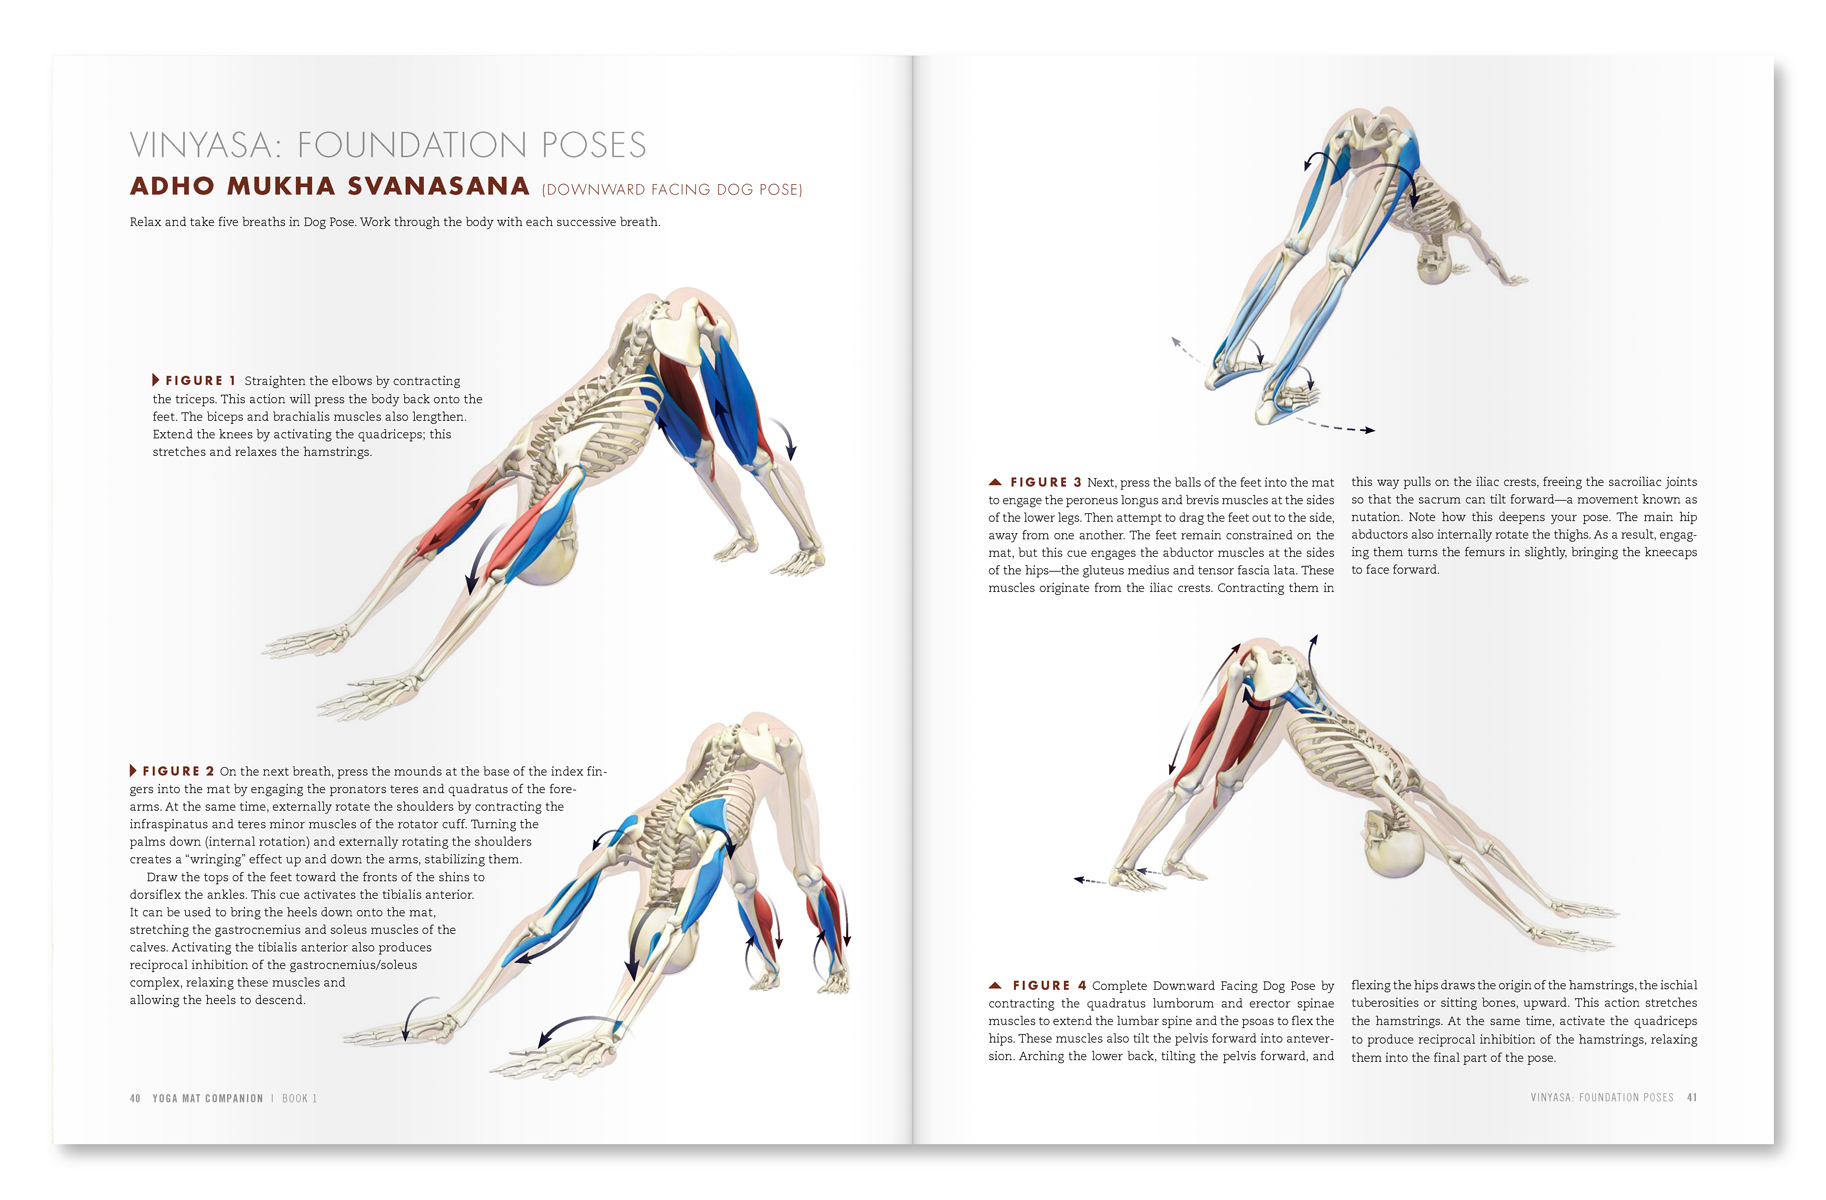 |
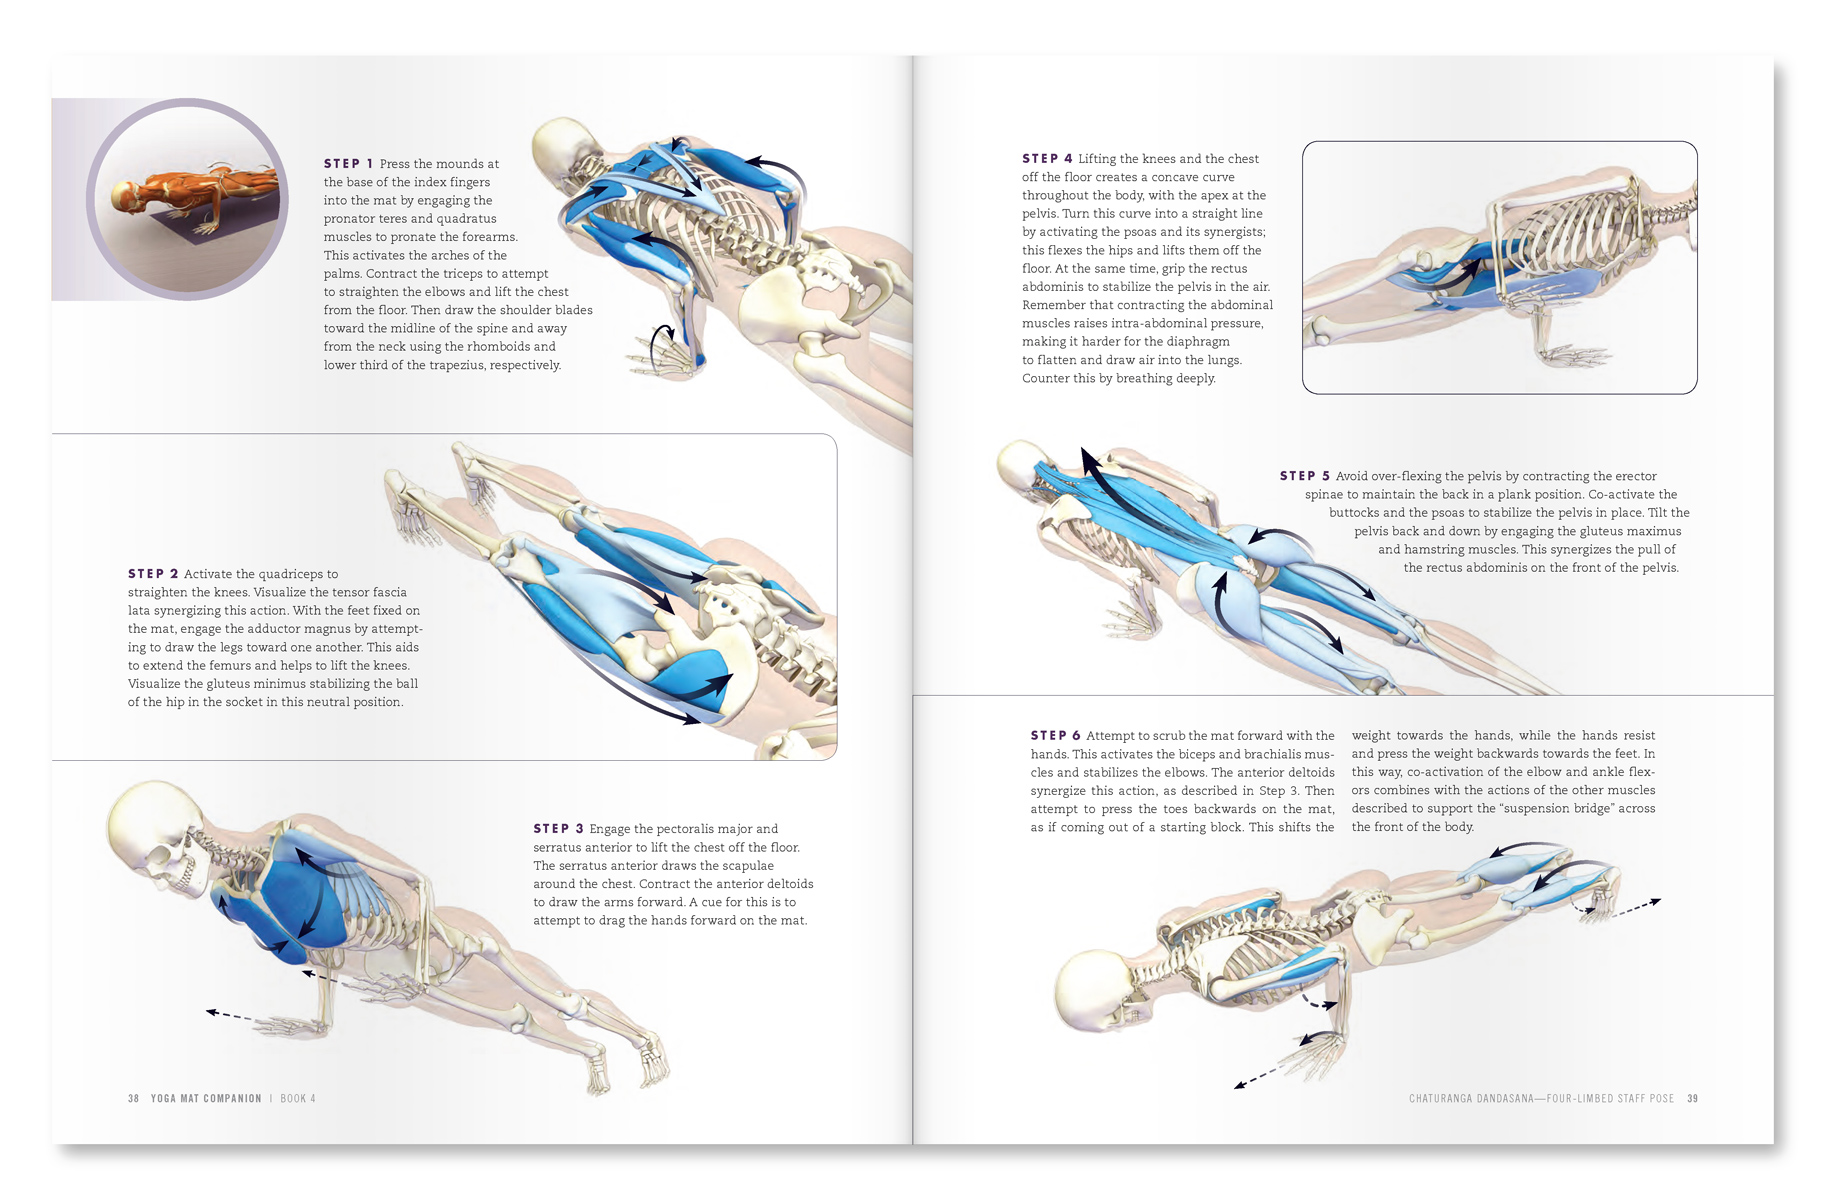
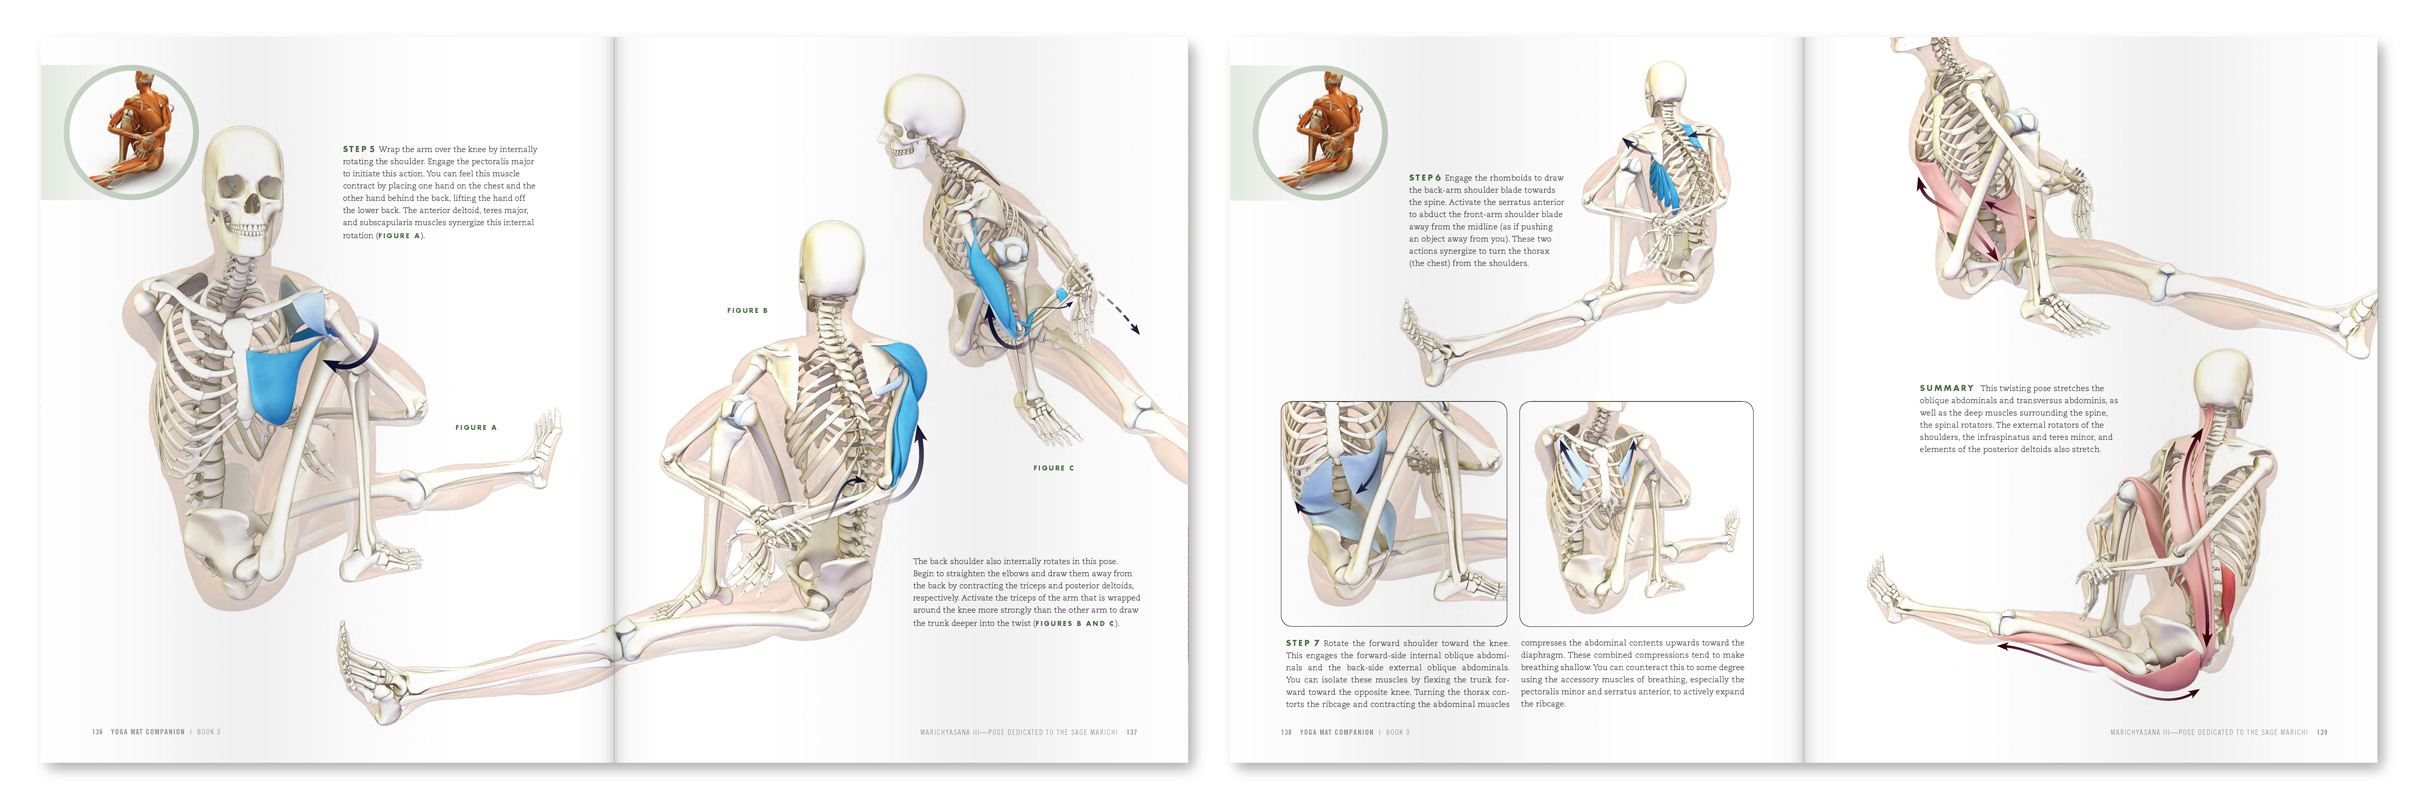
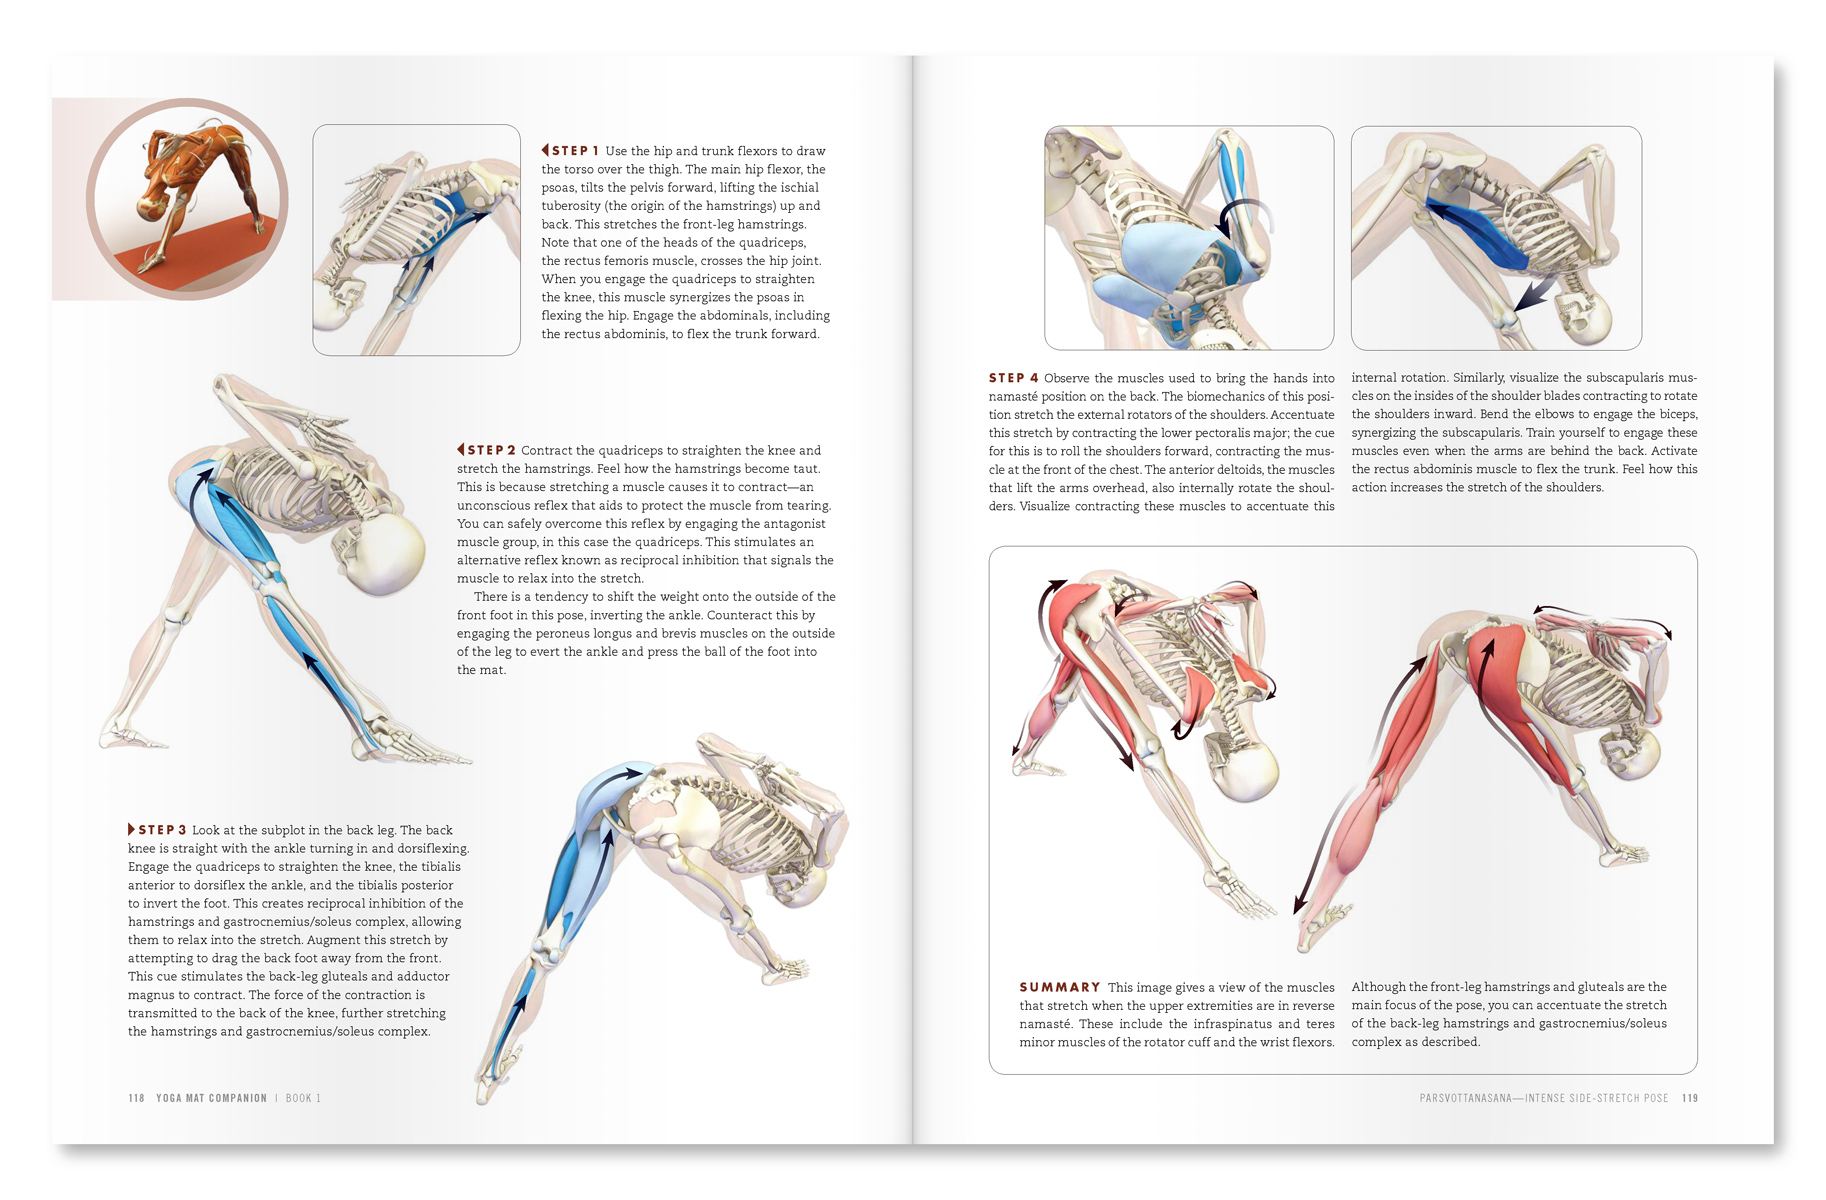
| An excerpt from "Yoga Mat Companion 1 - Anatomy for Vinyasa Flow and Standing Poses". |
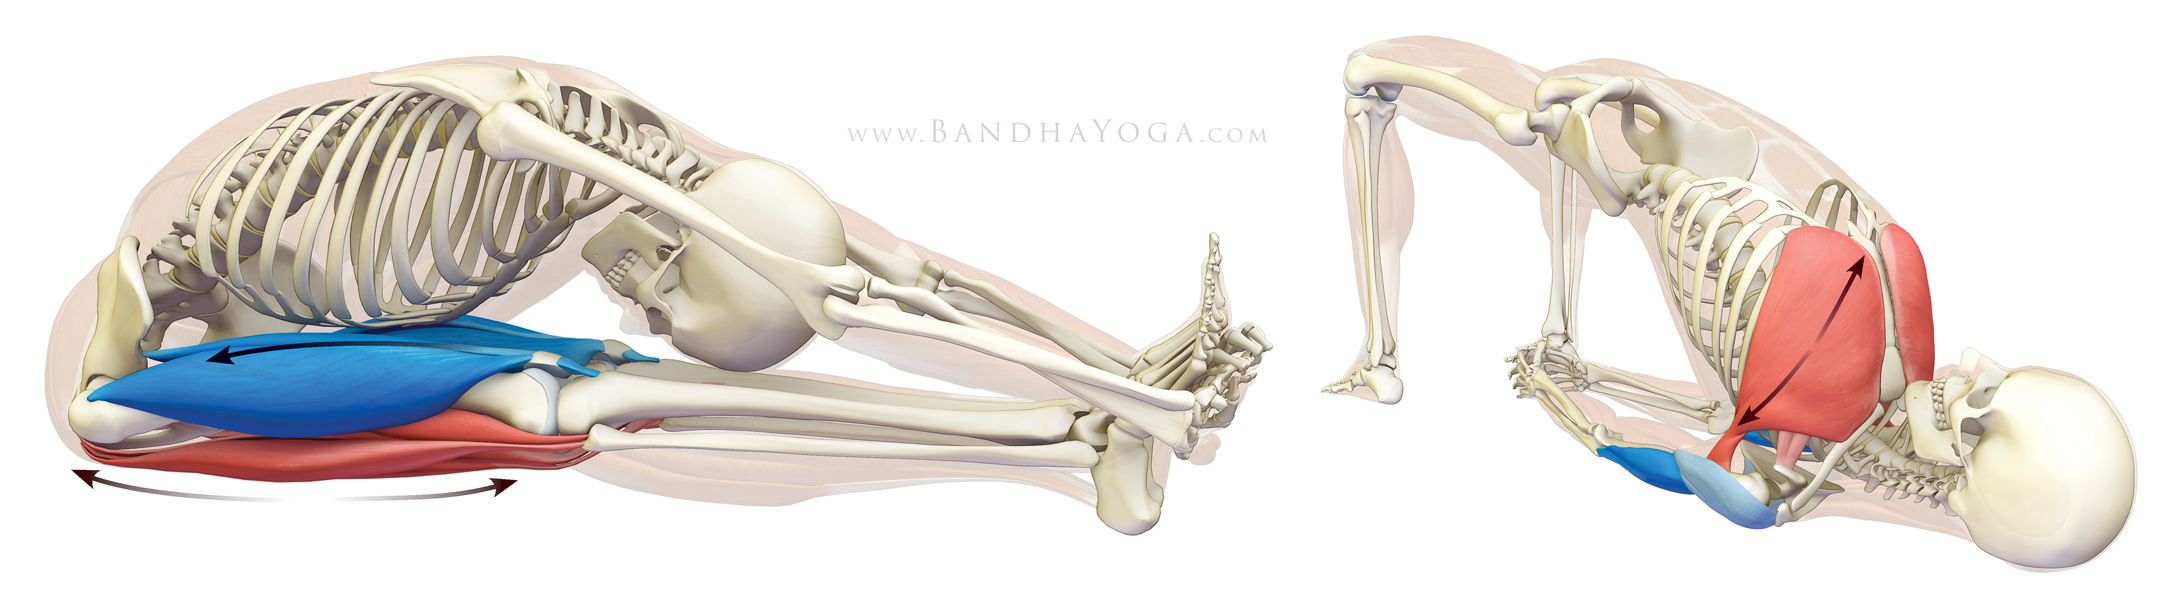
 |
| An excerpt from "Yoga Mat Companion 4 - Anatomy for Arm Balances and Inversions". |
Thanks for stopping by—see you in a couple of weeks for another post on combining anatomy, biomechanics and yoga.
All the Best,
Ray Long, MD
References:
- Graichen H1, Bonel H, Stammberger T, Englmeier KH, Reiser M, Eckstein F. Subacromial space width changes during abduction and rotation--a 3-D MR imaging study. Surg Radiol Anat. 1999;21(1):59-64.
- Hinterwimmer S1, Von Eisenhart-Rothe R, Siebert M, Putz R, Eckstein F, Vogl T, Graichen H. Influence of adducting and abducting muscle forces on the subacromial space width. Med Sci Sports Exerc. 2003 Dec;35(12):2055-9.