“. . . according to the Yoga Sutra (3.1), the term [Bandha] refers to the ‘binding’ of consciousness to a particular object or locus (desha), which is the very essence of concentration.” Georg Feuerstein
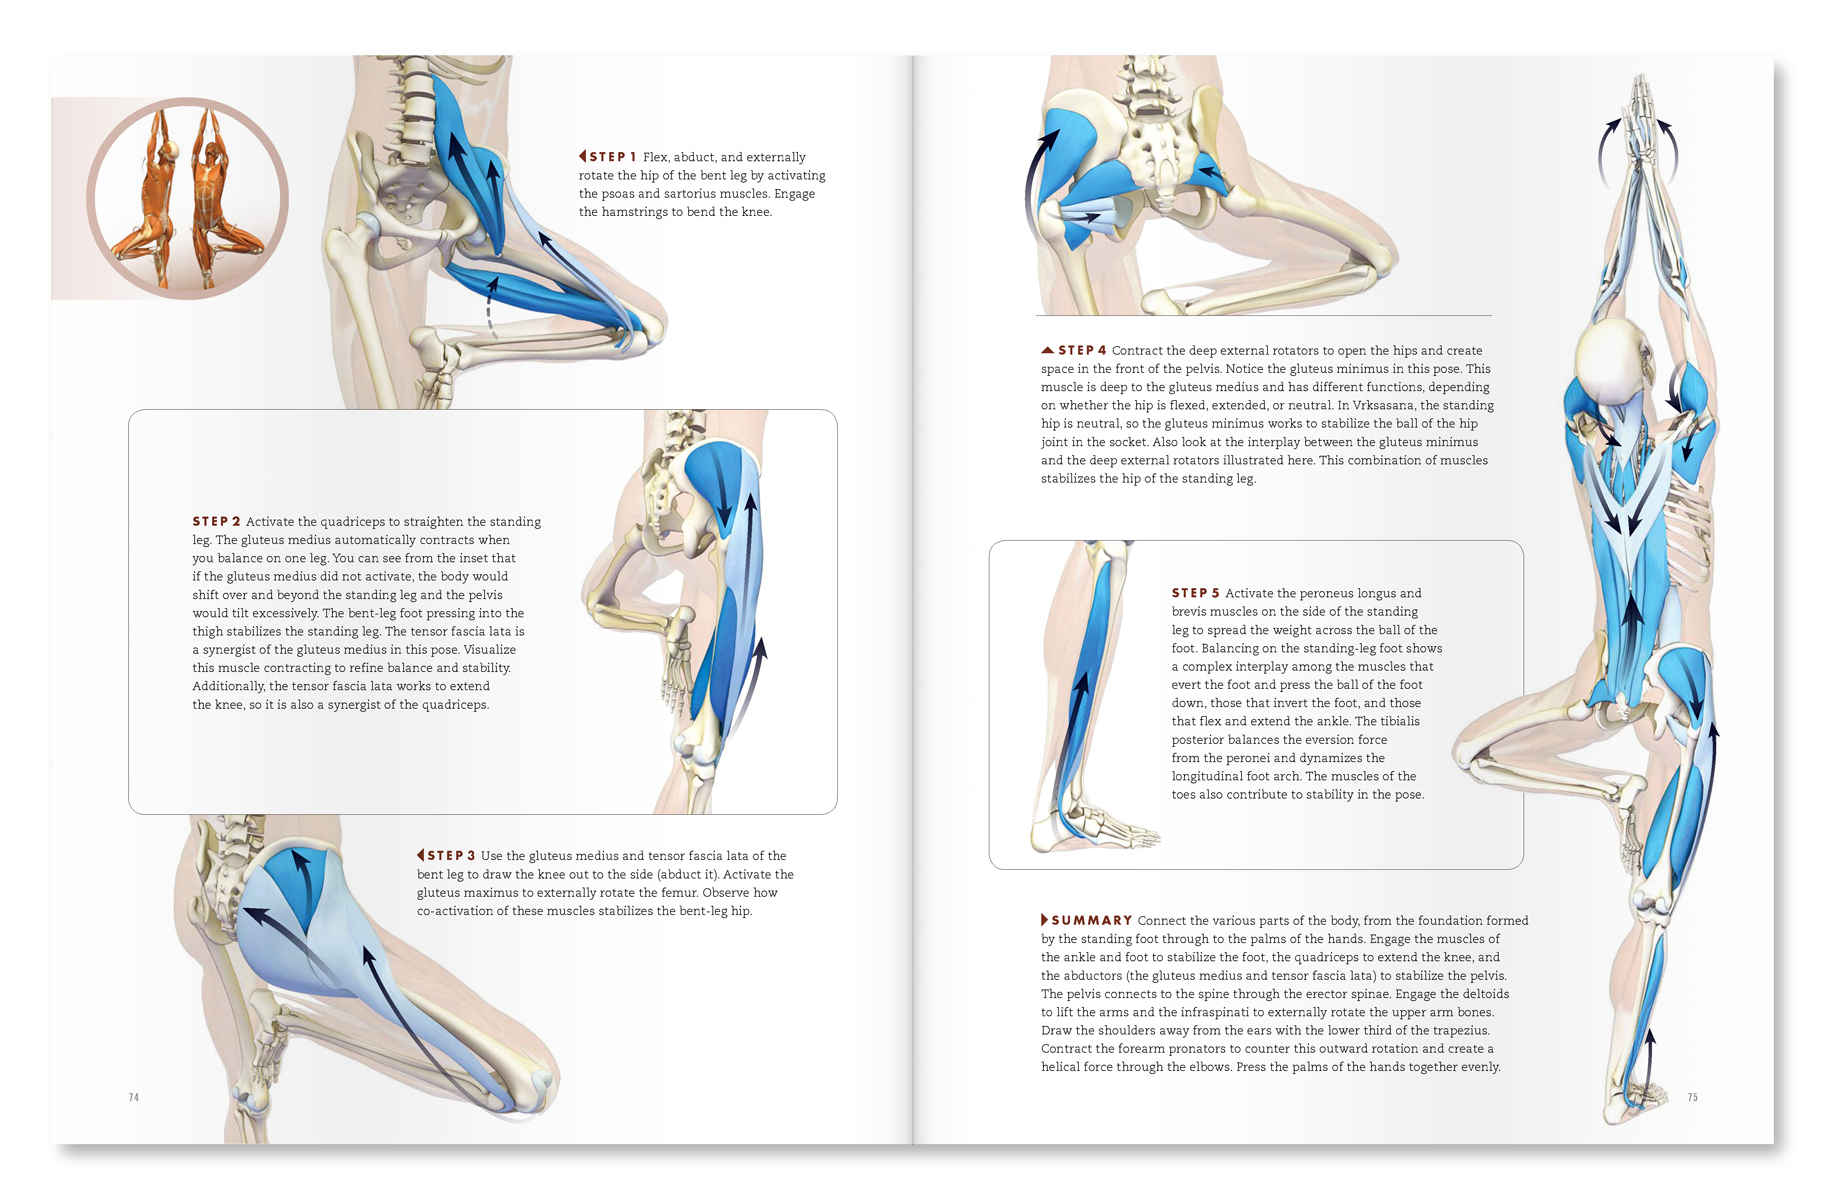
William Blake said you can see the world in a grain of sand. Similarly, fundamental principles you master in one asana are portable to others. With this in mind, let’s look at the key elements for activating your foot arch in the front leg foot in Trikonasana (Triangle Pose). Here’s the cue…
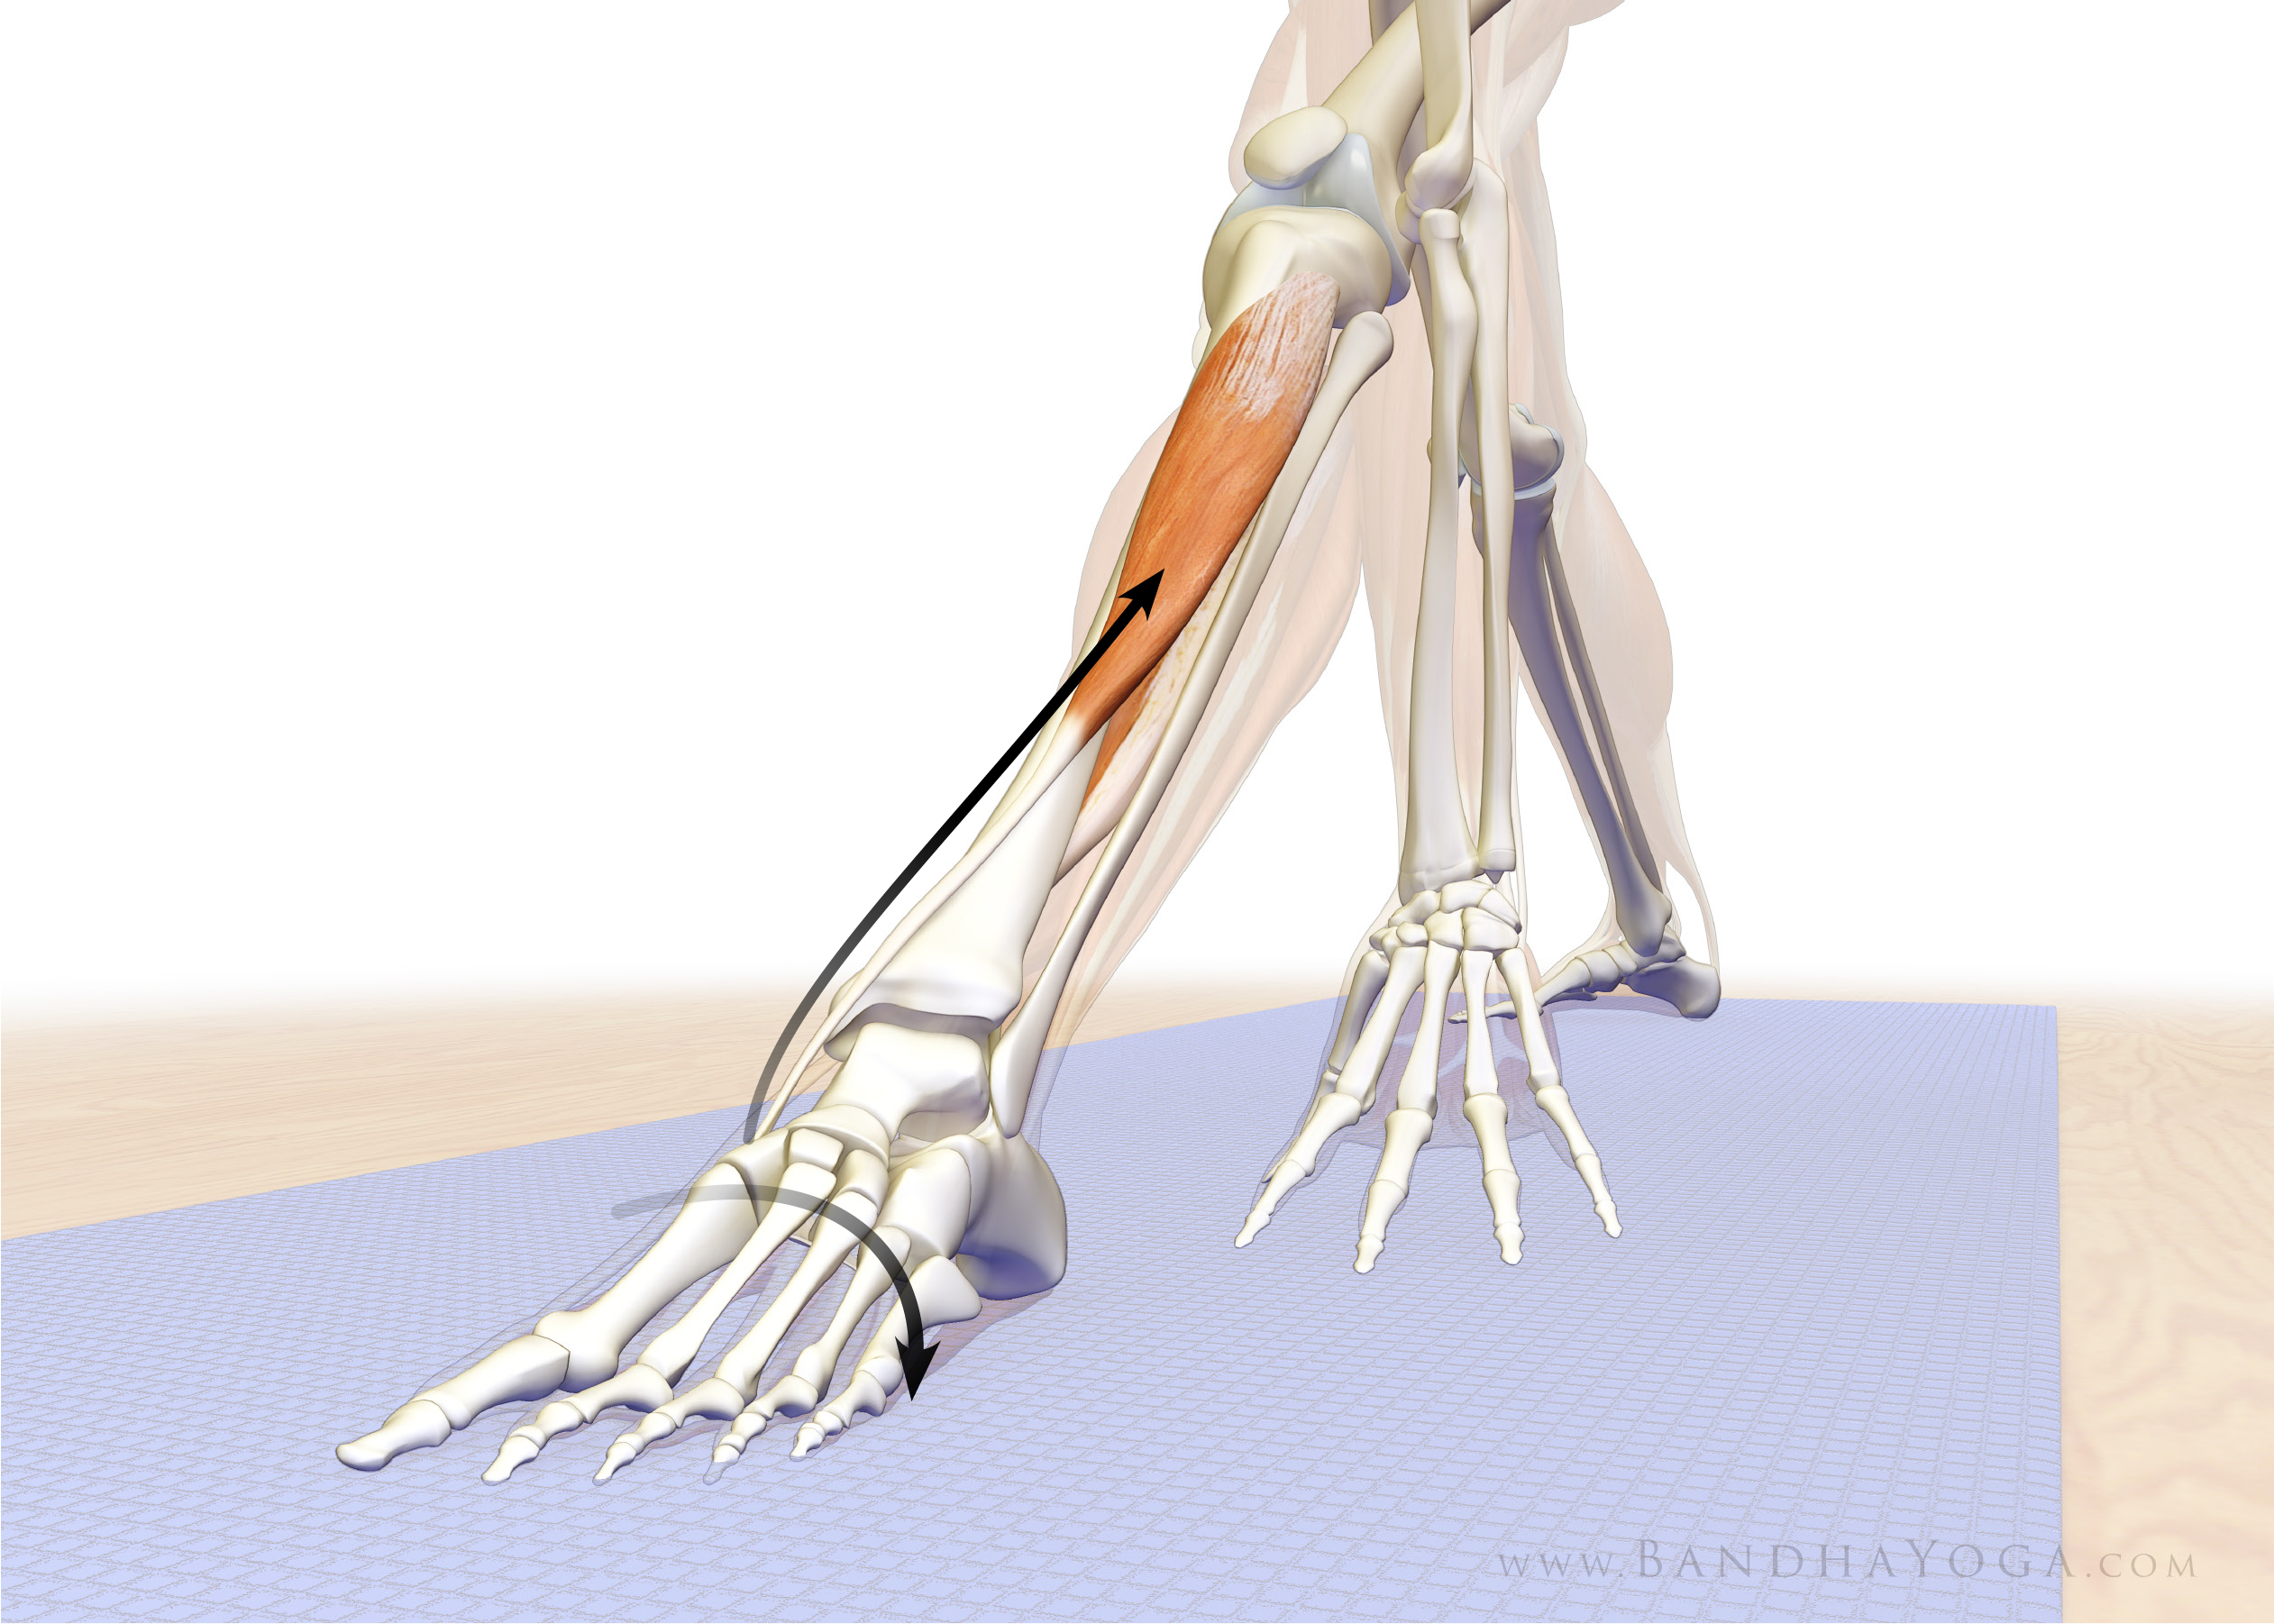
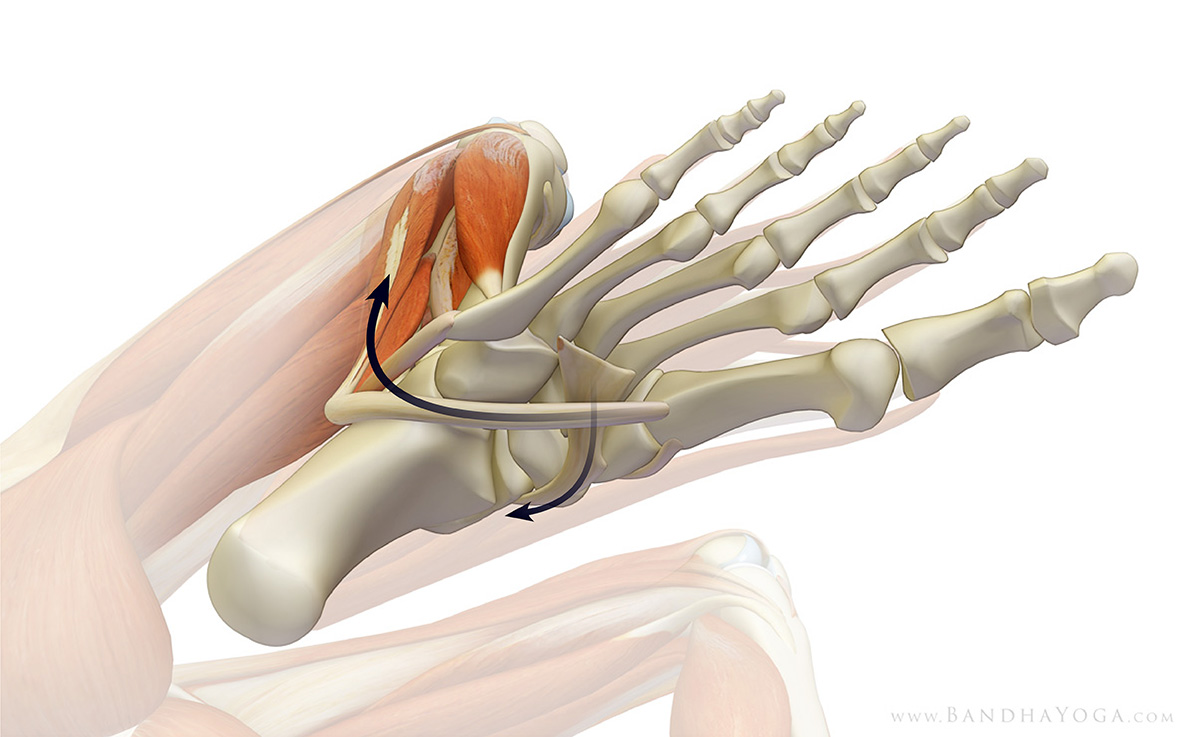
First, press the outer edge of your foot into the mat. This engages the tibialis anterior and posterior muscles of the lower leg (figure 1).
Figure 1
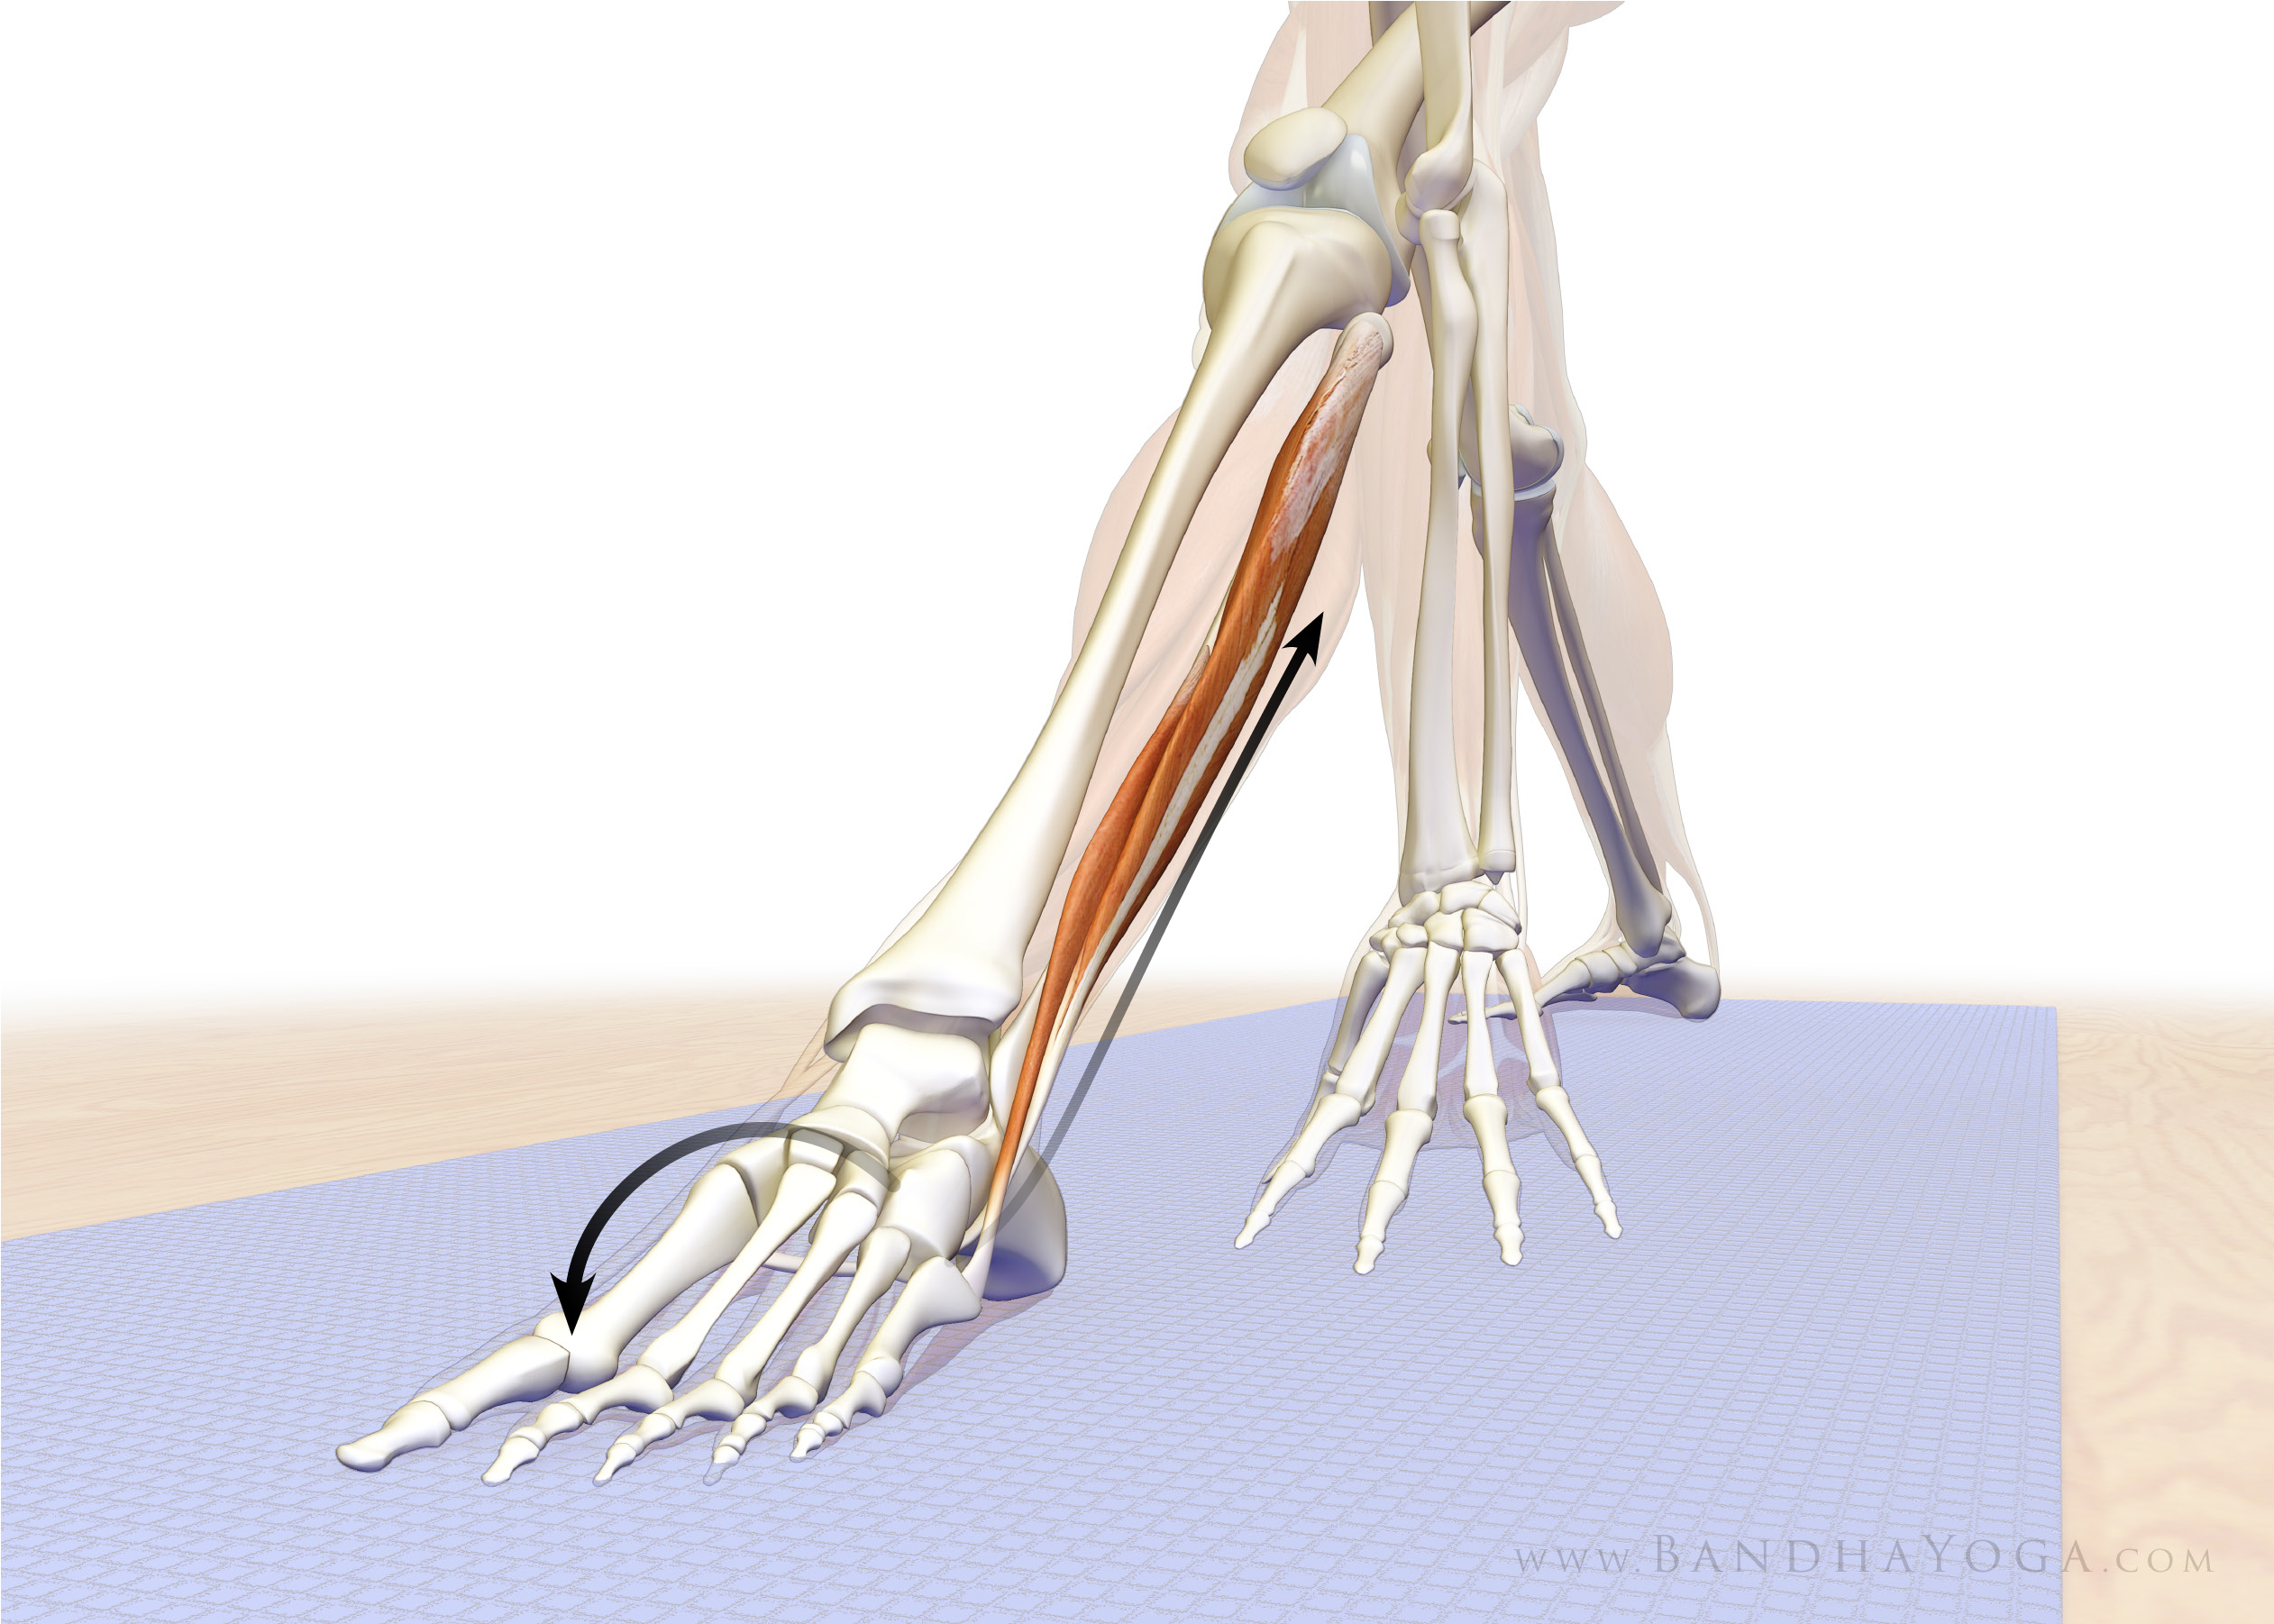
Maintain that action as you press the ball of your foot into the mat. This engages the peroneus longus and brevis muscles on the outside of your lower leg (figure 2).
Figure 2
Co-activating the muscles that invert (supinate) and evert (pronate) your foot creates an opposing force between these two antagonistic actions that stabilizes your ankle.
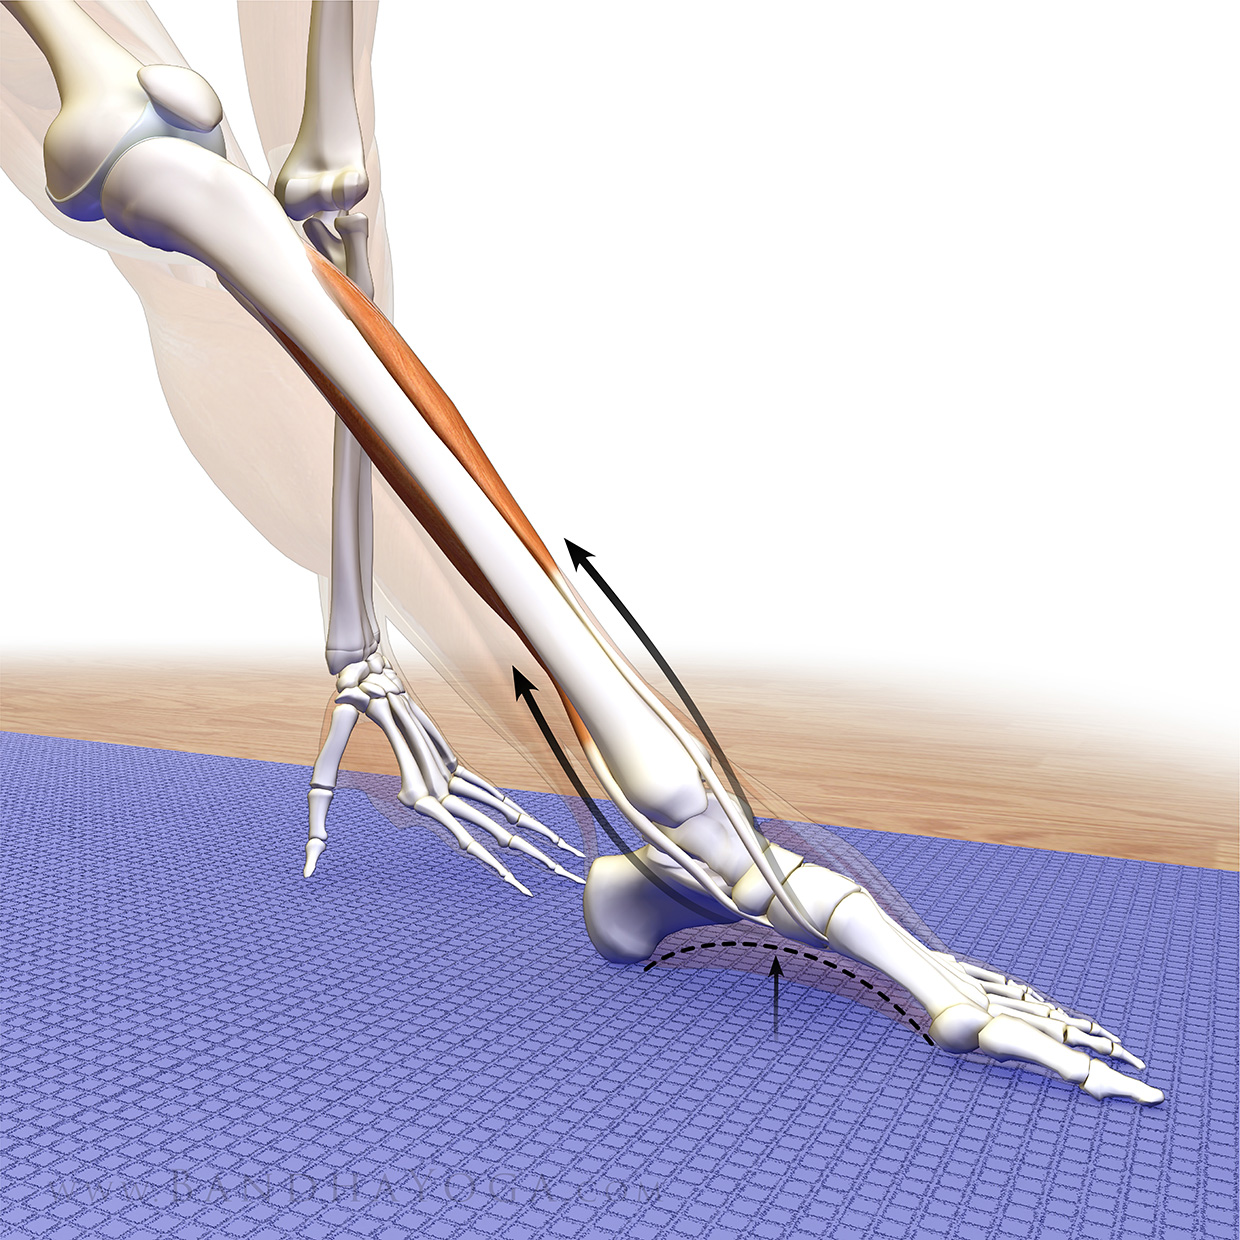
These same muscles work together (as synergists) to lift your foot arch (figures 3 and 4).
I hope you enjoyed this blog post. Page through the Key Muscles and Key Poses of Yoga and the Yoga Mat Companion Series to learn more about anatomy and biomechanics for yoga. See you next week when I will post another tip on anatomy and biomechanics for yoga.
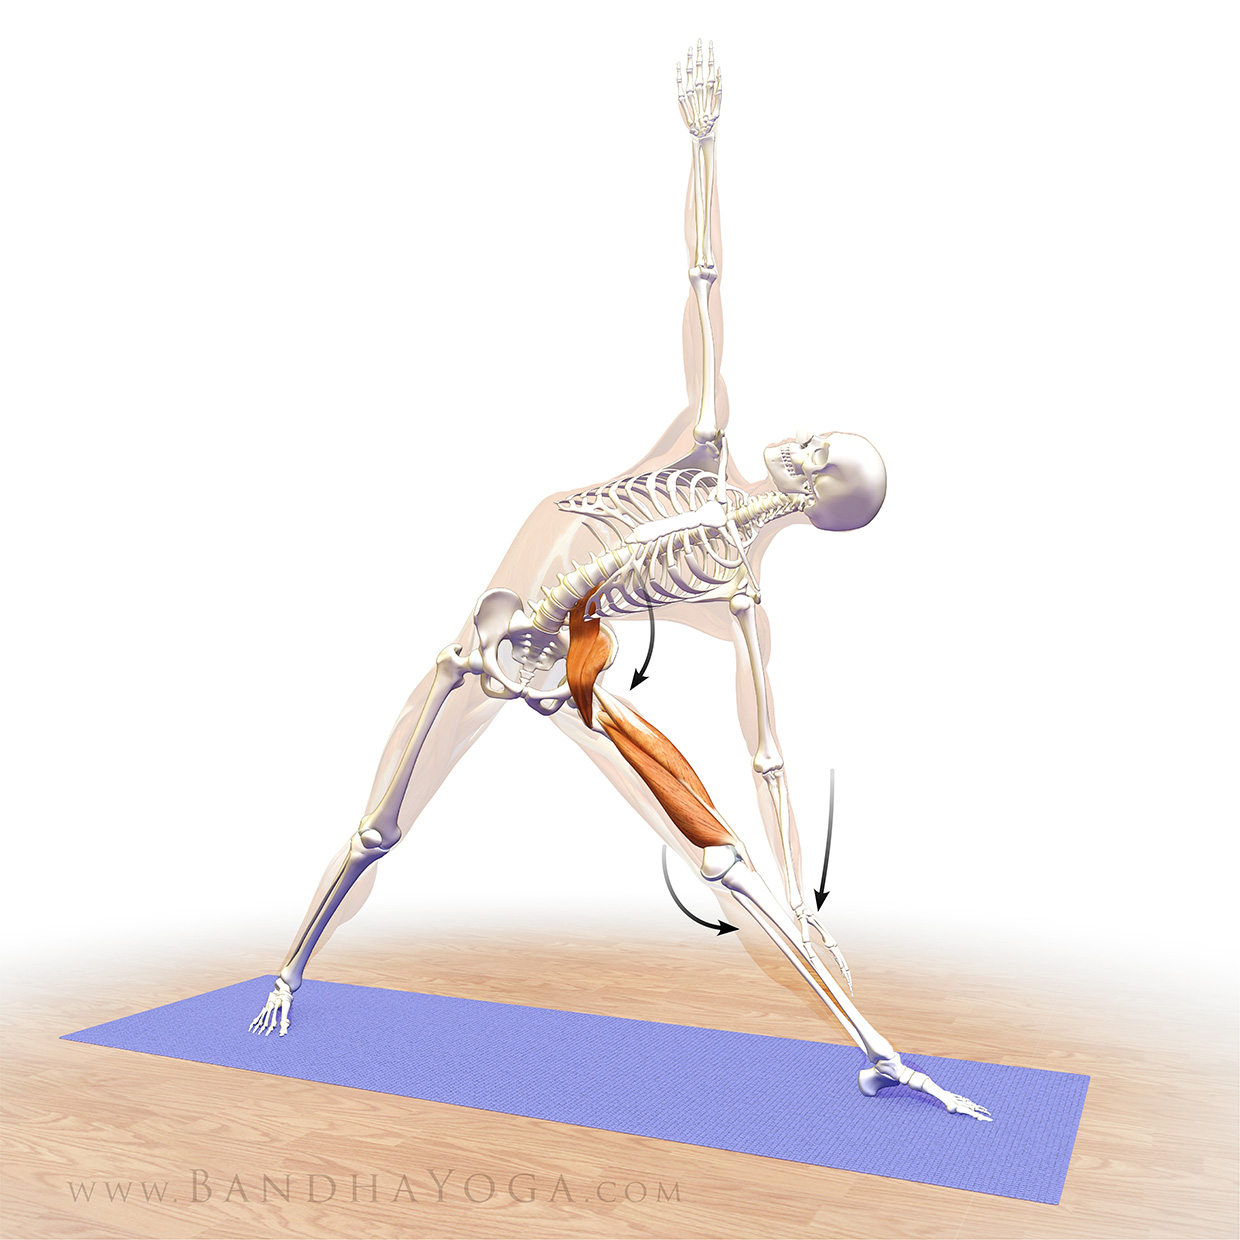
In this post, we continue our journey through Trikonasana (Triangle Pose) with a cue that connects the forward leg psoas with the back leg glutes, thus stabilizing your pelvis.
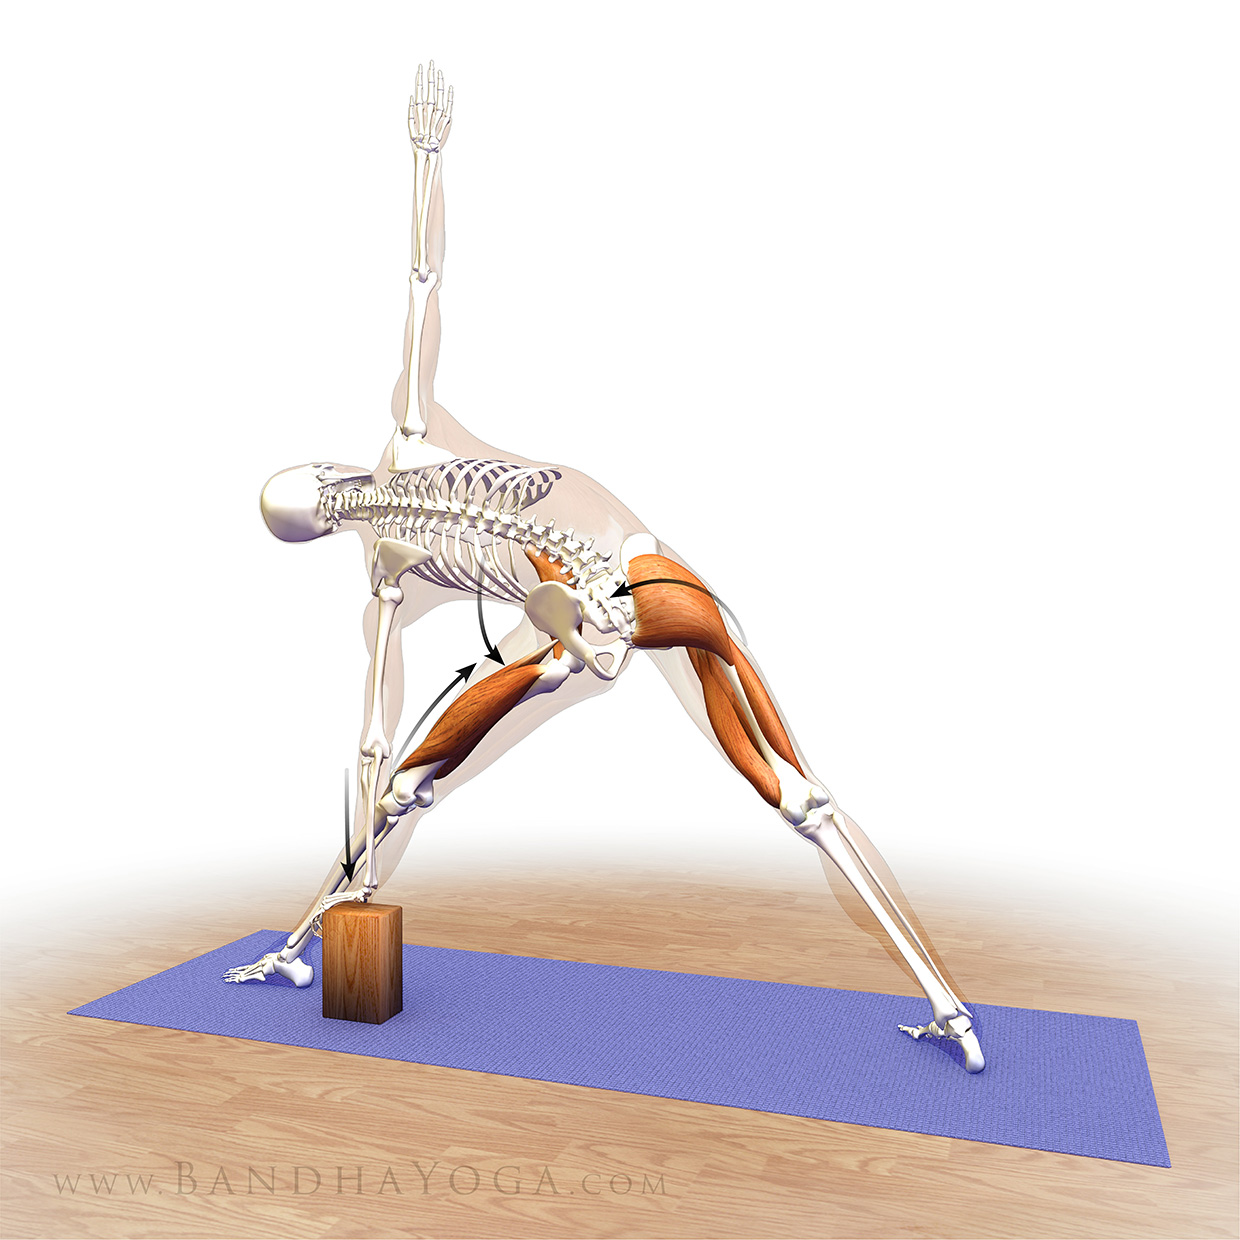
First, take a quick look at the cue from my previous post on co-contracting the psoas and quads of your forward leg. Engage the forward leg psoas and quads and then add contraction of the rear leg gluteus maximus (and quadriceps) as shown here in figure 1.
Figure 1: Co-contracting the psoas and glutes in Trikonasana.
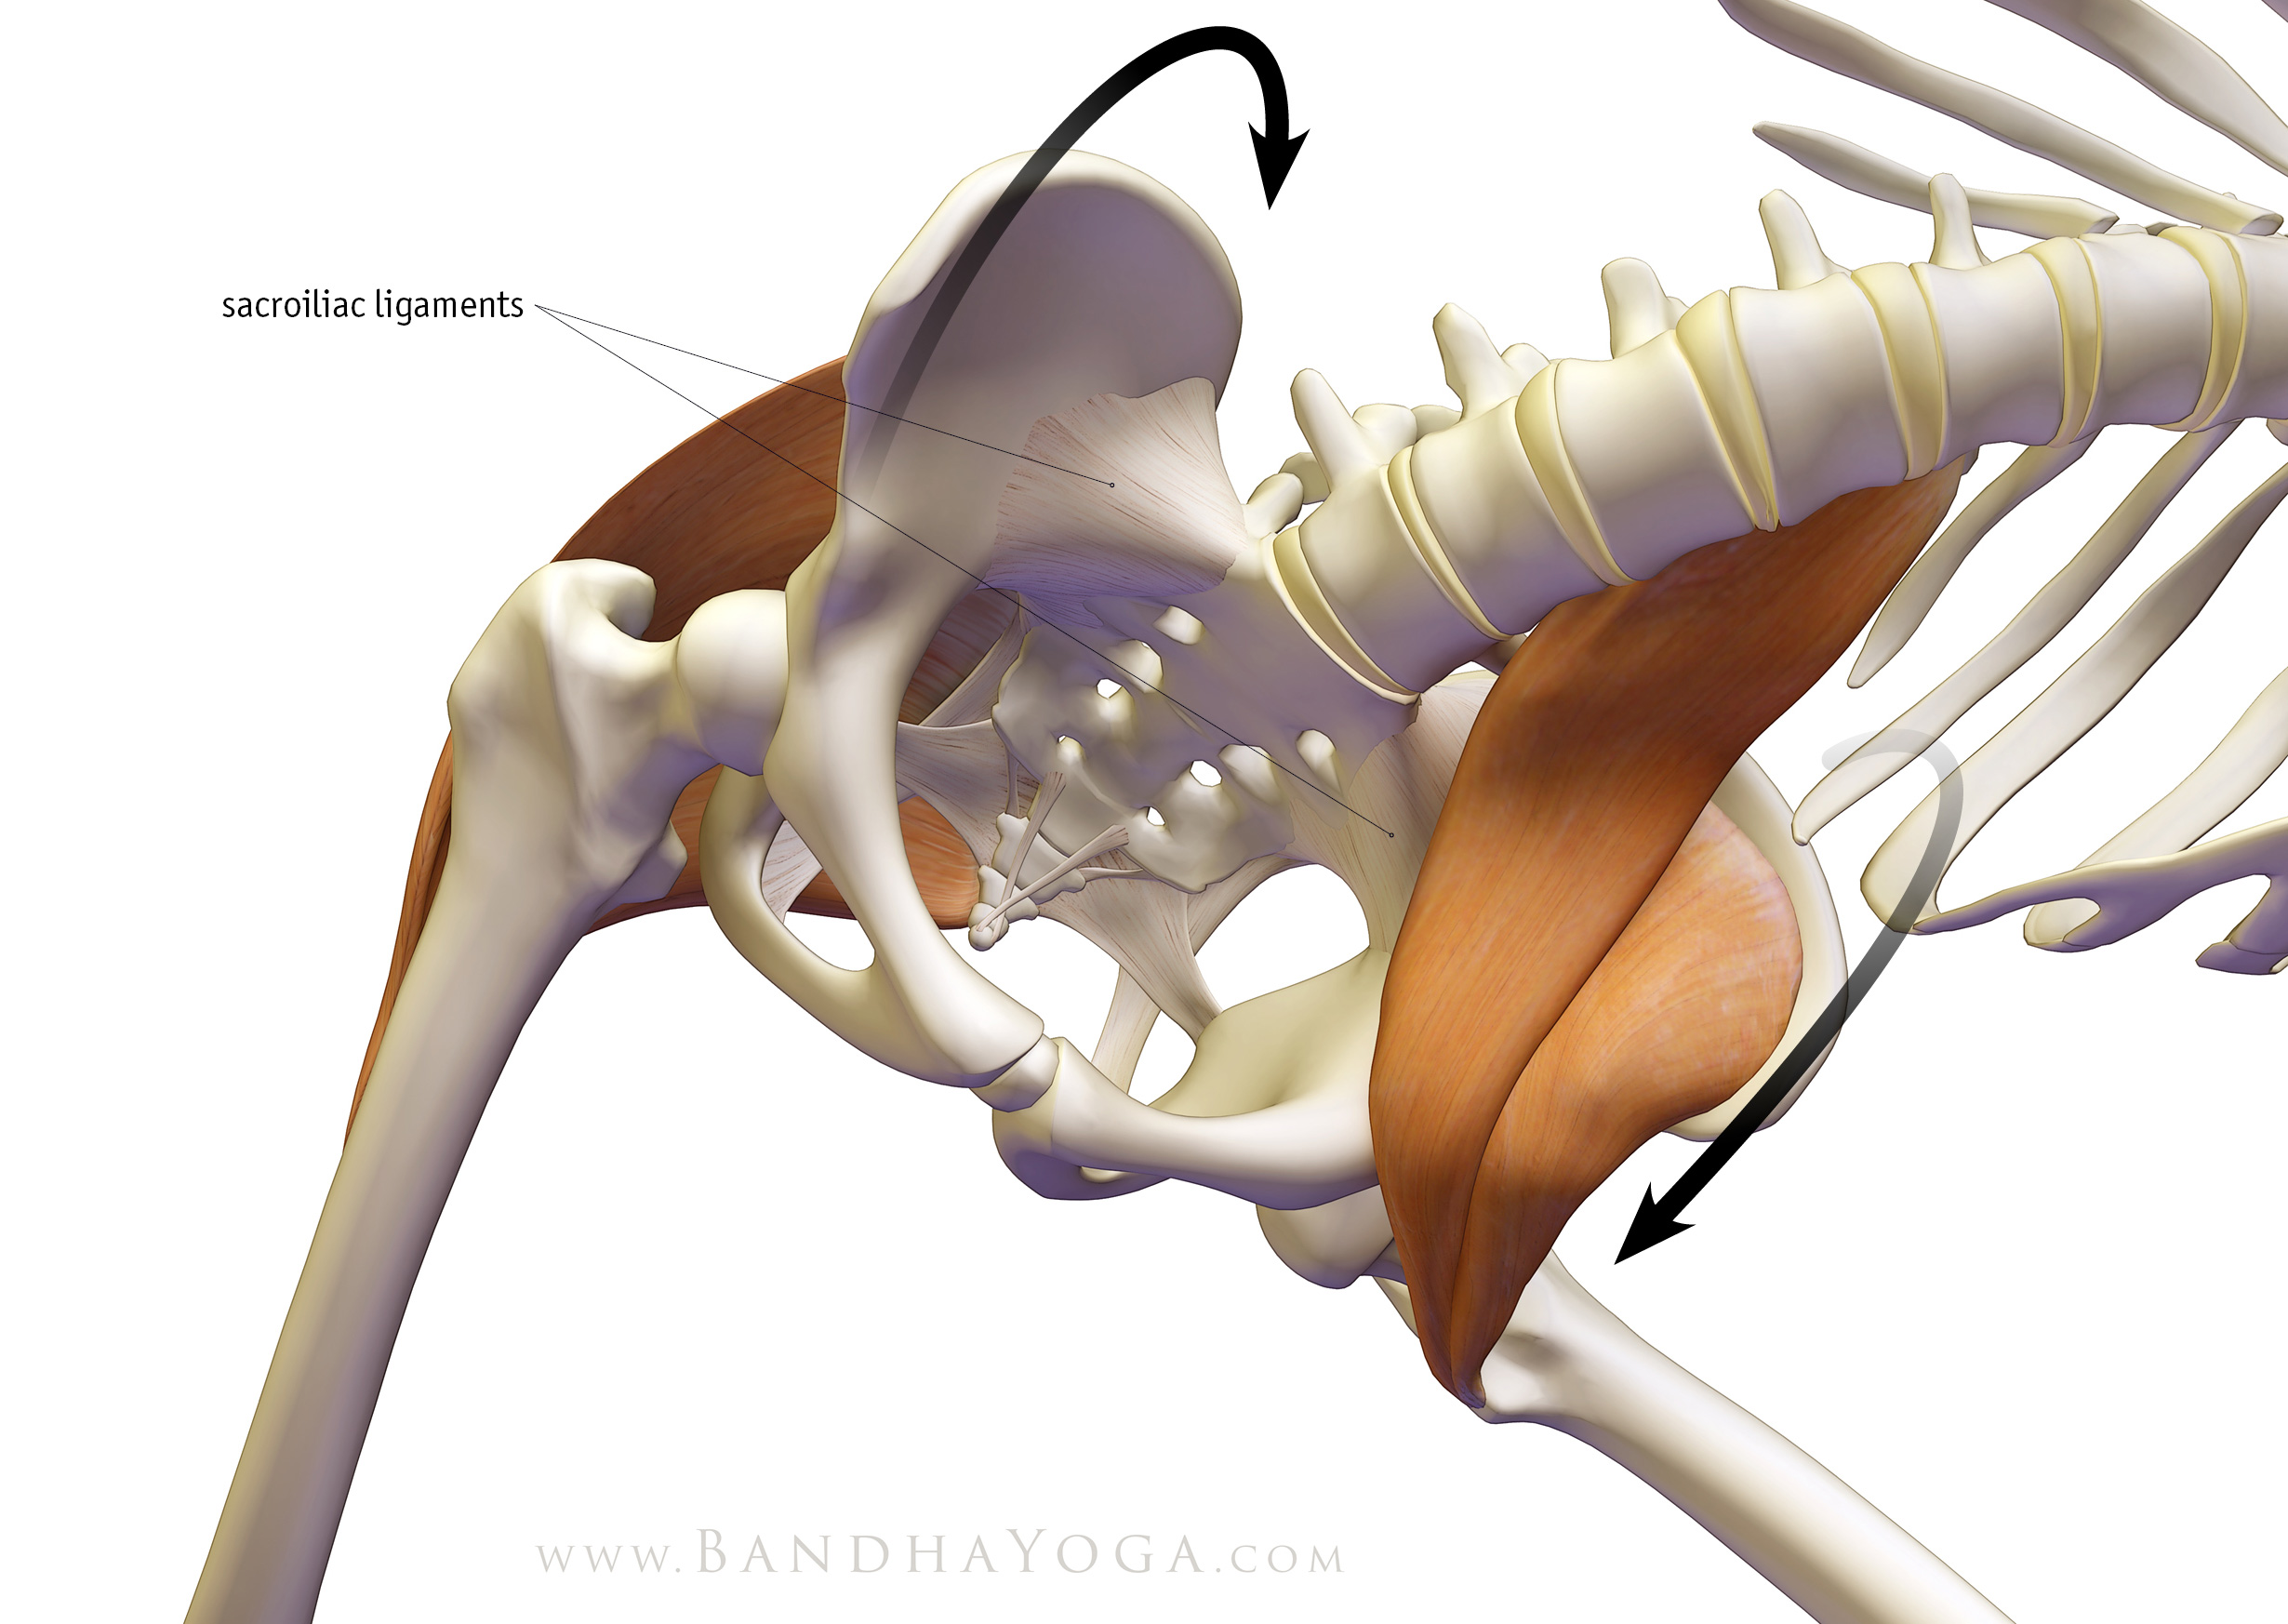
The psoas creates a force that tilts the forward leg side of the pelvis (hemipelvis) forward (anteversion) while the gluteus maximus creates a retroversion force on the back leg side hemipelvis. You will feel how combining these opposing forces creates stability. Figures 2 and 3 illustrate this concept.
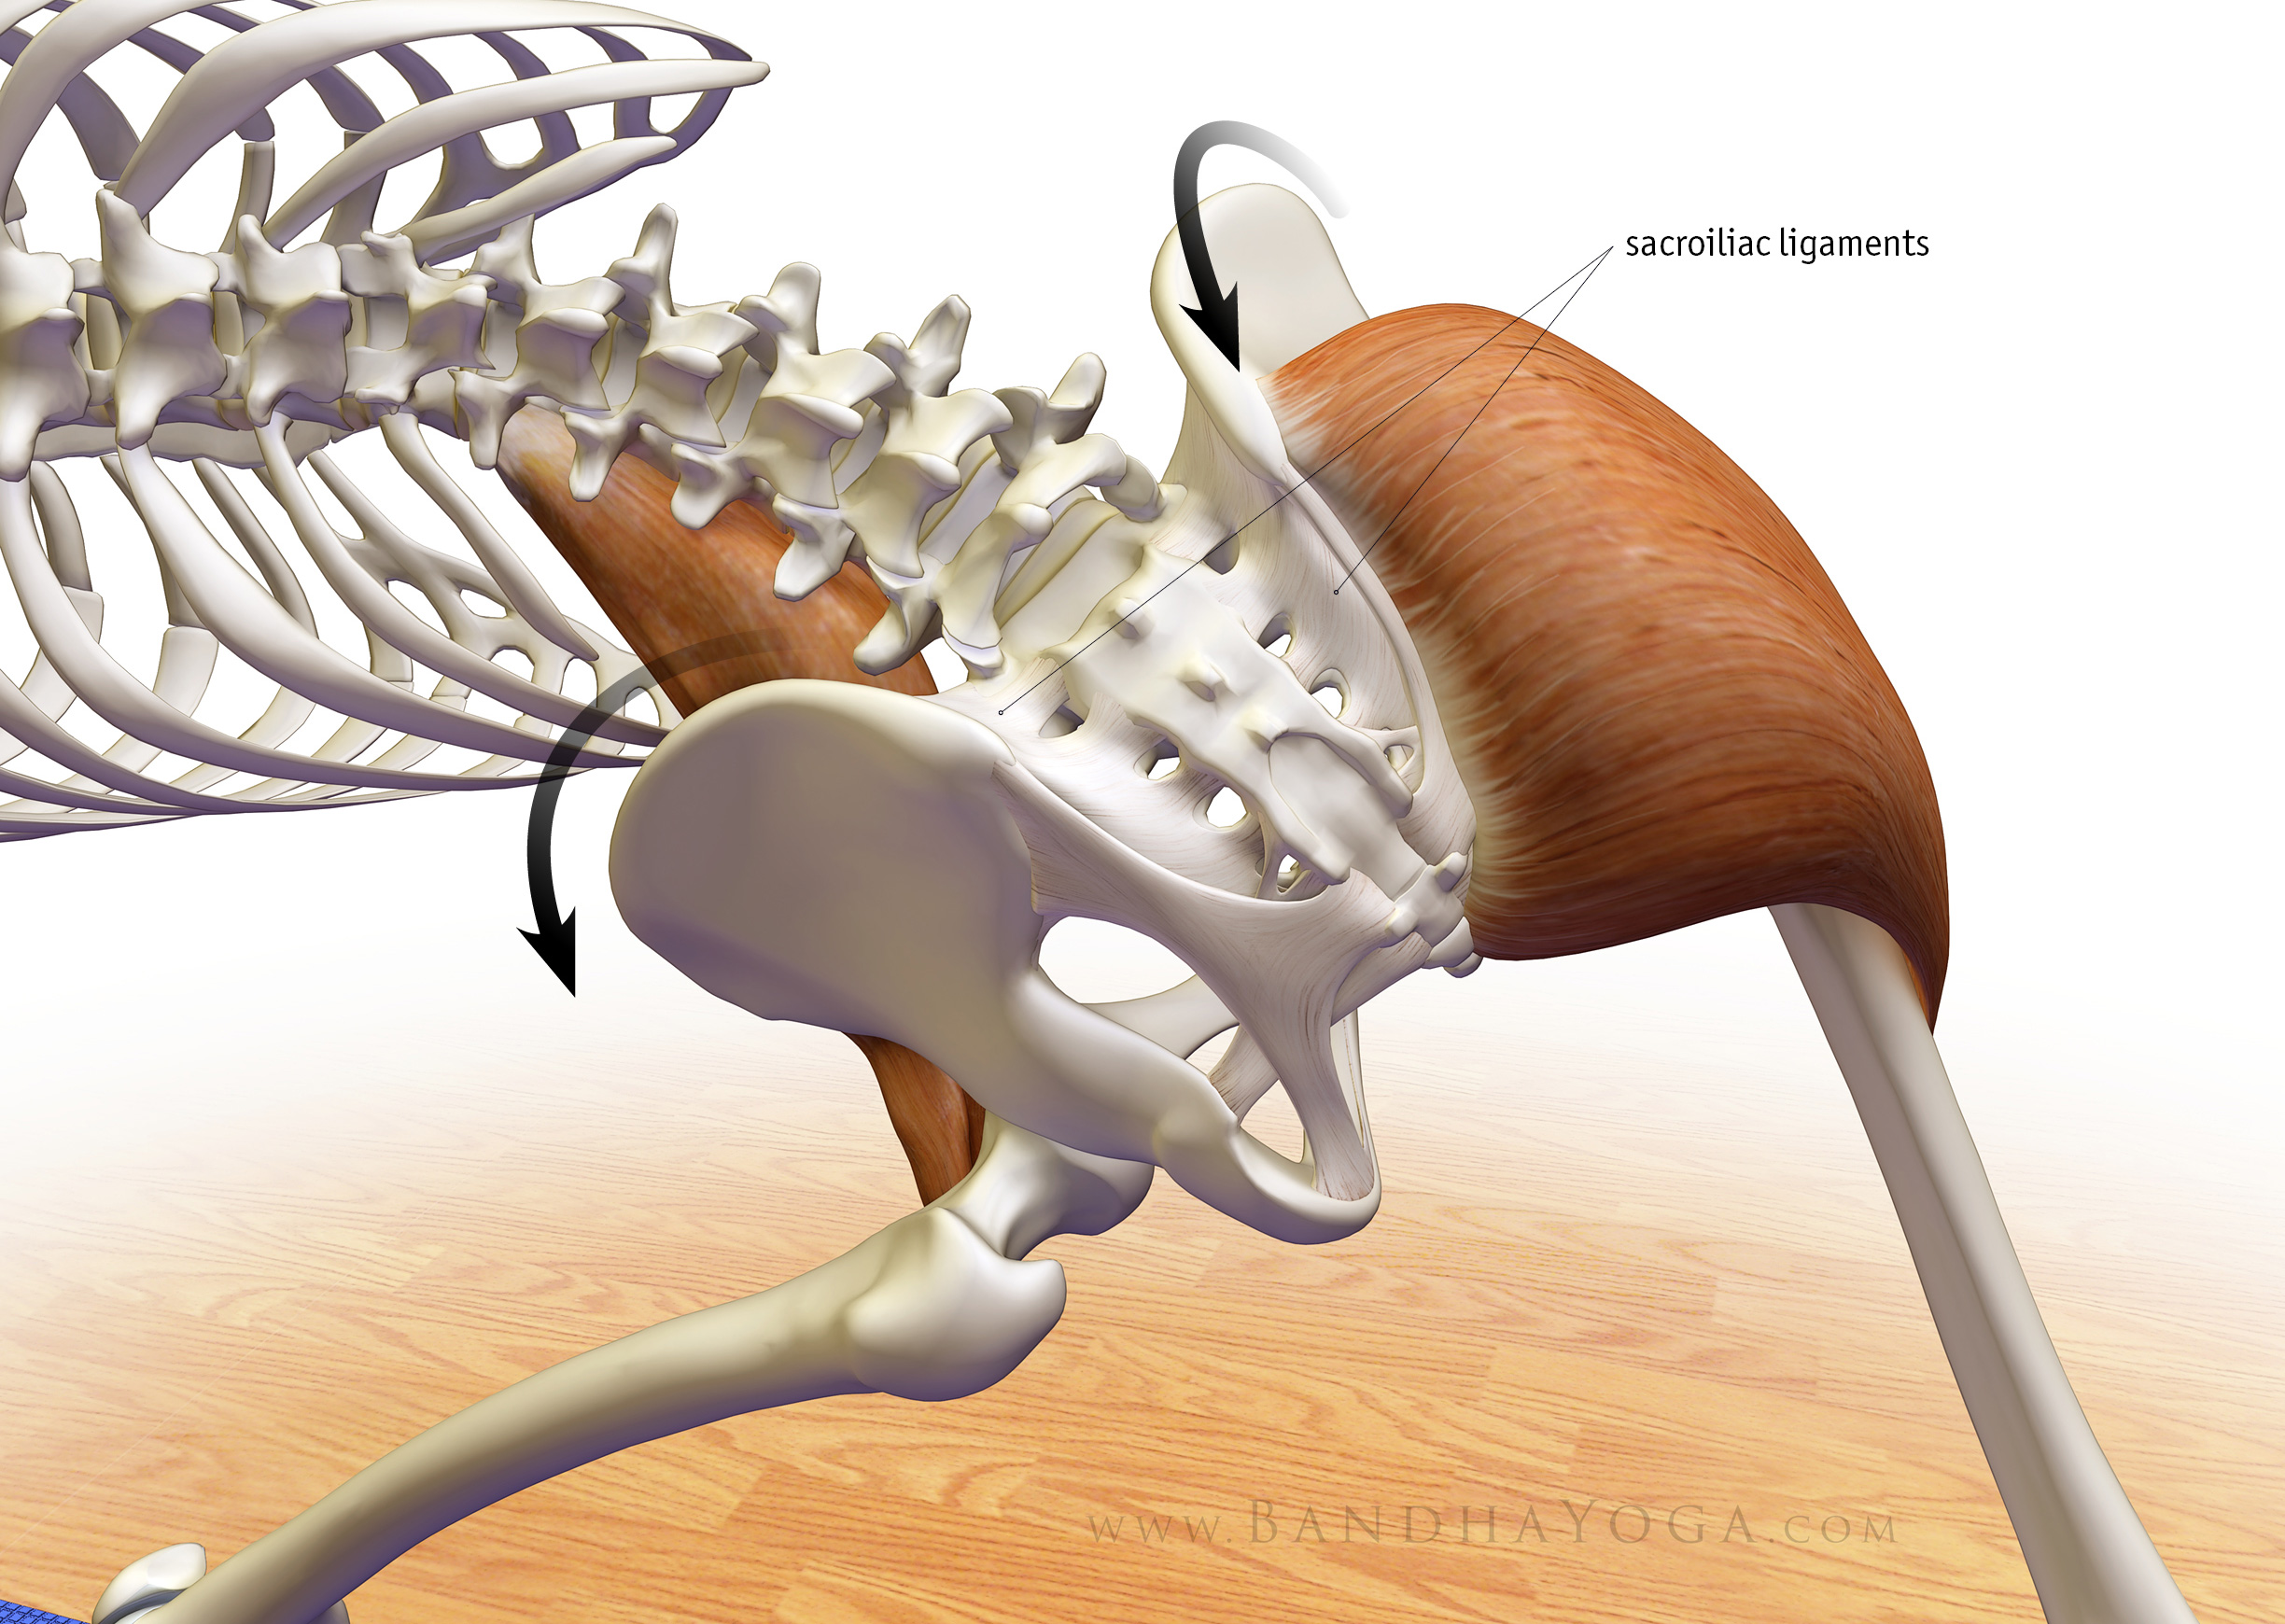
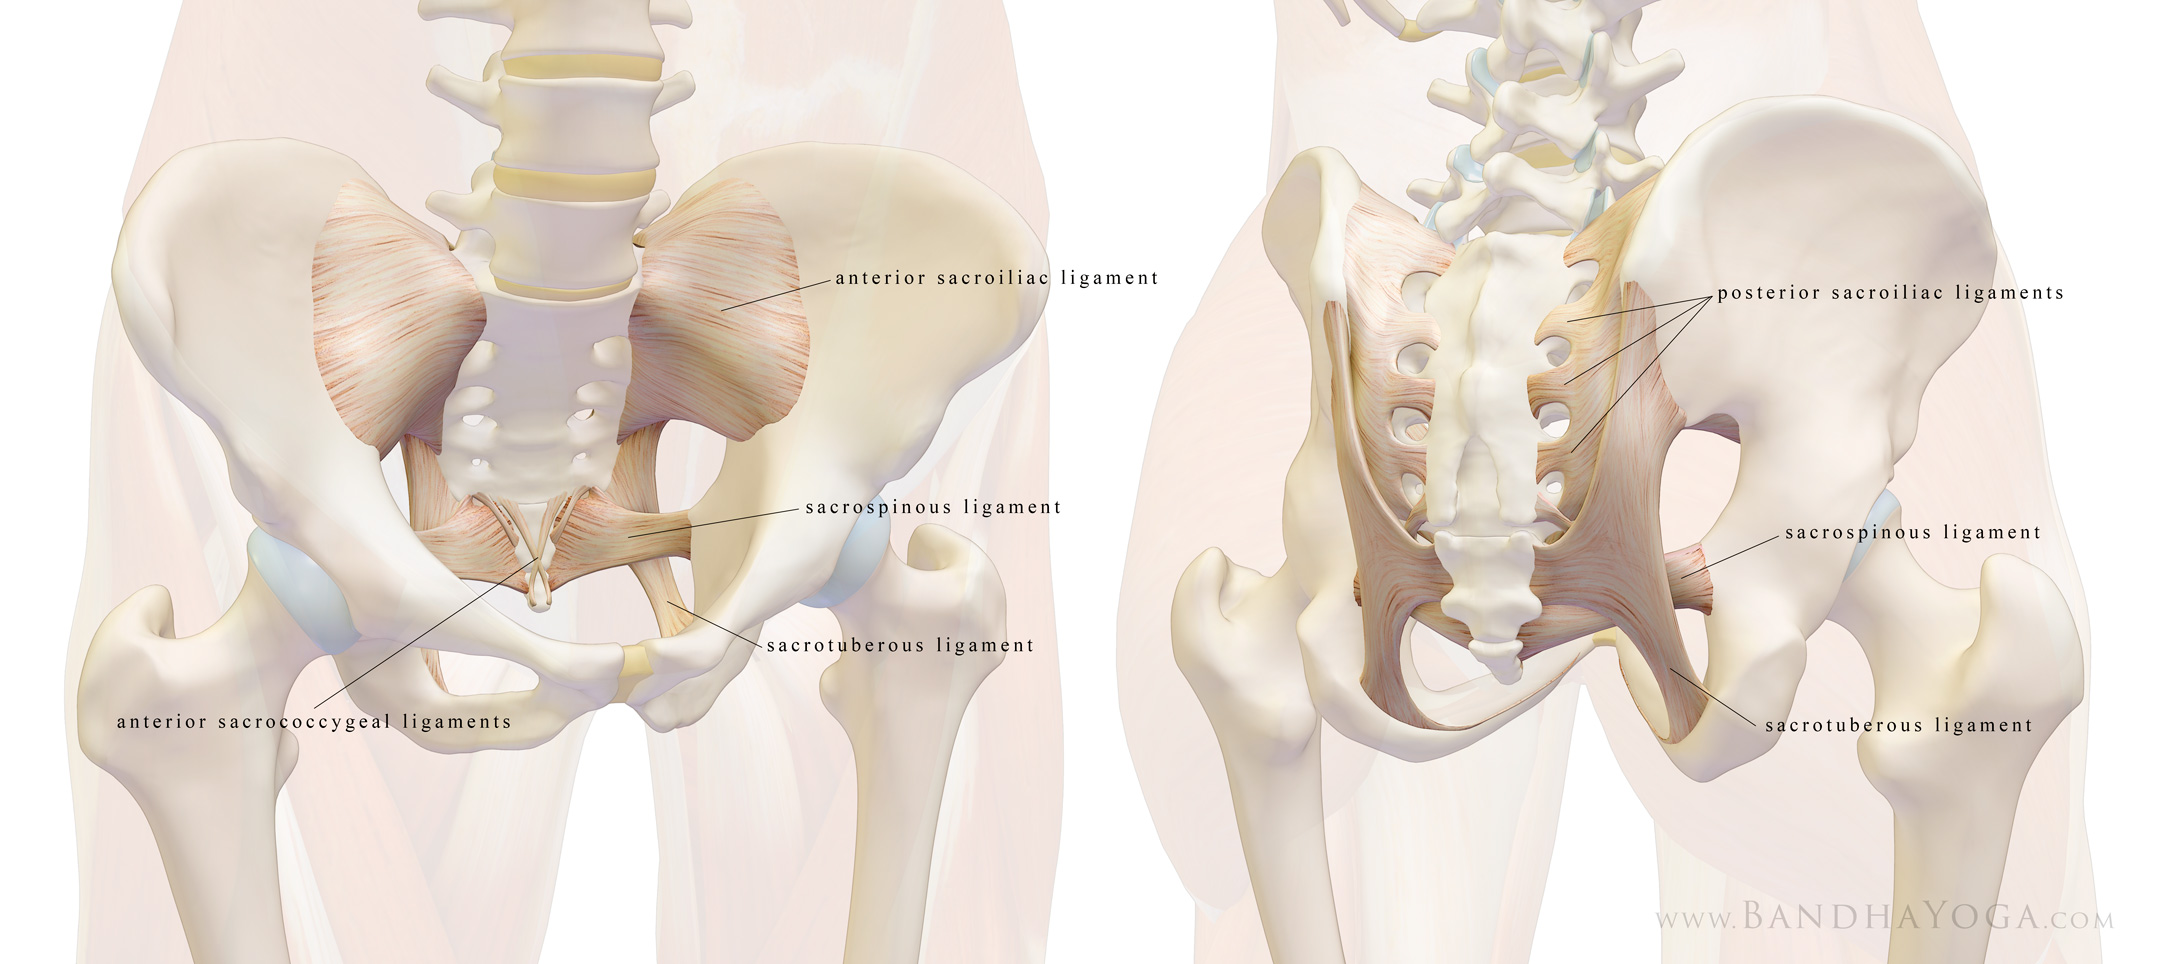
Figure 2: The opposing forces of the glutes and psoas and the posterior SI ligaments stabilizing the pelvis.
Figure 3: Opposing forces of the psoas and glutes and the anterior SI ligaments stabilizing the pelvis.
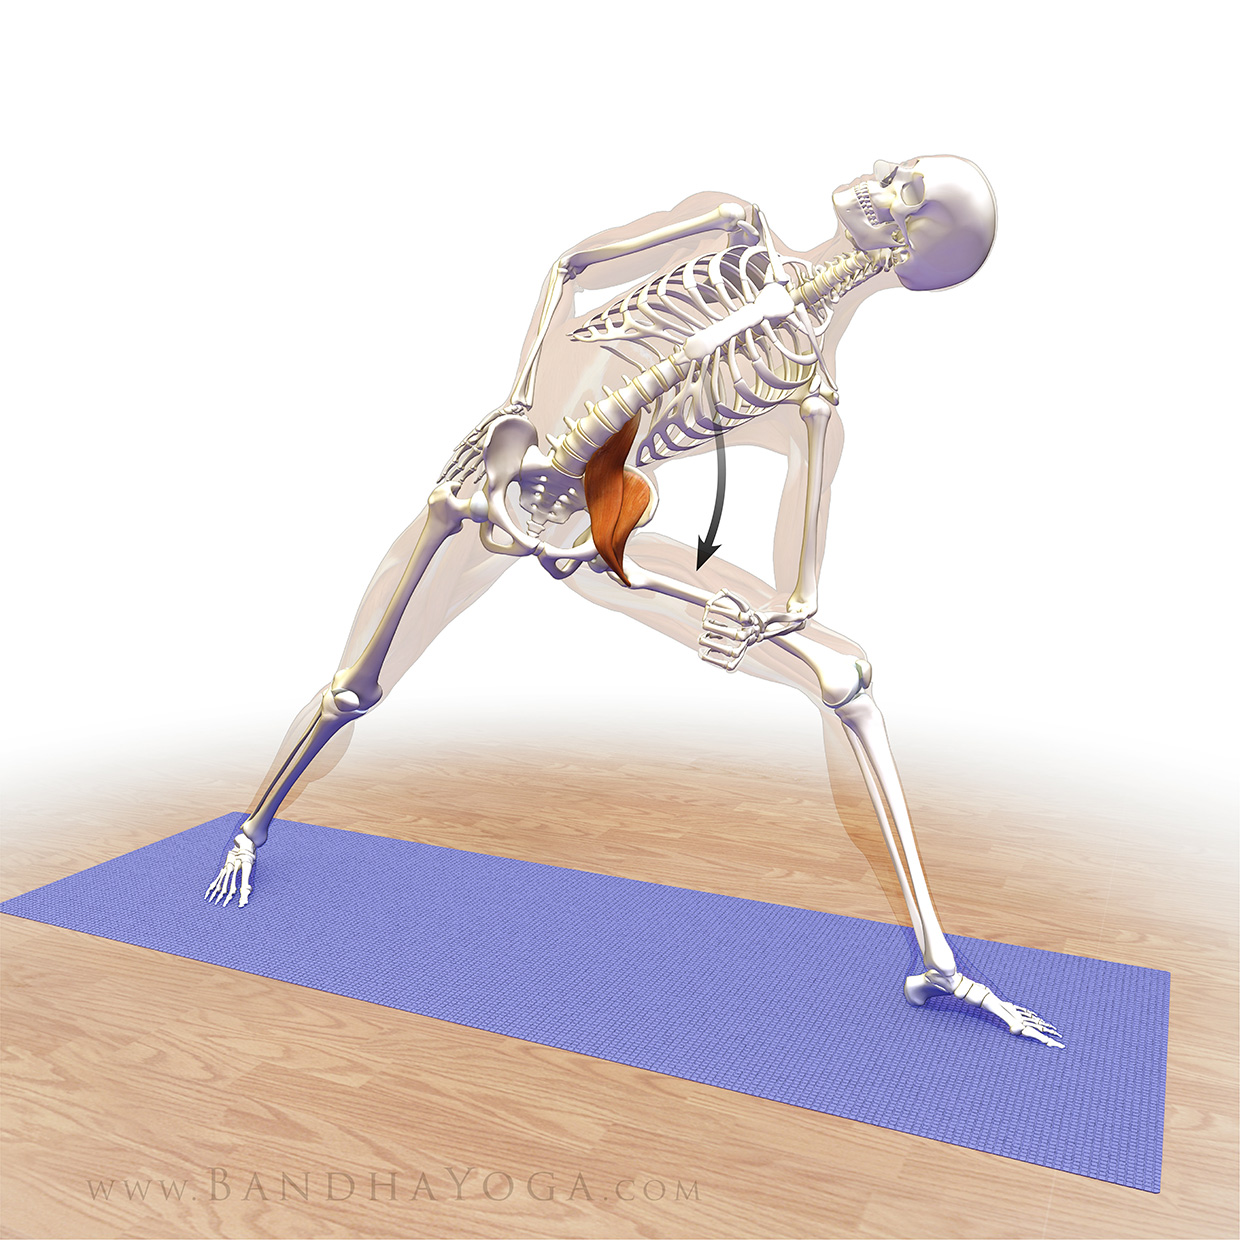
Sometimes doing just one pose can set you up for the whole day. Let’s look at Trikonasana or Triangle Pose and a powerful cue for stabilizing your pelvis and lumbar. Understanding tips like this one also sharpens your knowledge of anatomical and biomechanical principles.
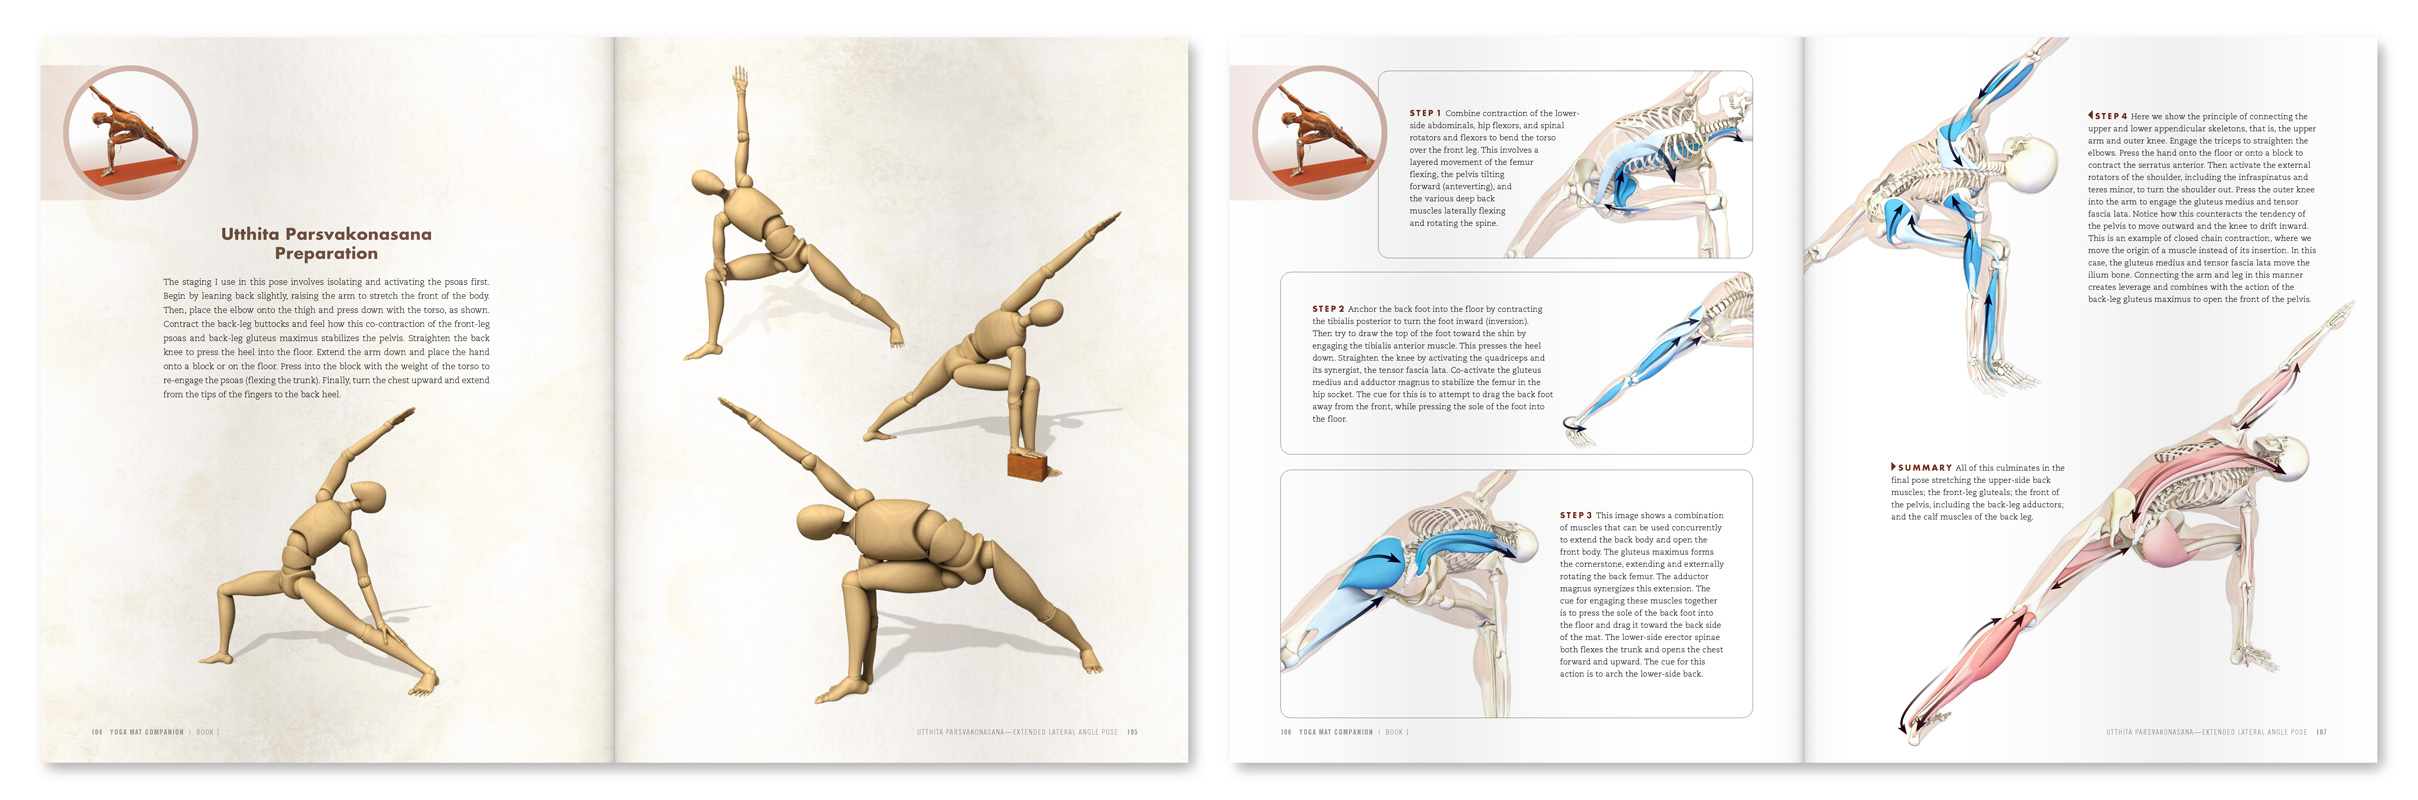
The principle at work here is that of muscle co-contraction. This cue co-contracts or activates two separate muscles, namely, the psoas and quadriceps of the forward leg. As a consequence, you will feel a deep stability in your hip joint and a connection from your leg to your lumbar spine.
Here's the cue:
Extend your forward leg knee by contracting the quadriceps. At the same time, press down with your torso through the arm into the hand, and onto your shin. This activates your psoas (and iliacus), tilting the pelvis over the forward leg and, by lumbopelvic rhythm, drawing the lumbar out of hyperflexion. Feel how this connection stabilizes your pelvis and lumbar and awakens the forward leg in the pose.
Figure 1:Co-activating the psoas and quads in Trikonasana
I hope you enjoy this cue. Think about what's happening biomechanically while you work with this. Thanks as well to everyone for your support of the folks in Panama City who were affected by Hurricane Michael. Check back next week to see how to integrate the back leg into this cue for Trikonasana.
Foundational knowledge gives you power that you can translate into applications for your practice and teaching.
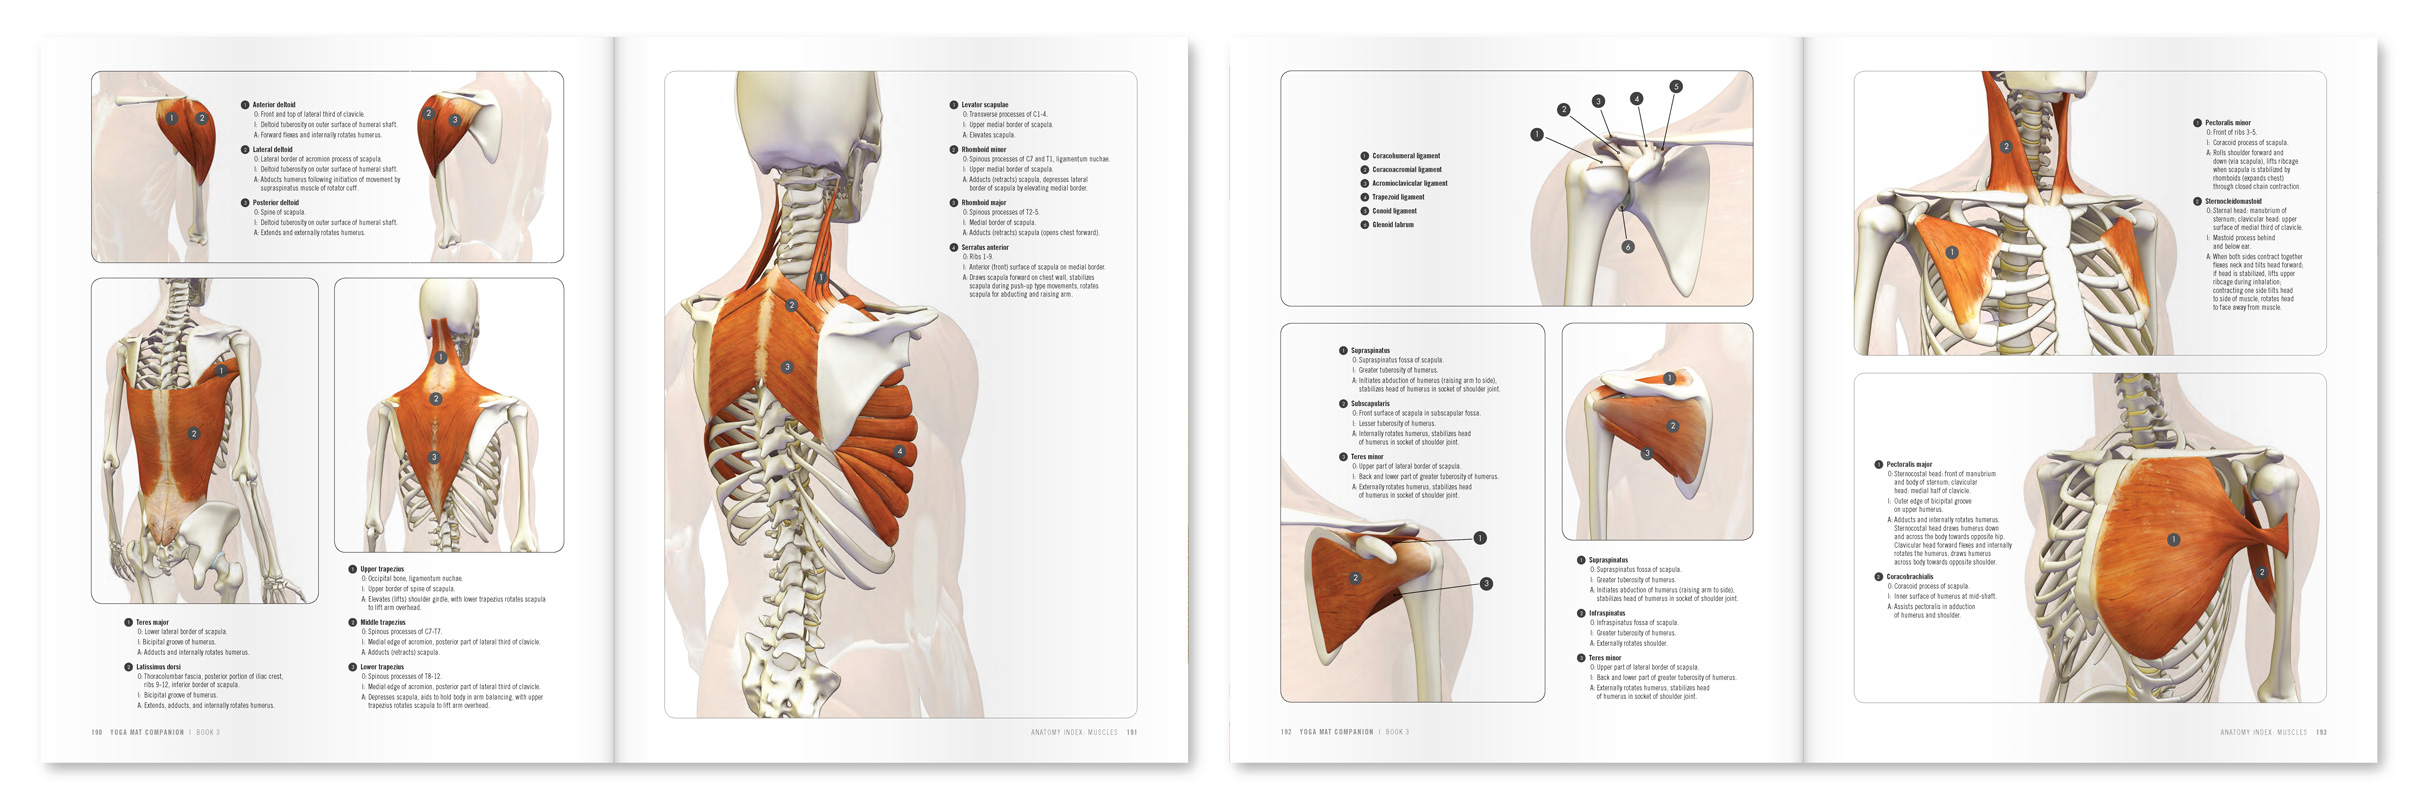
In this blog post, I explore some of the essential biomechanics of the shoulder joint, especially the “force couple” between your deltoid muscle and the rotator cuff. Understanding this relationship helps build your fund of knowledge regarding this complex articulation, which can help you later on in developing cues for your practice as well as well as for therapeutics in yoga.
The “force couple” is a biomechanical concept whereby groups of muscles work together around a joint to produce coordinated movement. The force couple between the rotator cuff and the deltoid muscle works in concert with other muscles around the scapula to produce movements such as raising the arm overhead.
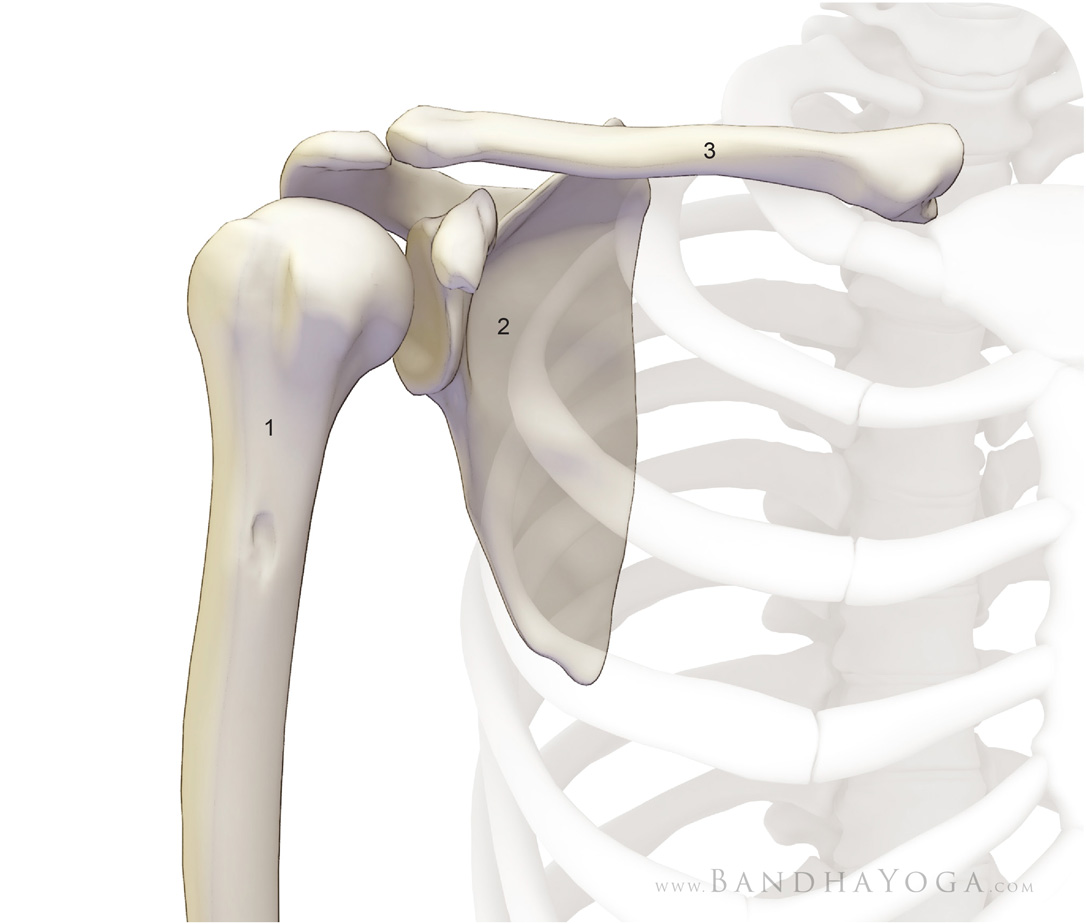
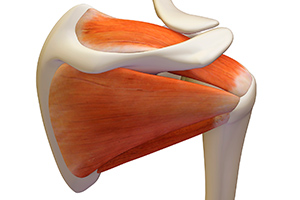
The shoulder joint proper is a ball and socket joint comprised of the humeral head which articulates with the shallow glenoid fossa (socket) of the scapula. The bone shapes of the shoulder joint allow for a high degree of motion. Contrast this with the hip joint, where the socket is much deeper and constraining on motion. In addition to the bony stabilizers, there are also soft tissue stabilizers such as ligaments and the labrum and muscular dynamic stabilizers. Figure 1 illustrates the bones of the shoulder. Click here for more on this in relation to your Down Dog.
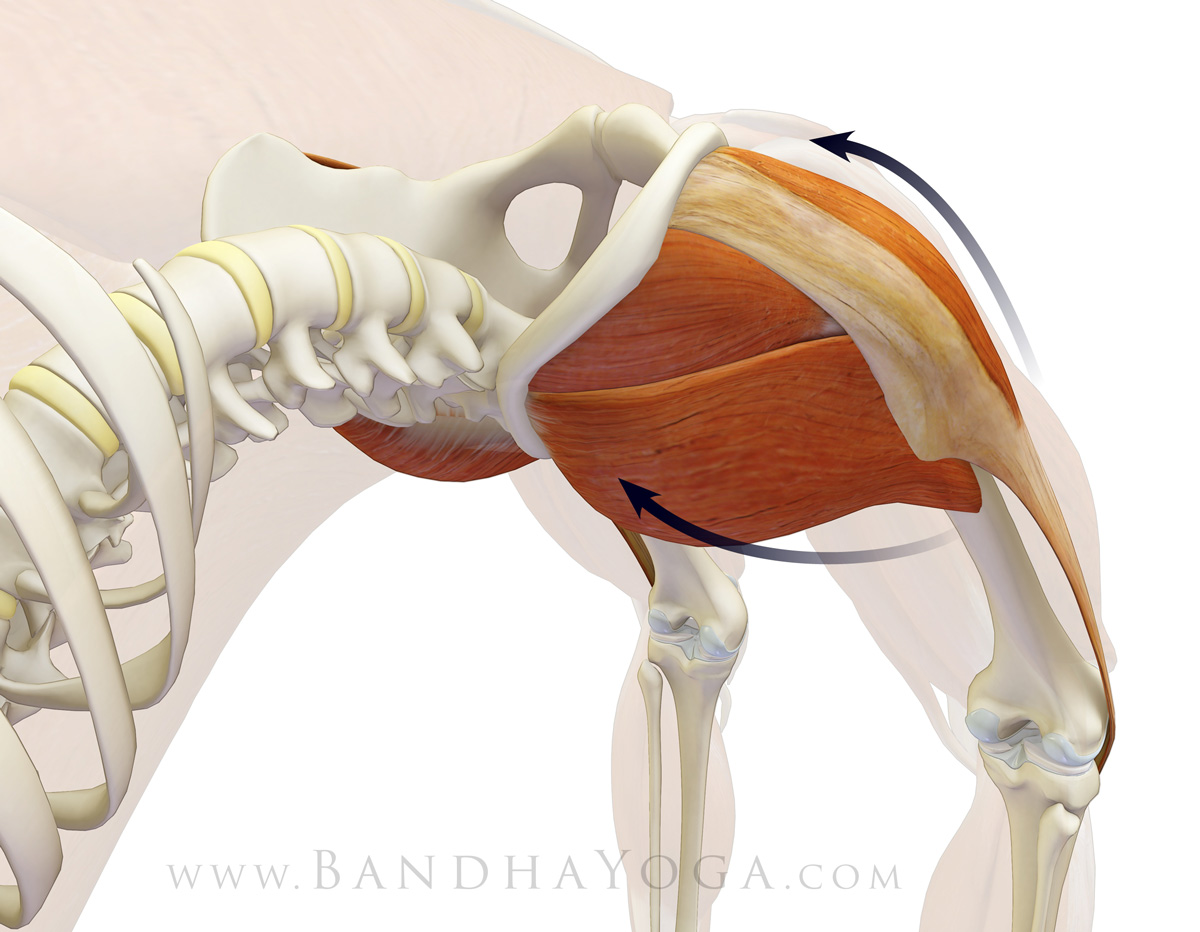
In the force couple between the deltoid muscle and the rotator cuff, the rotator cuff stabilizes the humeral head against the glenoid fossa. The deltoid muscle then levers the humeral head off the glenoid fossa to raise the arm. At the same time, the scapula and clavicle rotate to aid in producing movement, a process known as scapulohumeral rhythm (click here for more on this subject).
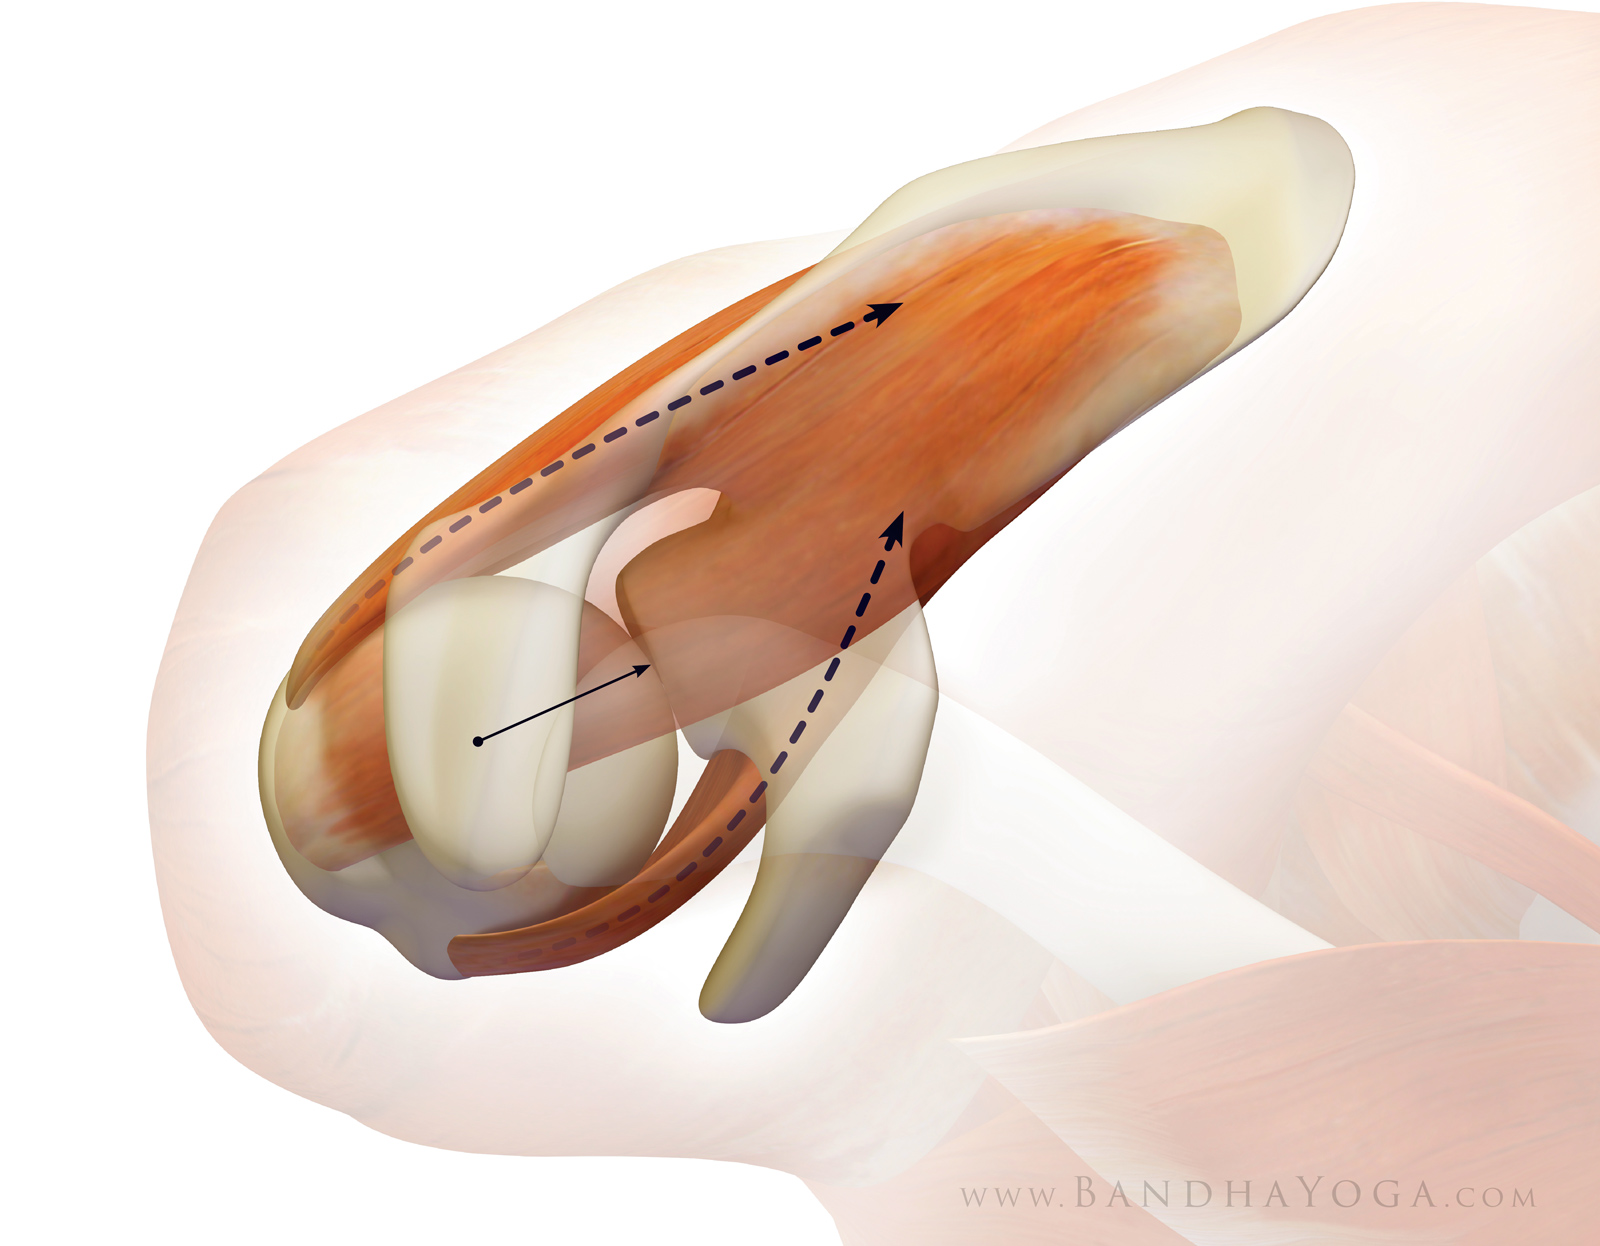
Figure 2 - The Subscapularis / Infraspinatus force couple.
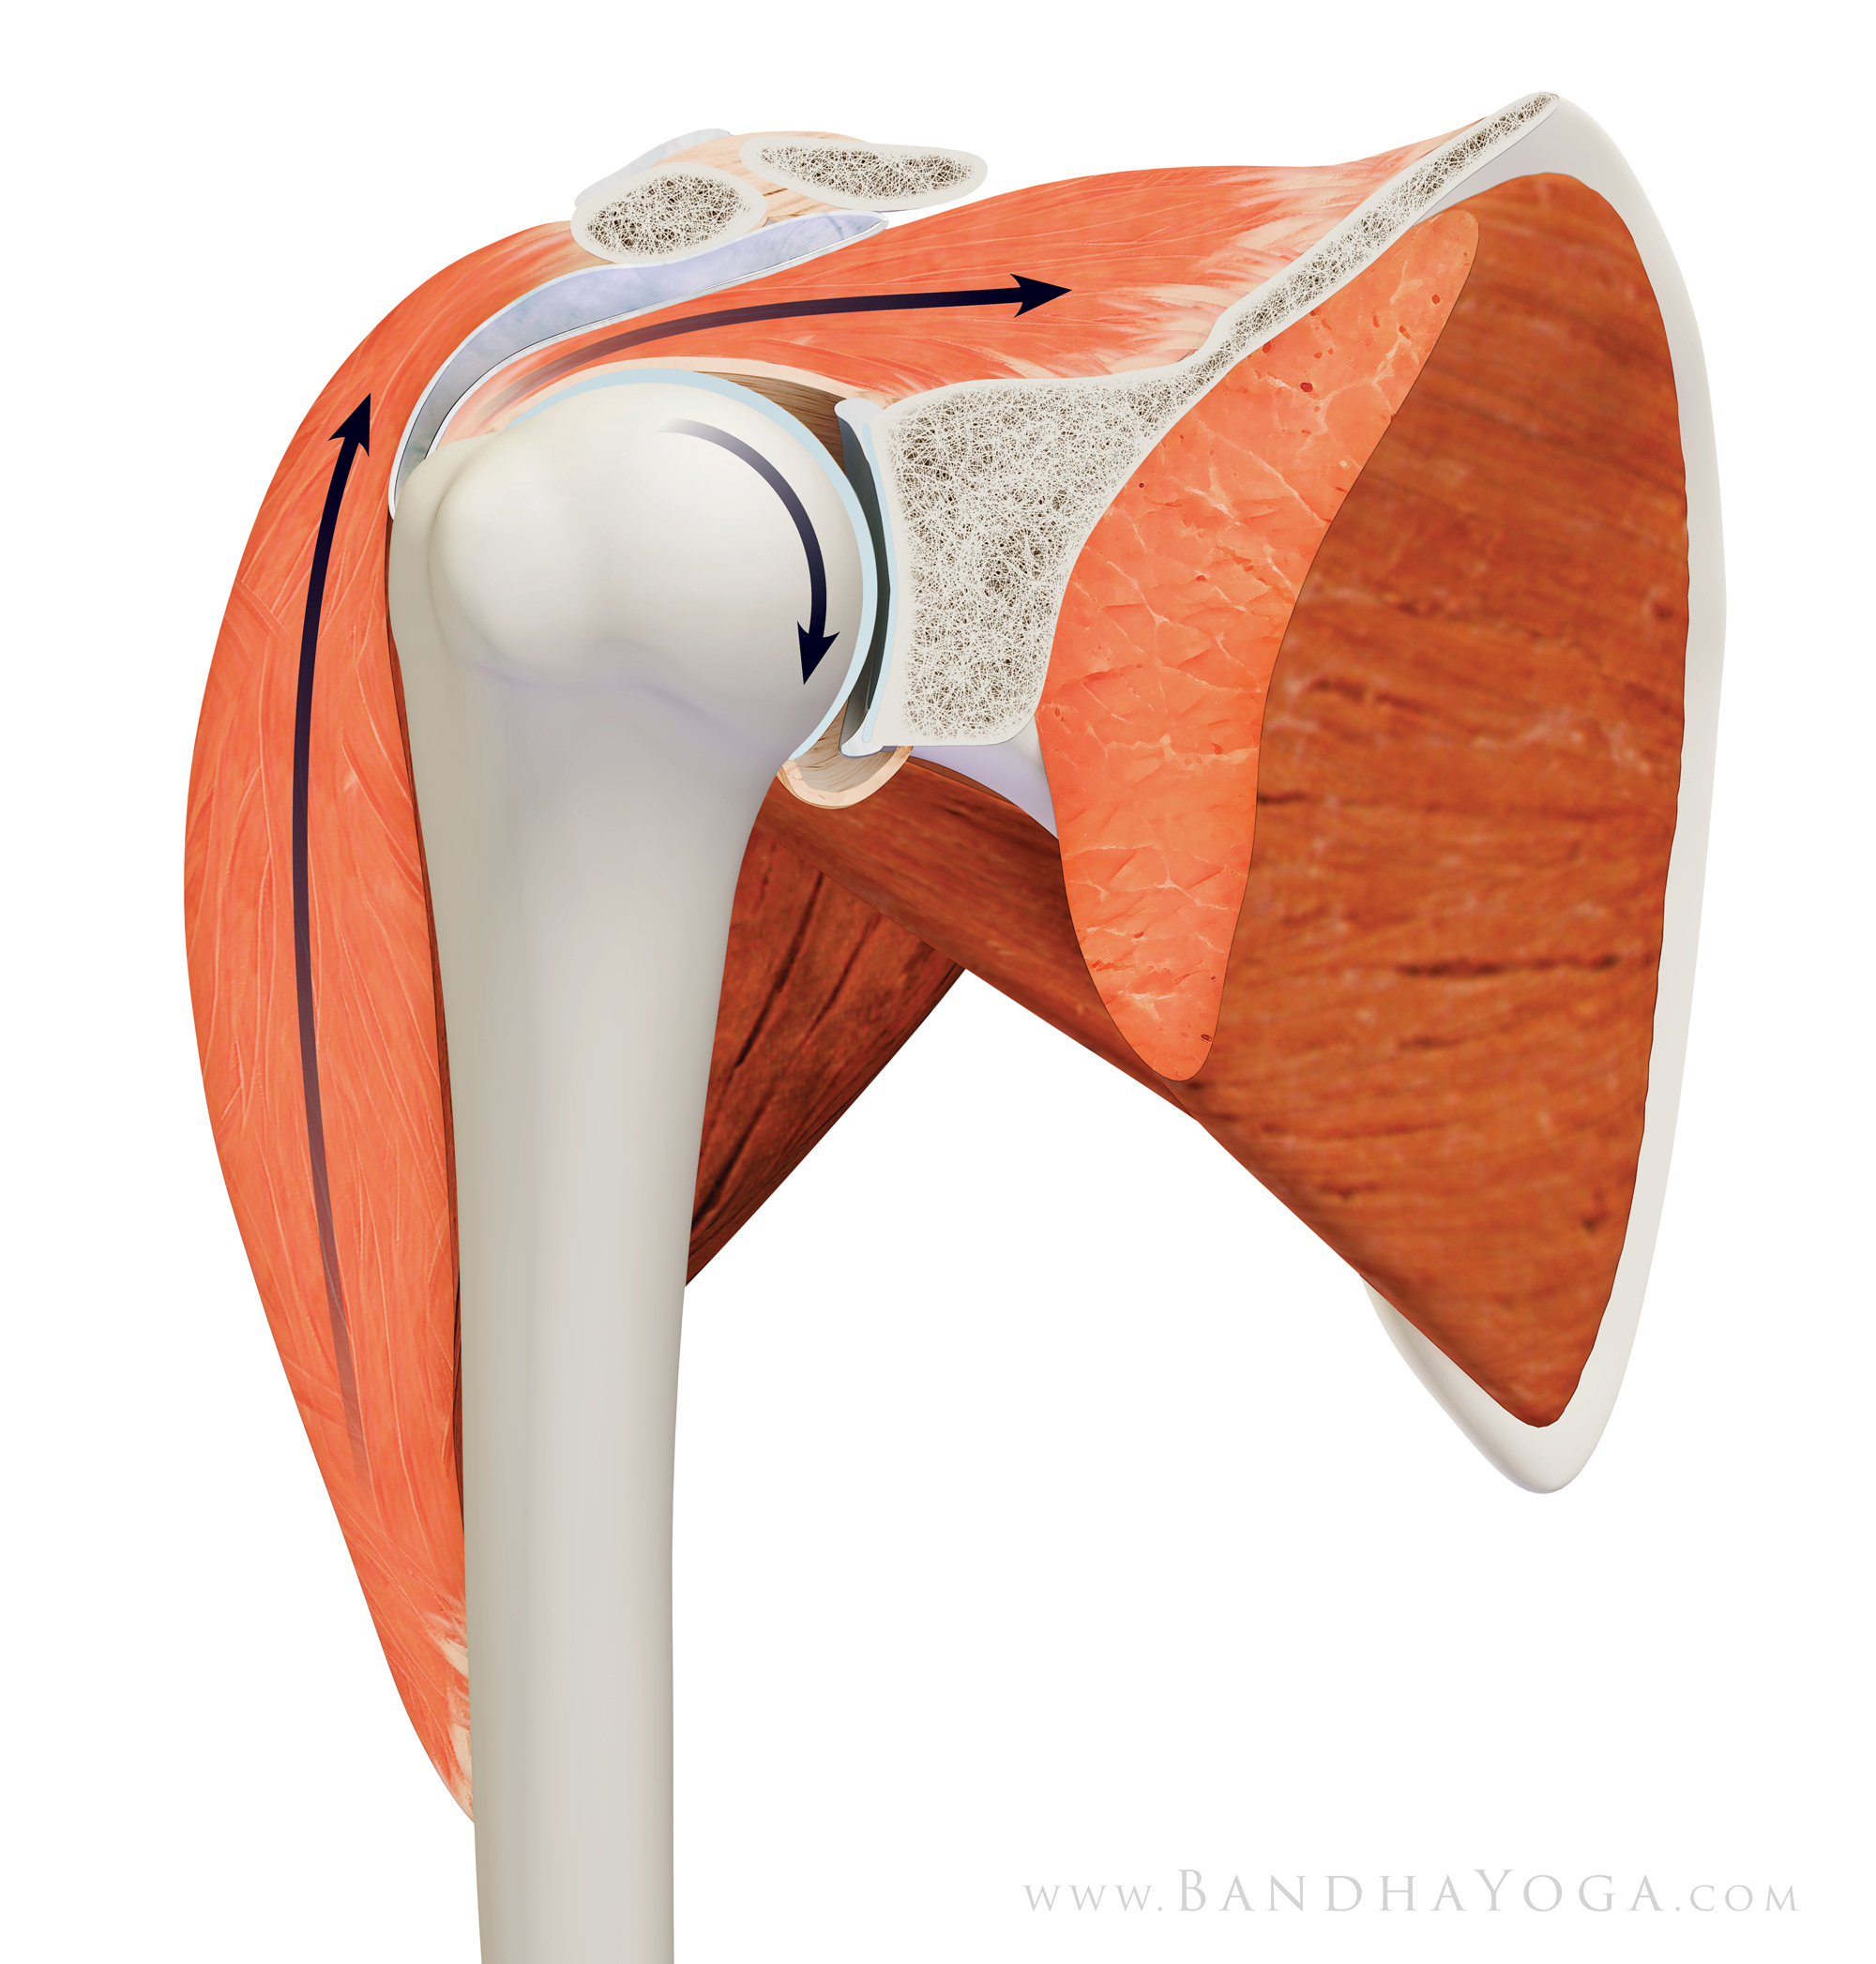
Figure 3 illustrates the force couple between the
rotator cuff and the deltoid muscle. Click here to learn about the supraspinatus muscle of the rotator cuff. As the deltoid contracts to raise the arm, the rotator cuff contracts to stabilize the humeral head in the socket. All of this happens automatically--the brain is hard wired for this force couple.
Figure 3 - The Deltoid / Supraspinatus force couple.
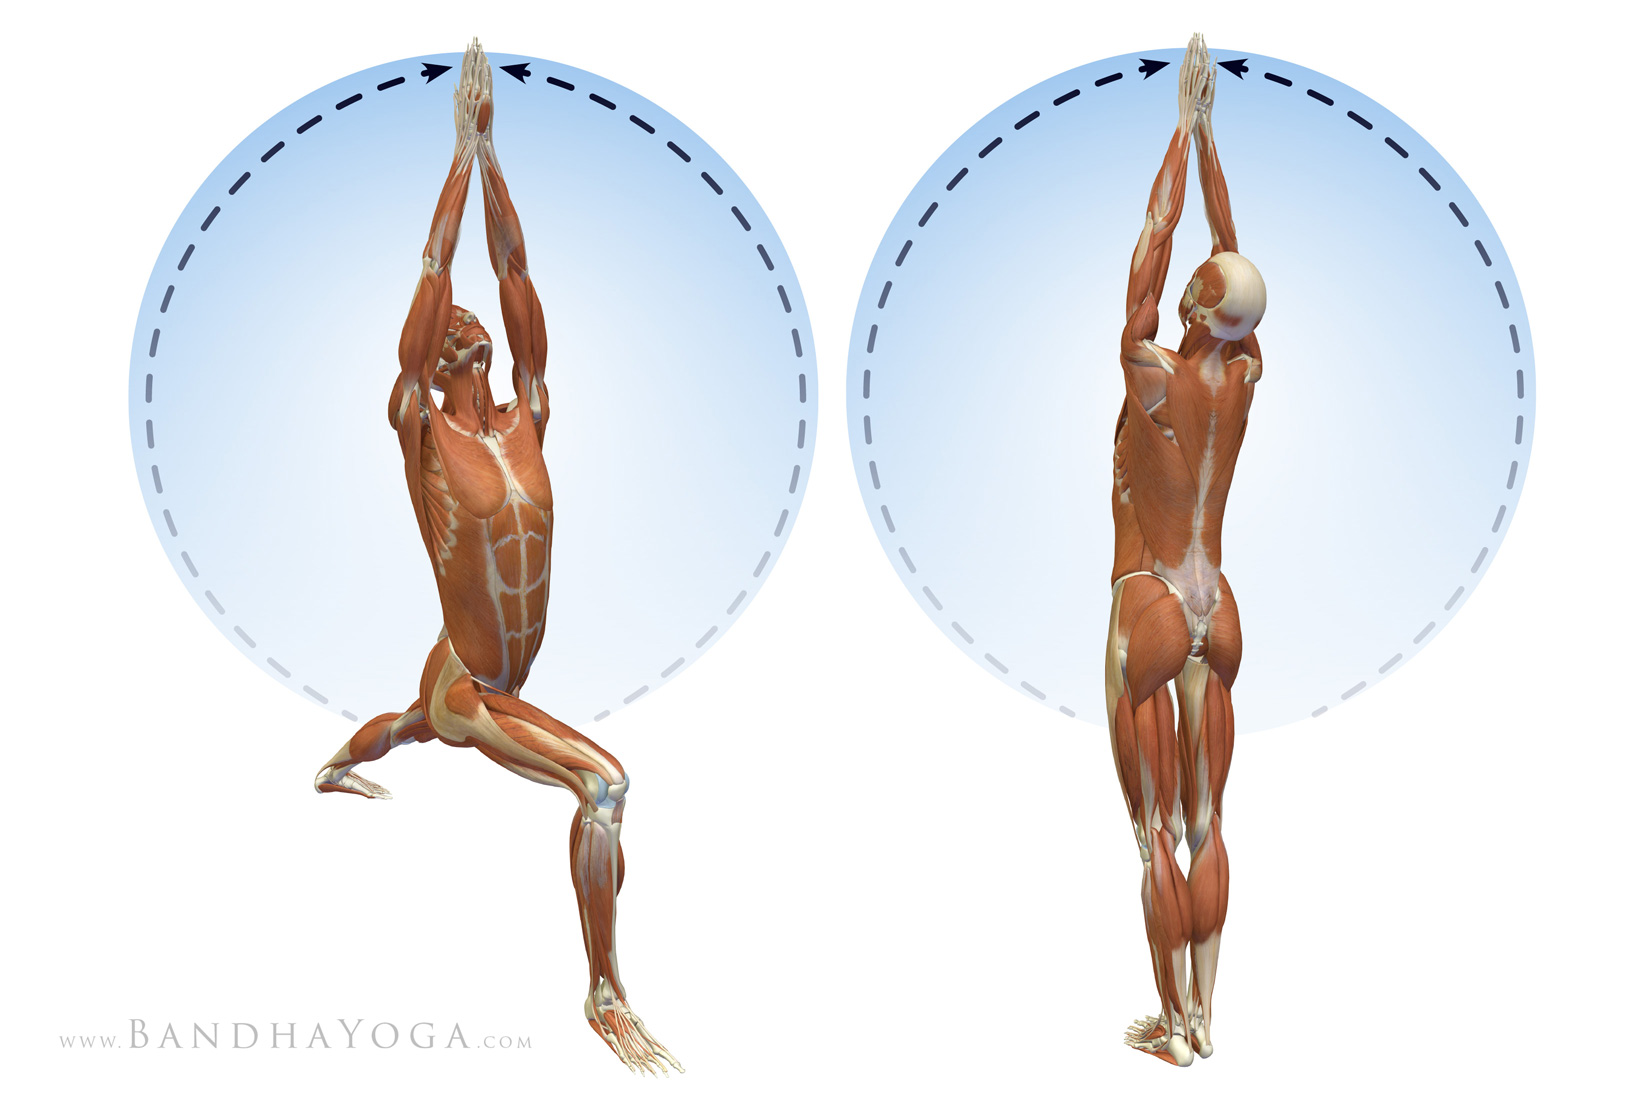
Injury to the rotator cuff, such as a tear or inflammation can lead to less efficient stabilization of the humeral head in the socket. As a consequence, when the deltoid contracts, instead of levering the humeral head off the glenoid, the force of the deltoid contraction causes the head of the humerus to shift upwards into the subacromial space. This can lead to impingement of the rotator cuff on the undersurface of the acromion, thus exacerbating the condition. To compensate, the body uses abnormal movement of the scapula in an attempt to stablize the humeral head in the socket. This abnormal movement of the scapula on the chest wall is known as “scapulothoracic dyskinesia”. I examine for this by comparing the movement of the normal and injured side from the back while having the patient raise the arms overhead.
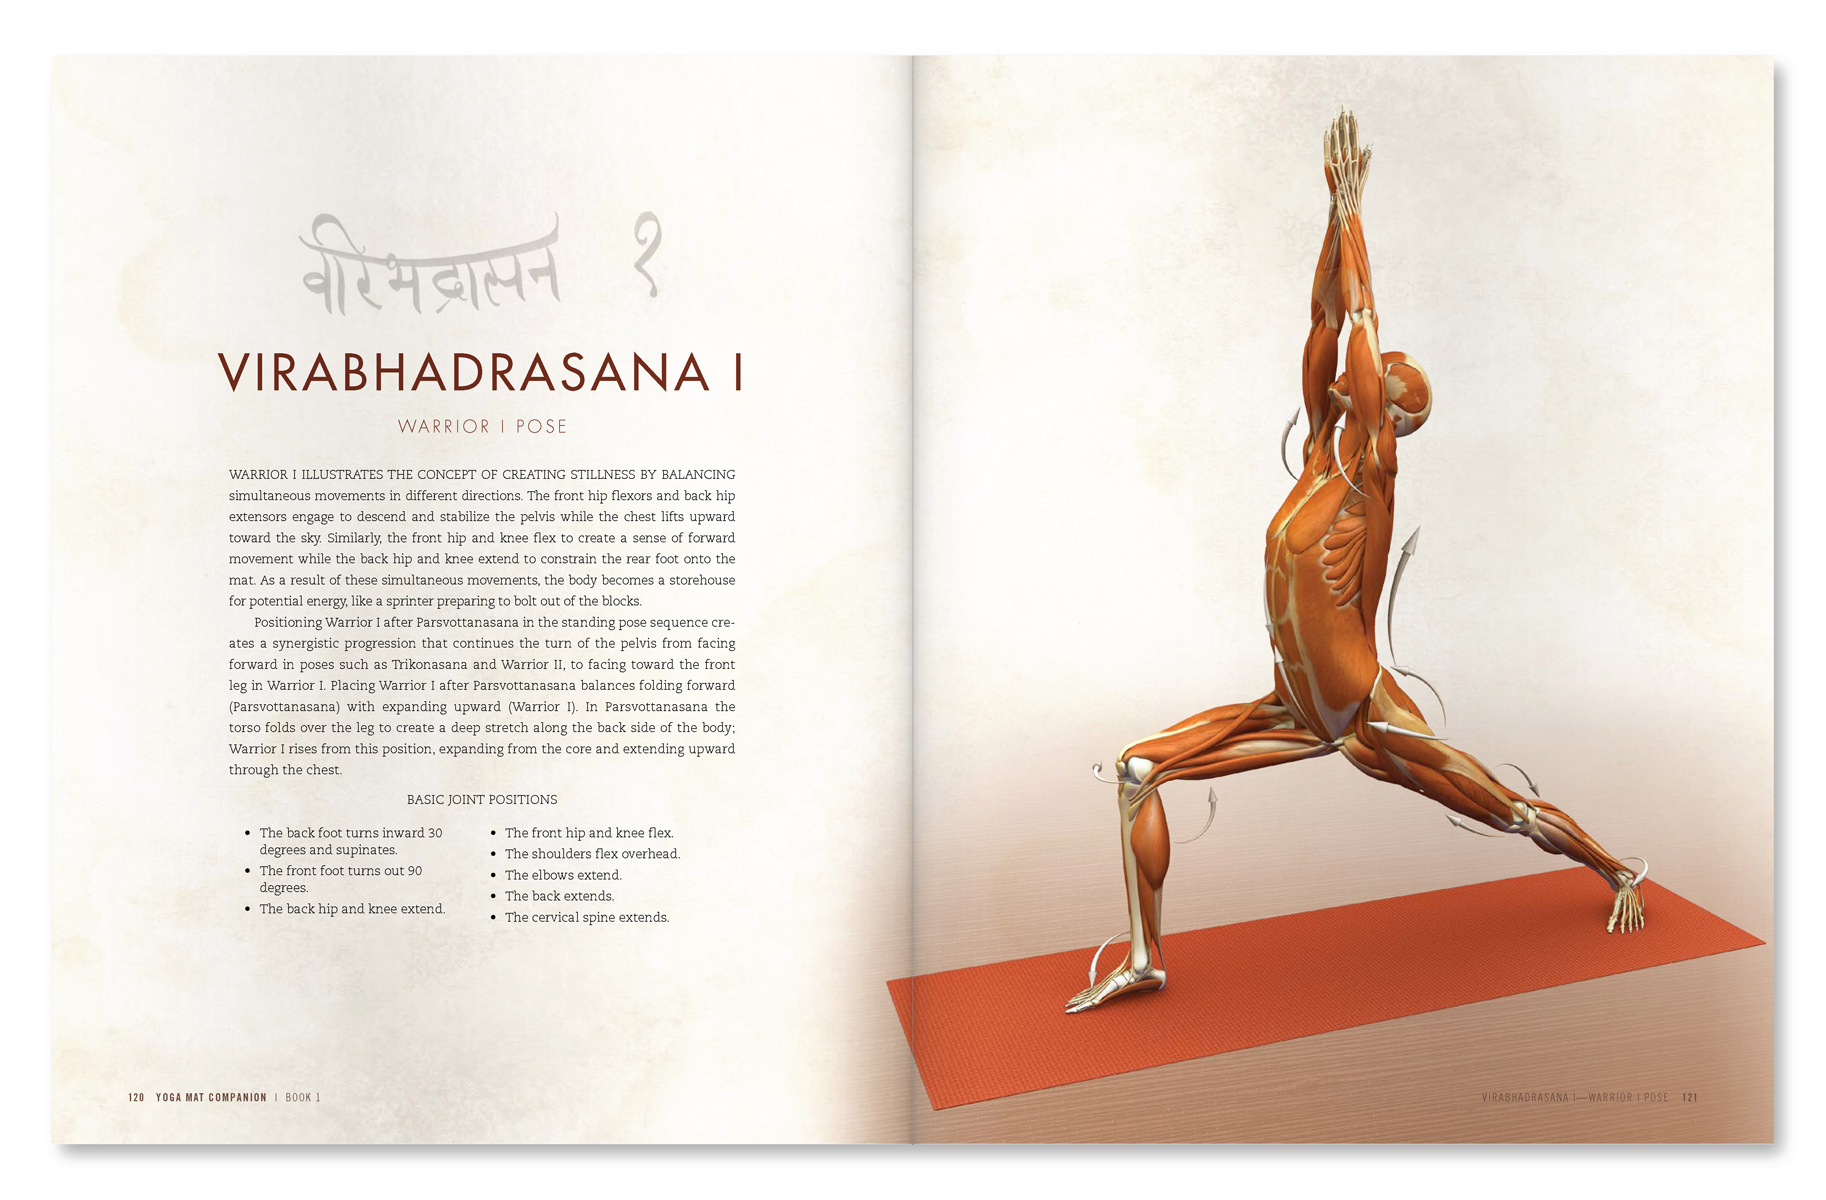
Figure 4 - Raising the arms over the head in Warrior I and Tadasana.
I hope this post helps you build your fund of knowledge regarding shoulder biomechanics. Stay tuned for my next post where I discuss some of the yoga poses that can be used to stretch and strengthen the rotator cuff. Learn more about anatomy, biomechanics and physiology for your yoga in “The Key Muscles of Yoga”, “The Key Poses of Yoga” and the Yoga Mat Companion series. Click on any
of these books to page through.
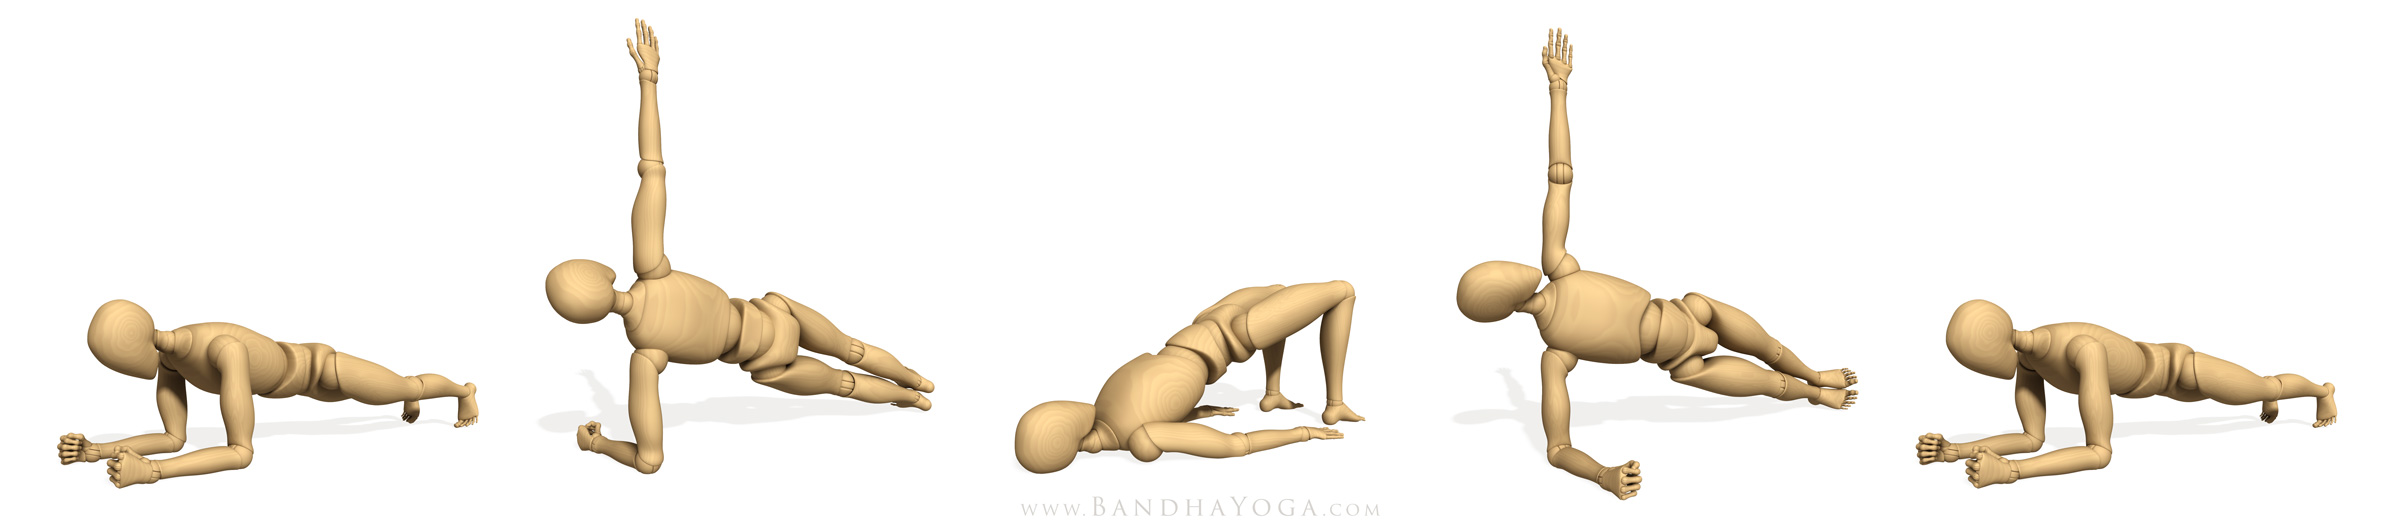
I want to share one of my favorite core workouts. I use this at the end of practice to integrate the shoulders, core and lower extremities. Let’s get right into it…
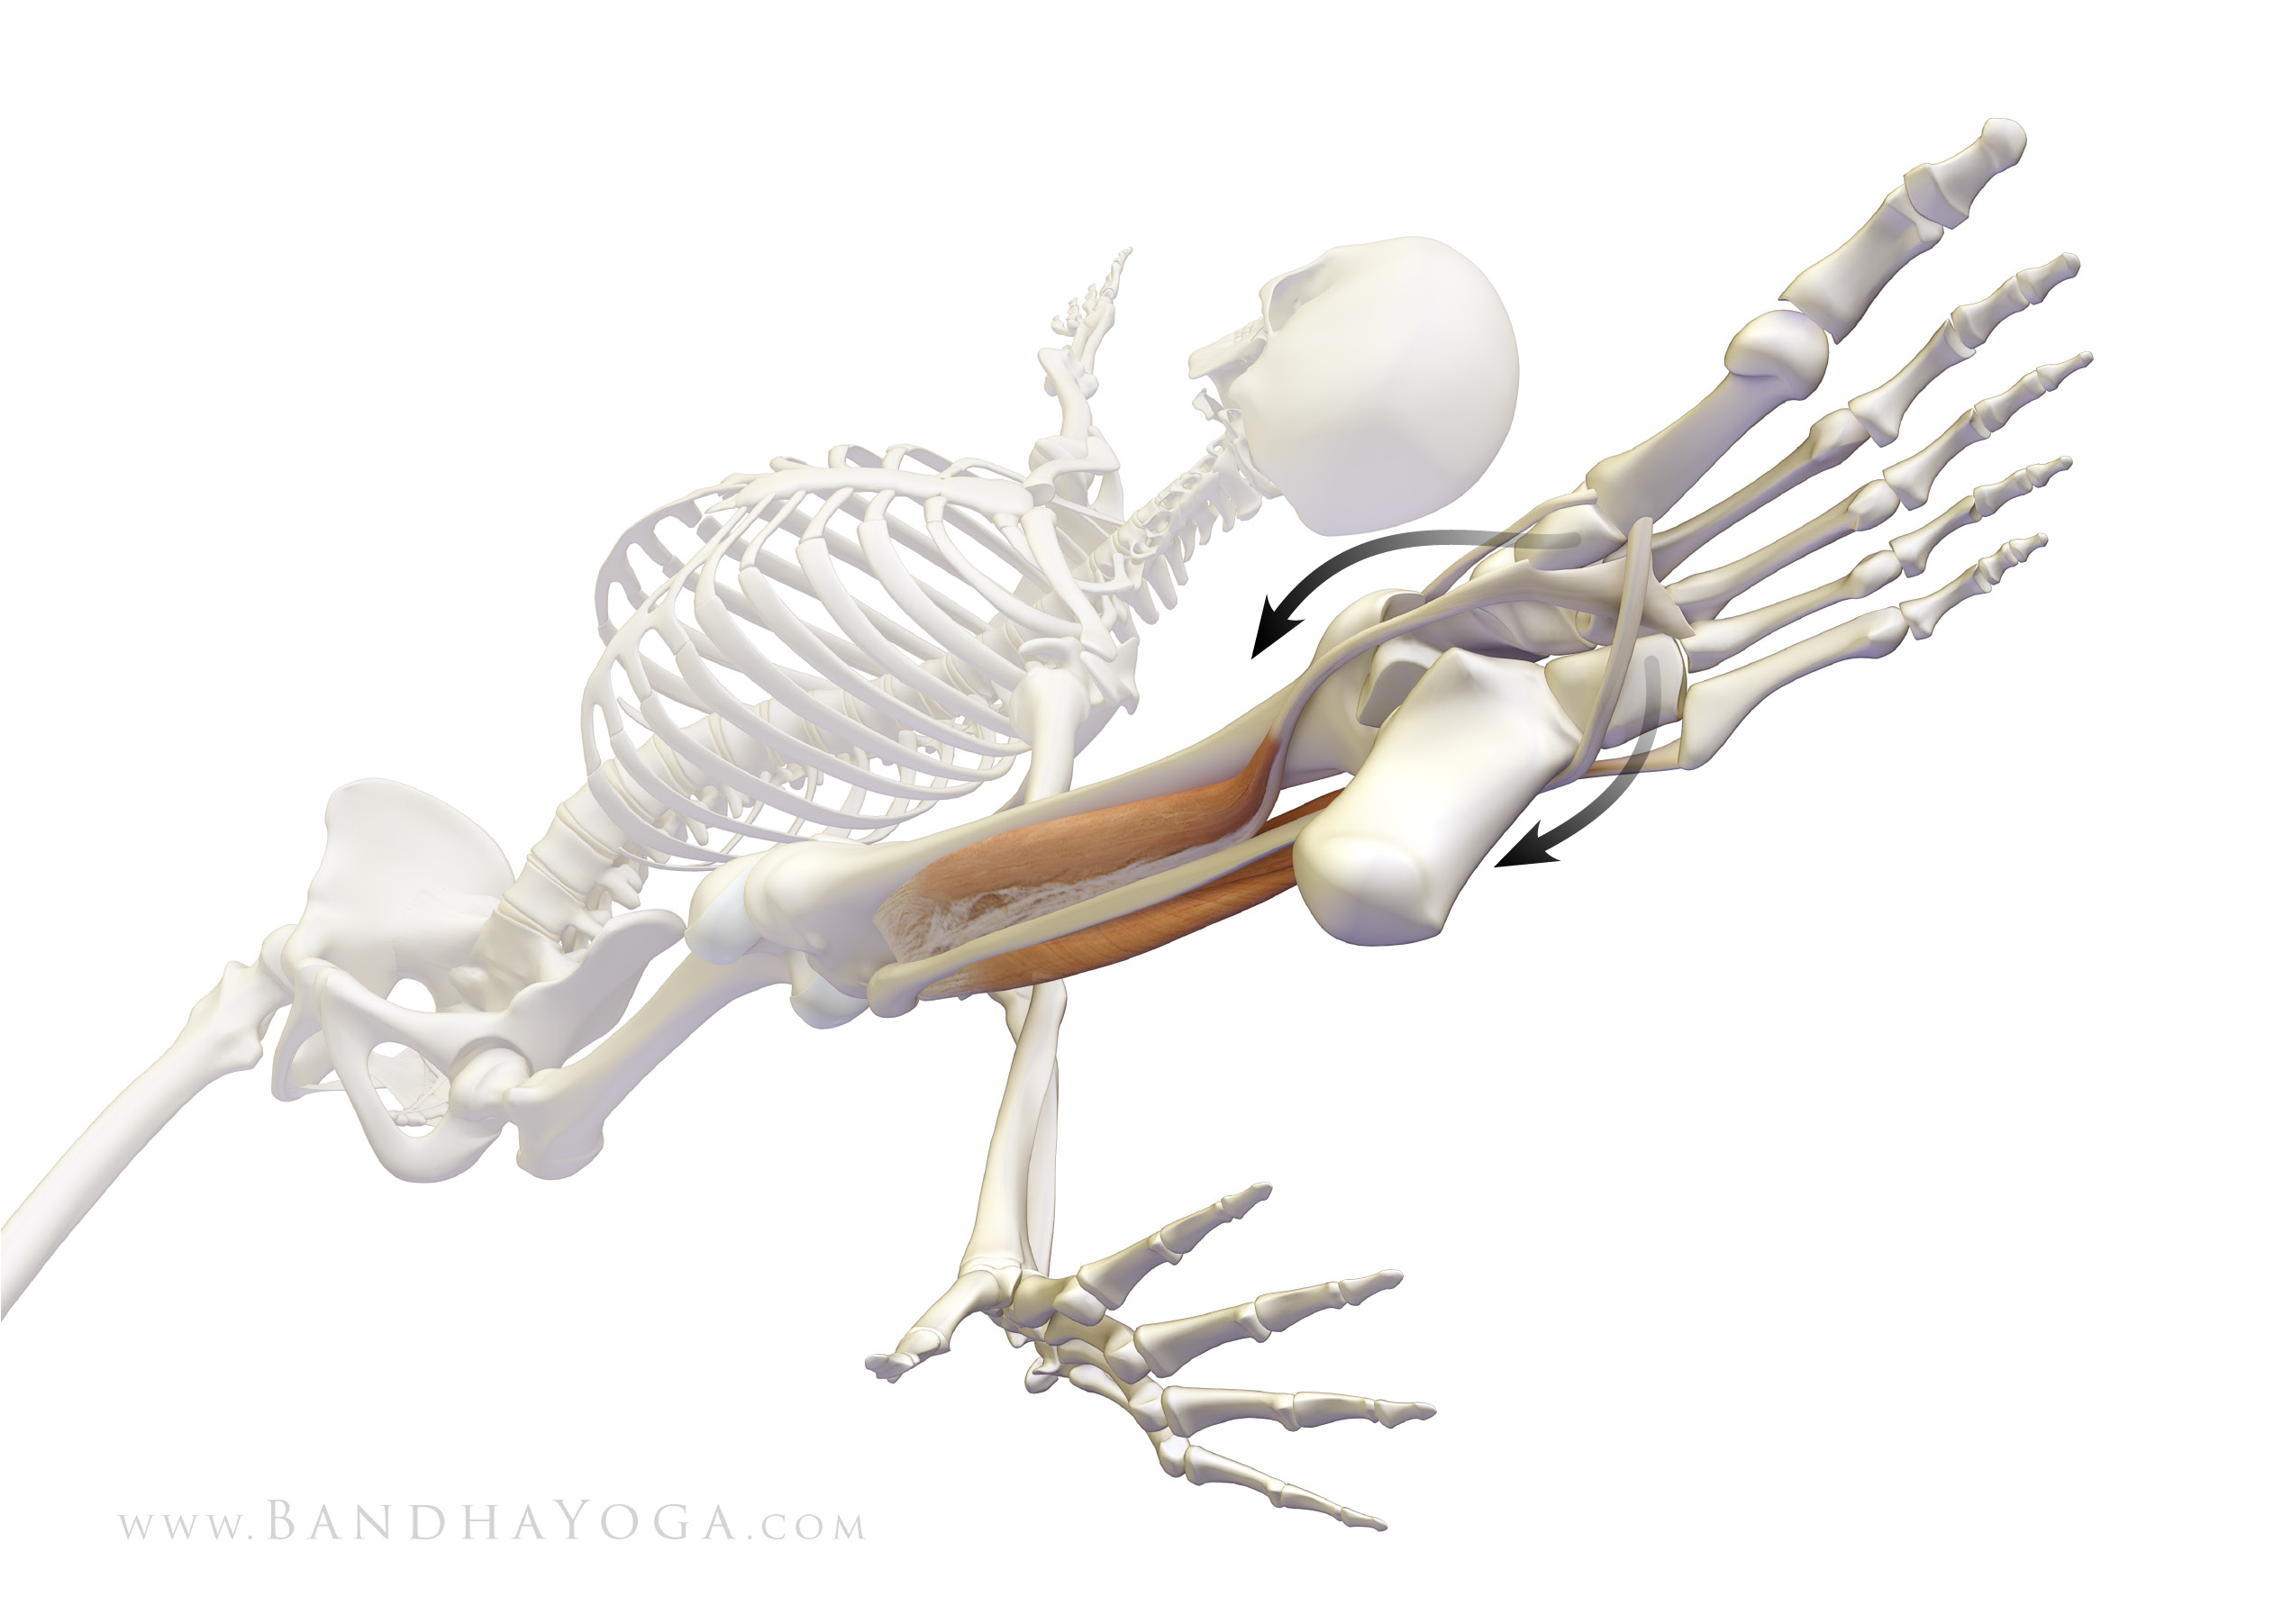
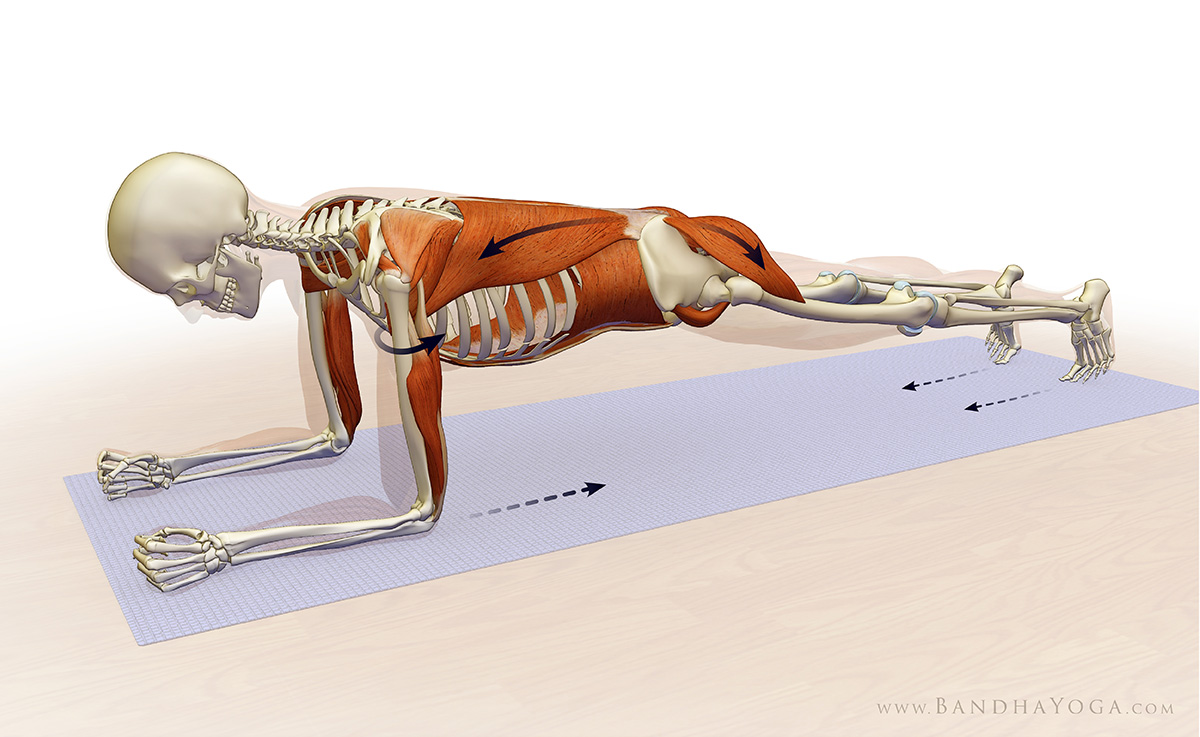
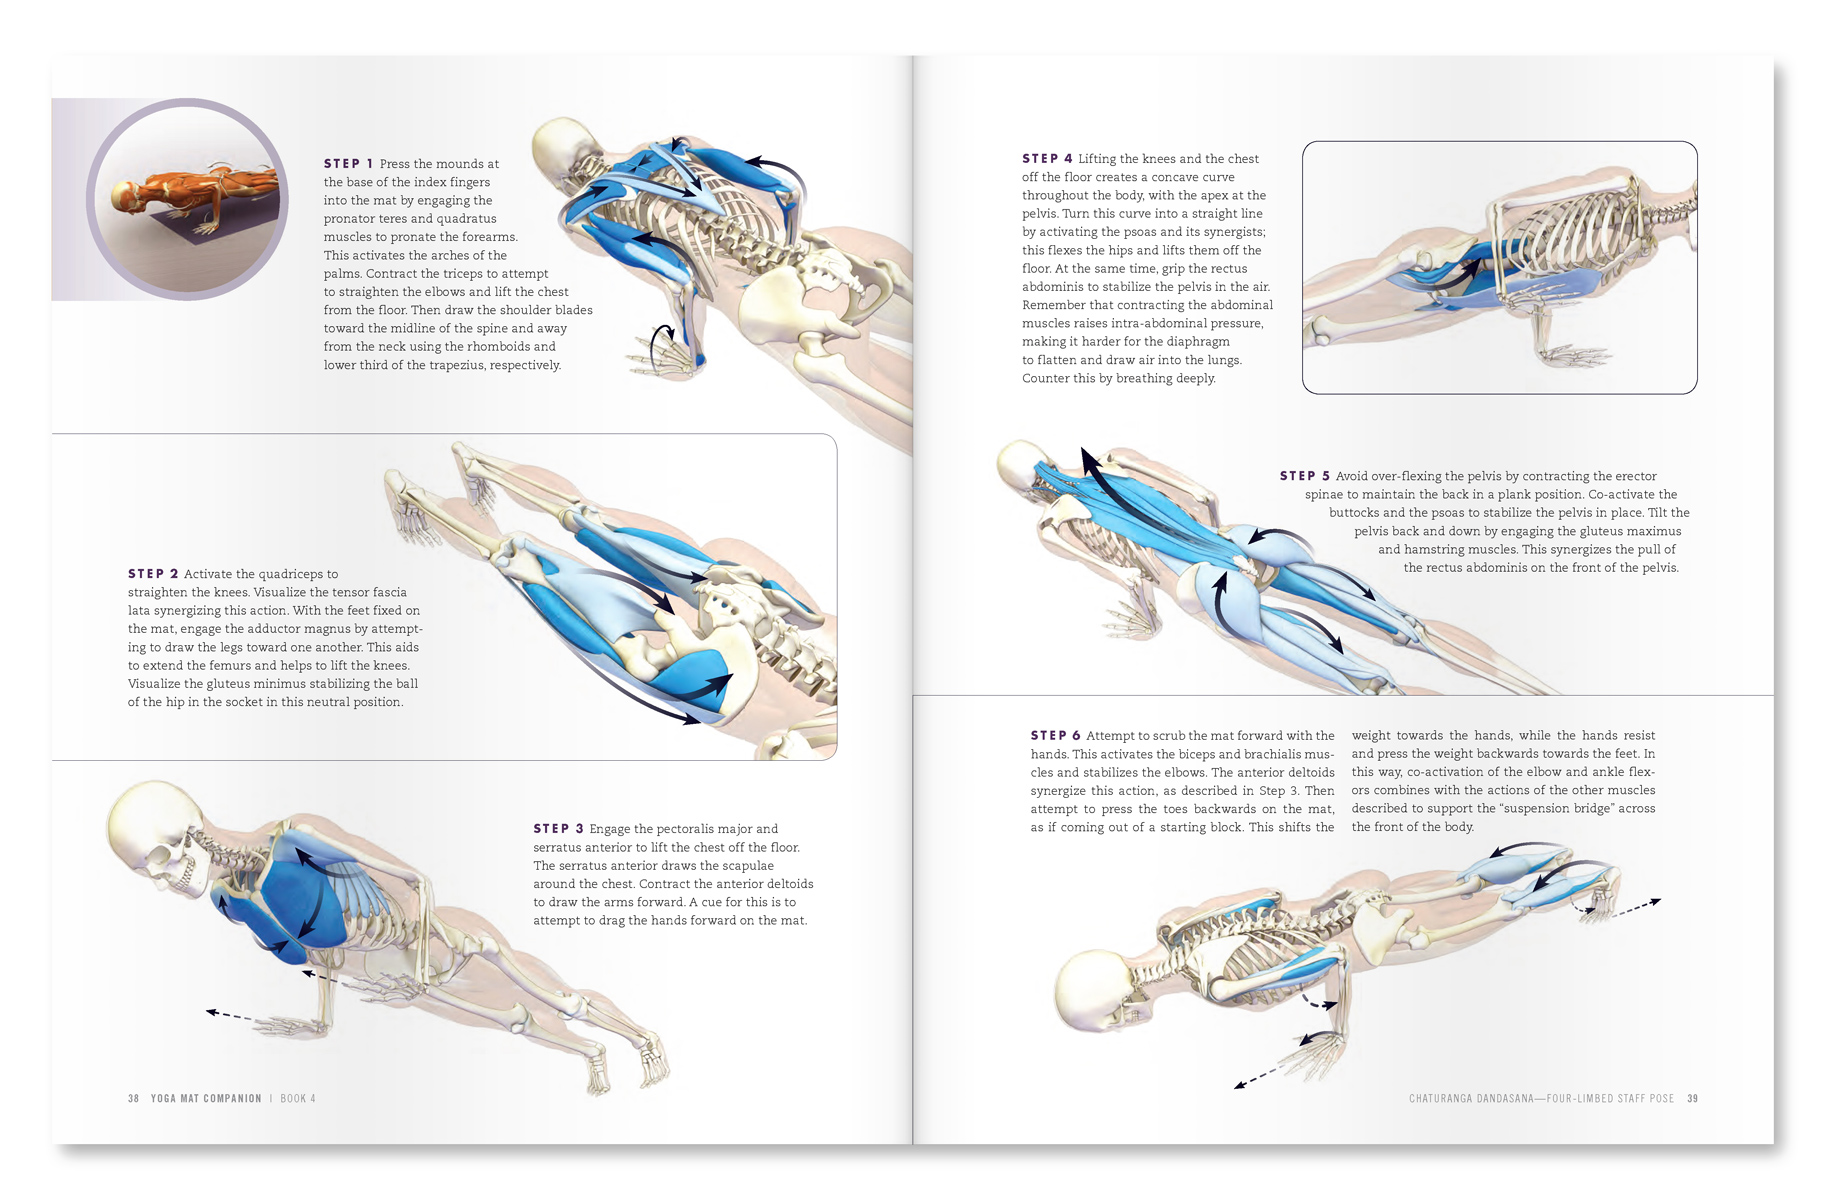
1) Start with forearm plank. Tighten your glutes and abs as you attempt to drag your forearms towards your feet. This is an isometric contraction of the core muscles shown below. At the same time, co-activate the muscles of your rotator cuff by attempting to “windshield wiper” your forearms in while resisting this action in the opposite direction (Figure 2). Hold for 10-30 seconds the come down and rest for 10 seconds. Click here to learn the key cues to activate your pose as well as the muscle subsystems it amplifies…
Figure 2: Forearm plank. Attempt to drag your forearms towards your feet.
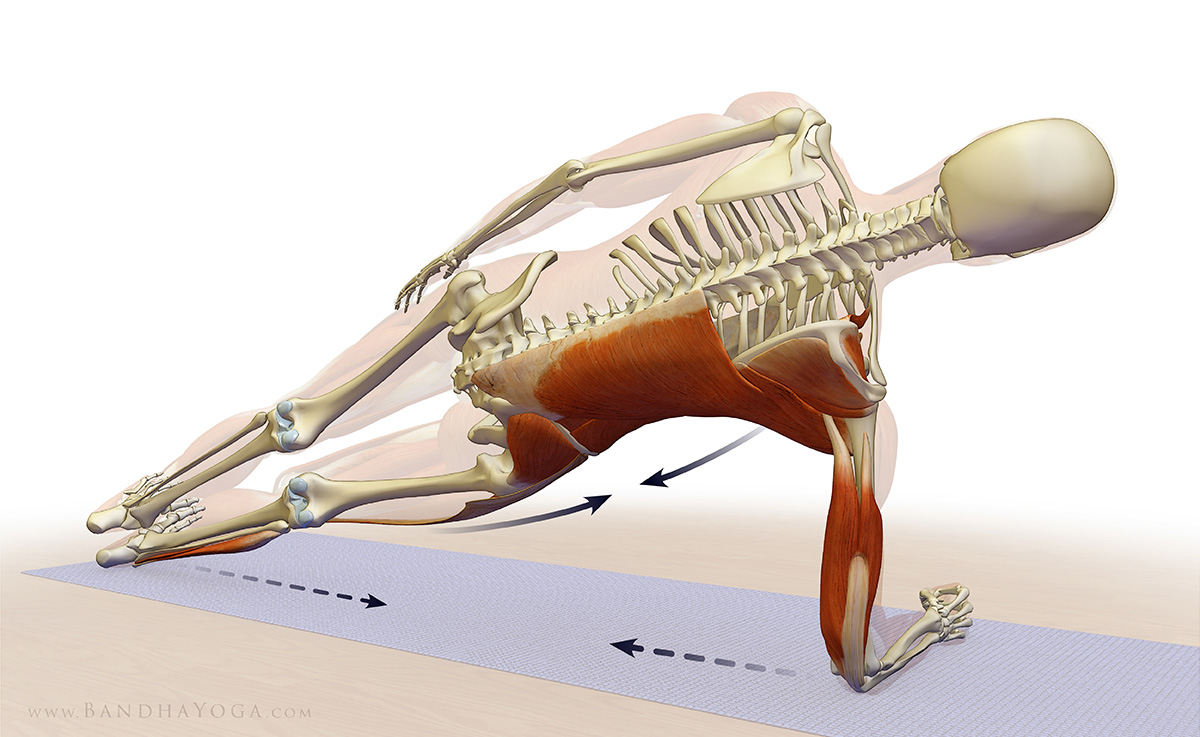
2) Now go to plank pose on your right side. Press the edge of your right foot into the mat and lift your pelvis. Attempt to drag your forearm towards your foot. Co-activate the rotator cuff by attempting to “windshield wiper” your forearm in internal rotation while resisting with external rotation (Figure 3). Hold for 10-30 seconds the come down and rest for 10 seconds. Click here to learn the key cues to activate your pose as well as the muscle subsystems it amplifies…
Figure 3: Side plank. Attempt to drag your forearm toward your foot and your foot toward your forearm.
Figure 5: Engage the muscles on the sides of the lower leg to lift your arch.
4) Next roll over to left side forearm plank. Hold for 10-30 seconds then come down and rest for 10 seconds.
5) Return to forearm plank and repeat the sequence, this time starting with left side plank pose.
Keep your breathing smooth throughout this sequence. Be sure to check out the details in the links above. Start with 10-30 seconds in each pose and build to 1-2 minutes. The adjustments in the links are the keys to integrating the extremities and core. For more cues to help you get the most from your practice, page through the Yoga Mat Companion Series and the Key Muscles and Poses of Yoga.
In this post we take a look at the glute max in backbends and how to avoid splaying out your knees in poses like Urdhva danurasana (Wheel). I give you some cues for sequencing muscle engagement and also address a misconception about contracting your adductor muscles.
For decades now we’ve heard the instruction in yoga, “soften your glutes in backbends” with no valid explanation why. Your hips are extending in backbends, and your gluteus maximus is the prime mover for that action. Why wouldn’t you want to contract the very muscle that creates that movement?
Let's look closer. When you deliberately soften your glutes, then the hip extension comes from the hamstrings, because your hamstrings work as synergists to the gluteus maximus for this action. So, why not just use your hamstrings to extend the hips and avoid getting scolded for using the prime movers (glutes)? Well, if you do that enough, you potentially set up a muscle imbalance that can lead to “synergistic dominance” wherein the hamstrings become the prime mover of this action. In the hip joint, this can result in abnormal kinematics and, ultimately, pain. I’ll go over some other problems with doing backbends without the glutes in Part II of this series.
One side effect of using your gluteus maximus is that it is also a powerful external rotator of the hip. Thus, when you engage your glute max in a backbend, your hips will rotate outward and your knees tend to splay apart.
Do we care if the knees splay out? Well, it depends on your objective in the pose. Recent literature shows that if the femurs are parallel, you fire your entire gluteus maximus, whereas when they are splayed apart, you fire mainly the upper portion (Selkowitz, 2016).
The “solution” that is usually proposed for this is to have folks try to squeeze a block between their knees to “fire those adductors!” In India, this instruction was often accompanied by much shouting at the frustrated person attempting it. There is a reason, however, why this cue works so poorly, despite the yelling. That is because when your hips are extended (in a backbend), the orientation of the adductor muscle fibers makes them become external rotators of the hip and synergize the gluteus maximus in splaying your knees apart. So it’s a bit like hitting the brakes and gas at the same time. Frustrating. Figure 1 illustrates this.
Figure 1: Note the orientation of the fibers of the adductor group and how contracting these muscles leads to splaying out of the knees in backbends.
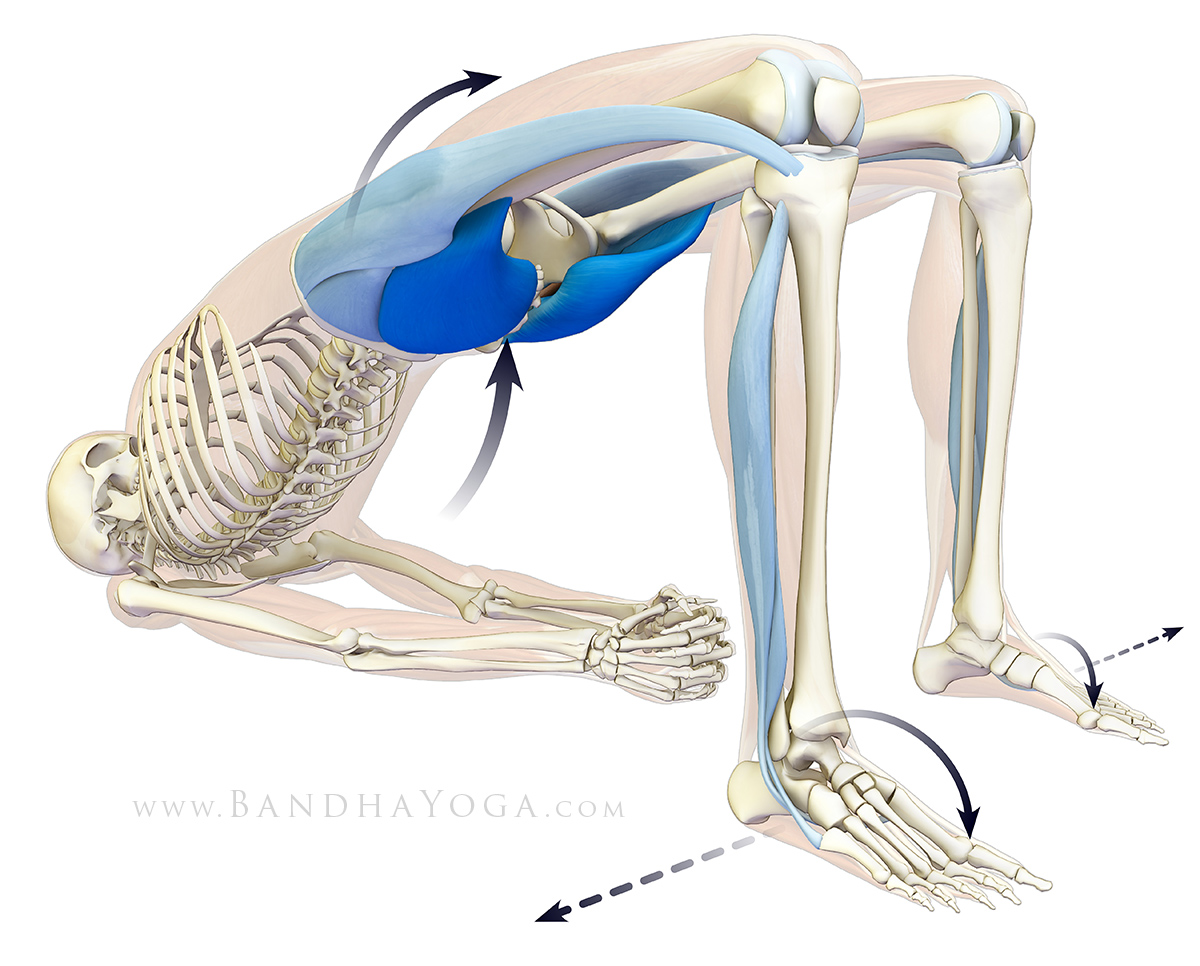
The real counterbalance for the gluteus maximus causing the knees to splay apart is to contract the muscles that internally rotate the hips, namely, the TFL and front part of the gluteus medius.
This cue works well, but it must be implemented in a sequence to function optimally. You have to engage the hip internal rotators before going up into the backbend. It's difficult to engage them once you are up in the pose because when the hips are extending, the TFL and front part of the gluteus medius are at a biomechanical disadvantage for initiating contraction. Thus, you want to first train the cue to engage these muscles with the hips flexed, where it is easy to contract them. Then bring in the glute max to do the backbend. I’ve taught this sequence all over the world and had great feedback. Done properly, the muscles form a “sheath” that lifts the pelvis in a balanced and stable fashion. (Figure 2)
Figure 2: Note how the muscles at the front of the hips internally rotate the thighs to balance external rotation from the gluteus maximus.
Here’s the sequence.
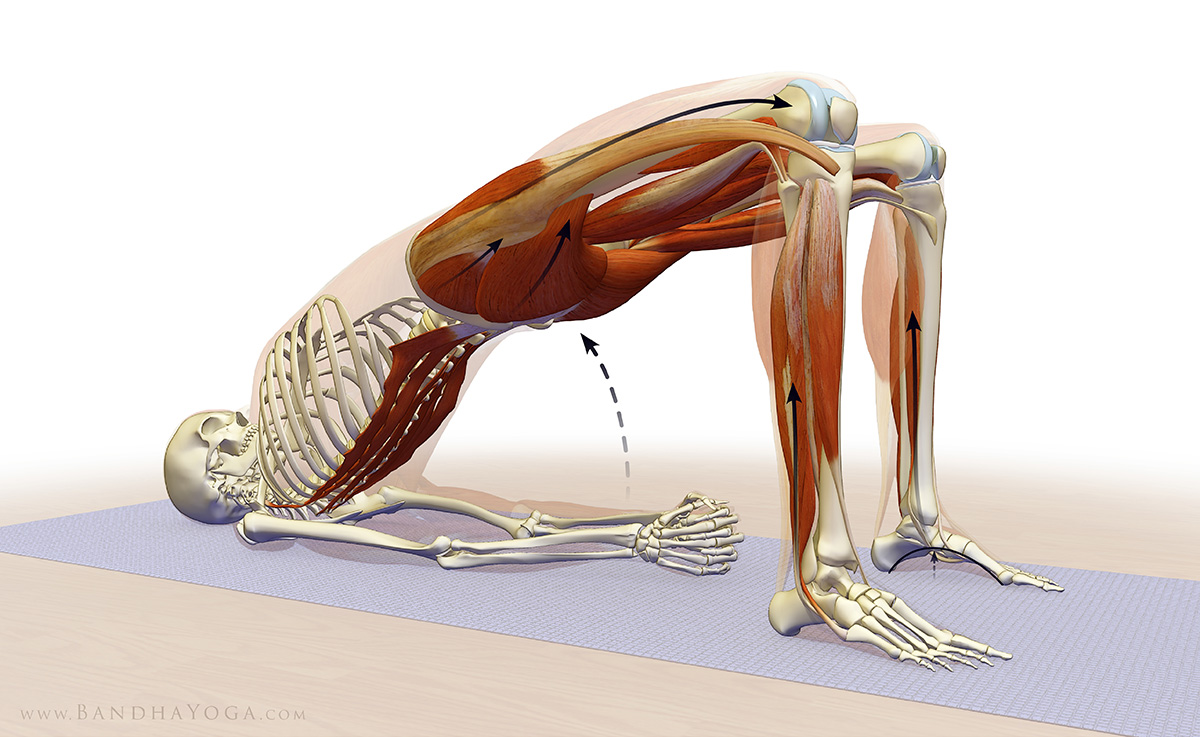
Step 1)
Lie on your back and bend your knees so that your feet are flat on the ground as shown. Place your hands on the front part of the pelvis to feel your internal rotators contract. Now, on exhalation, press the feet down and attempt to scrub them apart while allowing you knees to roll inward. Don’t actually move your feet. You should be able to feel your TFL contract. Release on the inhalation and repeat for about 10 times to train the action. Press your feet down and then attempt to scrub them away from the midline. The feet should remain fixed on your mat, as your knees roll inward and you should feel your muscles contract if you've got it.
Figure 3: Press your feet down and attempt to drag them apart as you allow your knees to roll inward. Place your hands on the front of your hips to feel the TFL and front of the gluteus medius contract with this action.
Step 2)
Follow the instruction from step 1, maintain the cue of pushing away from the midline with your feet and then dial in contraction of the gluteus maximus to lift the pelvis. You will be pushing down and away from the midline to engage your internal rotators and then engaging your glute max to extend the hips. Go up on the exhalation and down on inhalation. Try this about 10 times (2-3 sets). I recommend working with this set of cues for a few days before integrating them into a full back bend. Once you get it, then try the block thing (if you want). You’ll find it works better this way.
(NB: if you experience knee pain in this pose, try pressing down with the heels more--this often helps.)
Figure 4: This illustrates the sheath of muscle surrounding the pelvis and lifting it into the bridge.
I hope you enjoy this post. Use muscle engagement as a barometer to help identify imbalances between the two sides of the body. Then carefully work to balance things. This is one of the benefits of practicing Hatha Yoga using knowledge of anatomy and biomechanics.
Good to see you all again. Check back for Part II in the sequence when I will go over the role of the deep external rotators and discuss synergistic dominance of the hamstrings in more detail. All the Best, Ray Long, MD References:
Want to learn more about anatomy and biomechanics for your practice? Click here to check out the Yoga Mat Companion series! Below are some excerpts from these books.


 Your Rotator Cuff
 Your Piriformis Muscle
 Downward Dog Pose
 Warrior I
 Your Hamstrings
 Your Psoas
 Your Gluteus Medius