“. . . according to the Yoga Sutra (3.1), the term [Bandha] refers to the ‘binding’ of consciousness to a particular object or locus (desha), which is the very essence of concentration.”
Georg Feuerstein


Showing posts sorted by relevance for query shoulder. Sort by date Show all posts

Preventing Yoga Injuries vs Preventing Yoga, Part II: Joint Hypermobility

In this post we discuss labral tears and the condition of joint hypermobility. I also present the case of a specific injury from yoga practice, its biomechanical basis and the steps that can be taken to aid in its prevention.

First, however, let’s look at the concept of association vs causality. Simply put, because some activity is associated with a problem does not mean it caused it. In medicine, when we recognize that an injury is associated with a specific activity we then investigate whether there are factors associated with that activity that could cause the injury. An example would be anterior cruciate ligament (ACL) tears.

A while back, we recognized that ACL tears were approximately five times more common in female athletes compared to males. Thus, investigators sought to identify circumstances that could account for this increased incidence. The risk factor thought to contribute most significantly to the higher rate of ACL ruptures in female athletes related to insufficient neuromuscular control of the knee joint in certain athletes. Accordingly, neuromuscular training regimens were devised that have reduced the incidence of ACL ruptures in this group. This approach to ACL injuries is an example of working with science to decrease the risk of an activity, not the activity itself. With this in mind, let’s look at the potential association of joint hypermobility with yoga injuries.

Joint hypermobility, also known as generalized ligamentous laxity, is a spectrum ranging from mild “loose joints” to systemic pathological conditions such as Ehlers Danlos syndrome (a rare inherited condition that affects the connective tissue throughout the body). “Benign” joint hypermobility, or “double jointedness”, affects between 5% and 15% of the population, with most studies showing this condition to be significantly more common in women vs men. We evaluate the degree of hypermobility using the Beighton criteria, which examines factors such as knee, elbow and thumb hyperextension. Based on these factors, a score is created to quantify whether a person has hypermobility syndrome.

Joint hypermobility affects the capsular and ligamentous stabilizers of the articulations, which are lax. It is associated with an increased incidence of musculoskeletal injuries, including to the labrum of the shoulder and hip joints due to increased translations across the structure. The mainstay of management for ligamentous laxity (hypermobile joints) is physical therapy that is focused on strengthening the muscular stabilizers surrounding a given joint and improving proprioception. Now, let’s look at joint hypermobility in relation to injuries that may be associated with yoga.

Injuries that can be unequivocally directly attributed to practicing yoga, like the one described below, are infrequent (in my clinical experience) simply because yoga practitioners are active people who engage in other pursuits that may also cause injuries (sports, dance etc). Put another way, folks that actually practice yoga are generally not couch potatoes. Further complicating the issue are age related disease processes that can affect the joints whether or not one practices yoga. Nevertheless, we need to watch for associations of injuries with yoga and, where possible, determine their underlying cause, identify subgroups that may be at particular risk, and take steps to minimize those risks. With this in mind, let’s look at a specific injury that was caused during yoga practice, its biomechanical basis and steps that can be taken to aid in prevention.

During the past year I saw one yoga injury that was specifically caused by practicing a pose. This involved an experienced teacher who was demonstrating the “wrong way” to perform Vasisthasana (side plank pose) by having the hand of the supporting arm forward of the shoulder joint instead of directly below the shoulder and at a right angle to the floor. In the process, she experienced a “clunk” in her shoulder, followed by pain. On exam in the clinic, she was found to have joint hypermobility, as quantified by the Beighton criteria. Her MRI demonstrated a tear of the posterior part of the shoulder labrum. Conservative treatment with physical therapy, etc. was not successful in relieving her pain and she required arthroscopic repair of the labrum with tightening of the capsule.

It is worth noting that this teacher had practiced Vasisthasana many times with the hand placed below the shoulder without difficulty. Additionally, on questioning it was clear that she was not actively engaging the muscular stabilizers of the shoulder joint during the demonstration.

Now, let’s look at the mechanism of injury. First, as part of their joint hypermobility, this person had a condition known as “multidirectional shoulder instability”. In patients with this condition, the shoulder capsule and ligaments are lax and thus, do not contribute sufficiently to stability of the joint. As a result, the head of the shoulder can “slide” around on the glenoid (socket) more than usual. This causes increased translational forces across the glenoid labrum. In this particular case, while attempting side plank, she subluxed the head of the humerus over the labrum, tearing it.
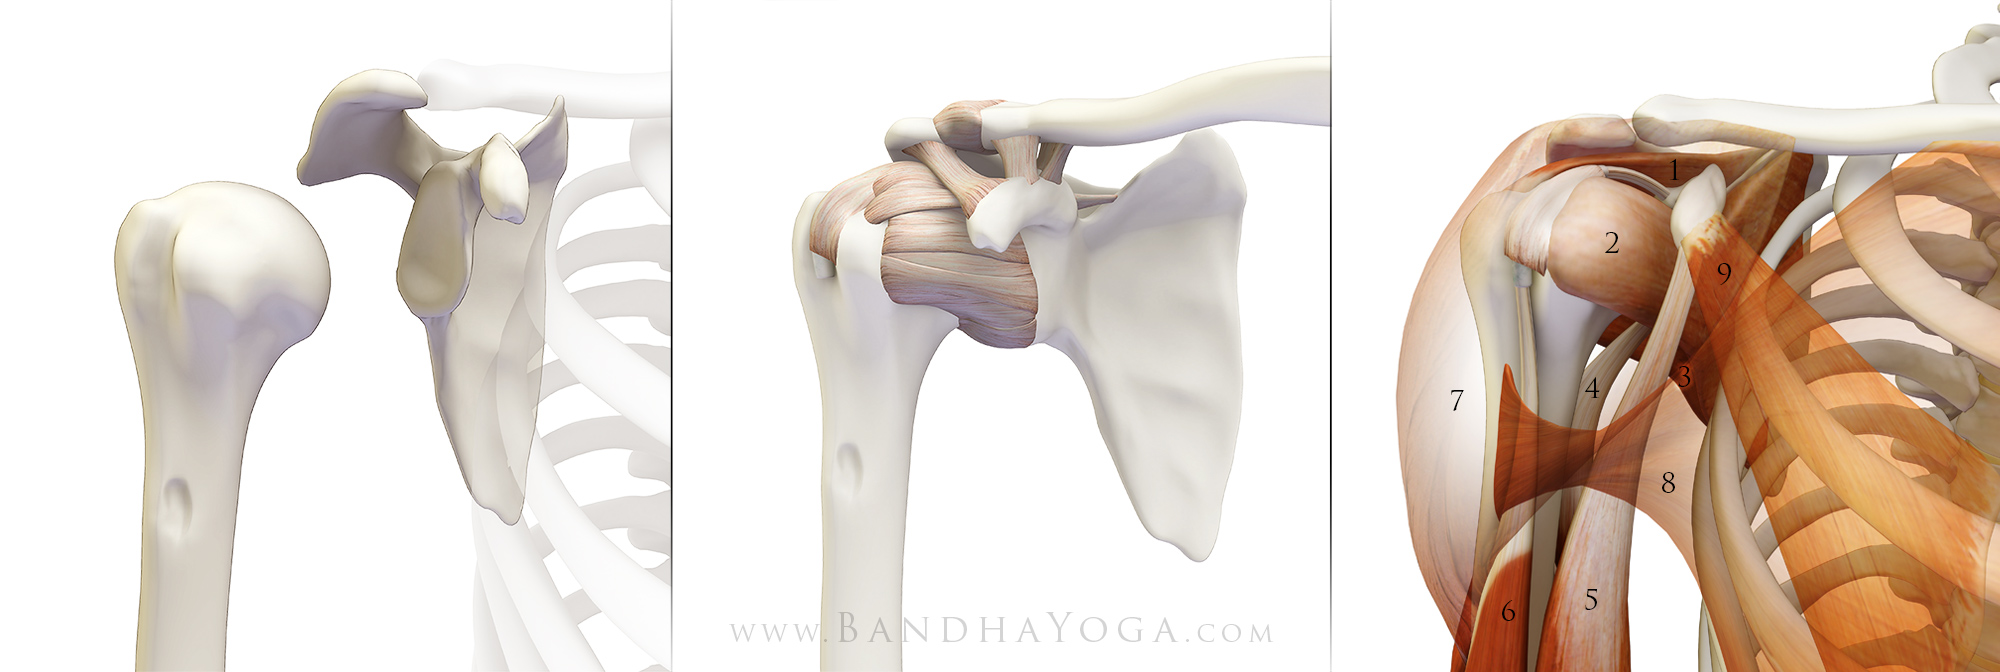

Figure 1: Bone structure of the shoulder; Figure 2: Ligaments and capsule; Figure 3: Muscular stabilizers
1-supraspinatus, 2-subscapularis, 3-infraspinatus, 4-triceps, 5-biceps(short head),
6-biceps(long head), 7-deltoid, 8- pectoralis major, 9-pectoralis minor

The three factors that contribute to mobility and stability of the joint are the bone shape, the capsulo-ligamentous structures and the muscles surrounding the articulation. Figure 1 illustrates the structure of the shoulder joint. Composed of a shallow socket and relatively thin capsular and ligamentous supports, this is the most mobile articulation in the body. The muscular stabilizers, including the rotator cuff play an important role in maintaining the congruency of the shoulder joint. When the capsule and ligaments are loose, then the muscles must compensate. This is why we focus on strengthening the muscles in multidirectional shoulder instability. Figures 1, 2 and 3 illustrate the bone structure, capsulo-ligamentous stabilizers and muscular stabilizers respectively.
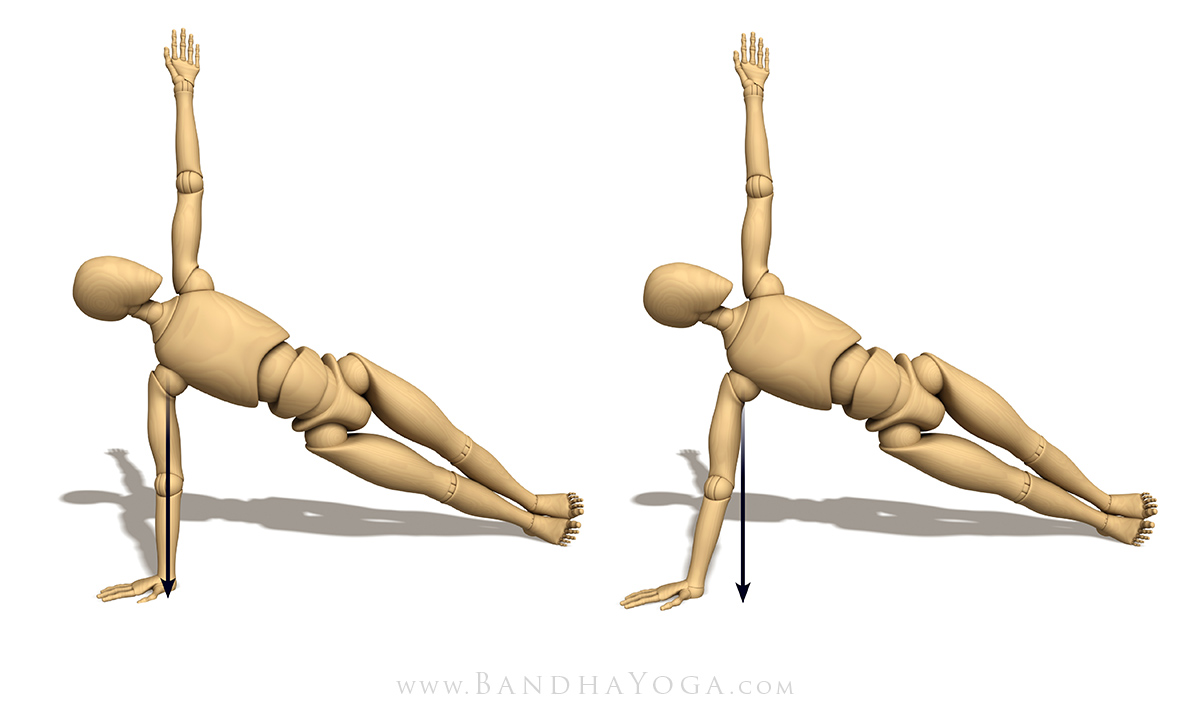
Figure 4: Vasisthasana illustrating the direction of gravity in variations of hand position.

Looking at the factors that caused this teacher to experience a subluxation with the hand forward of the shoulder we can see that, in this position, the body weight is directed at an angle to the alignment of the arm bones. When the hand is placed below the shoulder, the supporting arm is aligned in a position such that the bones are perpendicular to the direction of gravity. Practicing the pose in this way requires less muscular effort because it uses the inherent passive strength of the bones to aid in supporting the body weight. When the hand is placed forward of the shoulder, greater muscular effort is required to maintain the pose (figure 4).

People with joint hypermobility depend to a greater degree on the muscular stabilizers of the joint. Placing the hand so that the arm is angled against gravity means that these muscles must also work to support the body weight that would be borne, in part, by the bones. You can experience this concept yourself by standing near a wall and leaning against it (figure 5). Then, move the feet a bit further from the wall. Which one requires less muscular effort?

Figure 5: Illustrating using bone alignment vs muscular force.

Figures 6 illustrates Vasisthasana with the supporting muscular stabilizers. I go over a step-wise approach to engaging these muscles and the other core stabilizers of the trunk and legs in Yoga Mat Companion Four (arm balances and inversions).
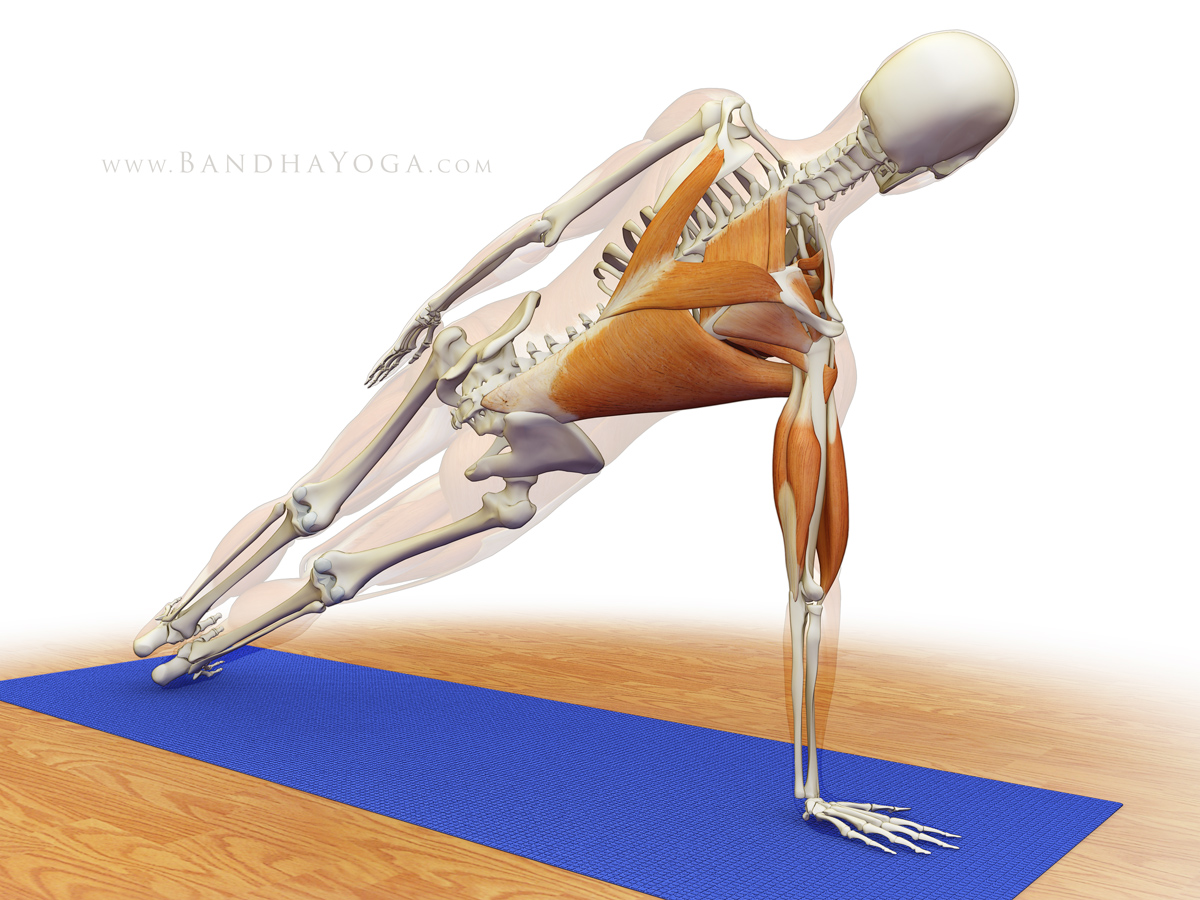
Figure 6: Muscular stabilizers of the shoulder in Vasisthasana.

Labral Tears in the Hip:

In our most recent blog post we discussed the normal structure and function of the hip labrum. Now let’s discuss labral tears. A number of activities have been associated with this injury including soccer, hockey, golf, ballet, gymnastics, and running. Additionally, a number of specific movements have been associated with labral tears. Pregnancy and childbirth have also been associated with acute tears of the labrum. Even shopping has been associated with injuries to this structure ("supermarket hip"). Other causes of labral tears include ligamentous laxity and abnormalities of the bone. Nevertheless, up to 75% of the time, symptomatic labral tears of the hip are not associated with an identifiable event or cause.

Adding to the complexity is the consideration that labral pathology may be related to the aging process, with up to 96% of cadaver specimens having tears. Furthermore, labral tears do not always cause pain; indeed, a prospective blinded study published in the American Journal of Sports Medicine identified labral tears in 69% of the joints studied in volunteers with no history of injury, pain or other symptoms. Even accounting for false positive mri’s, that is a significant number. Hip injuries and arthritis are among the most intensively investigated areas in medicine today, with new studies being published each month. In this regard, please review the linked references below.
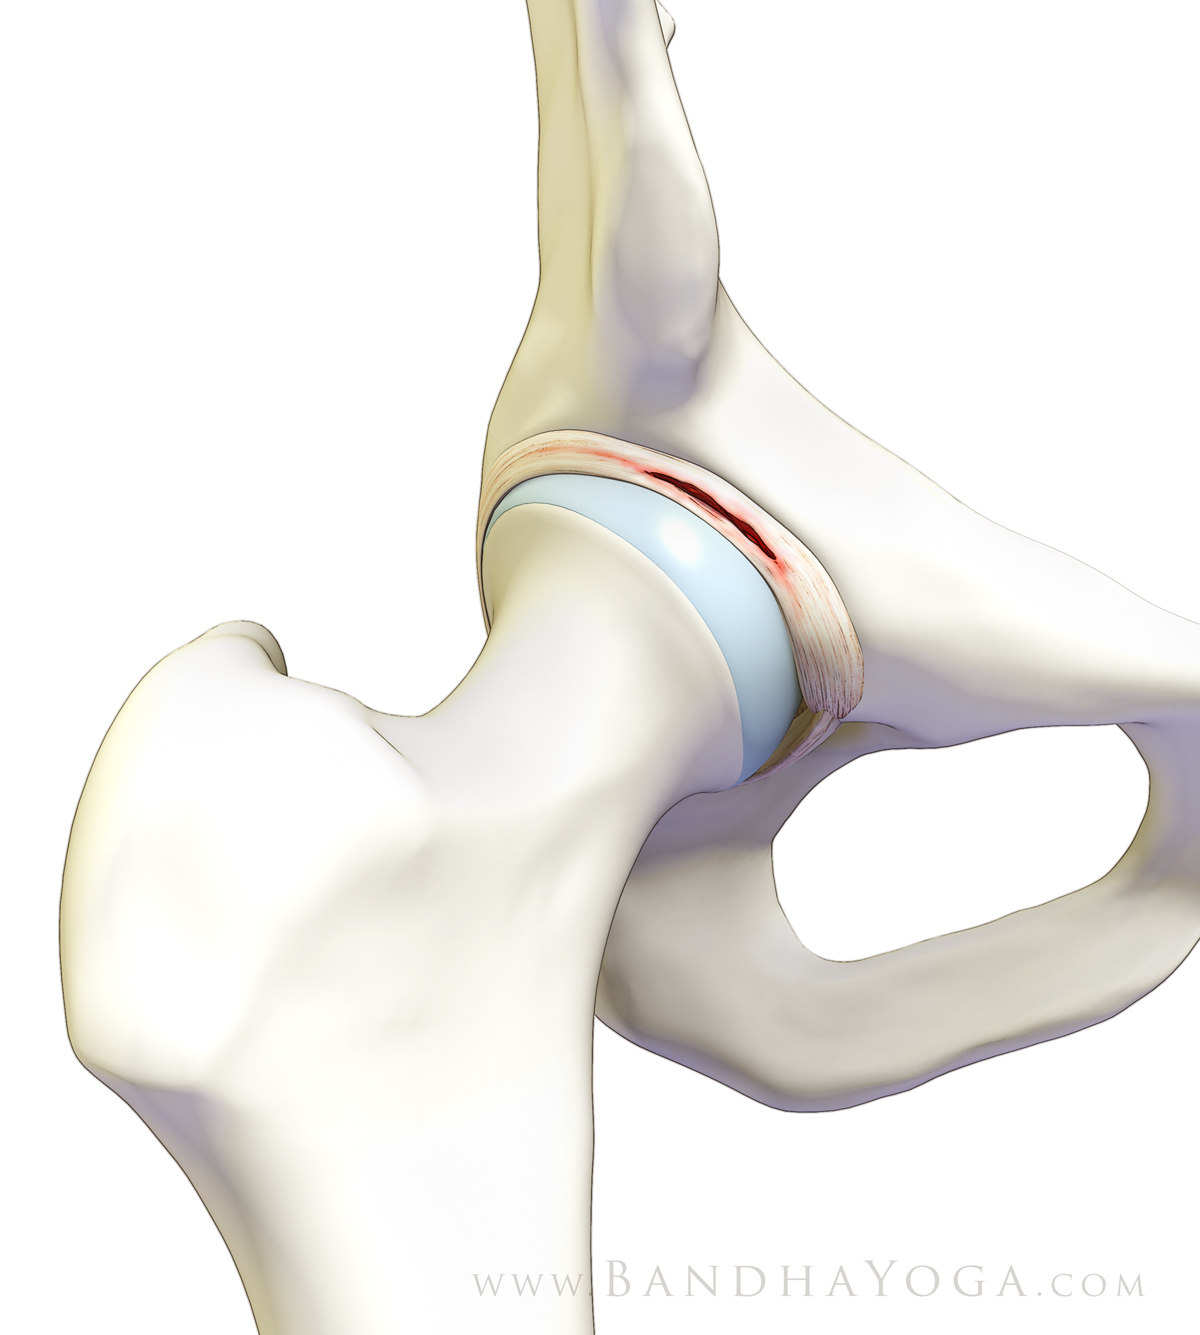
Figure 7: Hip Labral Tear.

One of the known causes of tears of the hip labrum is joint hypermobility. This is also a factor during pregnancy, when hormonal influences cause ligamentous laxity in persons who are not normally hypermobile. Tears of the hip labrum occur in this setting as result of increased translational forces across the labrum from the femoral head. As with hypermobile joints elsewhere in the body, hypermobility in the hips is managed (at least initially) by strengthening the muscular stabilizers that surround the joint. This aids to prevent injuries.

I think this is relevant in light of recent media attention on hip injuries and yoga, particularly since many of those practicing poses that take the hip joints into extreme positions also have hypermobile joints. In my experience, such individuals—who can easily perform extreme movements—often do so without maintaining muscular engagement during extremes of motion. Of particular note is a recent NY Times article that discusses flexibility as a liability for women in yoga. While spending considerable time discussing bone abnormalities (which are more prevalent in men, and were not thought to be a factor in studies on dancers), the NY Times article does not discuss joint hypermobility or the use of muscular stabilization during practice--something that is a cornerstone of injury prevention, especially in persons with high levels of joint mobility. Perhaps a more relevant view of the matter was presented in the Canadian media

Finally, here are a couple of suggestions that I have found to be helpful in my own practice and teaching:

  1. Ease into the end points of poses. Joints adapt to gradual changes much better than abrupt or rapid ones. For example, I deliberately slow down my movement as I near the end point of forward flexion in Uttanasana. This helps to protect the joints and also creates mindfulness in the practice.
  2. Use gentle muscular engagement to stabilize the joints. This is a cornerstone of rehabilitation and injury prevention. Knowledge of the musculoskeletal system and visualization helps in this process.

Note: if you have hip pain or other symptoms (from any activity), be sure to consult a health care professional who is appropriately trained and qualified to diagnose and manage such conditions. Follow their guidelines for your condition.
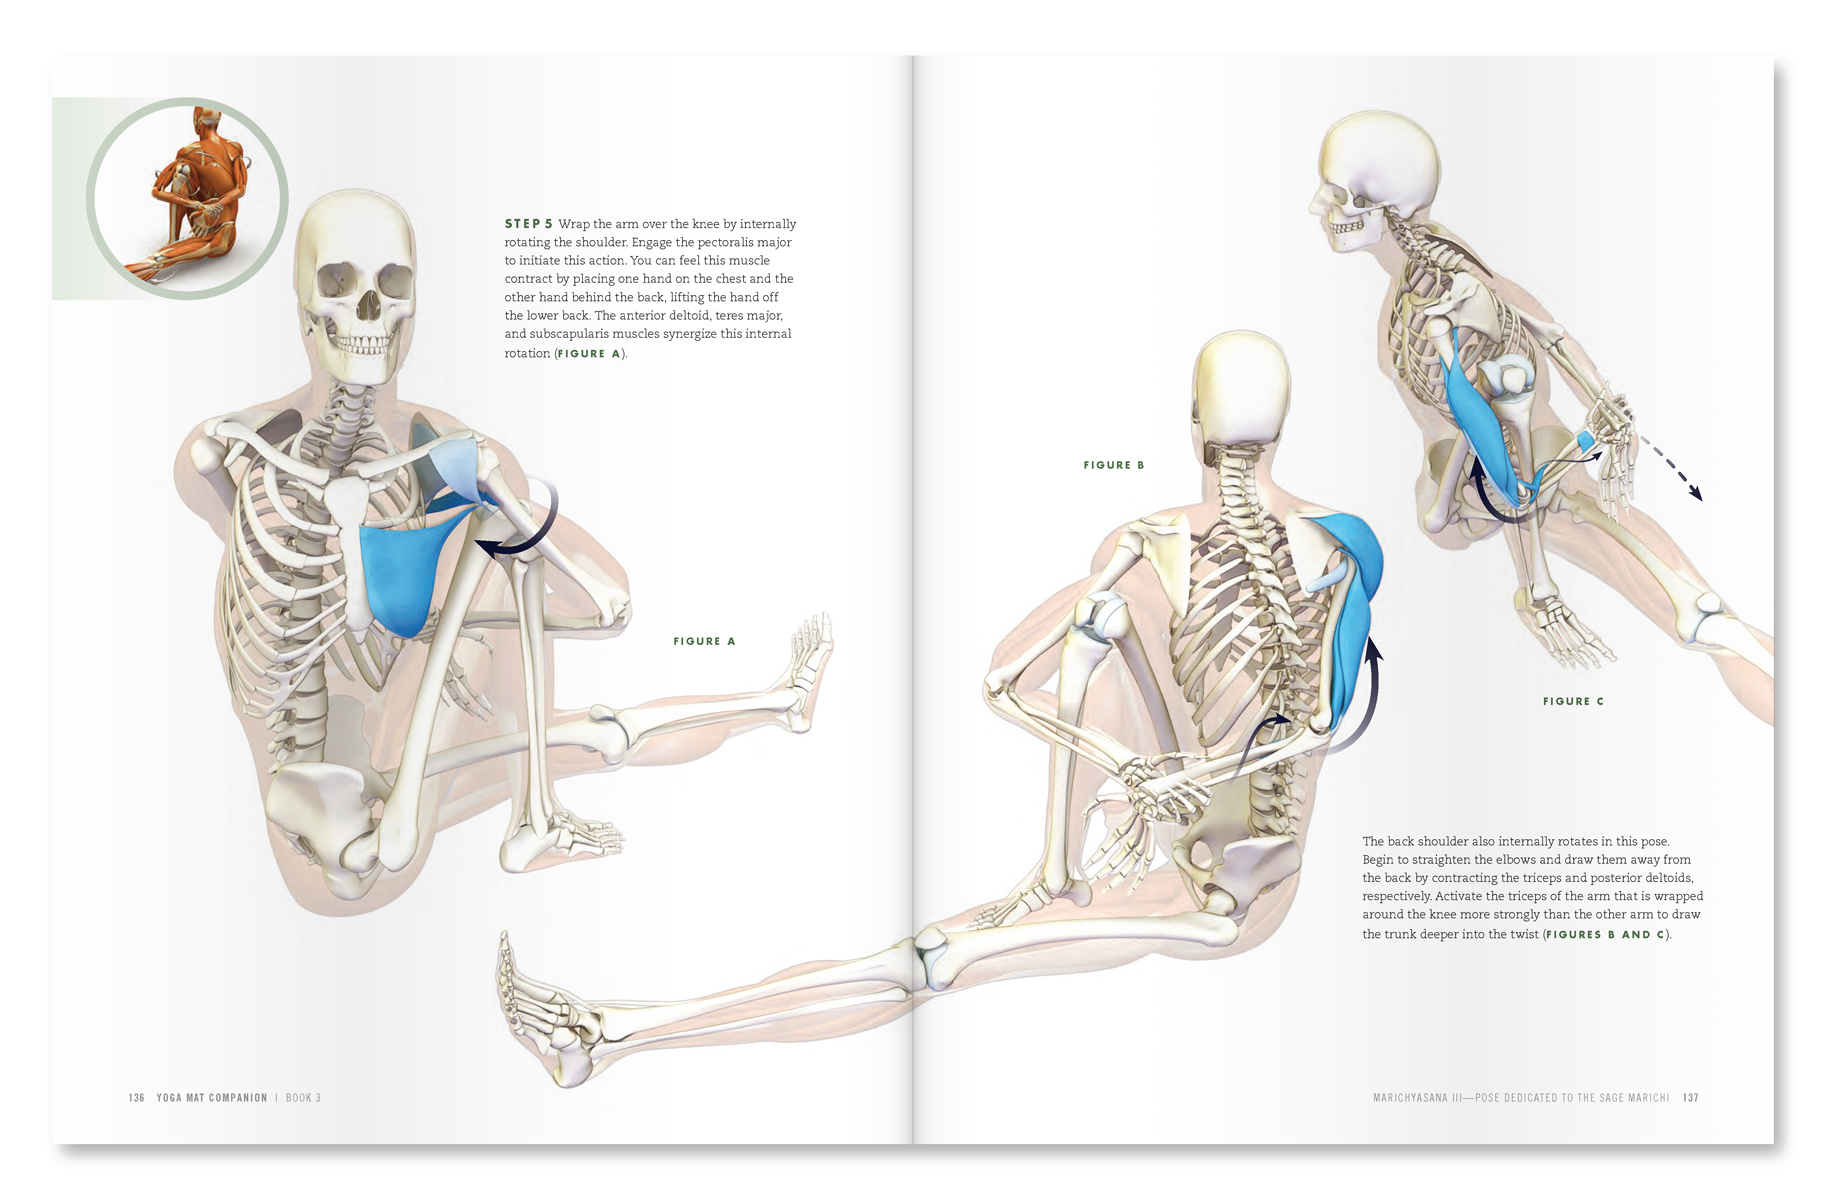
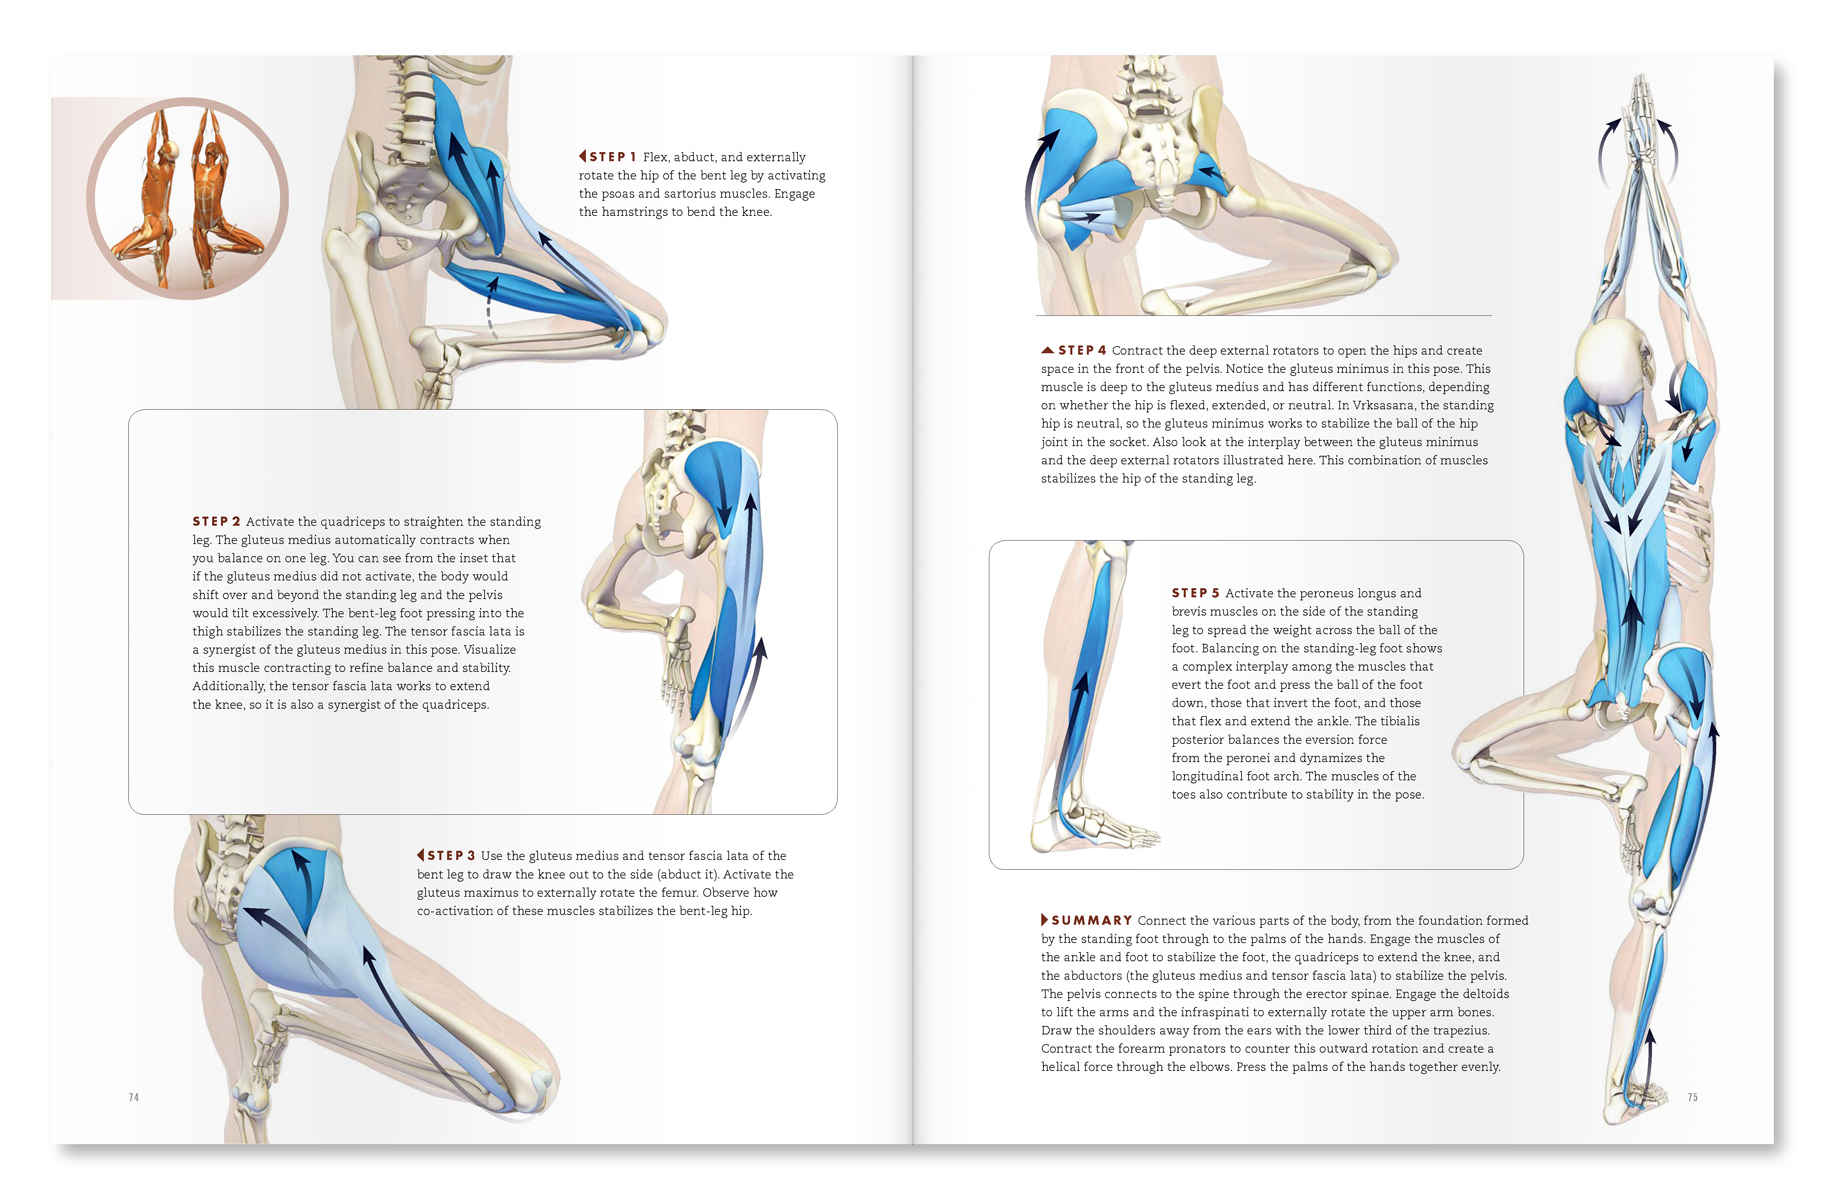
An excerpt from "Yoga Mat Companion 3 - Anatomy for Arm Backbends and Twists".

An excerpt from "Yoga Mat Companion 4 - Anatomy for Arm Balances and Inversions".

To learn more about anatomy, biomechanics and yoga, feel free to page through The Key Muscles and Key Poses of Yoga and the Yoga Mat Companion Series.

All the Best,

Ray Long, MD

References:
  1. Mandelbaum BR, Silvers HJ, Watanabe DS, Knarr JF, Thomas SD, Griffin LY, Kirkendall DT, Garrett W Jr. “Effectiveness of a neuromuscular and proprioceptive training program in preventing anterior cruciate ligament injuries in female athletes: 2-year follow-up.” Am J Sports Med. 2005 Jul;33(7):1003-10.
  2. Wolf JM, Cameron KL, Owens BD. “Impact of joint laxity and hypermobility on the musculoskeletal system.” J Am Acad Orthop Surg. 2011 Aug;19(8):463-71.
  3. Pacey V, Nicholson LL, Adams RD, Munn J, Munns CF. “Generalized joint hypermobility and risk of lower limb joint injury during sport: a systematic review with meta-analysis.Am J Sports Med. 2010 Jul;38(7):1487-97.
  4. Konopinski MD, Jones GJ, Johnson MI. “The effect of hypermobility on the incidence of injuries in elite-level professional soccer players: a cohort study.Am J Sports Med. 2012 Apr;40(4):763-9.
  5. McCormack M, Briggs J, Hakim A, Grahame RJoint laxity and the benign joint hypermobility syndrome in student and professional ballet dancers.J Rheumatol. 2004 Jan;31(1):173-8.
  6. Boykin RE, Anz AW, Bushnell BD, Kocher MS, Stubbs AJ, Philippon MJ. “Hip instability. J Am Acad Orthop Surg. 2011 Jun;19(6):340-9.
  7. Lewis CL, Sahrmann SA. “Acetabular labral tears. Phys Ther. 2006 Jan;86(1):110-21.
  8. Groh MM, Herrera J. “A comprehensive review of hip labral tears. Curr Rev Musculoskelet Med. 2009 Jun;2(2):105-17.
  9. Baker JF, McGuire CM, Mulhall KJ.Acetabular labral tears following pregnancy. Acta Orthop Belg. 2010 Jun;76(3):325-8.
  10. Yamamoto Y, Villar RN, Papavasileiou A. “Supermarket hip: an unusual cause of injury to the hip joint.Arthroscopy. 2008 Apr;24(4):490-3
  11. Register B, Pennock AT, Ho CP, Strickland CD, Lawand A, Philippon MJ. “Prevalence of abnormal hip findings in asymptomatic participants: a prospective, blinded study.Am J Sports Med. 2012 Dec;40(12):2720-4.
  12. Agricola R, Heijboer MP, Roze RH, Reijman M, Bierma-Zeinstra SM, Verhaar JA, Weinans H, Waarsing JH. Pincer deformity does not lead to osteoarthritis of the hip whereas acetabular dysplasia does: acetabular coverage and development of osteoarthritis in a nationwide prospective cohort study (CHECK).Osteoarthritis Cartilage. 2013 Oct;21(10):1514-21.
  13. Leunig M, Jüni P, Werlen S, Limacher A, Nüesch E, Pfirrmann CW, Trelle S, Odermatt A, Hofstetter W, Ganz R, Reichenbach S. “Prevalence of cam and pincer-type deformities on hip MRI in an asymptomatic young Swiss female population: a cross-sectional study.Osteoarthritis Cartilage. 2013 Apr;21(4):544-50.
  14. Agricola R, Heijboer MP, Bierma-Zeinstra SM, Verhaar JA, Weinans H, Waarsing JH. “Cam impingement causes osteoarthritis of the hip: a nationwide prospective cohort study (CHECK).Ann Rheum Dis. 2013 Jun;72(6):918-23.
  15. Charbonnier CKolo FCDuthon VBMagnenat-Thalmann NBecker CDHoffmeyer PMenetrey J. Assessment of congruence and impingement of the hip joint in professional ballet dancers: a motion capture study. Am J Sports Med. 2011 Mar;39(3):557-66.


Shoulder Kinematics in Yoga, Part I

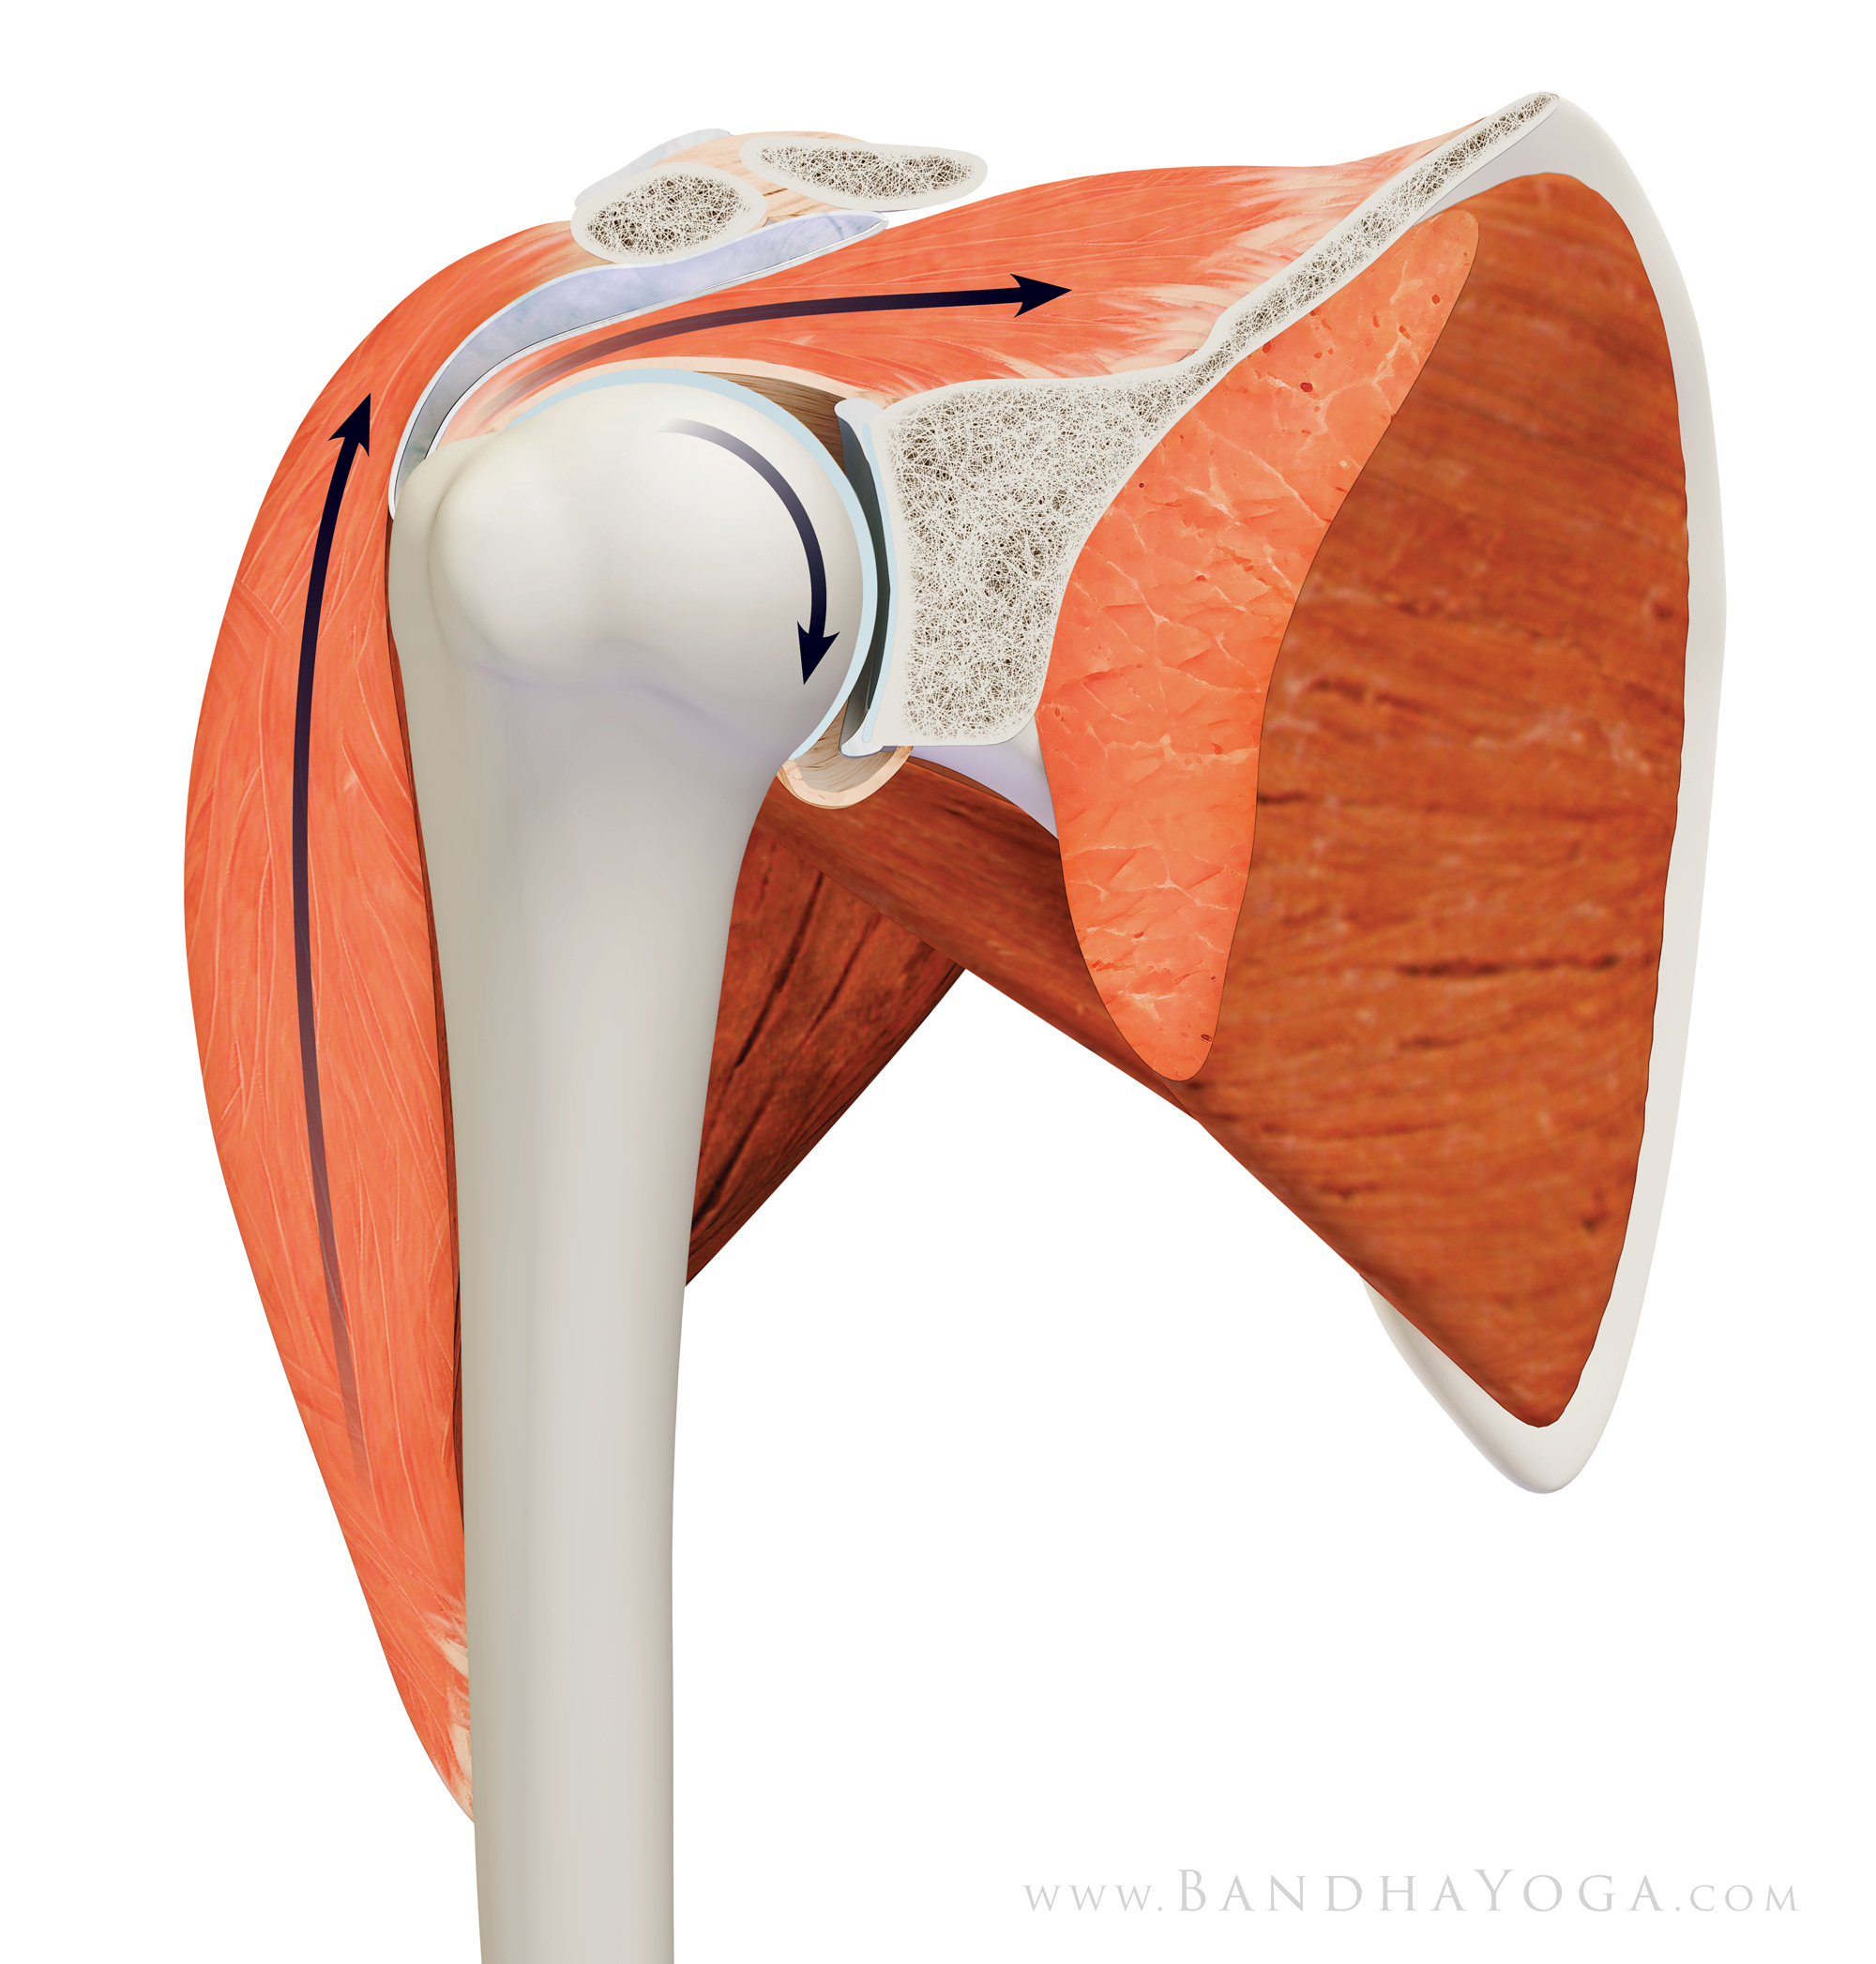
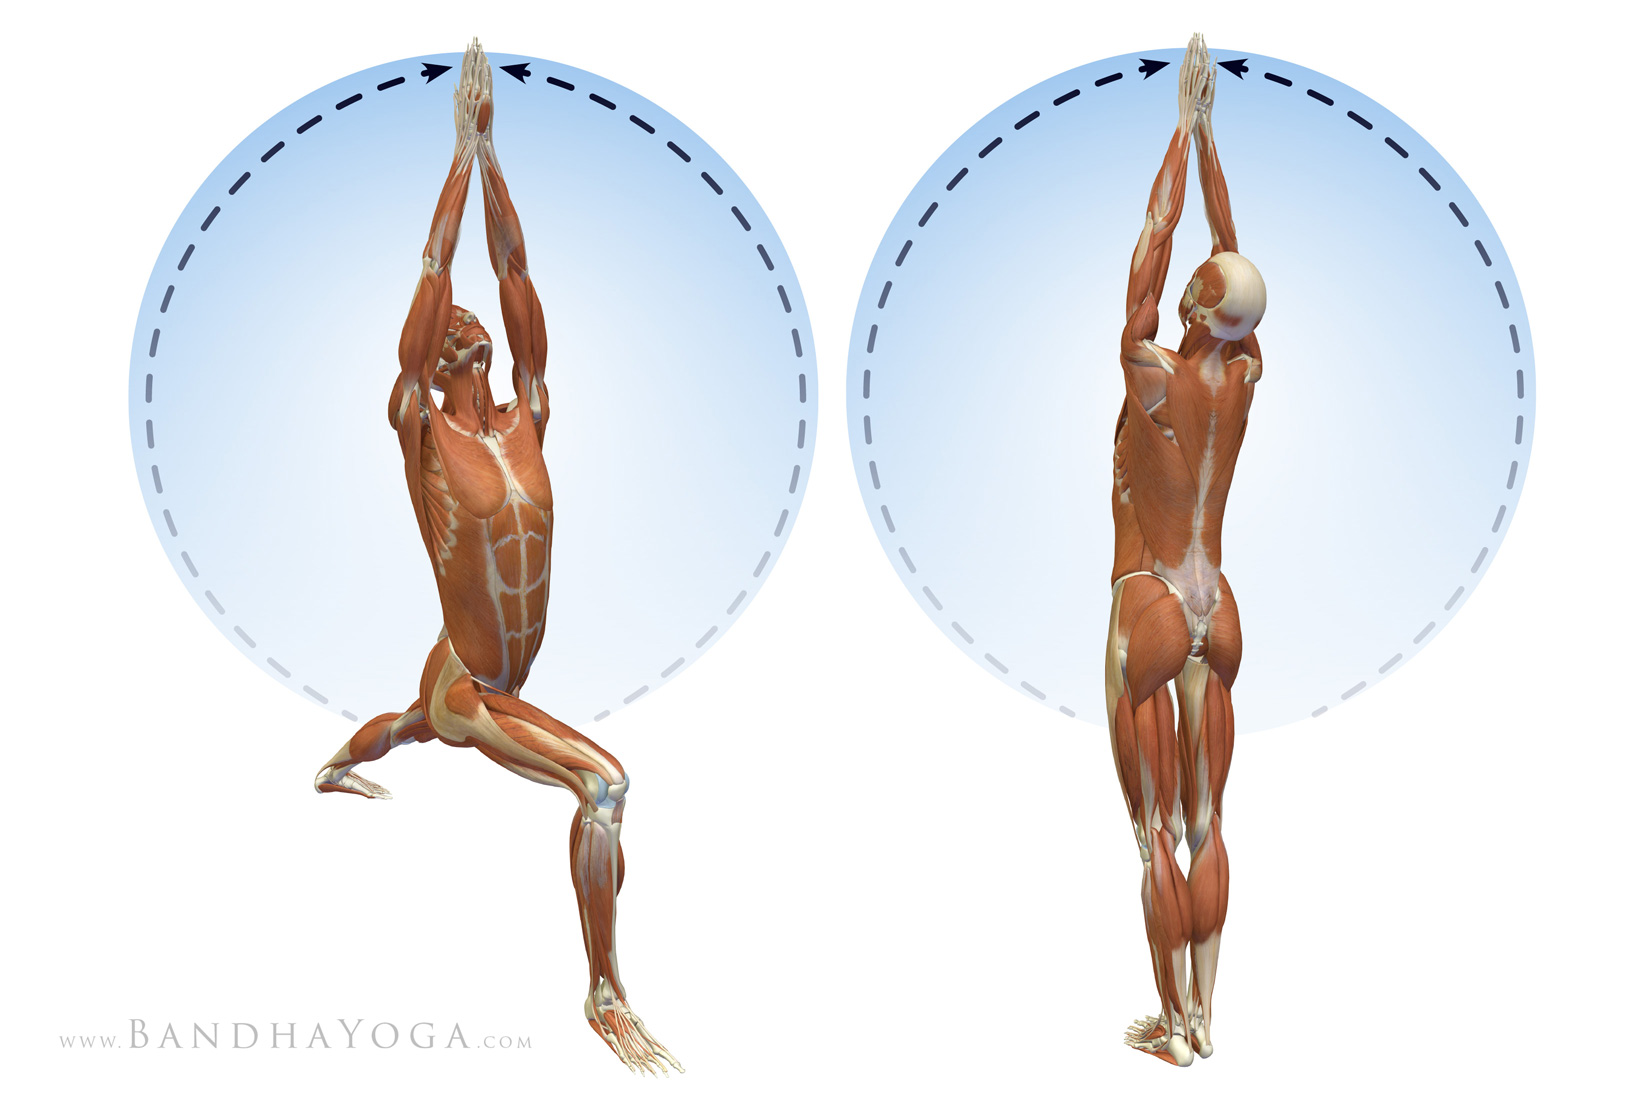
The shoulder is the most mobile joint in the body. It is a combination of several articulations: the glenohumeral, scapulothoracic, sternoclavicular, and acromioclavicular joints. Each of these contributes to shoulder and arm movement via a process known as joint “coupling.” For example, when you raise the arms over the head in Urdhva Hastasana, the clavicle pivots on the sternum (breastbone), the scapula rotates on the chest wall, and the head of the humerus moves within the shoulder joint. All of these work together simultaneously in what is known as scapulohumeral rhythm. In general, 60 degrees of this action comes from movement of the shoulder blade on the chest wall (scapulothoracic motion) and 120 degrees from the ball and socket of the shoulder (glenohumeral motion). During this process, the clavicle rotates on its long axis approximately 25 degrees and the humerus externally rotates about 45 degrees. Scapulohumeral rhythm is illustrated in the video below, with a breakdown of scapulo-thoracic and gleno-humeral contributions to the entire movement.


So we can see that the shoulder is a complex structure, with many factors contributing to movement, or potentially restricting it. It’s easier to understand a complex structure by breaking it down into its component parts and then reconstructing them into the whole. This gives a new understanding of their function. For the shoulder, we’ll begin by focusing on the skeletal anatomy of the glenohumeral joint.

Stabilizing Your Shoulders In Downward Dog

Hi Folks,

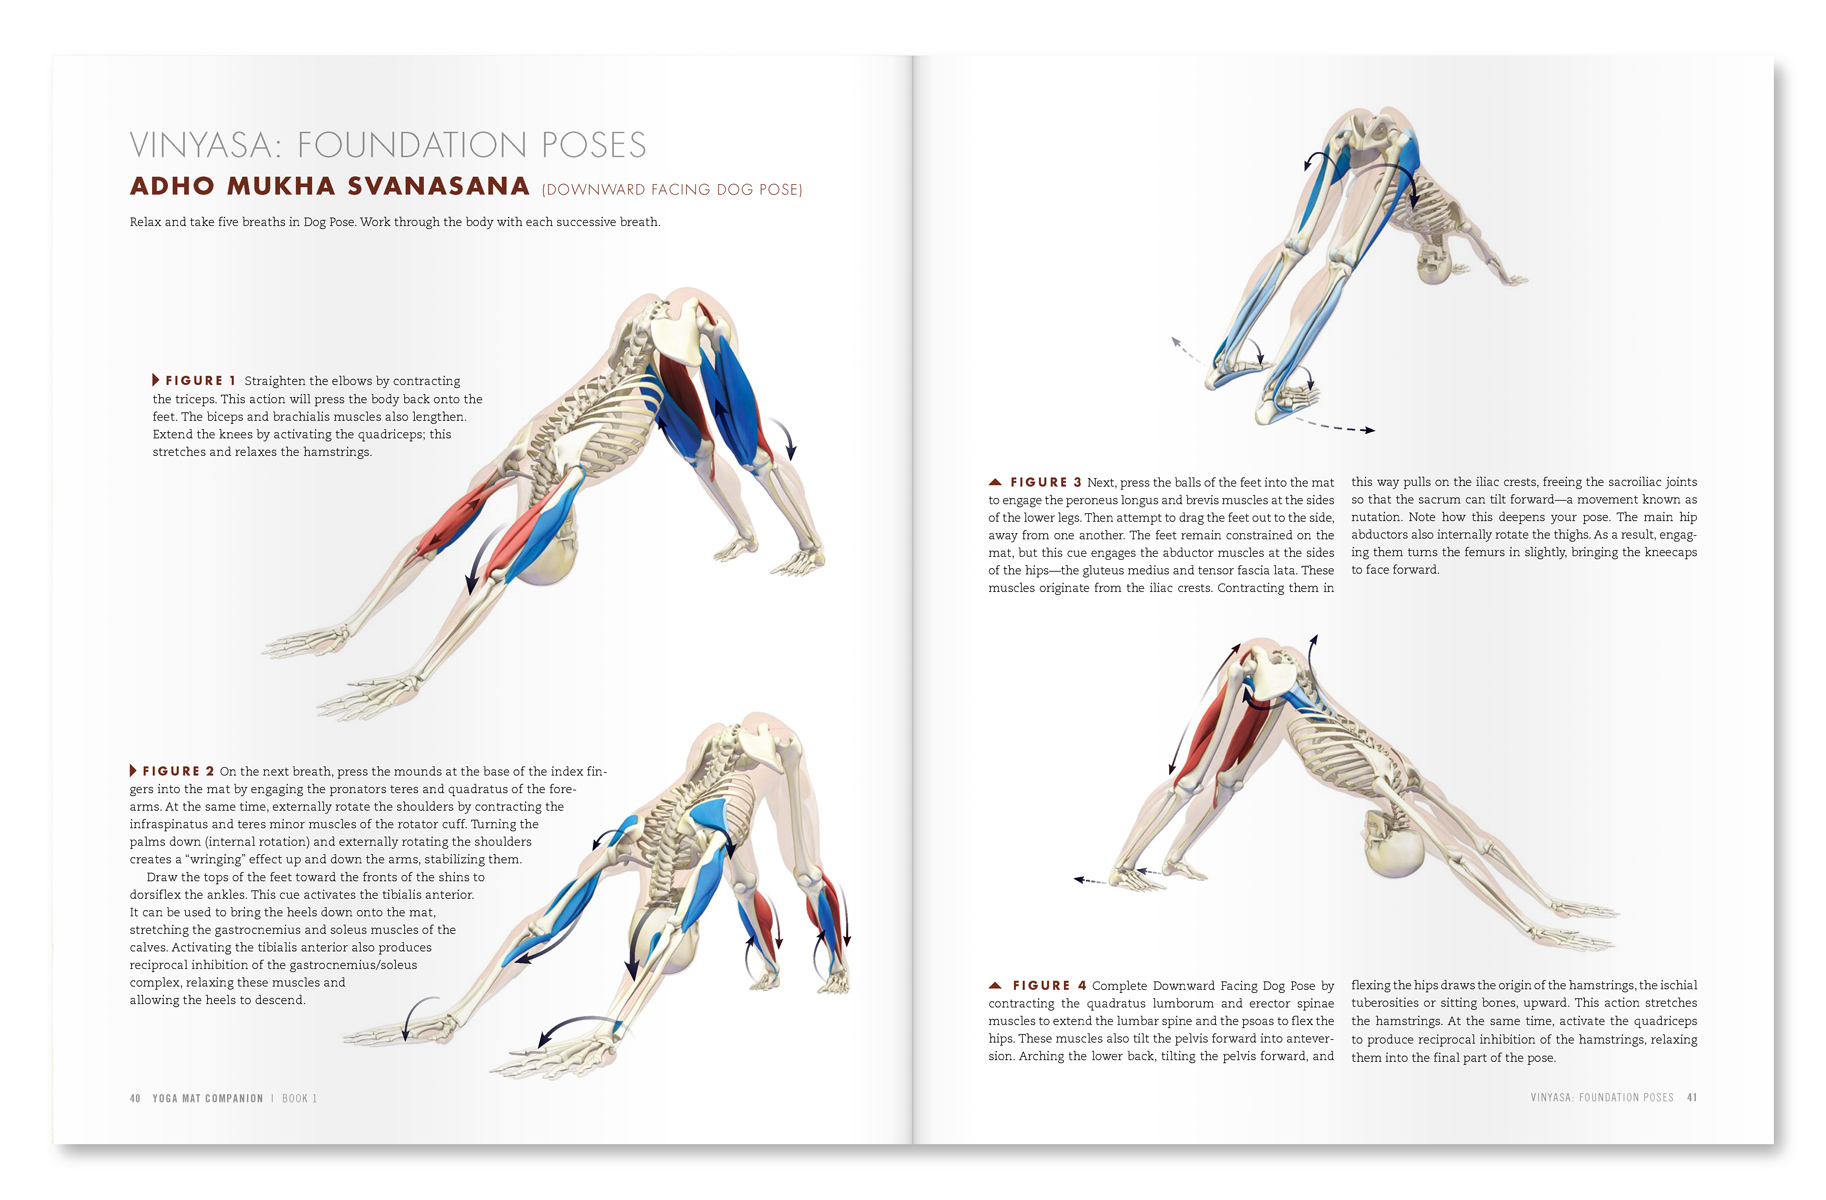
In our last post, we discussed joint rhythm for the shoulders. In this blog post I want to share some of my recent investigations on the biomechanics of the shoulder joint, with some specific tips for Down Dog. Shoulder pain is one of the problems that comes up in yoga, especially with folks who are doing Vinyasa based practice. The underlying cause of the pain can be multifactorial, but it is frequently related to impingement of the rotator cuff and subsequent inflammation of the cuff tendon (specifically the supraspinatus muscle). Inflammation of the tendon, in turn, affects function of the shoulder. Weakness or instability in the shoulder can then lead to abnormal pressures at the wrist, causing pain there as well. Thus, stabilizing the shoulders has beneficial effects beyond the shoulders. is a complex process involving strengthening the core and then linking the strong core to the shoulders.

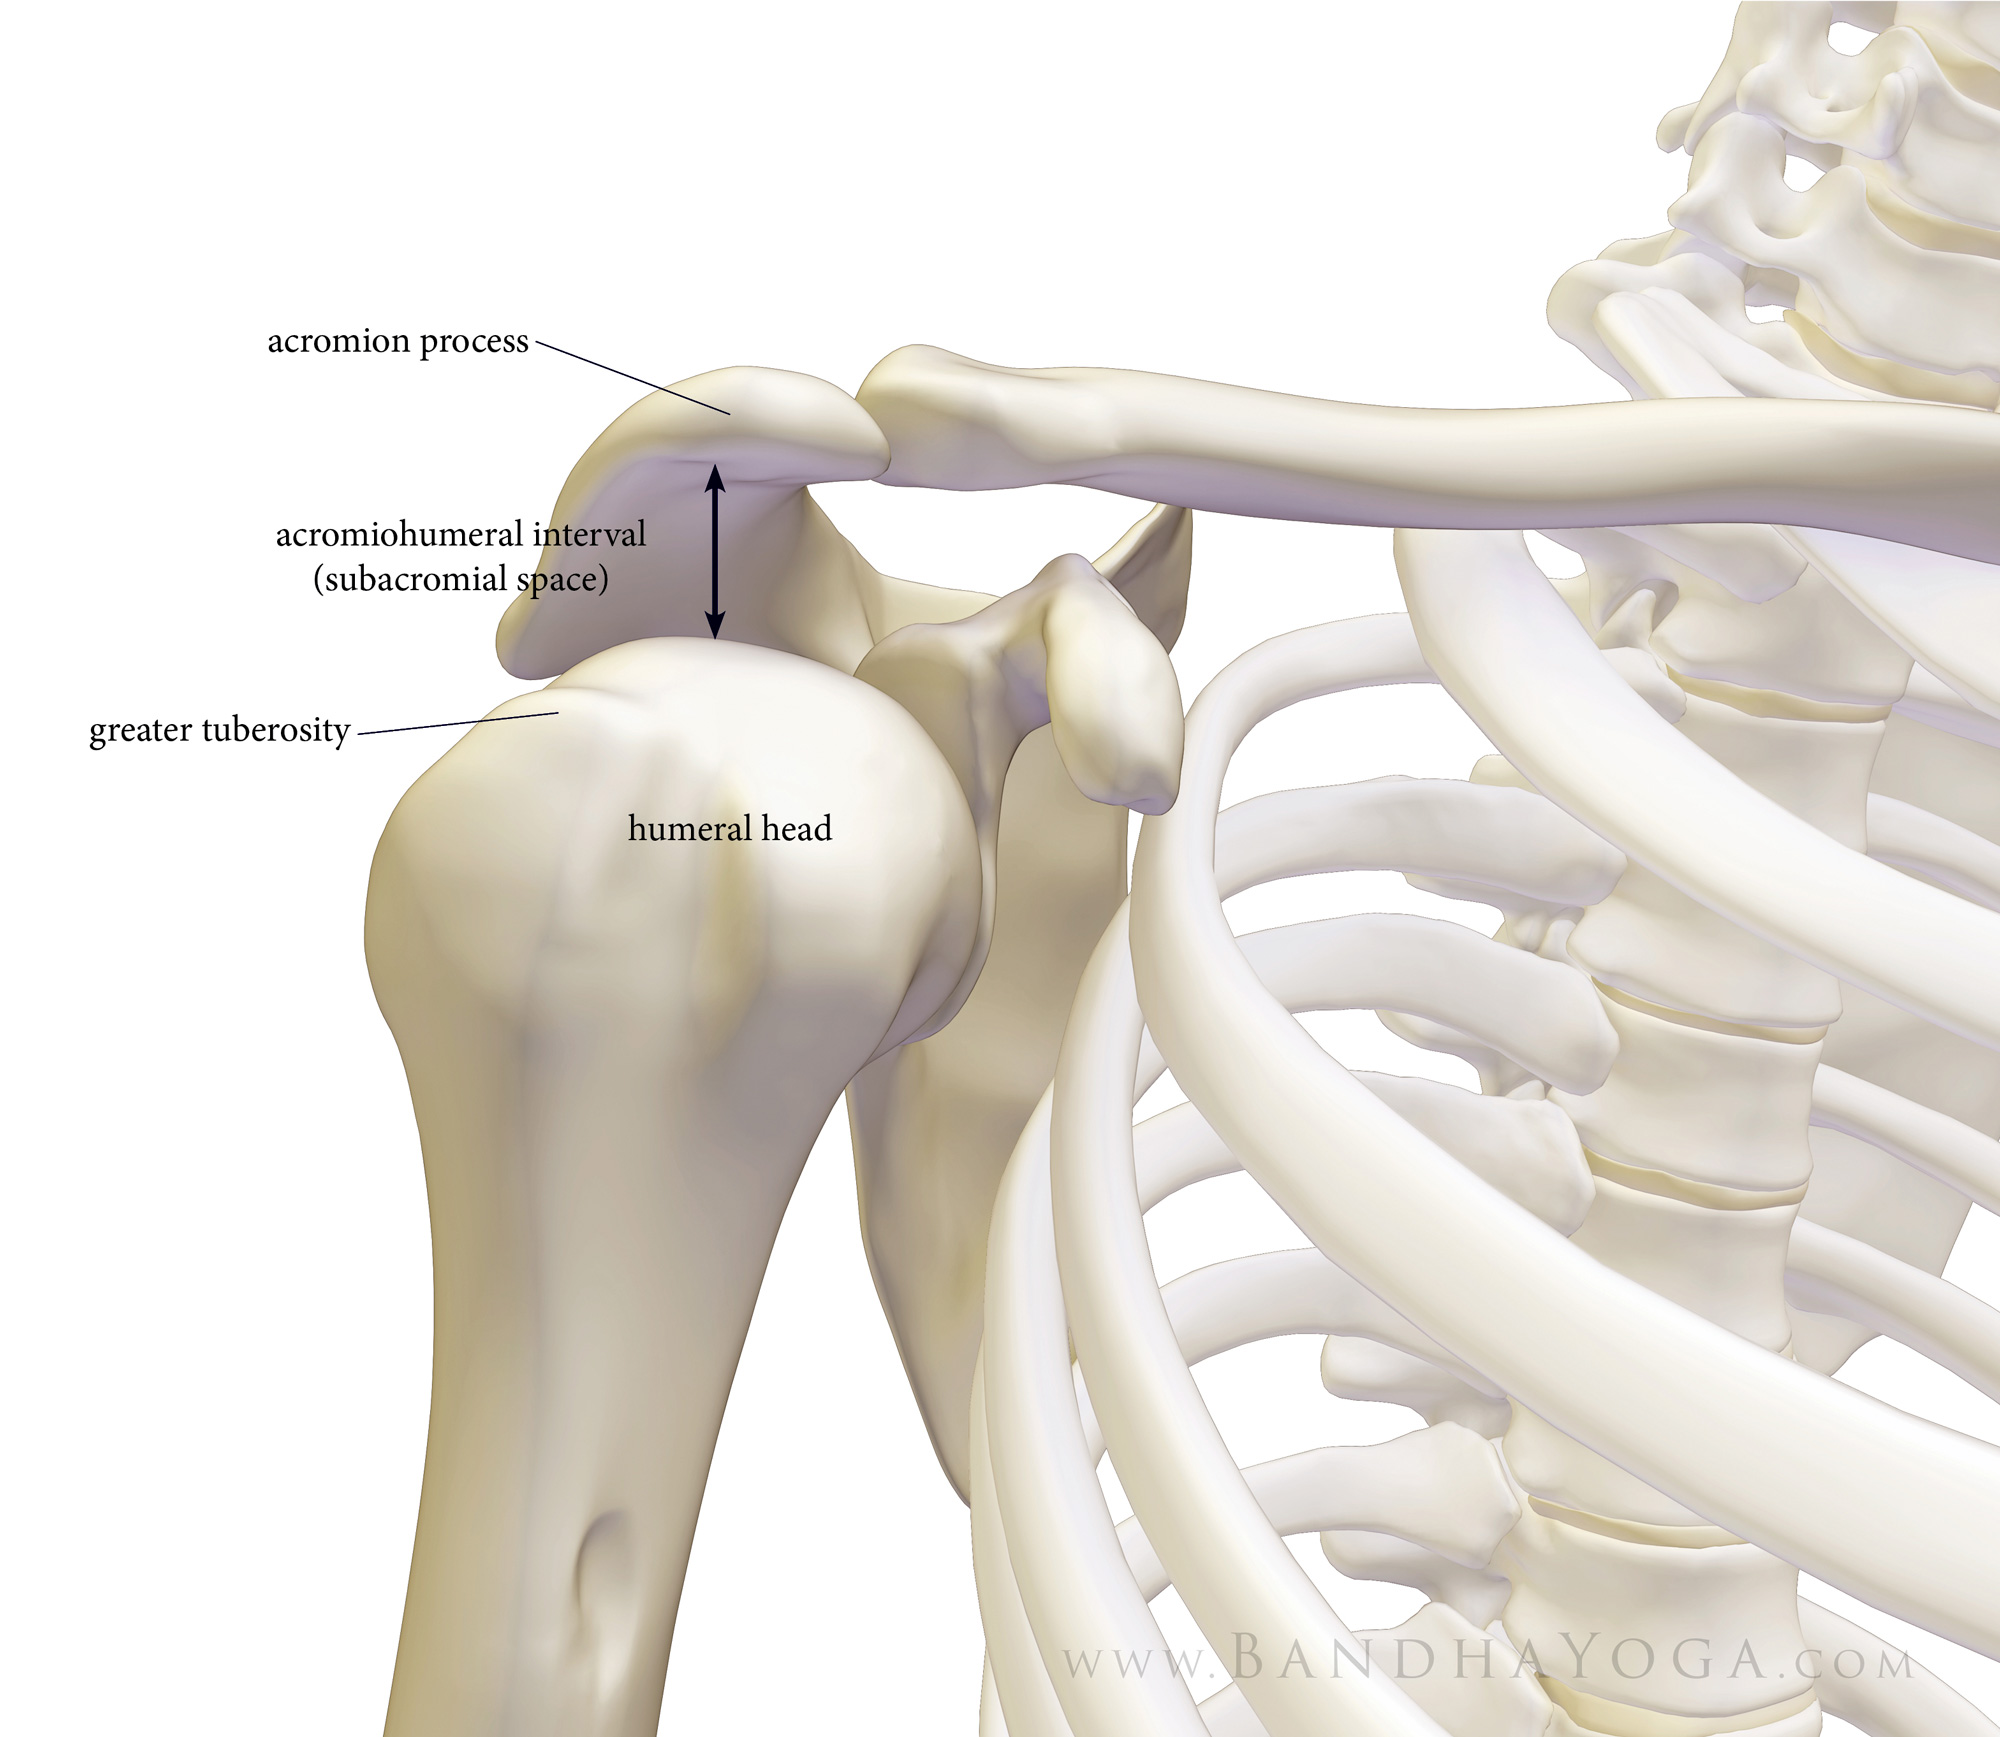
With this in mind, let’s look at one of the key factors in shoulder impingement, namely, the acromio-humeral interval. This refers to the distance between the undersurface of the acromion and the humeral head, as measured using radiology intruments (x-ray, ultrasound, mri). The acromion is a shelf of bone on the scapula, above the spine (seen in Figure 1). It serves as the attachment for the deltoid muscle. The humeral head articulates with the shoulder joint and serves as the attachment for the muscles of the rotator cuff (on the greater and lesser tuberosities). Factors that decrease the space between the acromion and humeral head can lead to inflammation of the cuff tendon due to compression between the two bones.

Figure 1: The acromio-humeral interval. 

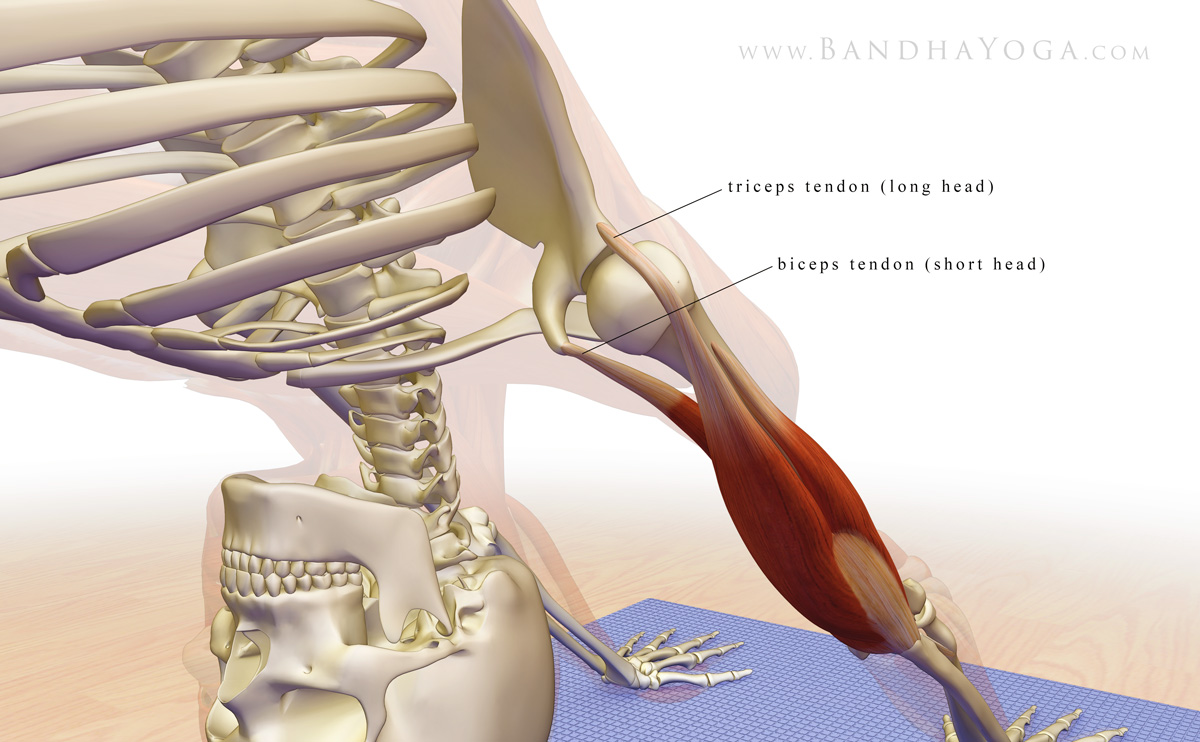
Research has shown that contracting the main adductor muscles of the shoulder serves to increase the acromio-humeral distance. These include the pectoralis major and latissimus dorsi. Co-contracting the biceps and triceps muscles when the arms are overhead can also draw the humerus away from the glenoid, as shown in Figure 2. Finally, externally rotating the shoulder humerus moves the vulnerable area of the supraspinatus tendon away from the area where it would impinge on the acromion (click here to learn more).

Figure 2: The long head of the triceps and short head of the biceps in relation to the gleno-humeral joint with the arms overhead.

Here’s the cue…

Warm up first a bit. Then, take Downward Dog pose. I use three steps for the shoulders. Go slowly and use gentle engagements.

  1. Contract the triceps to straighten your elbows. Then, press the mound at the base of your index fingers into your mat to engage the forearm pronator muscles.
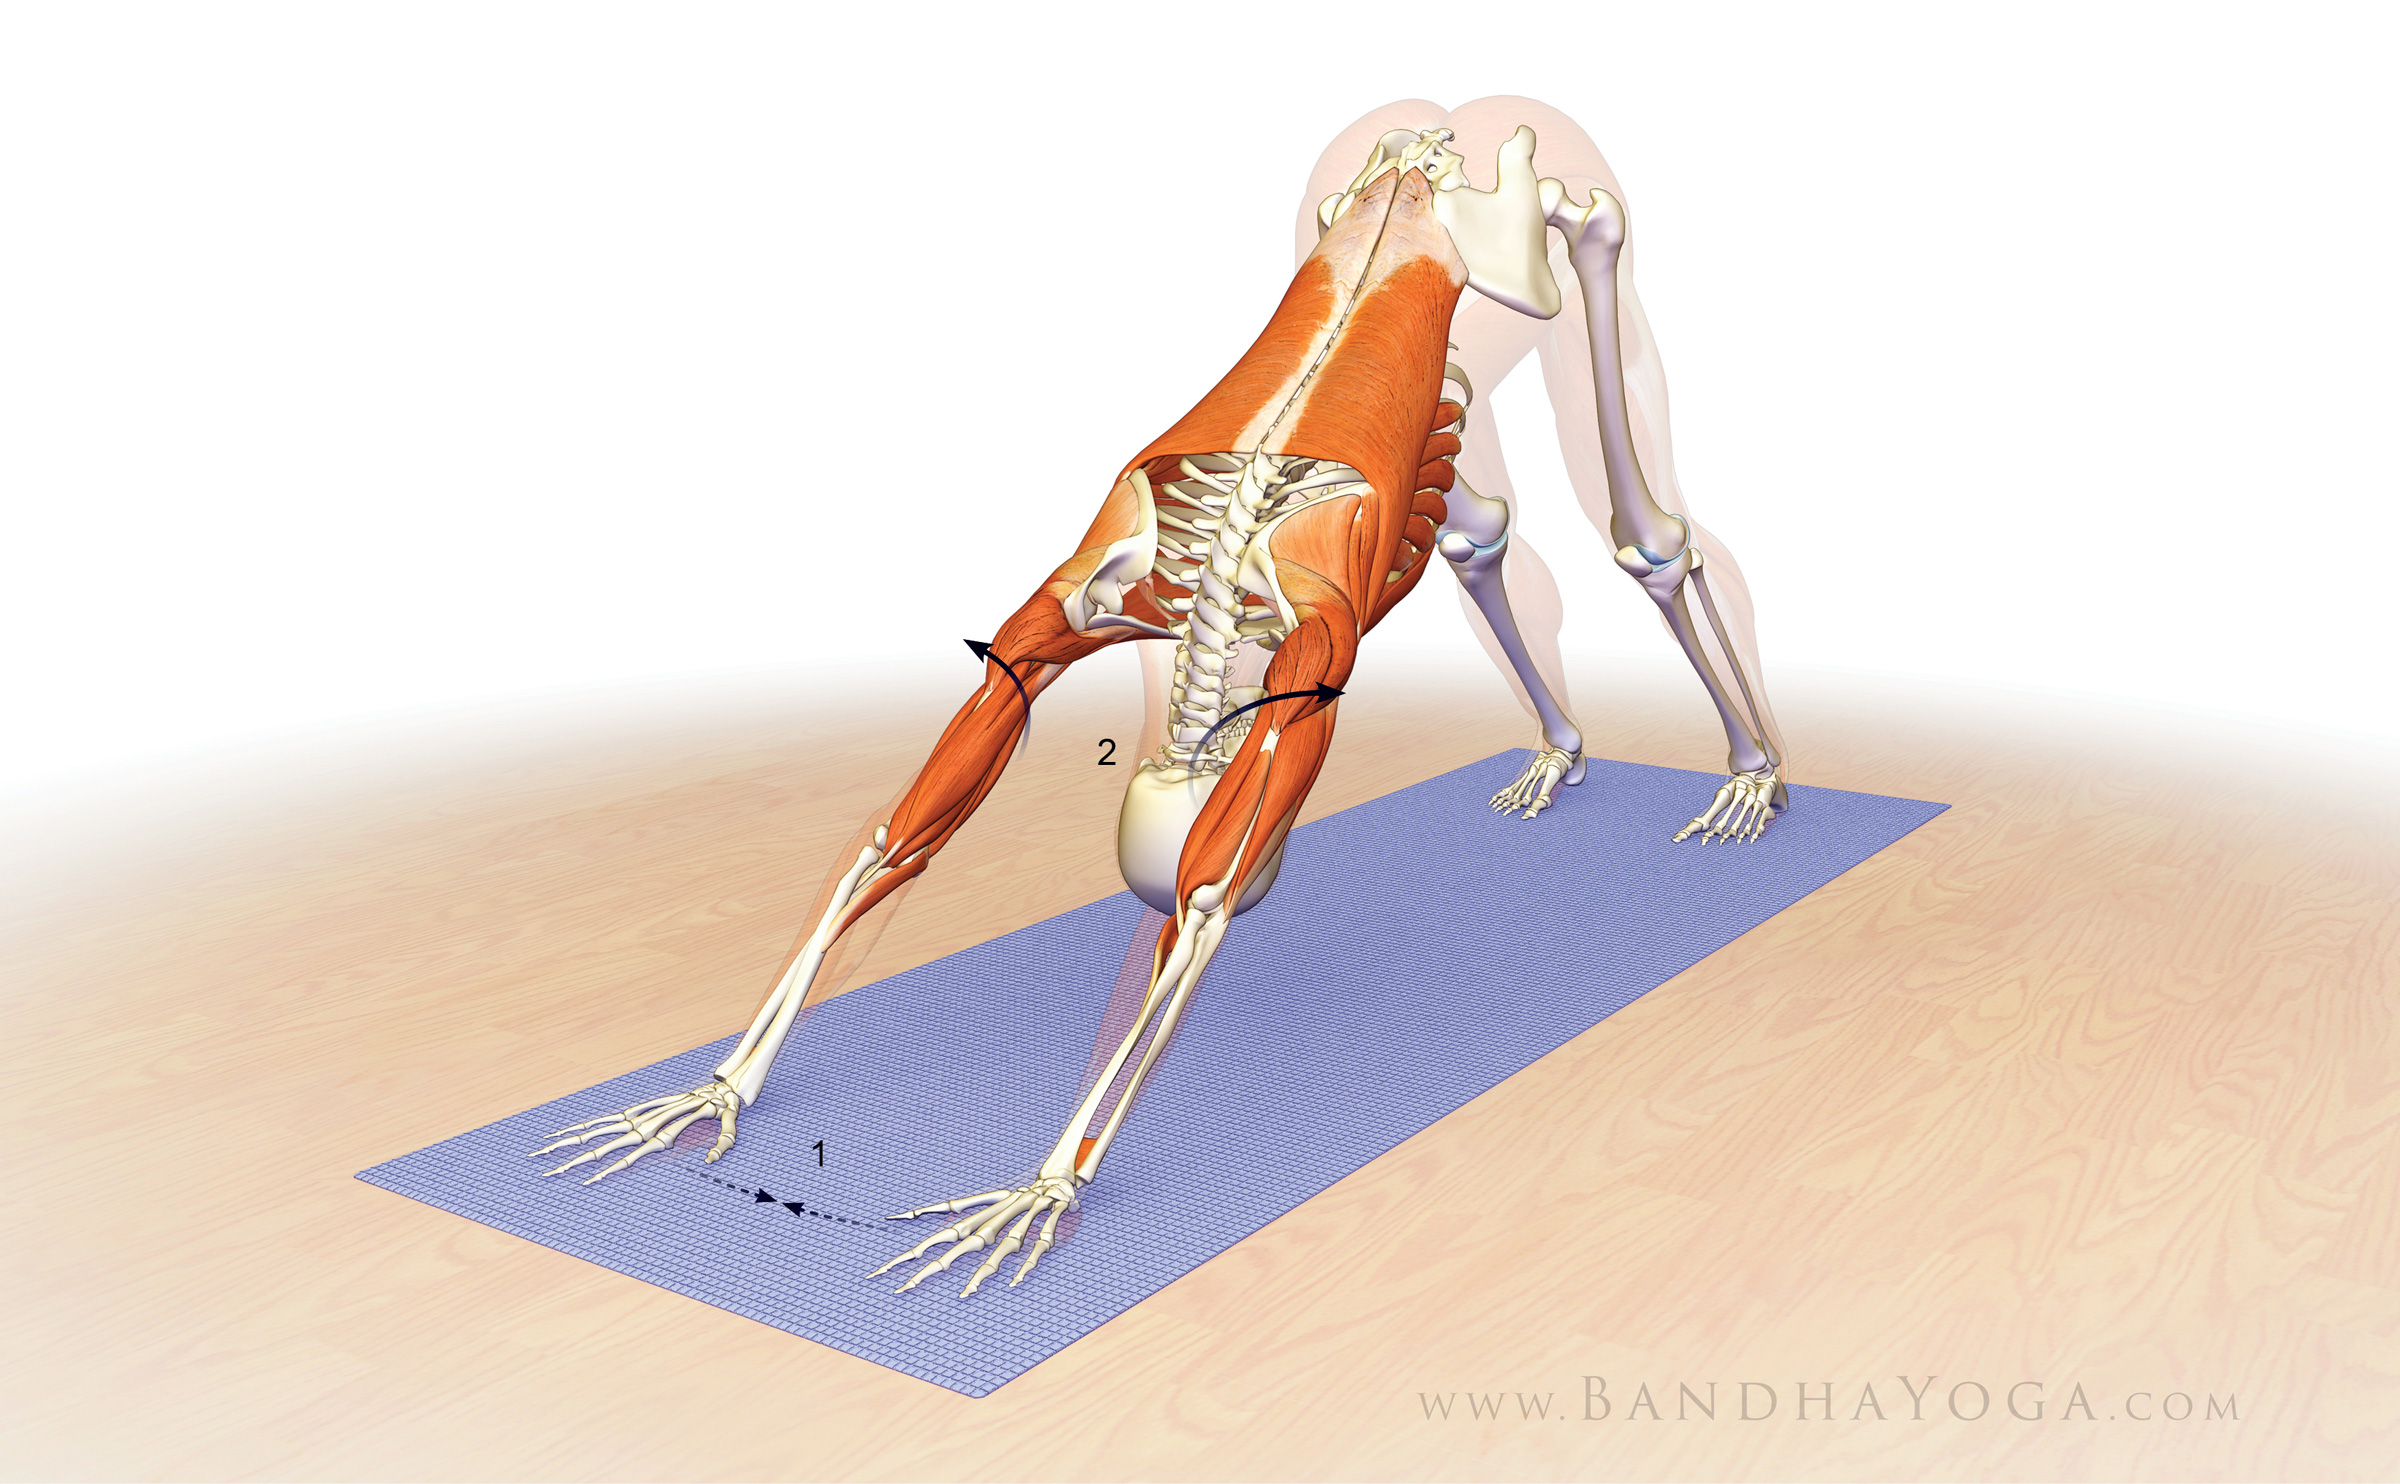
  2. Next, fix your palms into the mat and try to drag the hands towards each other. This engages the adductor muscles of the shoulders as well as the biceps.
  3. Finally, gently roll the shoulders outward. This externally rotates the humerus bone and helps to bring the greater tuberosity away from the undersurface of the acromion.

Figure 3 illustrates the various muscles involved in these cues.

Figure 3: Attempt to drag the hands towards one another. This engages the shoulder adductors. Then externally rotate the shoulders.

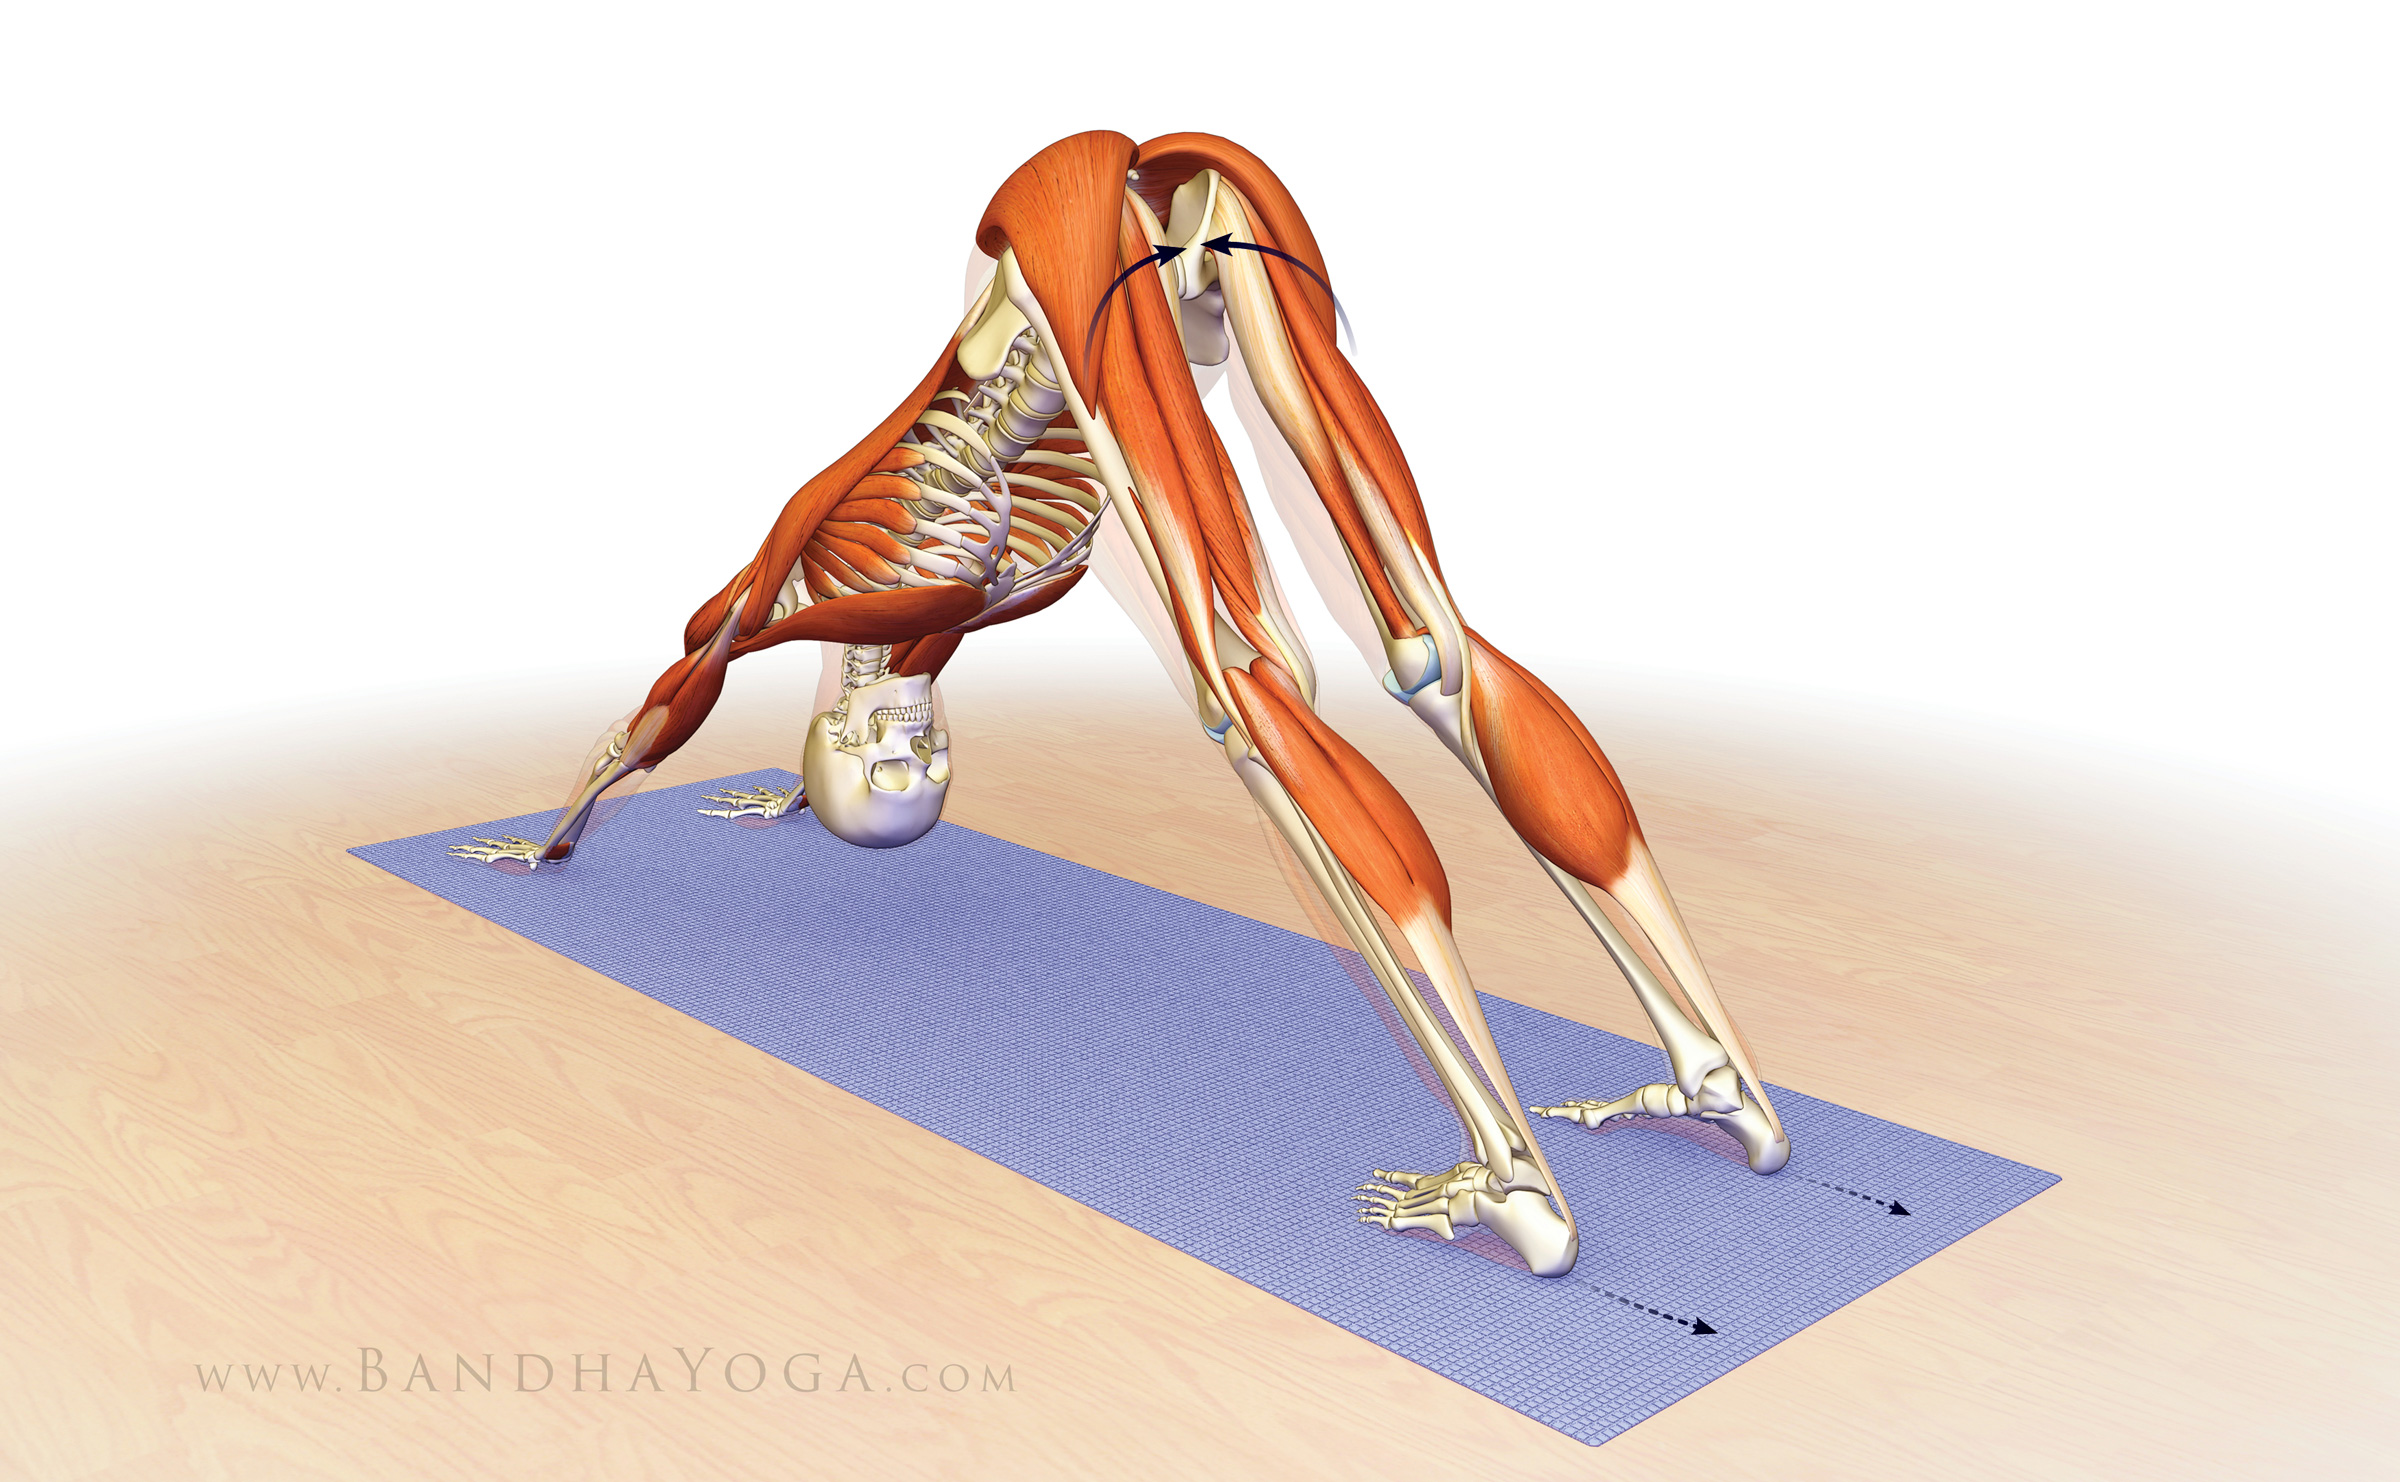
As a final adjustment, I like to link the action of the shoulders to the lower extremities. The cue for this is to engage your lower gluteus max and adductor magnus muscles by drawing in with the upper inner thighs and then attempt to drag your feet away from the hands. Feel how this stabilizes your pose. See Figure 4 for the graphics.

Figure 4: Engage the lower parts of the gluteus maximus and adductor magnus as you attempt to drag the feet away from the hands to stabilize the pose.

Bear in mind that shoulder stability is a complex process. The shoulders are linked to the core; so building a strong core leads to stable shoulders. Stable shoulders help to protect the wrists, and so on. Click here to read more on your core. If you would like to learn more anatomic sequencing to improve your poses, click here to take a tour of The Yoga Mat Companion Series.

An excerpt from "Yoga Mat Companion 1 - Anatomy for Vinyasa Flow and Standing Poses".

An excerpt from "Yoga Mat Companion 4 - Anatomy for Arm Balances and Inversions".


Thanks for stopping by—see you in a couple of weeks for another post on combining anatomy, biomechanics and yoga.

All the Best,

Ray Long, MD


References:


  1. Graichen H1, Bonel H, Stammberger T, Englmeier KH, Reiser M, Eckstein F. Subacromial space width changes during abduction and rotation--a 3-D MR imaging study. Surg Radiol Anat. 1999;21(1):59-64.
  2. Hinterwimmer S1, Von Eisenhart-Rothe R, Siebert M, Putz R, Eckstein F, Vogl T, Graichen H. Influence of adducting and abducting muscle forces on the subacromial space width. Med Sci Sports Exerc. 2003 Dec;35(12):2055-9.

Shoulder Biomechanics, Part I: The Subscapularis Muscle

Hello Friends,

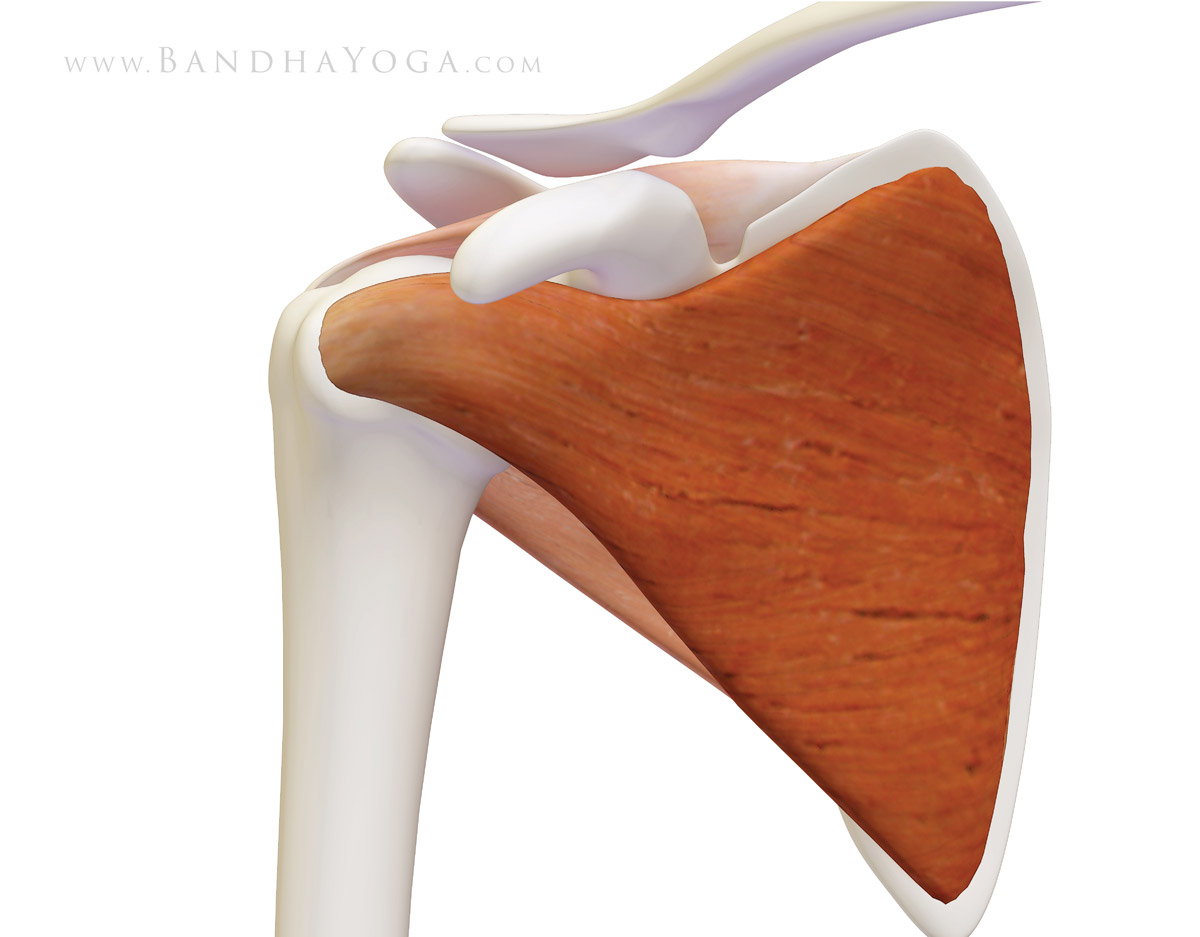
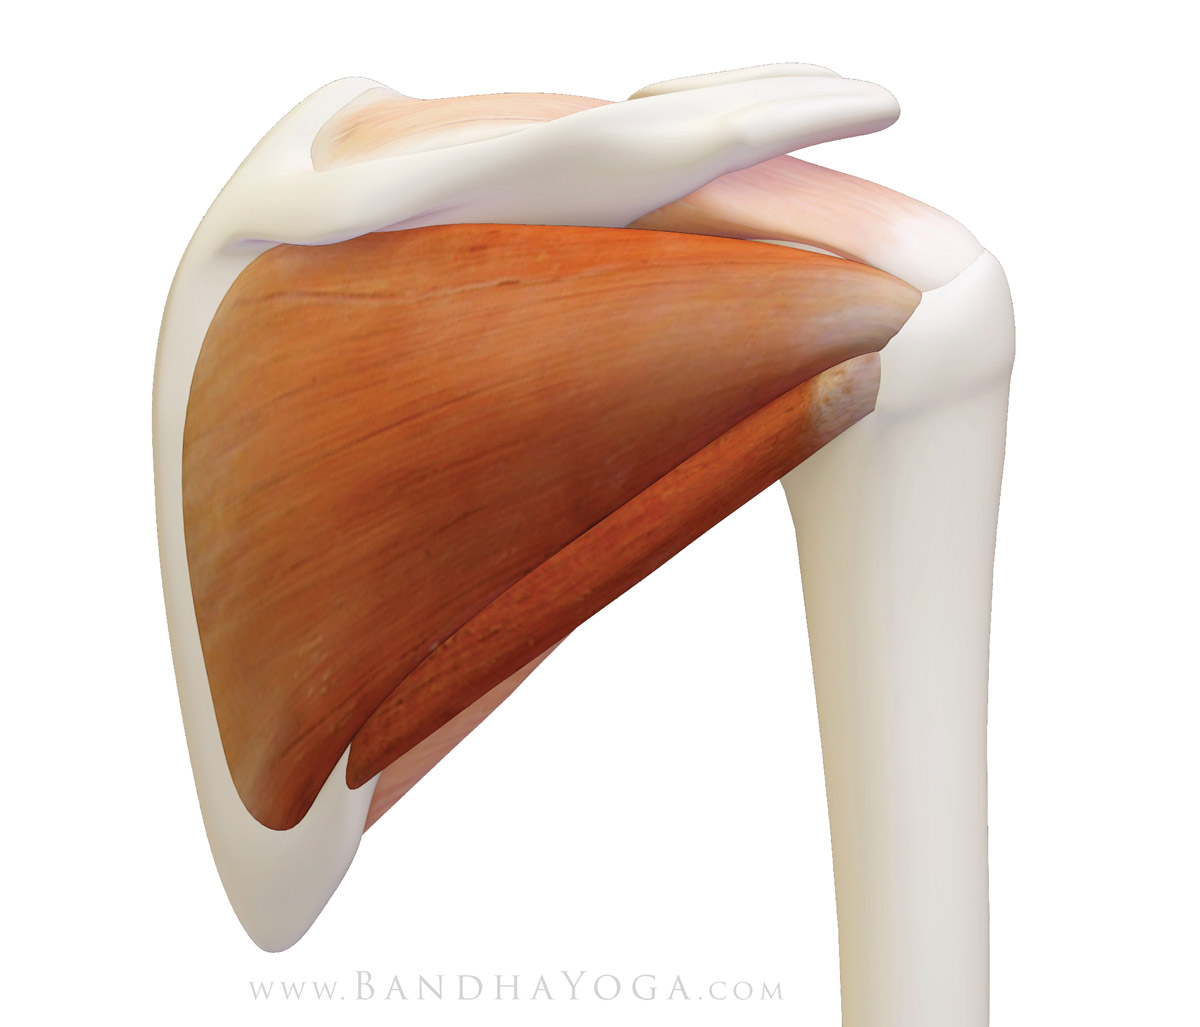
This is the first of a four-part series on the shoulder joint, focusing specifically on the rotator cuff and its biomechanical relationship with the deltoid muscle. Let's begin by looking at the muscles that comprise the rotator cuff, starting with the subscapularis. As figure 1 illustrates, the subscapularis occupies the space, or fossa, at the front of the scapula. From there it attaches to the lesser tuberosity, a knob-like structure on the humerus bone at the front of the shoulder. Concentrically contracting the subscapularis muscle (shortening the muscle on contraction) internally rotates the shoulder. The subscap also acts, in conjunction with the infraspinatus muscle, as a stabilizer of the humeral head in the socket (glenoid). We test strength and function of this muscle with the "belly press" test or the "bear hug" test. Tightness in the subscapularis can limit external rotation of the shoulder.


Figure 1: The subscapularis muscle, illustrating the origin on the inside of the scapula and the insertion on the lesser tuberosity of the humerus.


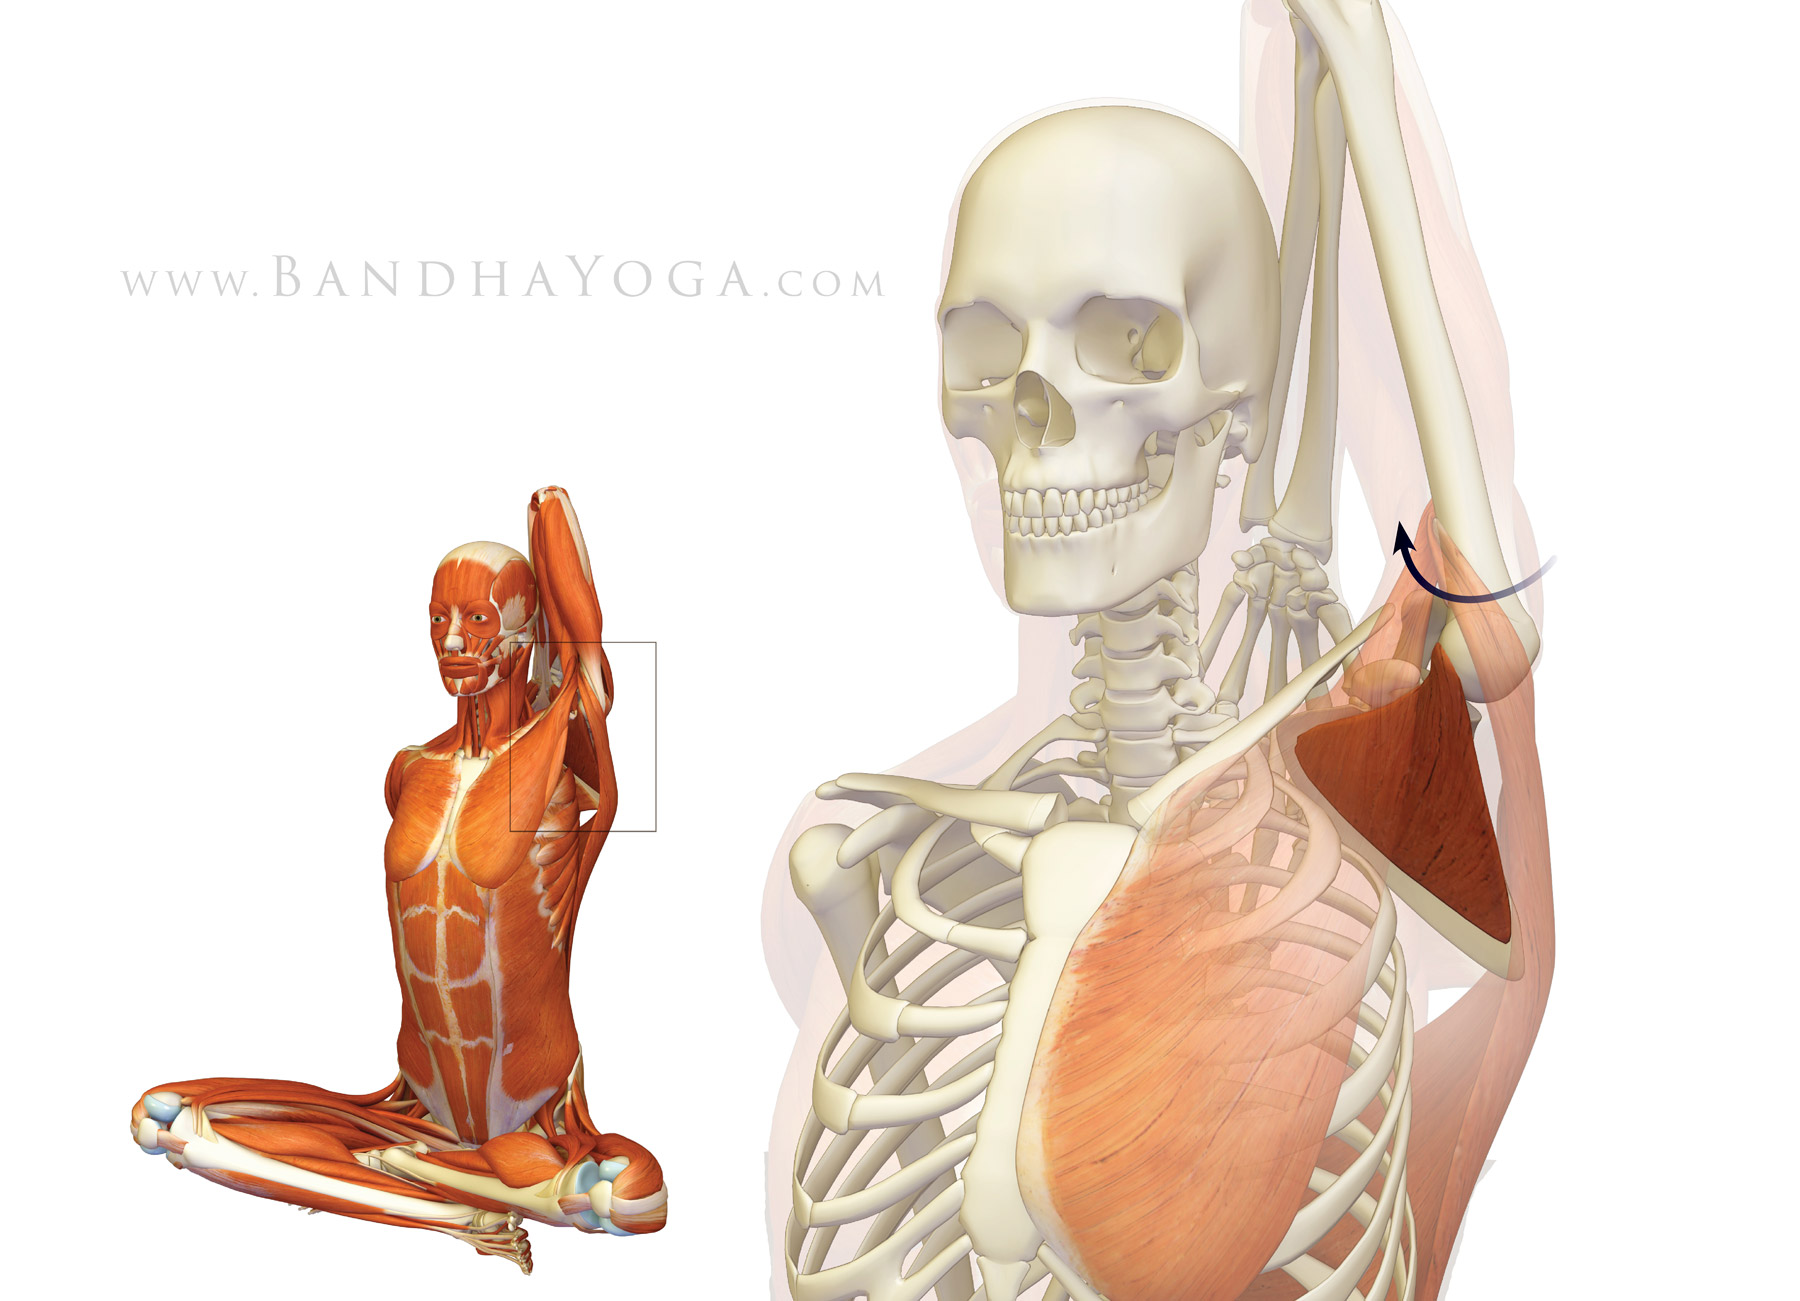
Figure 2 illustrates one of the poses that stretch the subscapularis muscle, namely, Gomukhasana. The upper side humerus externally rotates in this pose, thus stretching the muscle as shown.

Figure 2: This illustrates the effect on the subscapularis muscle of the upper arm in Gomukhasana. External rotation of the humerus stretches the muscle.


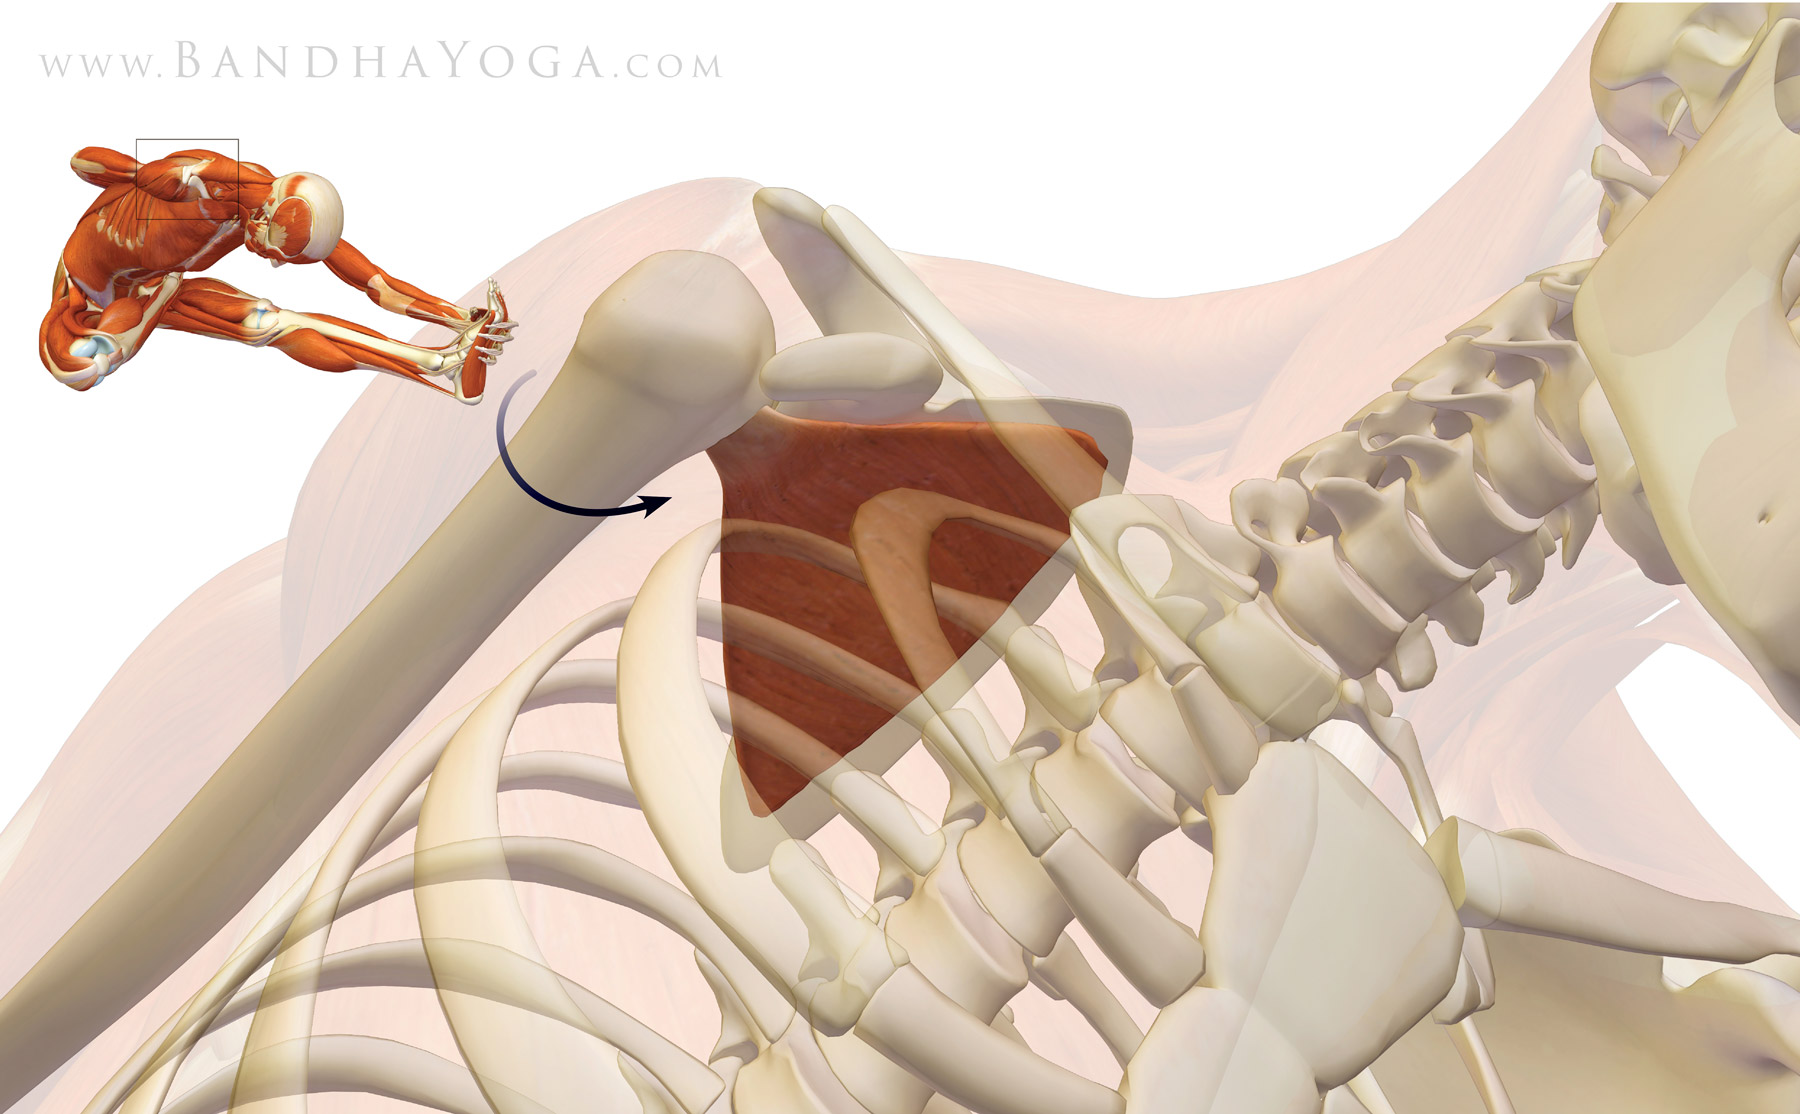
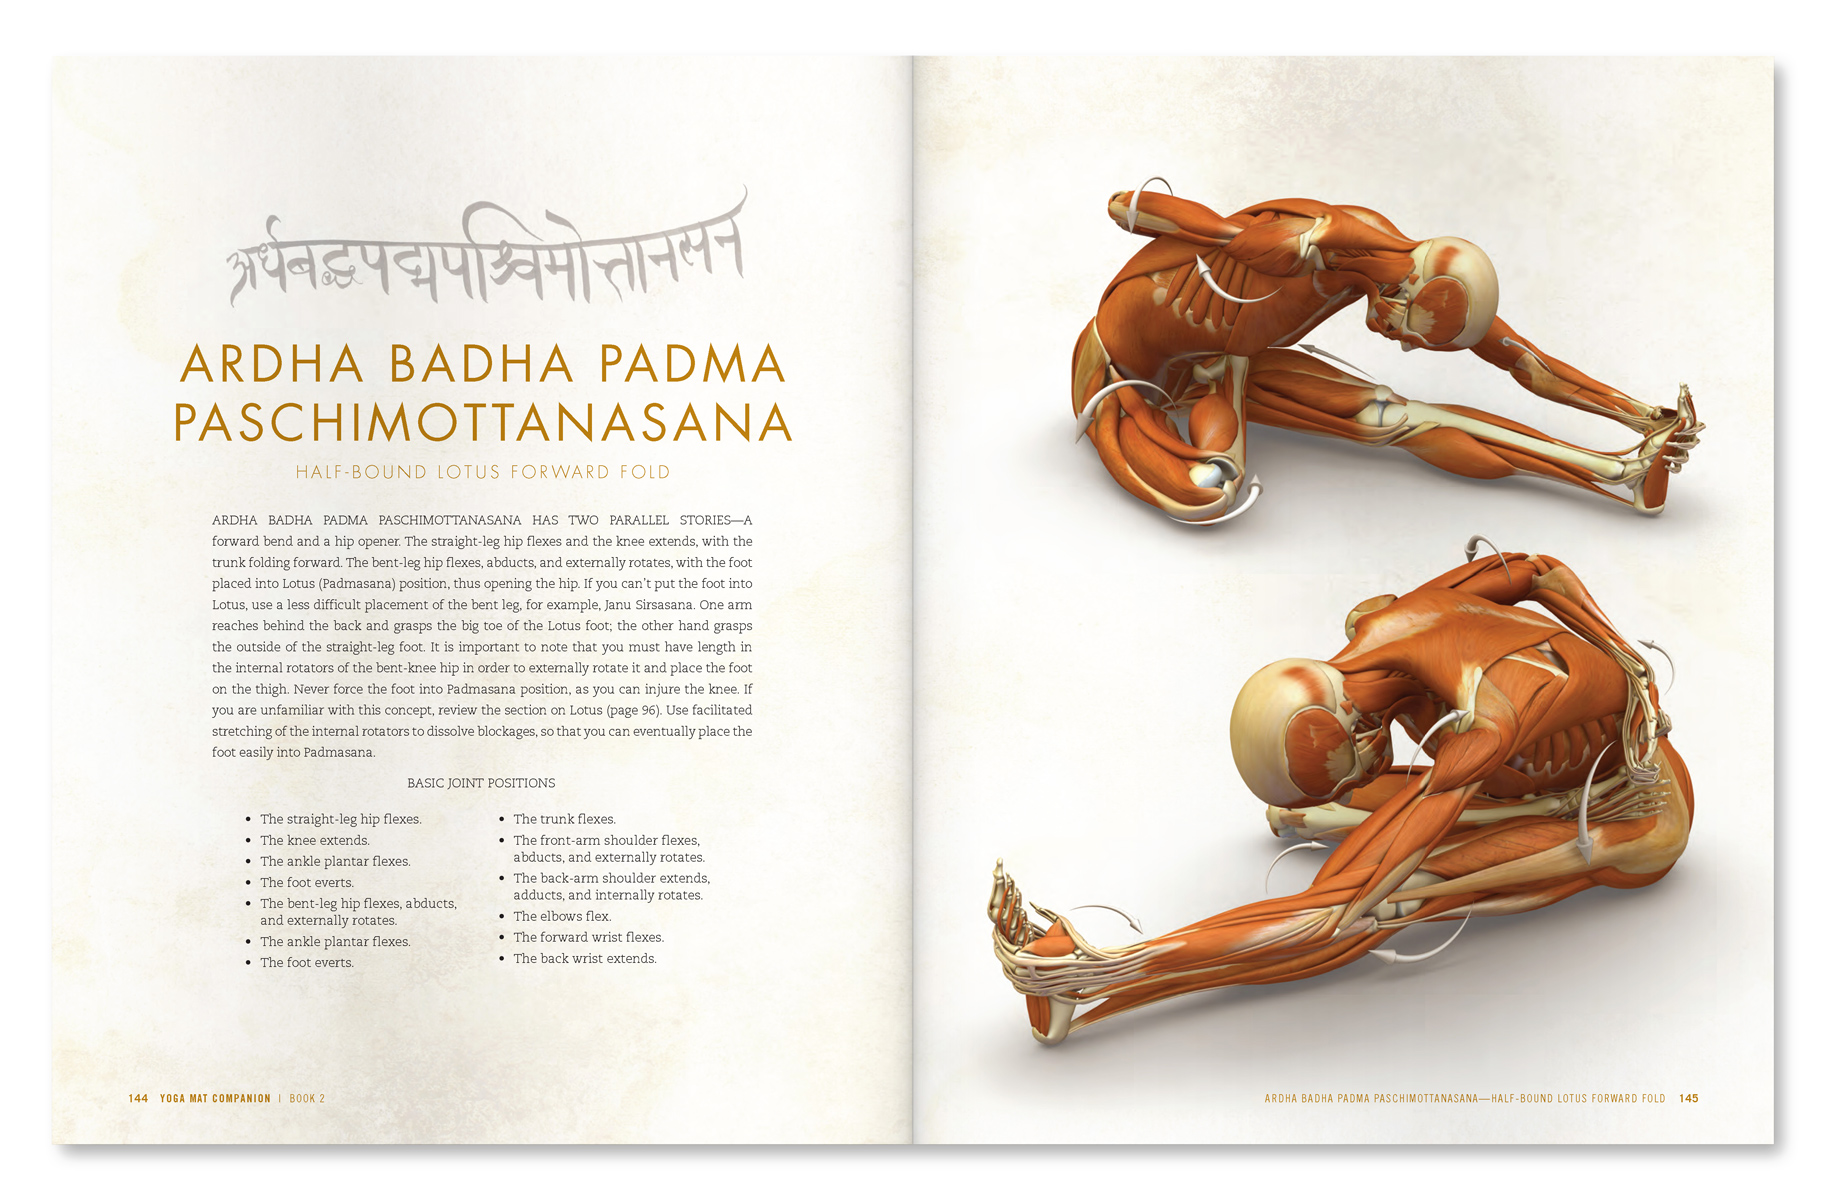
Figure 3 illustrates engaging the subscapularis muscle in Ardha Baddha Padma paschimottanasana. Advanced practitioners can attempt to lift the hand off the back to engage the muscle in this pose. This also replicates the "lift off" test, which is used in orthopedics to test the function of the subscap muscle.

Figure 3: This image illustrates contraction of the subscapularis muscle to internally rotate the humerus.


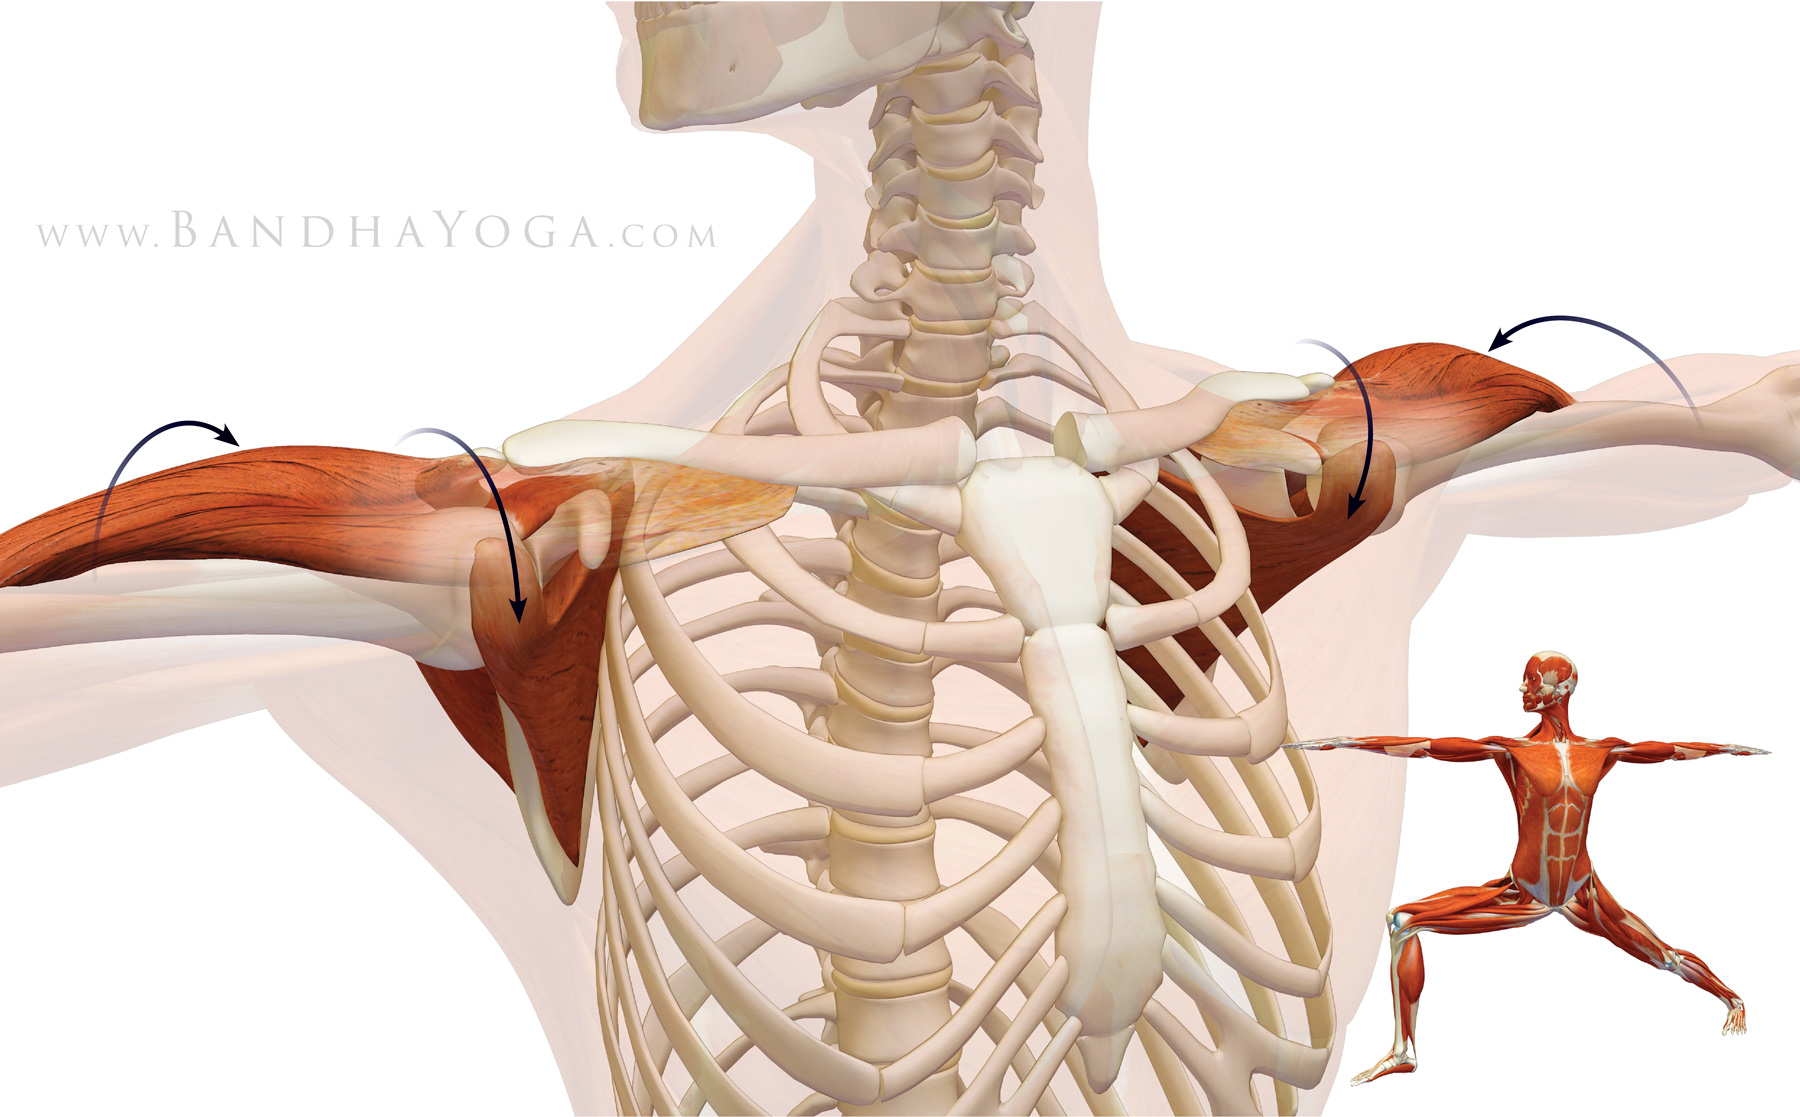
Finally, we have the subscapularis as a stabilizer during a static position in a pose. In Warrior II, attempt to internally rotate the shoulders by imagining pressing the mound at the base of the index fingers down against an object. Resist this by externally rotating the shoulders at the same time. Co-contracting opposing muscles--like the subscap and infraspinatus--stabilizes the head of the humerus in the socket while the deltoid contracts to abduct the humerus. Click here to go into a bit more depth on the subject of stabilizing your shoulders in your Downward dog pose. 


Figure 4: Co-contracting the subscapularis and the infraspinatus stabilizes the humeral head in the socket while the deltoid muscle abducts the humerus.


Click here to take the rotator cuff quiz and test your knowledge!

An excerpt from "Yoga Mat Companion 2 - Anatomy for Hip Openers and Forward Bends".


An excerpt from "Yoga Mat Companion 2 - Anatomy for Hip Openers and Forward Bends".


Thanks for stopping by. Stay tuned for the next post when I'll go over the antagonist muscle for the subscapularis. By the end of this four-post series, you'll have a good understanding of the functional anatomy and biomechanics of the shoulder joint as applied to yoga. Click here to browse through the Bandha Yoga book series on anatomy, biomechanics and physiology for yoga.

All the Best!

Ray Long, MD

Shoulder Biomechanics, Part II: The Infraspinatus & Teres Minor Muscles


Hello Friends,

Welcome to the second of the four-part series on the shoulder joint. Last week I discussed the subscapularis muscle, which is the main shoulder internal rotator. Now we’re on to the antagonist muscles of the subscap, namely, the infraspinatus and teres minor. The infraspinatus arises in a trough below the scapular spine, hence its name (“infra” means below). The teres minor arises back part (dorsum) of the scapula along its outer (lateral) border. The infraspinatus and teres minor insert onto the back part of the greater tuberosity of the humerus, as shown in Figure 1. 

These muscles externally rotate the humerus, with the infraspinatus being the strongest external rotator of the joint. The infraspinatus and teres minor also function to stabilize the humeral head in the socket (glenoid).


Figure 1: The infraspinatus and teres minor muscles of the rotator cuff (the supraspinatus is the faded muscle on top).


The Force Couple

These muscles combine with the subscapularis at the front of the joint to form a “force couple”. In this manner, antagonist muscles (for rotation) become synergists (for stability). Therapy (and surgery) for rotator cuff pathology is directed towards restoring this force couple. Click here to read about concept of antagonist/ synergist combinations for the hip muscles in yoga. Click here for some cues to use this in Dandasana.
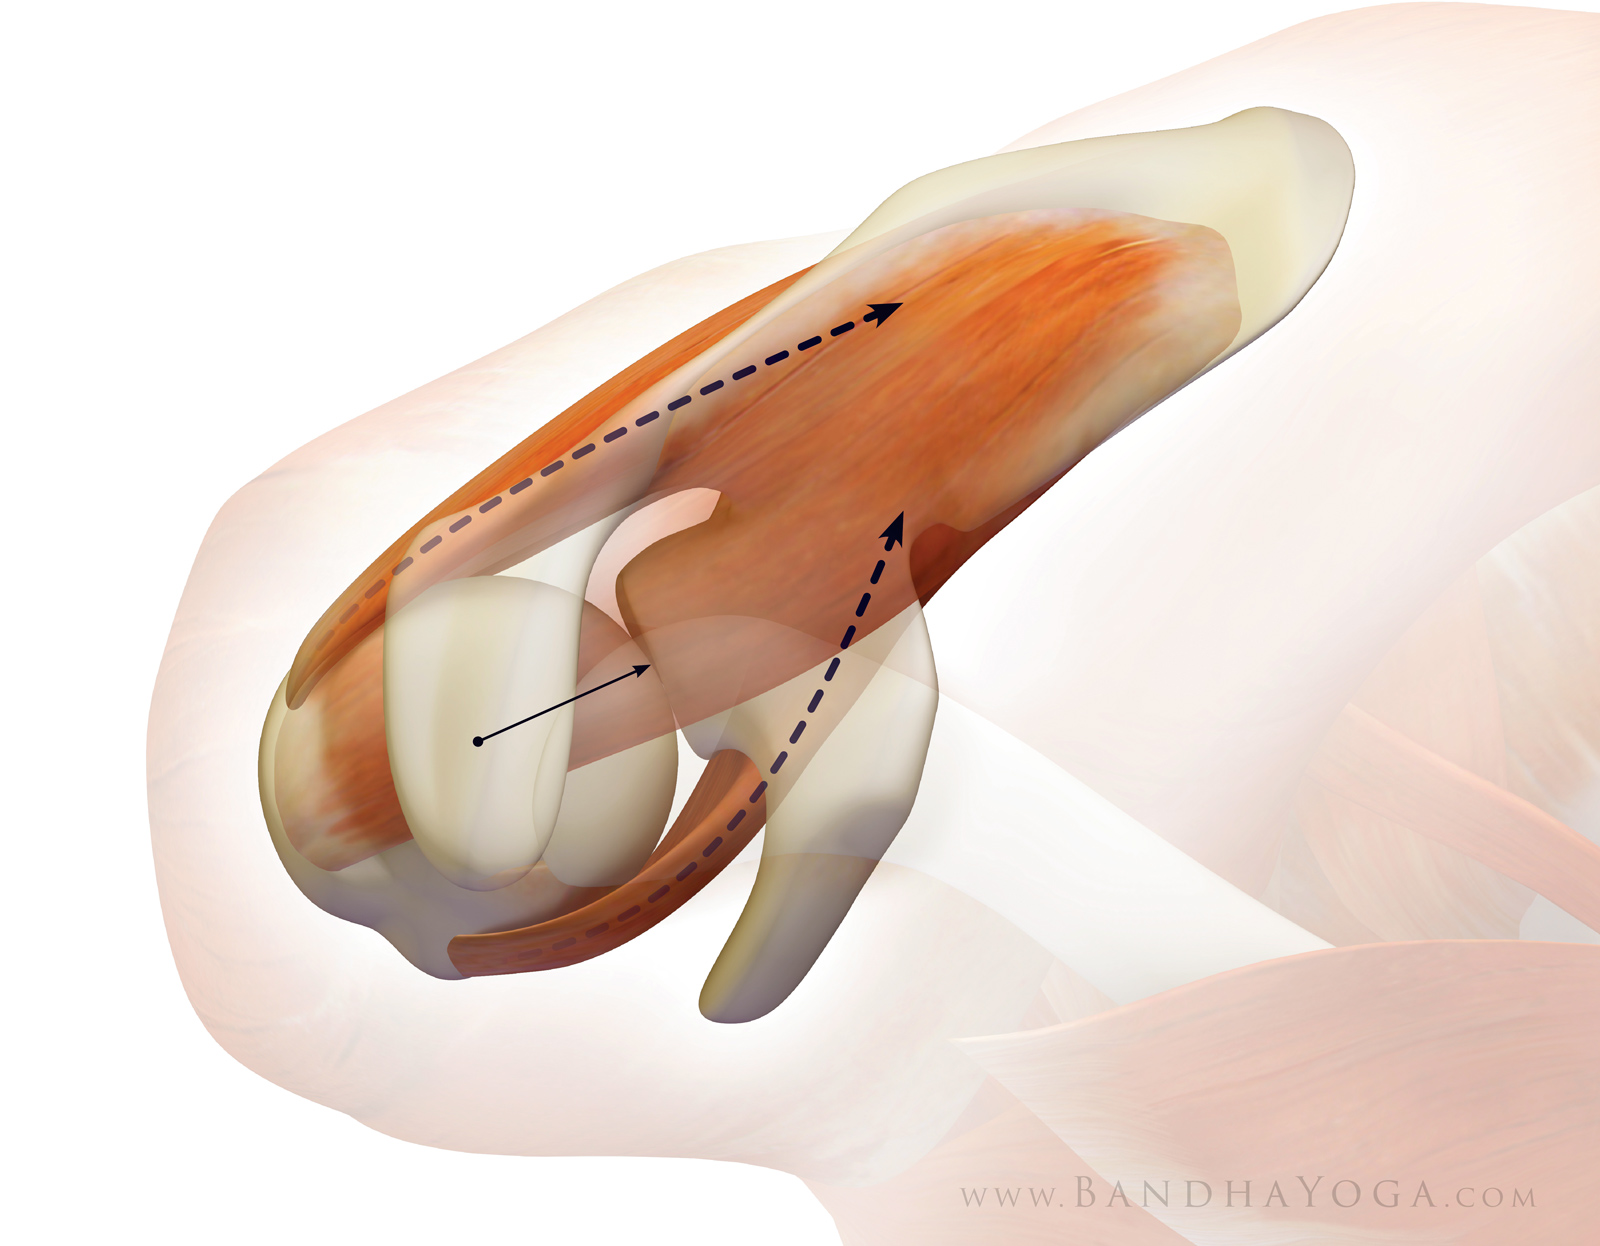
Figure 2 illustrates this biomechanical process. This view is looking down on the shoulder with the front of the joint towards the bottom of the page


Figure 2: The force couple between the infraspinatus and subscapularis muscles. This view is looking down on the shoulder with the front of the joint towards the bottom of the page.

Poses with the arms in reverse Namaste' stretch the infraspinatus and teres minor, as does Gomukhasana. Those of you who are more flexible may gently press the knife edge of the hand into the back to "load" the external rotators. Folks who are tighter may simply grasp the elbows or hands behind the back. Click here for more details and an animation of Gomukhasana stretching these muscles as well as a not so obvious cue for loading and using PNF for this stretch.

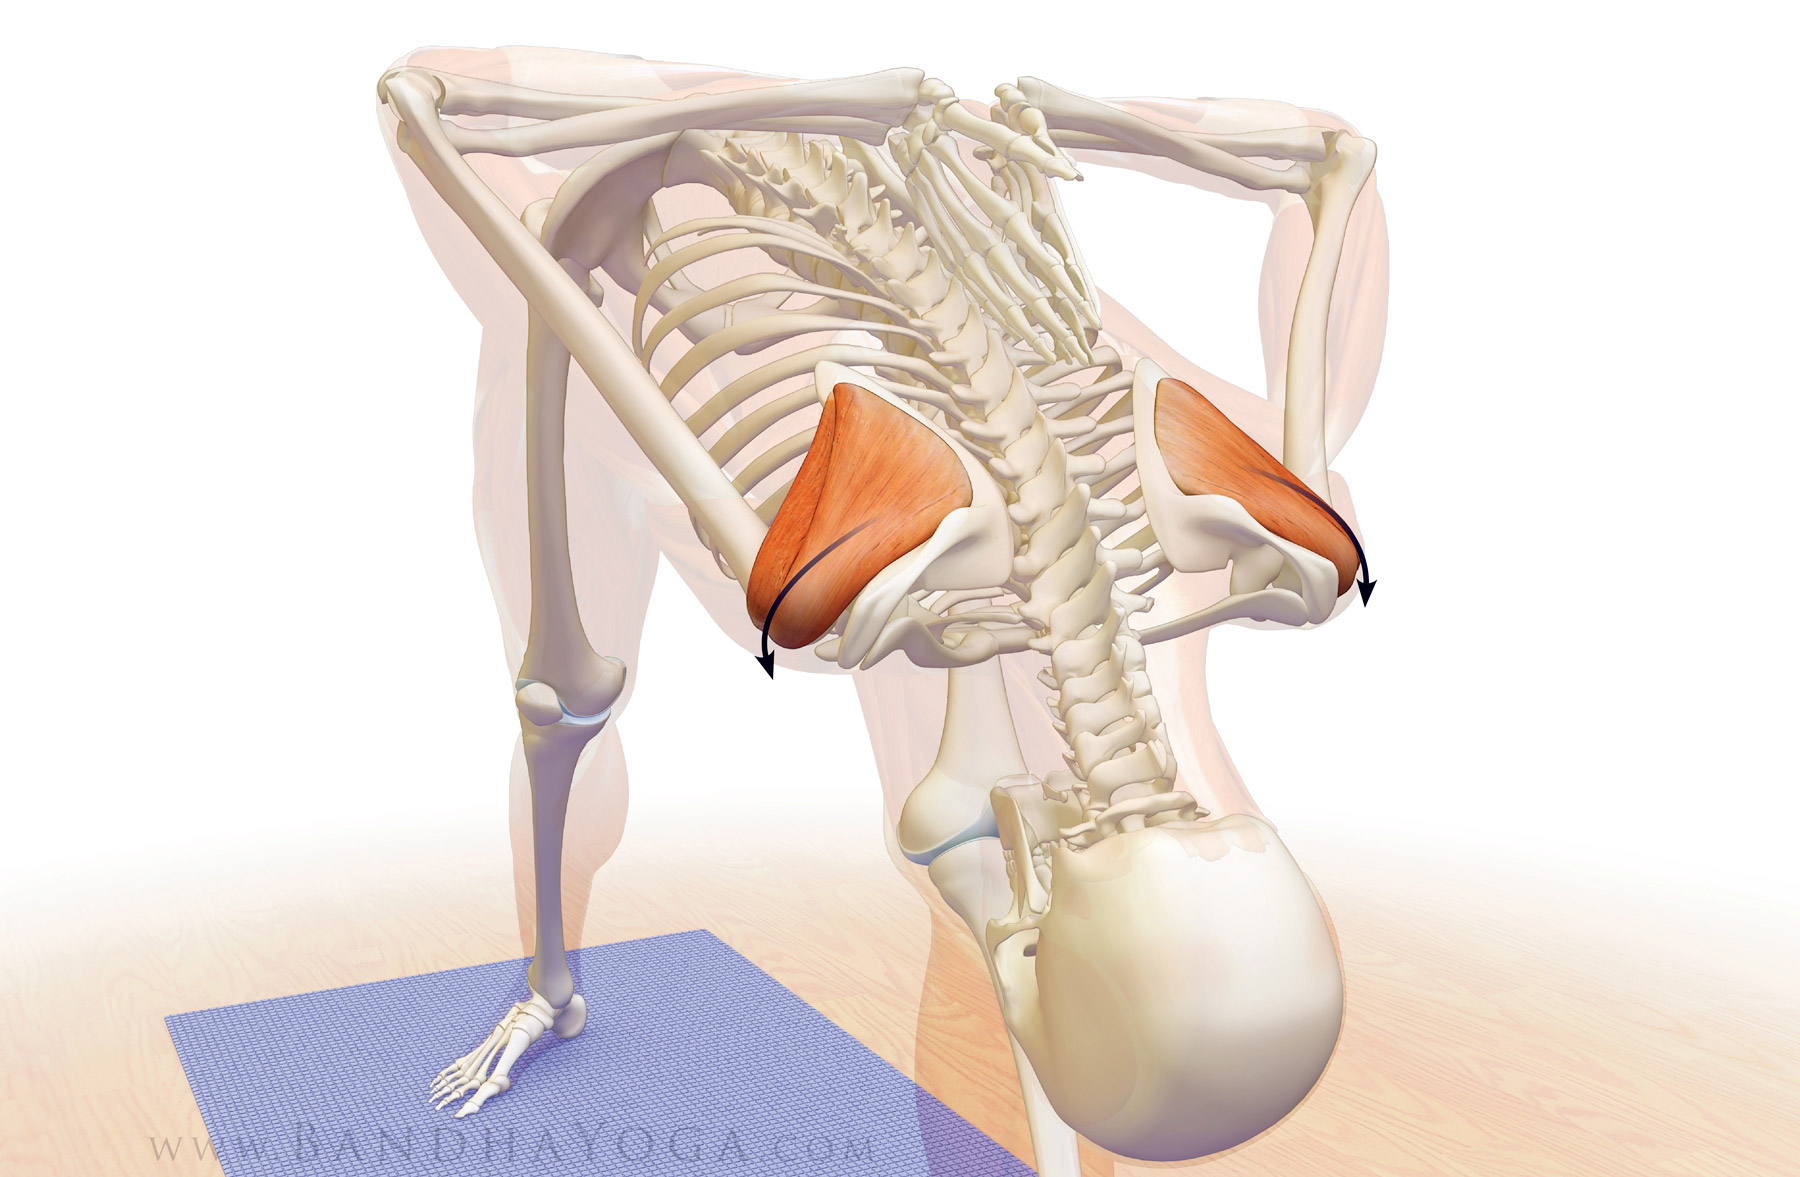
Figure 3: Stretching the infraspinatus and teres minor by internally rotating the shoulders in Parsvottanasana.


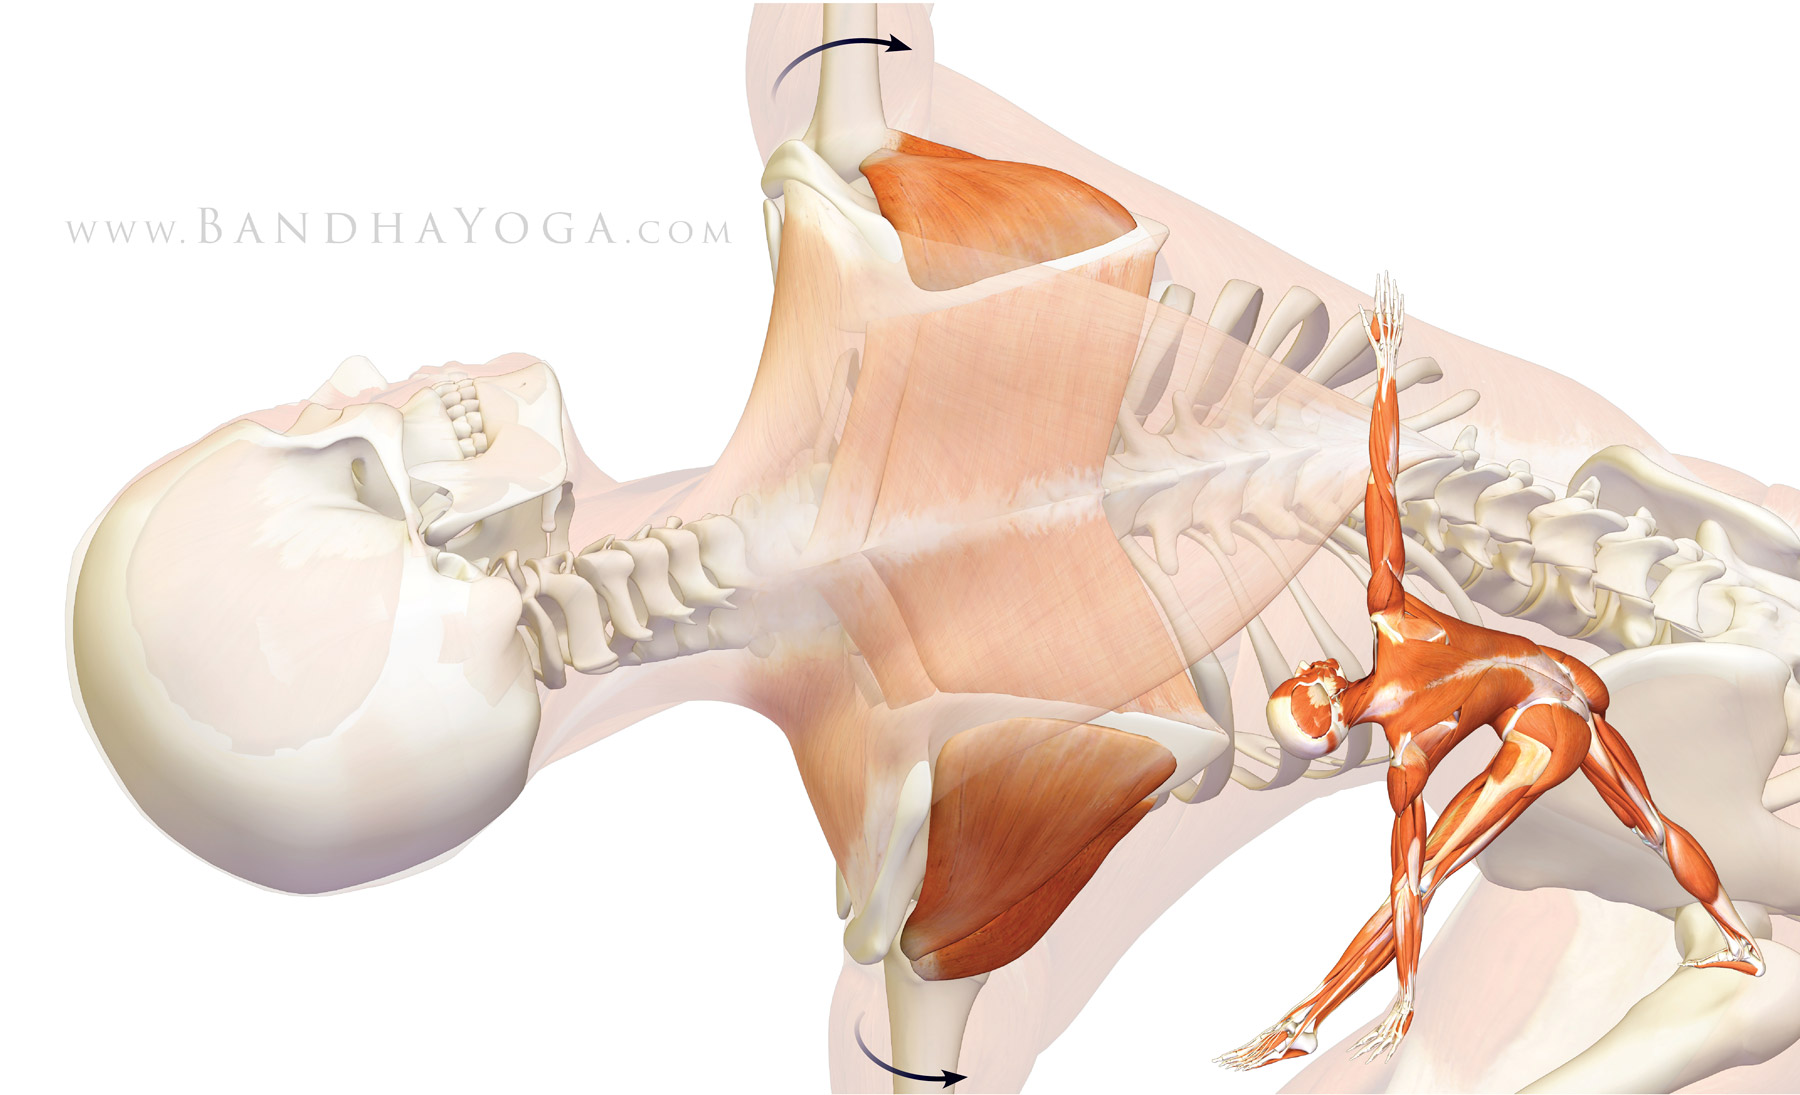
Externally rotating the shoulders in poses like Trikonasana (Triangle) can be used to activate the infraspinatus and teres minor. Figure 4 illustrates this, as well as the myofascial connection between these muscles and the muscles that retract the scapula, namely the trapezius and rhomboids.


Click here to take the rotator cuff quiz and test your knowledge!


An excerpt from "Yoga Mat Companion 4 - Anatomy for Backbends and Inversions".


An excerpt from "Yoga Mat Companion 2 - Anatomy for Hip Openers and Forward Bends".

Thanks for stopping by--I hope you're enjoying learning about biomechanical concepts like the force couple. Stay tuned for the next post when I'll go over the last muscle of the rotator cuff, the supraspinatus. Then I'll finish up with the relationship between the rotator cuff and the deltoids. By the end of this four-post series, you'll have a good understanding of the functional anatomy and biomechanics of the shoulder joint as applied to yoga. Click here to browse through the Bandha Yoga book series on anatomy, biomechanics and physiology for yoga.


All the Best,

Ray Long, MD

Shoulder Biomechanics Part IV: The Deltoid--Rotator Cuff Connection

Foundational knowledge gives you power that you can translate into applications for your practice and teaching.

In this blog post, I explore some of the essential biomechanics of the shoulder joint, especially the “force couple” between your deltoid muscle and the rotator cuff. Understanding this relationship helps build your fund of knowledge regarding this complex articulation, which can help you later on in developing cues for your practice as well as well as for therapeutics in yoga.

The “force couple” is a biomechanical concept whereby groups of muscles work together around a joint to produce coordinated movement. The force couple between the rotator cuff and the deltoid muscle works in concert with other muscles around the scapula to produce movements such as raising the arm overhead.

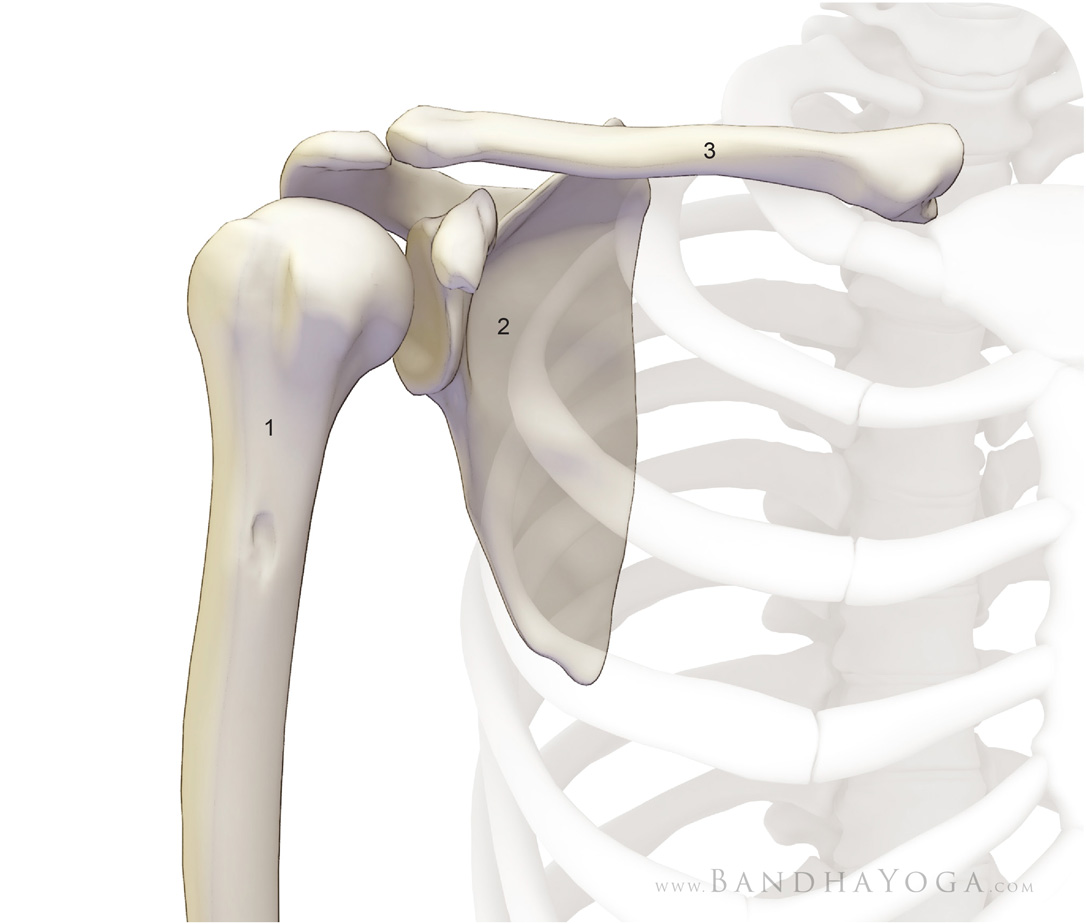
The shoulder joint proper is a ball and socket joint comprised of the humeral head which articulates with the shallow glenoid fossa (socket) of the scapula. The bone shapes of the shoulder joint allow for a high degree of motion. Contrast this with the hip joint, where the socket is much deeper and constraining on motion. In addition to the bony stabilizers, there are also soft tissue stabilizers such as ligaments and the labrum and muscular dynamic stabilizers. Figure 1 illustrates the bones of the shoulder. Click here for more on this in relation to your Down Dog.

Figure 1 - (1) humerus. (2) scapula. (3) clavicle.

In the force couple between the deltoid muscle and the rotator cuff, the rotator cuff stabilizes the humeral head against the glenoid fossa. The deltoid muscle then levers the humeral head off the glenoid fossa to raise the arm. At the same time, the scapula and clavicle rotate to aid in producing movement, a process known as scapulohumeral rhythm (click here for more on this subject).


Figure 2 illustrates the subscapularis and infraspinatus muscles acting together to stabilize the humeral head in the glenoid fossa. Click here for more information on the these muscles of the rotator cuff.


Figure 2 - The Subscapularis / Infraspinatus force couple.


Figure 3 illustrates the force couple between the rotator cuff and the deltoid muscle. Click here to learn about the supraspinatus muscle of the rotator cuff. As the deltoid contracts to raise the arm, the rotator cuff contracts to stabilize the humeral head in the socket. All of this happens automatically--the brain is hard wired for this force couple.

Figure 3 - The Deltoid / Supraspinatus force couple.

Injury to the rotator cuff, such as a tear or inflammation can lead to less efficient stabilization of the humeral head in the socket. As a consequence, when the deltoid contracts, instead of levering the humeral head off the glenoid, the force of the deltoid contraction causes the head of the humerus to shift upwards into the subacromial space. This can lead to impingement of the rotator cuff on the undersurface of the acromion, thus exacerbating the condition. To compensate, the body uses abnormal movement of the scapula in an attempt to stablize the humeral head in the socket. This abnormal movement of the scapula on the chest wall is known as “scapulothoracic dyskinesia”. I examine for this by comparing the movement of the normal and injured side from the back while having the patient raise the arms overhead.

Figure 4 - Raising the arms over the head in Warrior I and Tadasana.

I hope this post helps you build your fund of knowledge regarding shoulder biomechanics. Stay tuned for my next post where I discuss some of the yoga poses that can be used to stretch and strengthen the rotator cuff. Learn more about anatomy, biomechanics and physiology for your yoga in “The Key Muscles of Yoga”, “The Key Poses of Yoga” and the Yoga Mat Companion series. Click on any of these books to page through.

An excerpt from "Yoga Mat Companion 1 - Anatomy for Vinyasa Flow and Standing Poses".


An excerpt from "Yoga Mat Companion 3 - Anatomy for Backbends and Twists".


Thanks for stopping by--look forward to seeing you for my next post!

Ray Long, MD

Shoulder Kinematics in Yoga Part II: The Lower Trapezius and Serratus Anterior

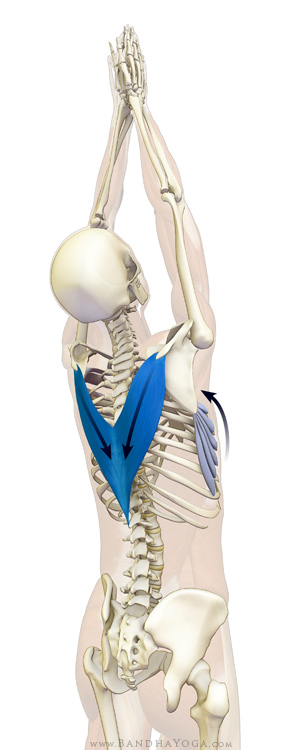
Our last blog post used a video to illustrate shoulder kinematics in 3D and reviewed how to externally rotate the humerus to protect against impingement. This week we look at the scapular motion on the ribcage and the role of the lower third of the trapezius in drawing the shoulders away from the neck. This motion is called scapular depression, and it is frequently used in yoga, especially when the arms are overhead. Scapular depression helps to maintain freedom of movement in the cervical spine, either to lift the head and look up (in Urdhva Hastasana) or to relax the head down (as in Dog Pose).

lower trapezius and serratus anterior - tadasana

Here’s the Anatomy . . .

When you raise the arms overhead, the scapulae elevate, protract, and rotate. This is through the action of several muscles, including the upper trapezius and the levator scapulae. Scapular rotation occurs through sequential actions of the upper, middle, and lower thirds of the trapezius and the serratus anterior. Protraction is mainly through the work of the serratus anterior.

A Tip for Helping to Correct Alignment in Hyperextended Elbows and Knees in Yoga

Aligning the bones accesses their inherent strength so that yoga poses ultimately require less muscular effort to maintain. For example, in our last post we gave a tip on using the big toes to correct the tendency for the pelvis to drift back in standing forward bends and one-legged standing poses like Warrior III. This correction brings the leg bones upright and perpendicular to the floor, which better supports the body weight. Aligning the bones in this manner also has the benefit of increasing joint congruency and spreads the joint reaction forces more evenly across the articular cartilage. Conversely, engaging the muscles that align the bones has been demonstrated to have a protective effect on the joint cartilage.

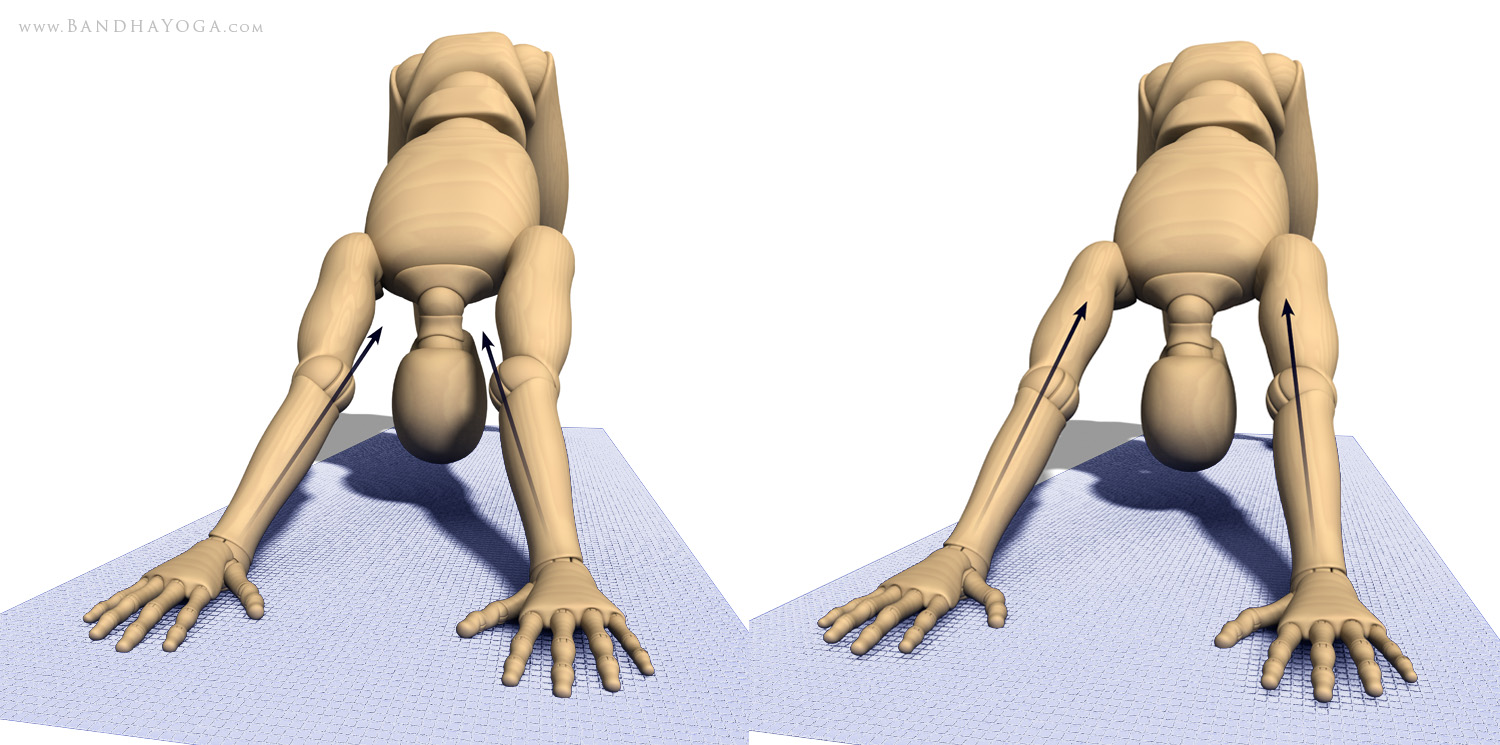
hyperextension in downward dog pose
Dog Pose showing the direction of force through hyperextended elbows vs aligned elbows.
Hyperextending the knees or elbows in yoga poses can be disadvantageous because it misdirects the forces that create the form of the asana. For example, if the elbows are hyperextending in Dog Pose, then the force of the hands pushing into the mat is angled inward. Ideally this force should be directed through the long axes of the forearm bones, humerus, and shoulders and then through to the trunk and pelvis. Aligning the bones of the arms helps to create the proper form of Downward Facing Dog. Pressing the body back in this manner then synergizes the stretch of the muscles at the backs of the legs. 

Connect Your Cuff to Your Core in Forearm Plank

Update on Forearm Plank: 

One of my goals in reviewing the scientific literature is to identify information that can be translated into a practical cues that you can integrate into your practice. With this in mind, I want to call your attention to a new study from the Journal of Strength and Conditioning Research

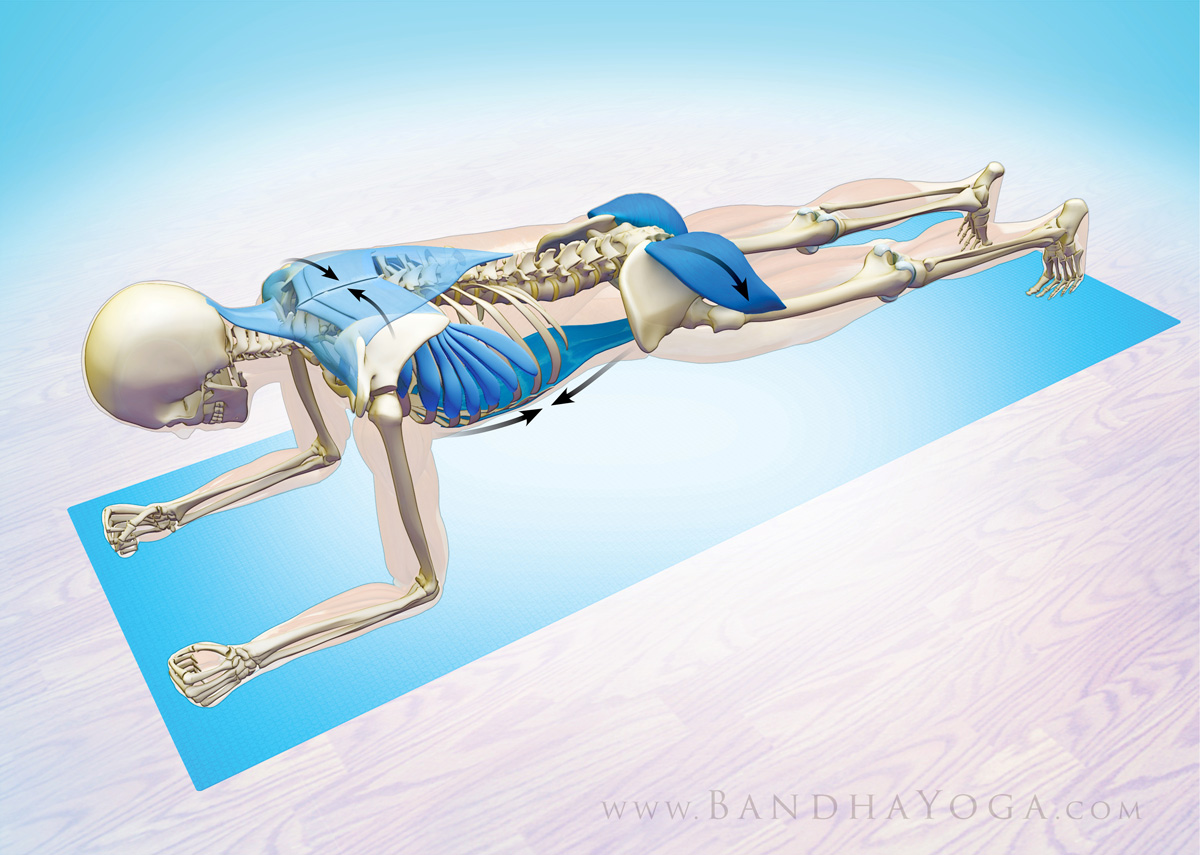
The investigators showed that drawing the shoulder blades (scapulae) towards the midline (adducting) and tilting the pelvis back and down (retroverting) resulted in greater activation of the rectus abdominis, external oblique, internal oblique and erector spinae muscles. 

Figure 1 shows you the muscles involved in this cue. Engage your rhomboids and middle trapezius to draw your shoulder blades towards the midline. At the same time, engage your glutes and rectus abdominis to retrovert the pelvis. Take a look below at how this fits in with the other cues for forearm plank that I describe below on connecting your cuff to your core!

Figure 1: Adducting the shoulder blades and tilting the pelvis helps to activate your core.

Your wrists are not an area where you want to “work through pain”...

Scientific studies have demonstrated that having a strong core can improve the efficiency of your rotator cuff. A strong and efficient rotator cuff leads to improved stability of your shoulder girdle. This decreases load transfer to your wrists in poses where you bear weight on the hands (like arm balances, Dog Pose and Chaturanga).

Conversely, if your core is weak, or you don’t properly engage it in these types of poses, your cuff is less efficient and your wrists have to bear more of the load. Practicing with imbalances of this nature can lead to a cycle that reinforces the imbalance and, ultimately, injury to the wrist (and shoulders).

The Sanskrit term “Ahimsa” means nonviolence or reducing harm (translation from Nicolai Bachman’s book “The Language of Yoga”). While this term is often used in relation to social ethics, it also applies to how we work with the body.

Reducing the risk of harm to your wrists (and other joints) can include decreasing the frequency and duration of poses that load the wrists and correcting imbalances in the postures. If you have developed wrist pain, you should consult a trained medical professional and work under their guidance. Managing wrist pain almost always includes a period of time off and resting from weight bearing poses, usually combined with some light wrist mobility exercises.

In the interim, I’ve found that Hard Style Plank Pose is a great pose to work on. That’s because it’s awesome for strengthening the core and addressing the underlying imbalance and it doesn’t involve weight bearing on the wrist. Figure 1 illustrates this pose.


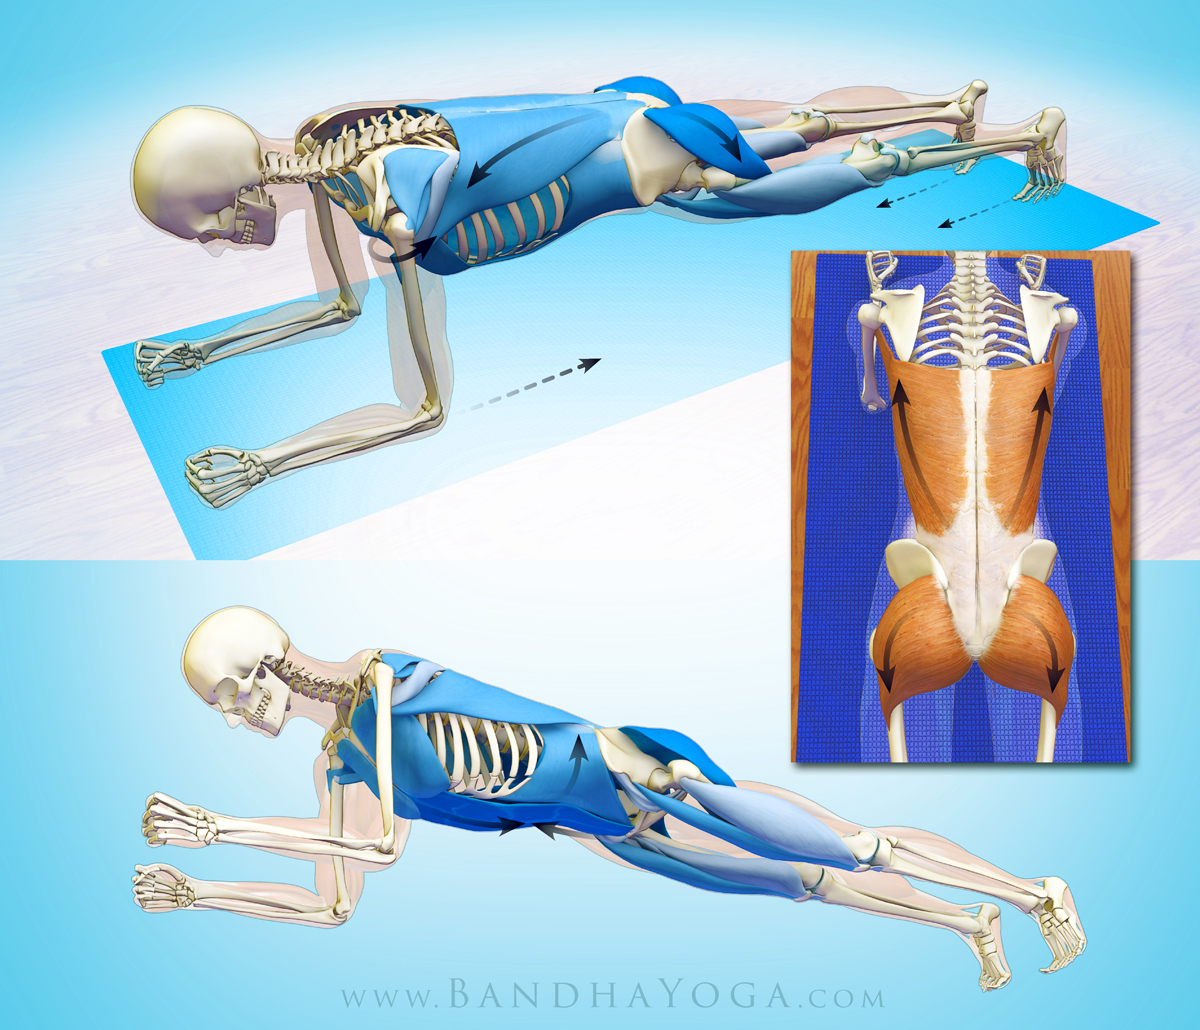
Figure 2: Forearm Plank Pose with the posterior oblique myofascial subsystem.

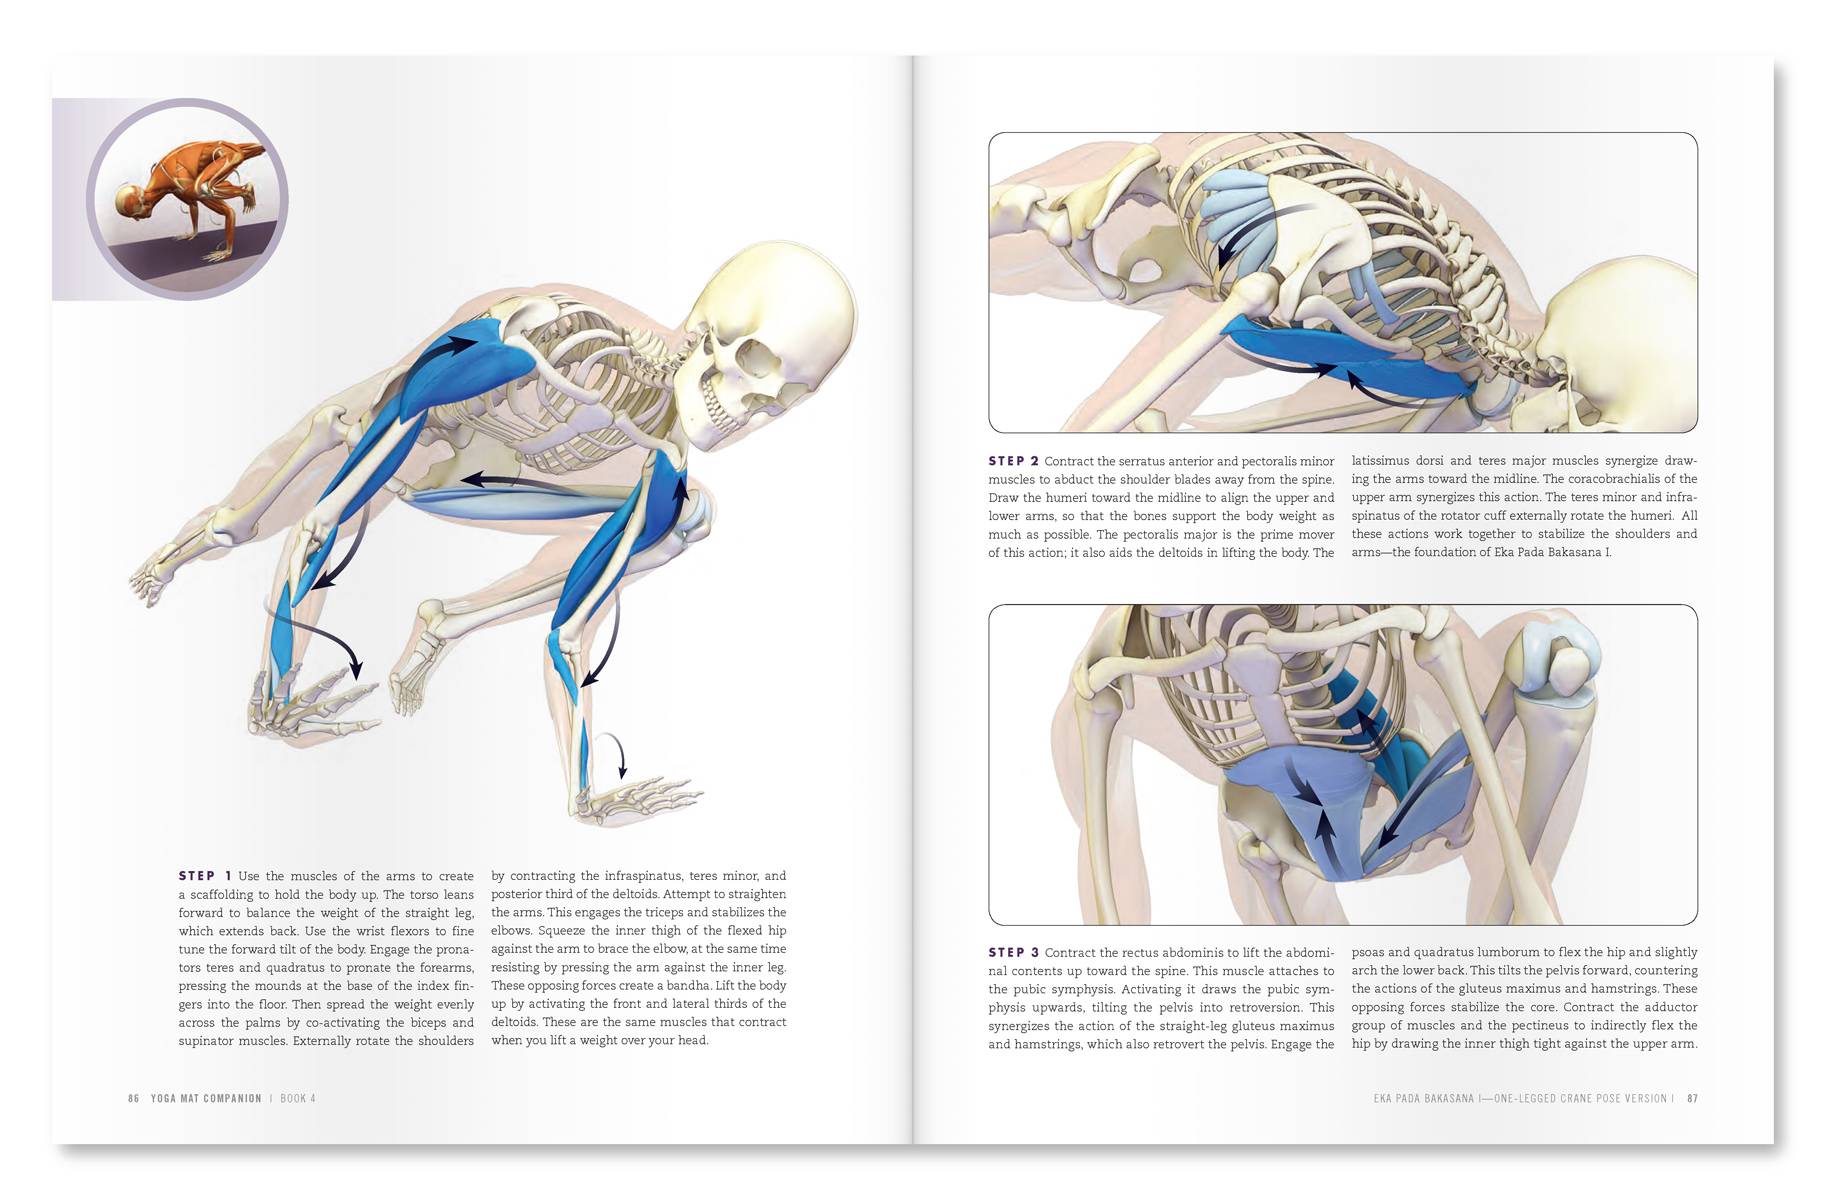
In Hard Style Plank, your weight is on your forearms, with the upper arm bones (the humerus) perpendicular to the floor (in Chaturanga, they are parallel to the floor). Clench your fists to strengthen the muscles that cross the wrists. Then press your forearms into the mat and gently attempt to internally rotate the shoulders. Your forearms are fixed on the mat and don’t actually move. Next, co-contract the external rotators of your shoulders by attempting to externally rotate them. The cue for this is to pretend that your forearms are like windshield wipers that are fixed in place. This co-contracts the subscapularis, infraspinatus and teres minor muscles of the cuff and connects them to your core. Finally, engage the lats and attempt to drag the forearms towards the feet while, at the same time, contracting your abs and gluts. Hold for five to ten seconds and repeat two times. Remember to breathe!

Figure 1 above illustrates the muscles involved here, with color-coding according to the strength of your engagement. Check out the posterior oblique subsystem of the lats, thoraco-lumbar fascia and gluts. Engaging this connection helps stabilize the SI joint. Click here for info and illustrations of side forearm plank and the another myofascial subsystem. Click here and here for more on the gluts and abs connection and the lumbar spine in Chaturanga.

As an aside, soaking your wrists in ice water between sessions of injuring them is a lousy solution; it doesn’t address the underlying imbalances and can lead to more injury. You have to dedicate time off from weight bearing to let your wrists heal, not to the “practice” of injuring them.

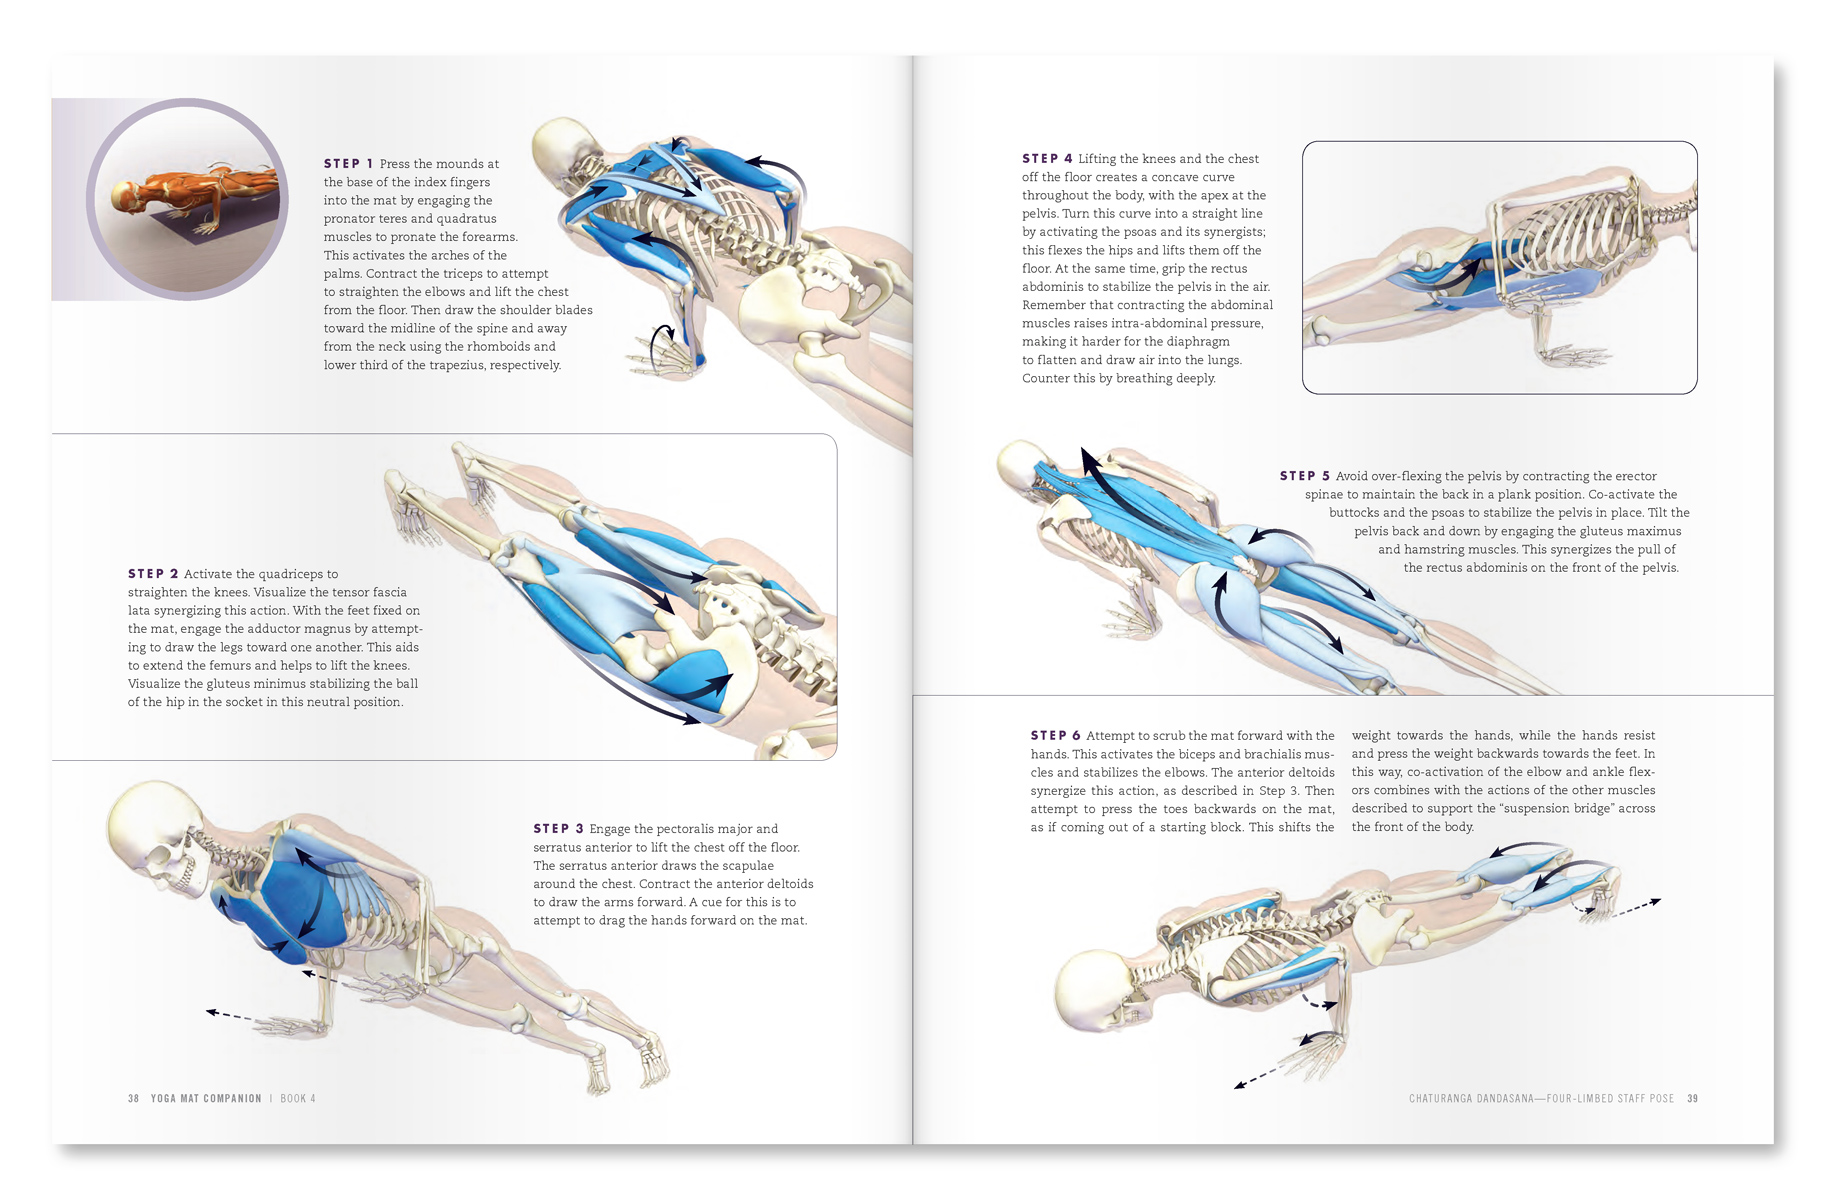
An excerpt from "Yoga Mat Companion 4 - Anatomy for Arm Balances and Inversions".

An excerpt from "Yoga Mat Companion 4 - Anatomy for Arm Balances and Inversions".


Thanks for stopping by--I hope you're enjoying learning about biomechanical concepts like the force couple. Stay tuned for the next post when I'll go over the hamstring connection to the pelvis and lumbar. Click here to browse through the Bandha Yoga book series on anatomy, biomechanics and physiology for yoga.


All the Best,


Ray Long, MD


Shoulder Biomechanics, Part III: The Supraspinatus Muscle

Hello Friends,

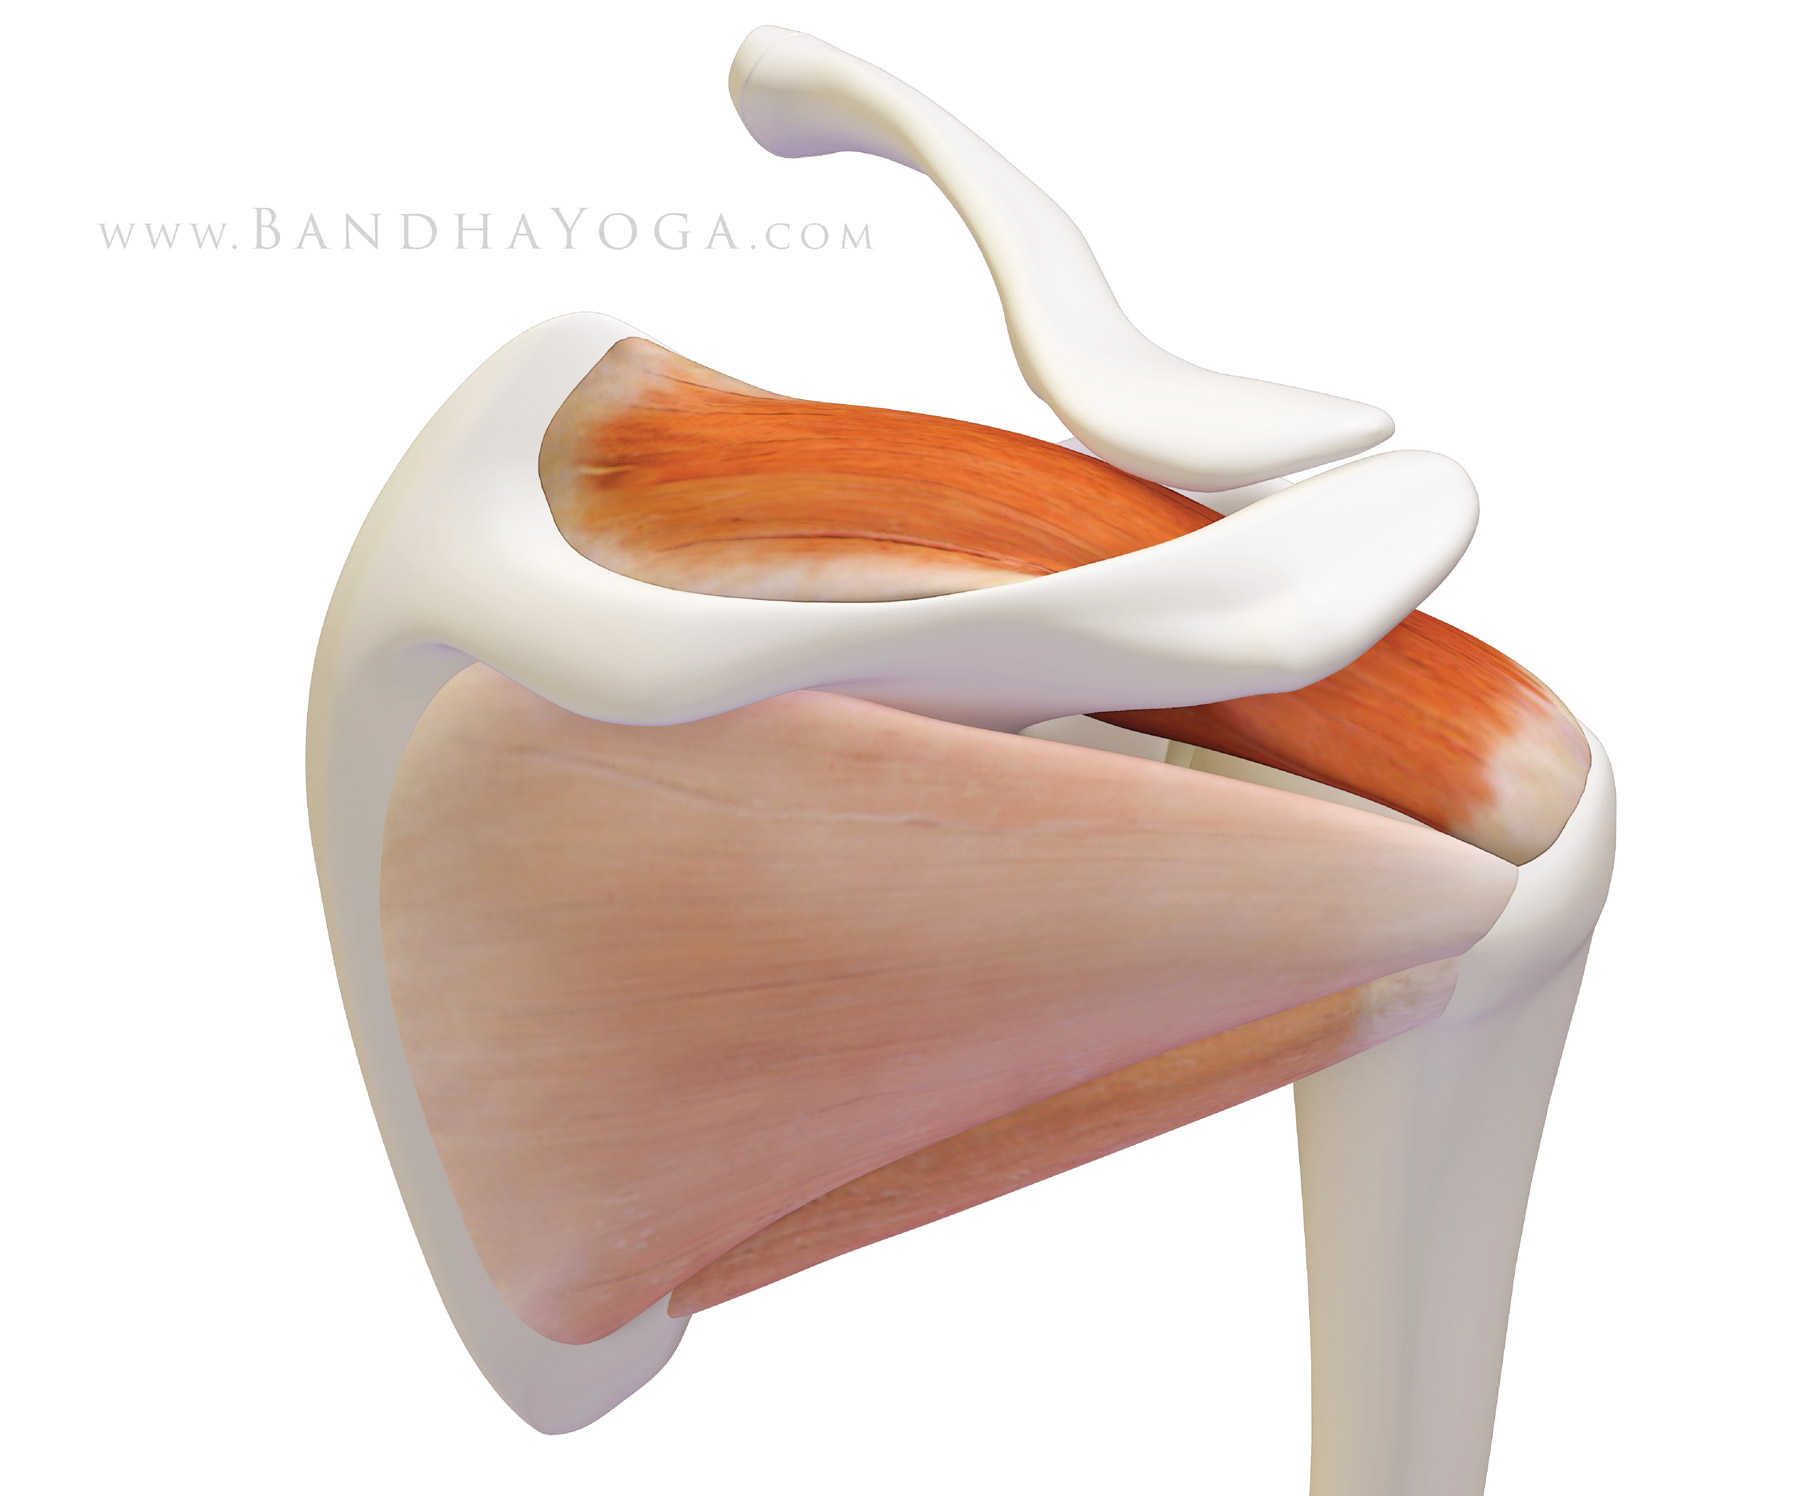
Let’s cap off the muscles of your rotator cuff with the supraspinatus. This muscle originates in a trough-like area above the scapular spine, hence its name supra, which means “above”. The supraspinatus then inserts onto the greater tuberosity just behind where the long head of the biceps enters the shoulder (figure 1).

(We’ve covered the subscapularis, infraspinatus and teres minor muscles along with some key biomechanical points about each muscle—click to review.)


Figure 1: The supraspinatus muscle of the rotator cuff (with the infraspinatus and teres minor faded).


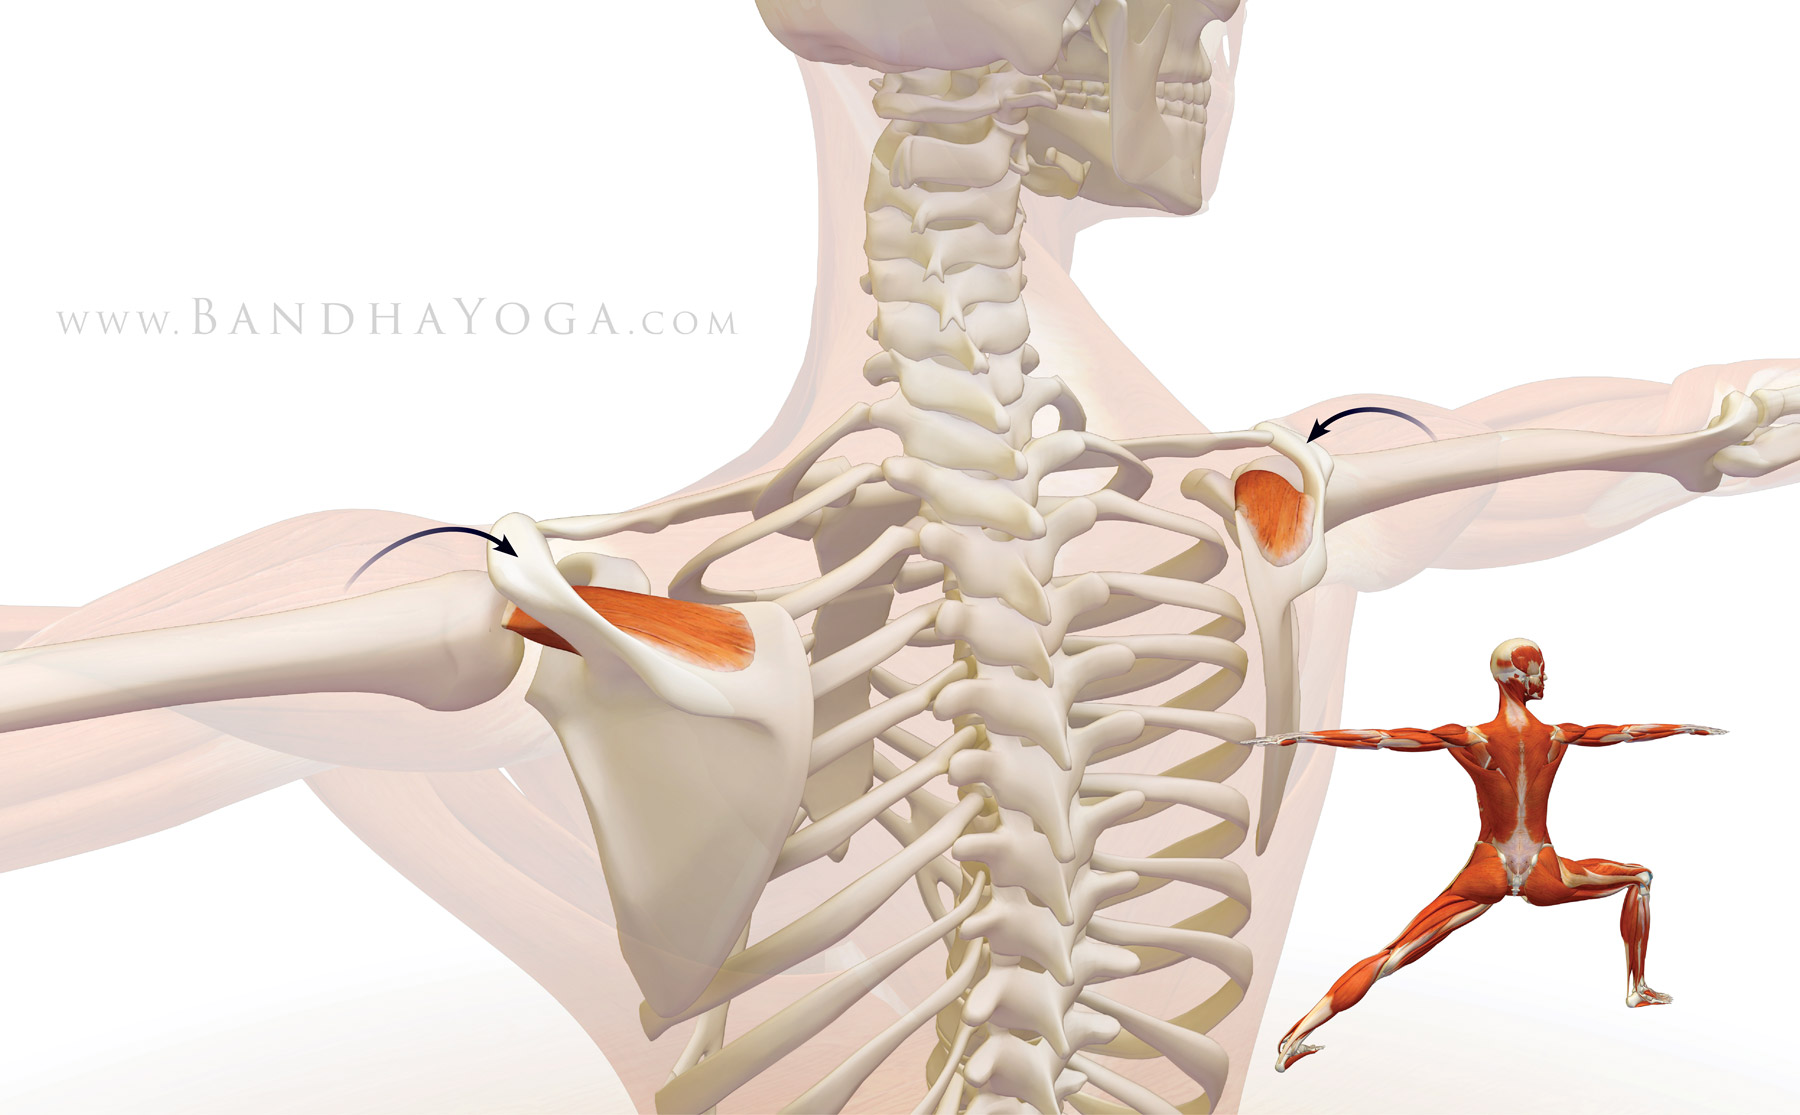
Contracting the supraspinatus abducts the humerus at the glenoid socket (takes the arm out to the side) for the first 15 degrees. After that, it becomes a synergist of the deltoid for abduction. As with the other muscles of the cuff, the supraspinatus also stabilizes the humeral head in the socket. Figure 2 illustrates this in Warrior II. 


Figure 2: The supraspinatus contracting to synergize the deltoid in abducting the shoulders in Warrior II.


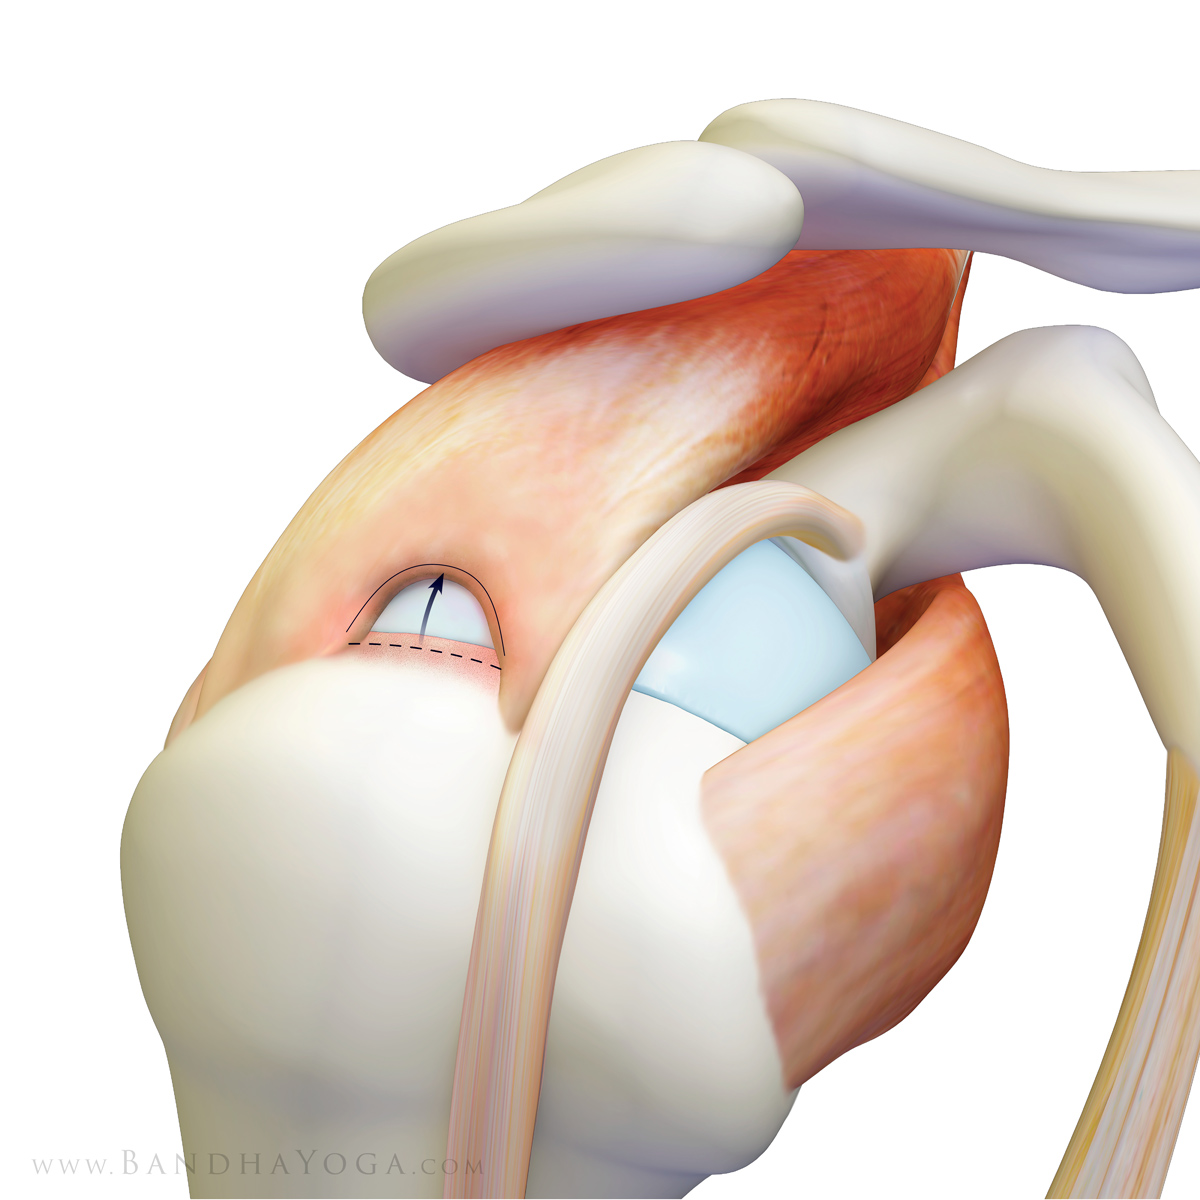
The supraspinatus is the rotator cuff muscle that is most frequently torn. Tears start to become common beyond the age of forty, with an increased incidence in each decade of life. Figure 3 illustrates a supraspinatus rotator cuff tear.


Figure 3: Full thickness tear of the supraspinatus muscle (with the long head of the biceps shown in front of the supraspinatus).


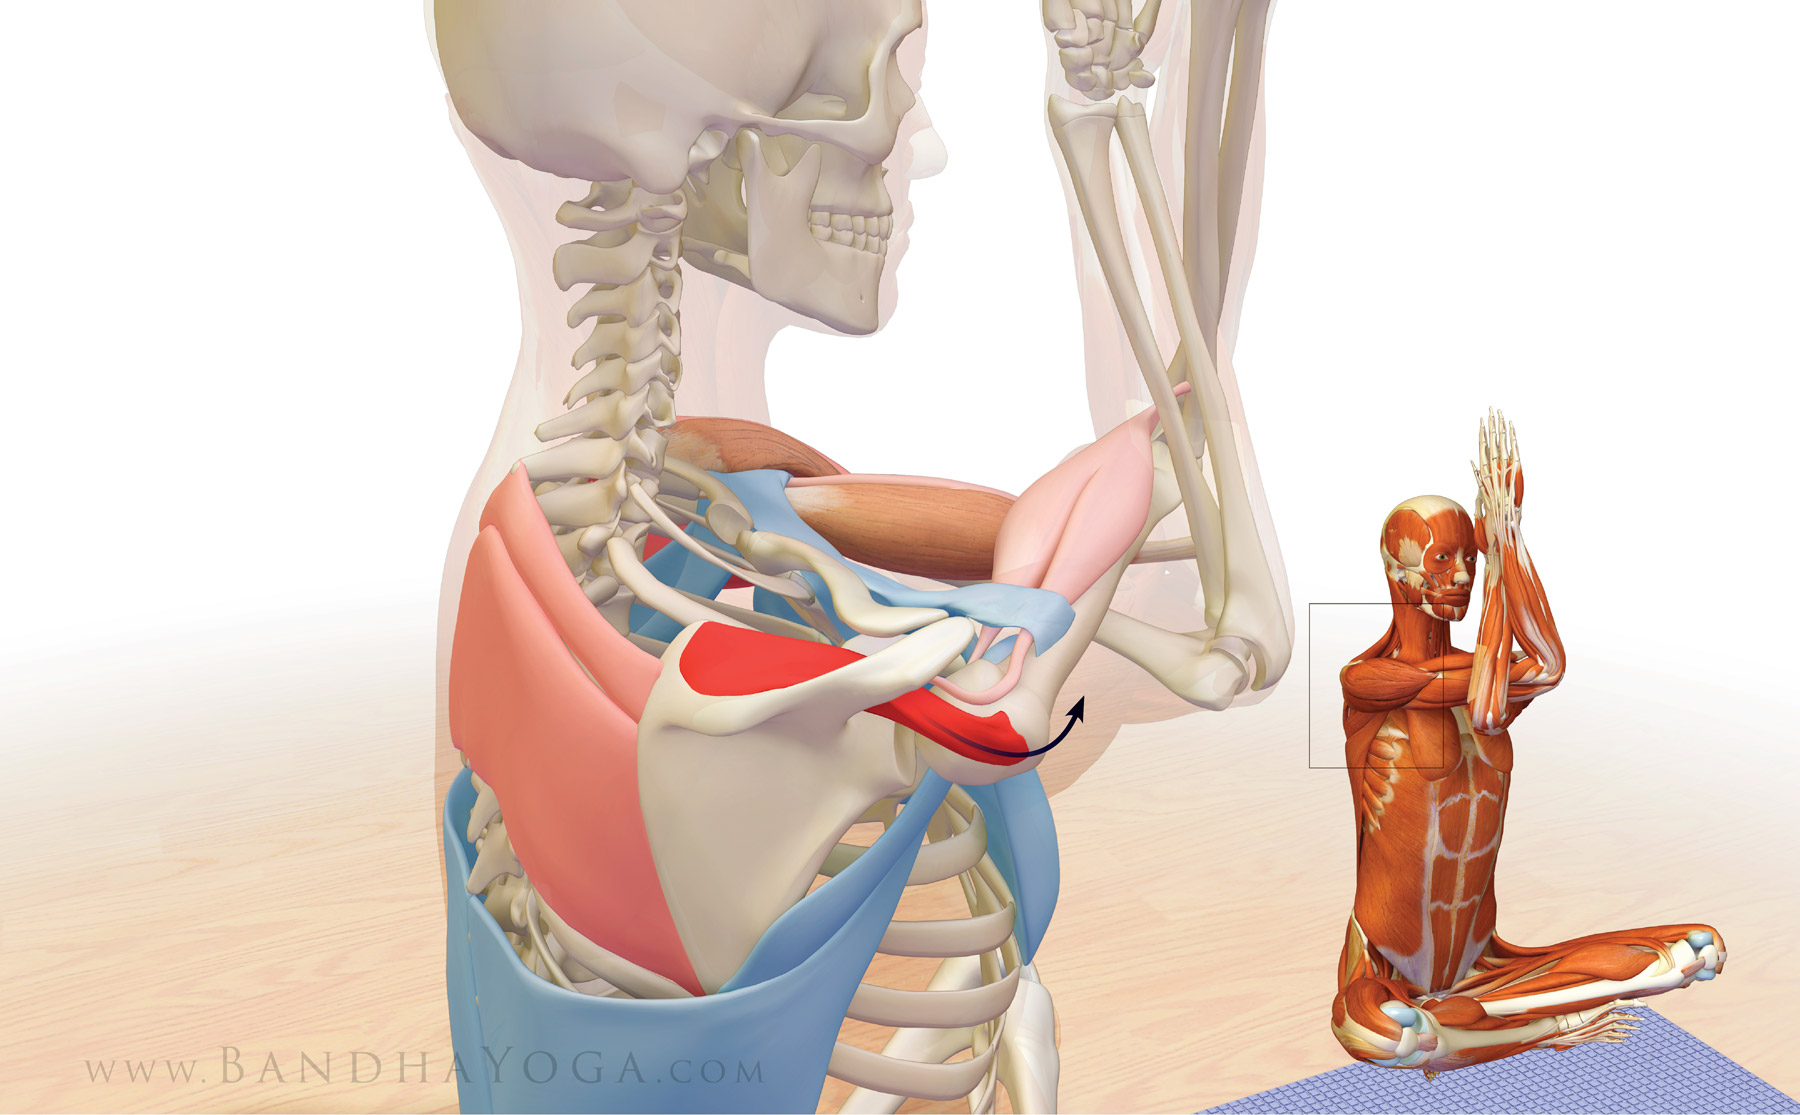
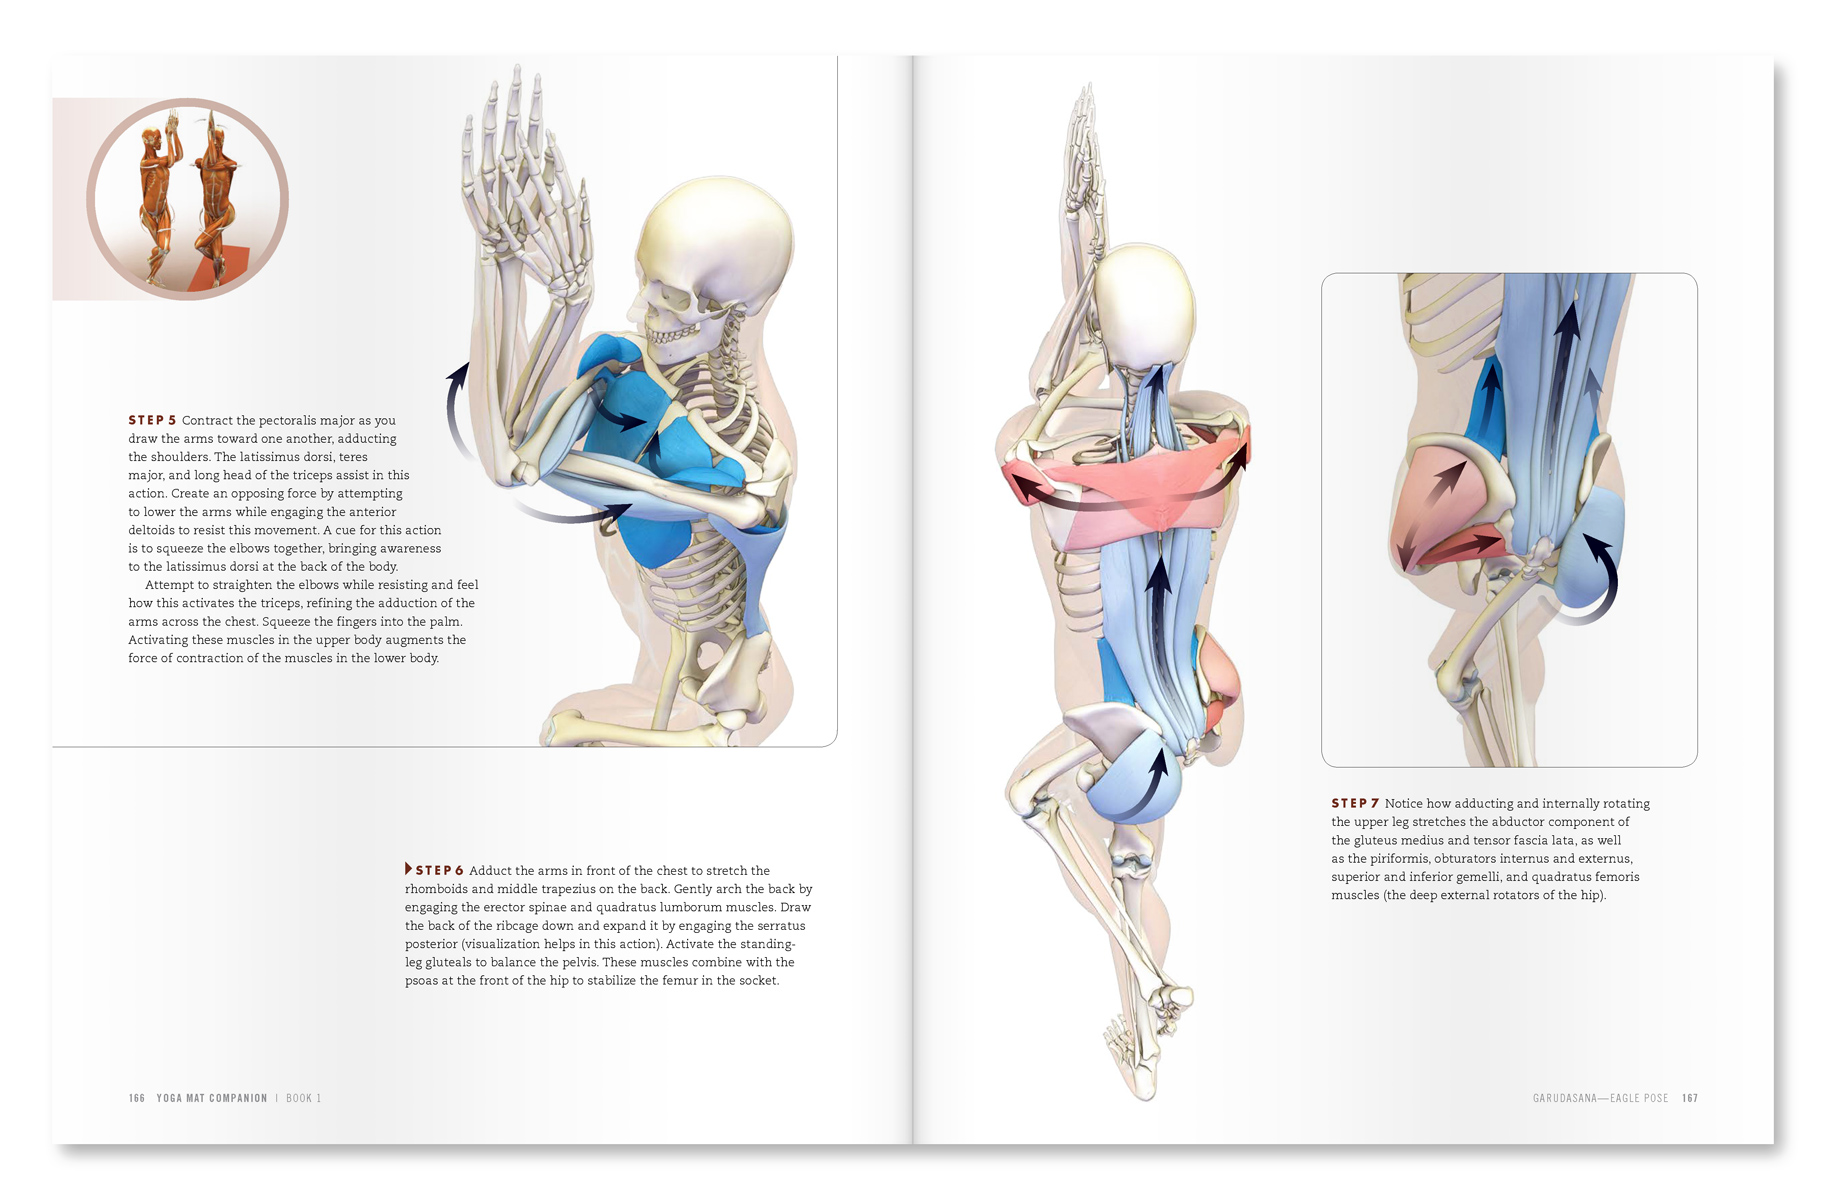
Drawing your arm across the chest (adducting it) stretches the supraspinatus, as well as the capsule of the shoulder and the deltoid muscle. Figure 4 illustrates this action in Garudasana. Note the muscles (colored blue) that contract to stretch the supraspinatus and the muscles that also stretch in this pose (colored red). 


Figure 4: The supraspinatus muscle stretching in Garudasana. The muscles in red are stretching and those in blue are contracting.


Click here to take the rotator cuff quiz to test your knowledge!


An excerpt from "Yoga Mat Companion 1 - Anatomy for Vinyasa Flow and Standing Poses".


An excerpt from "Yoga Mat Companion 4 - Anatomy for Arm Balances and Inversions".

Thanks for stopping by. Stay tuned for the next post when I'll go over the interaction between the deltoid muscle and the rotator cuff. By the end of this four-post series, you'll have a good understanding of the functional anatomy and biomechanics of the shoulder joint as applied to yoga. Click here to browse through the Bandha Yoga book series on anatomy, biomechanics and physiology for yoga.


All the Best,


Ray Long, MD