“. . . according to the Yoga Sutra (3.1), the term [Bandha] refers to the ‘binding’ of consciousness to a particular object or locus (desha), which is the very essence of concentration.” Georg Feuerstein
Once you learn the individual muscles, then it’s time to look at how
they function together during movement and in your asanas. Use your knowledge to develop cues to refine and deepen your poses. Groups of
muscles, ligaments and fascia that function together are known as
“subsystems”. In this post we examine the posterior oblique subsystem in
Bird Dog pose.
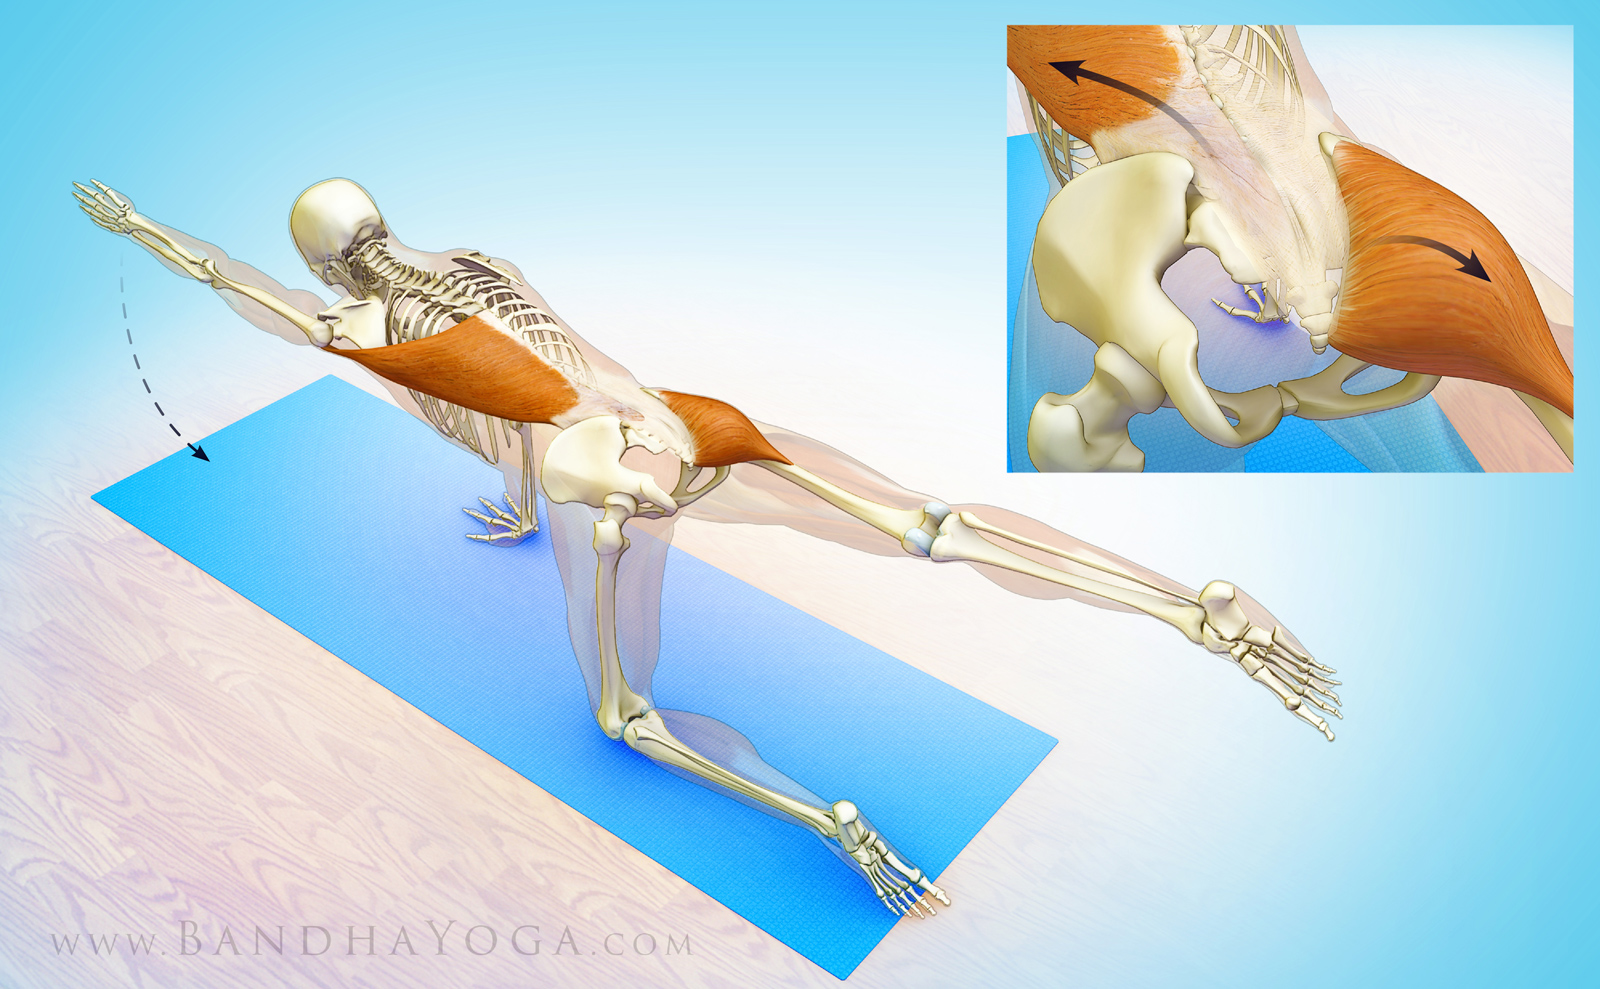
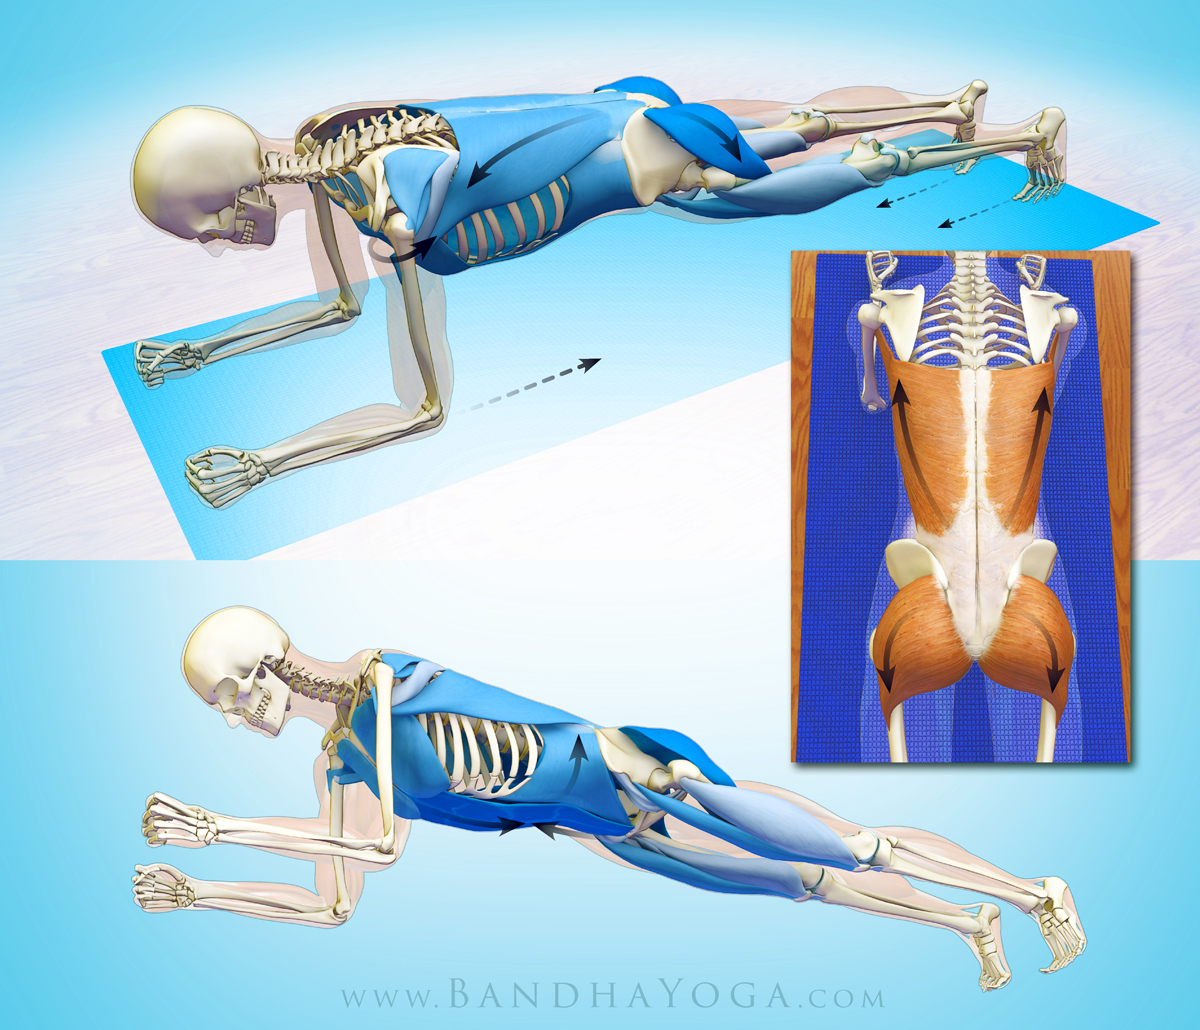
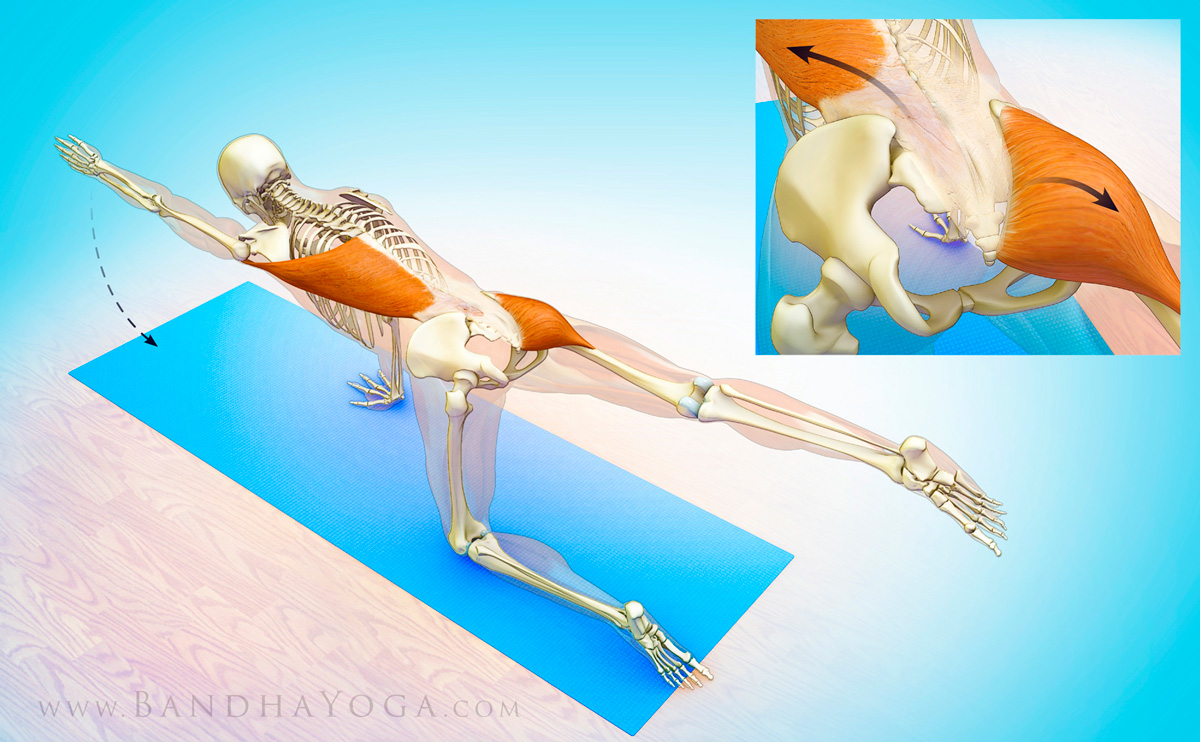
The posterior oblique subsystem is comprised of the gluteus maximus on one side of the body and the latissimus dorsi on
the other side, with the thoracolumbar fascia between (as shown in the
inset illustration). These structures operate synergistically with other
groups of muscles, ligaments and fascia, particularly during rotational
movements such as a golf swing.
Figure 1 illustrates how the fibers of the gluteus maximus and opposite side latissimus
dorsi run perpendicular to the sacroiliac joint. Co-contracting these
two muscles can be used to tension the thoracolumbar fascia, thus stabilizing the
sacroiliac joint. Click here to learn more about the thoracolumbar fascia and
its important role in core stability.
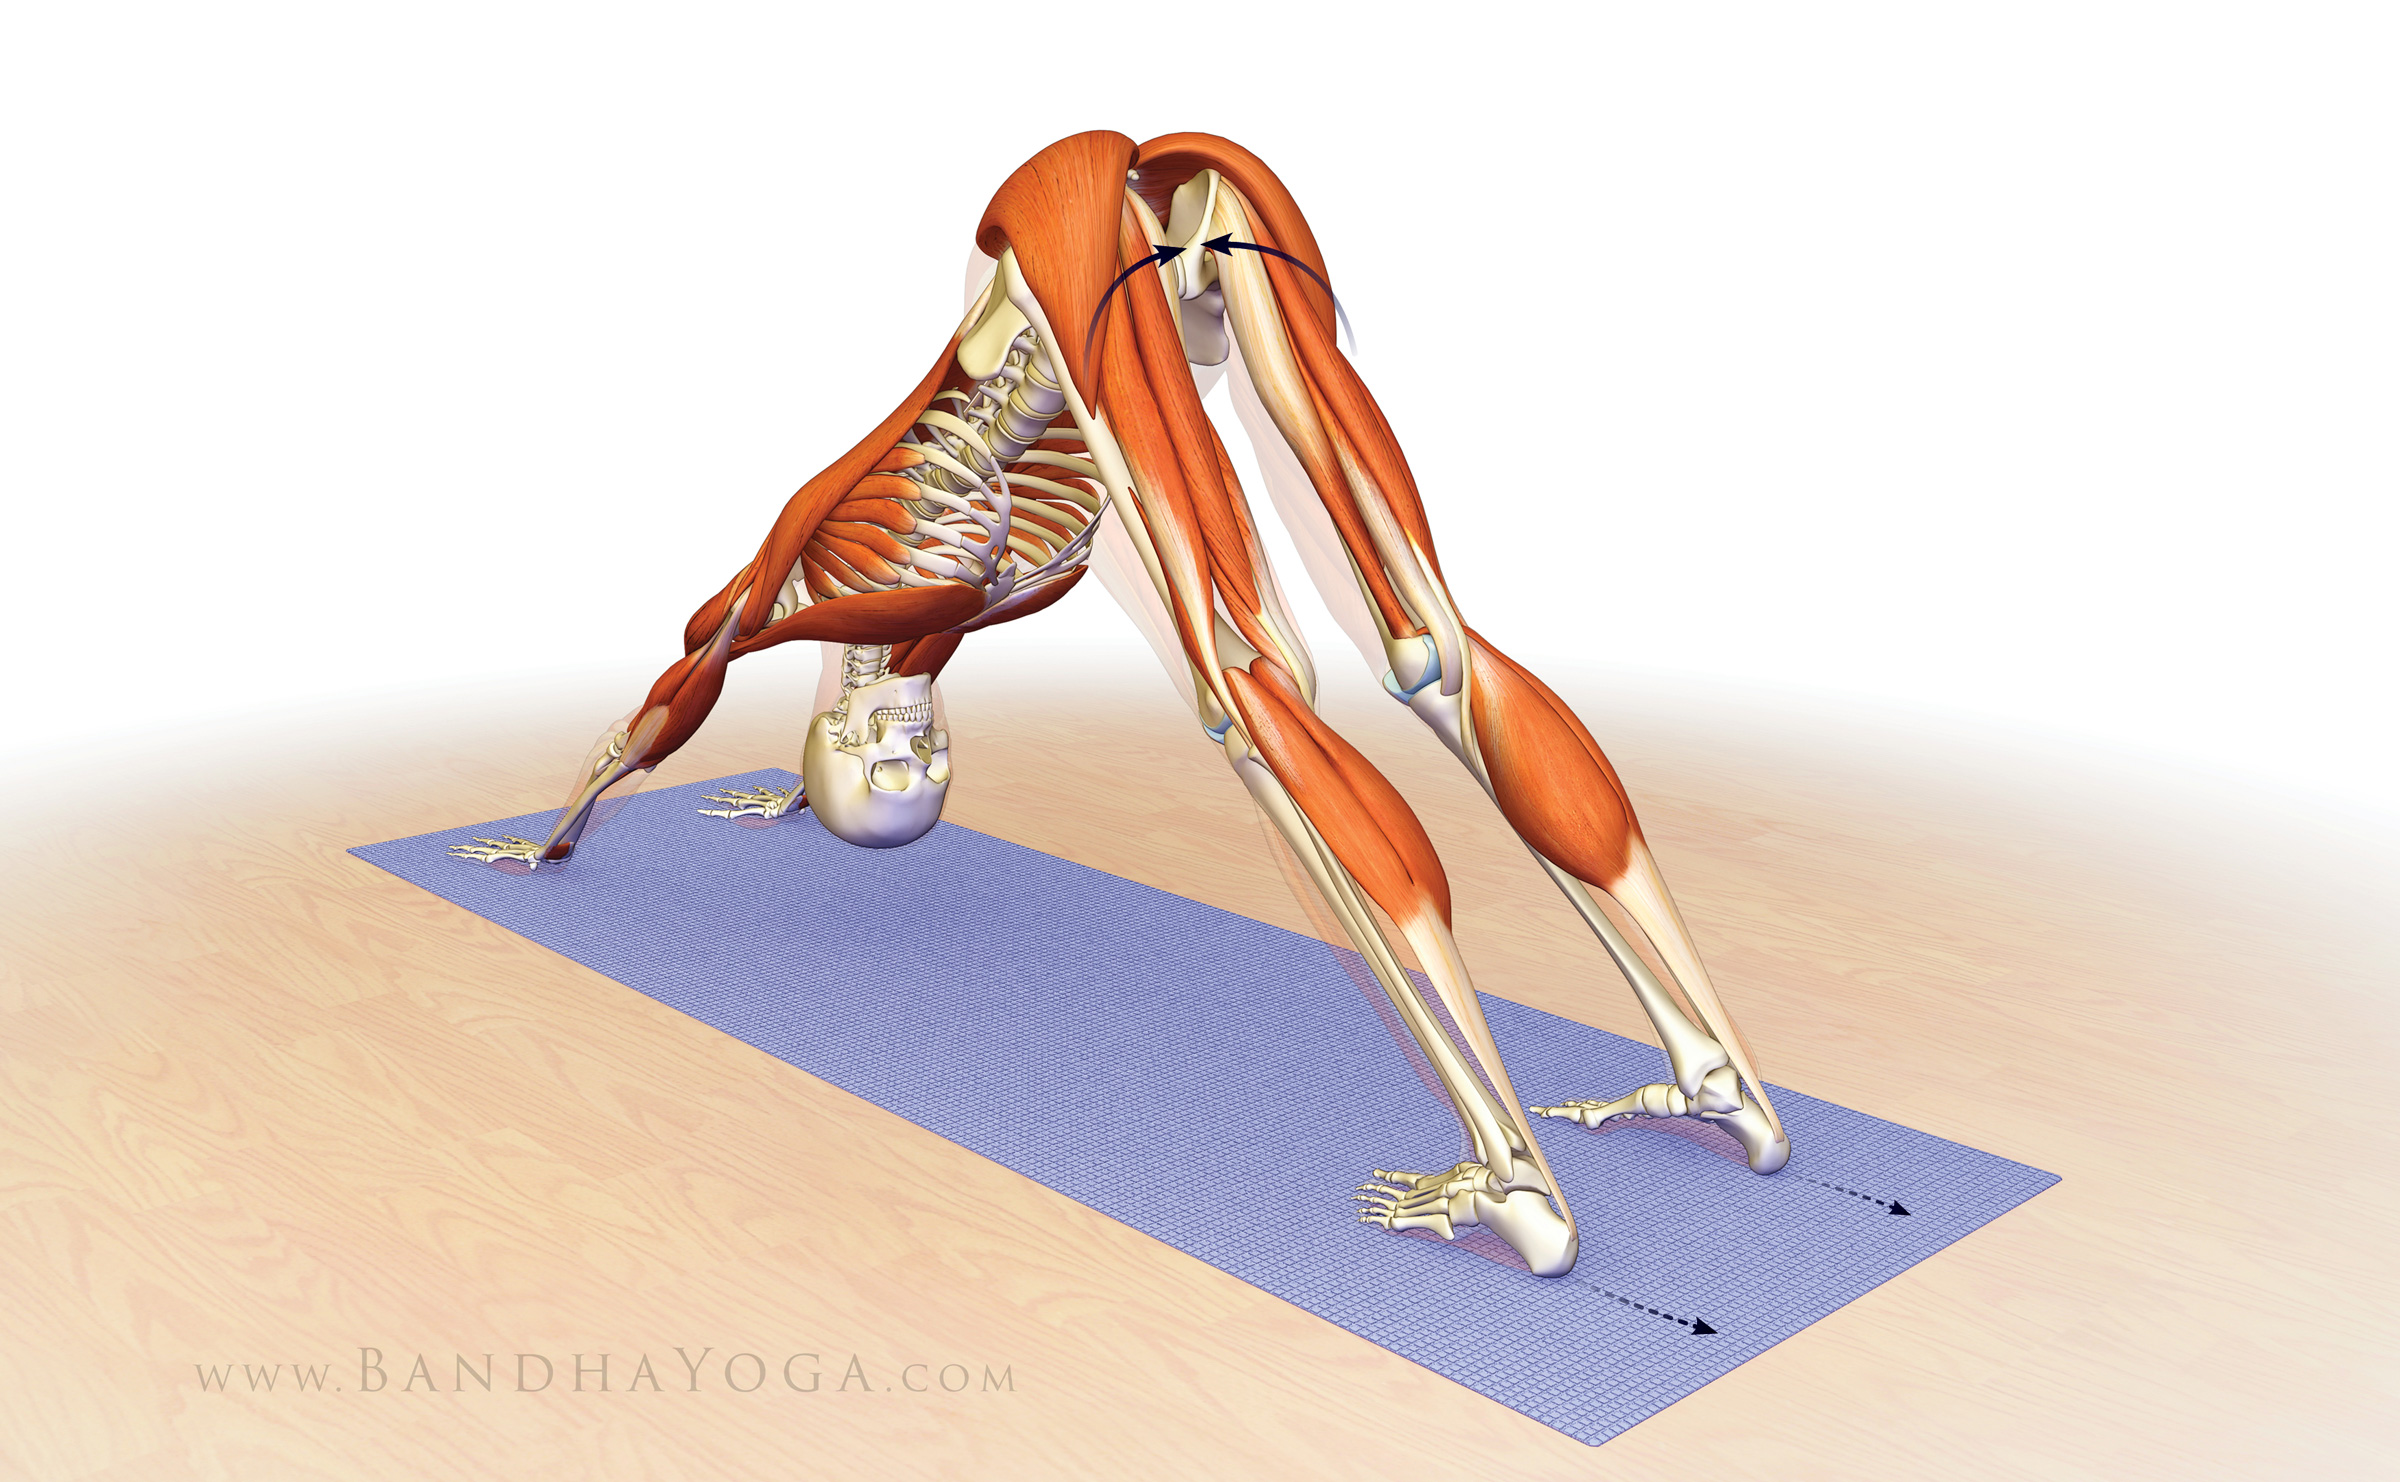
Bird Dog is an excellent pose for strengthening the core and engaging
the posterior oblique subsystem. A good cue for activating the
latissimus dorsi muscle in this pose is to straighten the arm forward
and then imagine pushing down with the hand against an immoveable object
(as shown with the dotted arrow). Alternatively, imagine pulling down
on a rope with the forward hand. Combine this isometric contraction of the lats with engaging
the gluts on the side of the lifted leg to augment the stabilizing
effect on the SI joint.
Figure 1: The posterior oblique subsystem and sacroiliac joint in Bird Dog Pose.
Click here to check our our previous post, "Connect Your Cuff to Your Core in Forearm Plank" and see how this subsystem works in plank pose. With this in mind, what other poses can
be used to activate the posterior oblique myofascial subsystem? Place
your answer in the comment section below…
Thanks
for stopping by--I hope you're enjoying learning about biomechanical
concepts like the myofascial subsystems and how they work in your poses. Stay tuned for the next post when I'll go over the hamstring connection to the pelvis and lumbar. Click here to browse through the Bandha Yoga book series on anatomy, biomechanics and physiology for yoga.
One of my goals in reviewing the scientific literature is to identify information that can be translated into a practical cues that you can integrate into your practice. With this in mind, I want to call your attention to a new study from the Journal of Strength and Conditioning Research.
The investigators showed that drawing the shoulder blades (scapulae) towards the midline (adducting) and tilting the pelvis back and down (retroverting) resulted in greater activation of the rectus abdominis, external oblique, internal oblique and erector spinae muscles.
Figure 1 shows you the muscles involved in this cue. Engage your rhomboids and middle trapezius to draw your shoulder blades towards the midline. At the same time, engage your glutes and rectus abdominis to retrovert the pelvis. Take a look below at how this fits in with the other cues for forearm plank that I describe below on connecting your cuff to your core!
Figure 1: Adducting the shoulder blades and tilting the pelvis helps to activate your core.
Your wrists are not an area where you want to “work through pain”...
Scientific studies have demonstrated that having a strong core can improve the efficiency of your rotator cuff. A strong and efficient rotator cuff leads to improved stability of your shoulder girdle. This decreases load transfer to your wrists in poses where you bear weight on the hands (like arm balances, Dog Pose and Chaturanga).
Conversely, if your core is weak, or you don’t properly engage it in these types of poses, your cuff is less efficient and your wrists have to bear more of the load. Practicing with imbalances of this nature can lead to a cycle that reinforces the imbalance and, ultimately, injury to the wrist (and shoulders).
The Sanskrit term “Ahimsa” means nonviolence or reducing harm (translation from Nicolai Bachman’s book “The Language of Yoga”). While this term is often used in relation to social ethics, it also applies to how we work with the body.
Reducing the risk of harm to your wrists (and other joints) can include decreasing the frequency and duration of poses that load the wrists and correcting imbalances in the postures. If you have developed wrist pain, you should consult a trained medical professional and work under their guidance. Managing wrist pain almost always includes a period of time off and resting from weight bearing poses, usually combined with some light wrist mobility exercises.
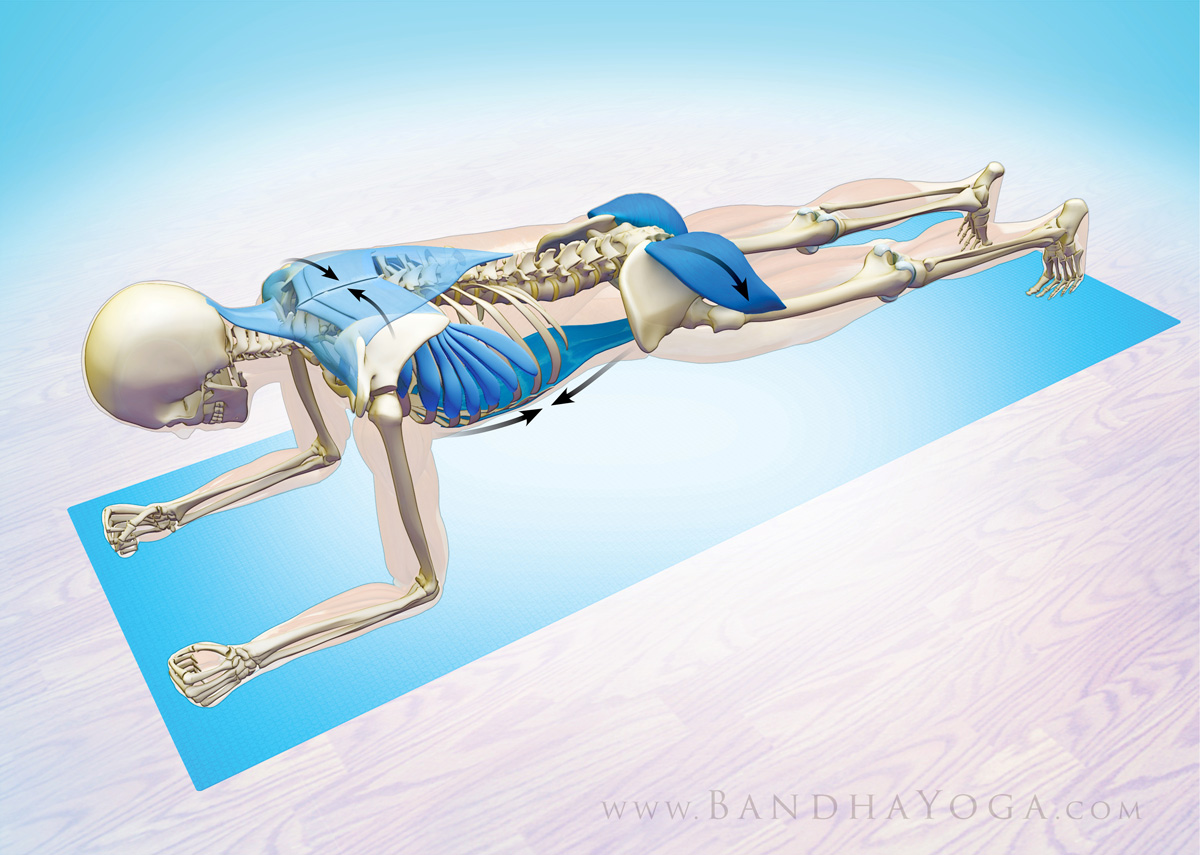
In the interim, I’ve found that Hard Style Plank Pose is a great pose to work on. That’s because it’s awesome for strengthening the core and addressing the underlying imbalance and it doesn’t involve weight bearing on the wrist. Figure 1 illustrates this pose.
Figure 2: Forearm Plank Pose with the posterior oblique myofascial subsystem.
In Hard Style Plank, your weight is on your forearms, with the upper arm bones (the humerus) perpendicular to the floor (in Chaturanga, they are parallel to the floor). Clench your fists to strengthen the muscles that cross the wrists. Then press your forearms into the mat and gently attempt to internally rotate the shoulders. Your forearms are fixed on the mat and don’t actually move. Next, co-contract the external rotators of your shoulders by attempting to externally rotate them. The cue for this is to pretend that your forearms are like windshield wipers that are fixed in place. This co-contracts the subscapularis, infraspinatus and teres minor muscles of the cuff and connects them to your core. Finally, engage the lats and attempt to drag the forearms towards the feet while, at the same time, contracting your abs and gluts. Hold for five to ten seconds and repeat two times. Remember to breathe! Figure 1 above illustrates the muscles involved here, with color-coding according to the strength of your engagement. Check out the posterior oblique subsystem of the lats, thoraco-lumbar fascia and gluts. Engaging this connection helps stabilize the SI joint. Click here for info and illustrations of side forearm plank and the another myofascial subsystem. Click here and here for more on the gluts and abs connection and the lumbar spine in Chaturanga.
As an aside, soaking your wrists in ice water between sessions of injuring them is a lousy solution; it doesn’t address the underlying imbalances and can lead to more injury. You have to dedicate time off from weight bearing to let your wrists heal, not to the “practice” of injuring them.
Thanks for stopping by--I hope you're enjoying learning about biomechanical concepts like the force couple. Stay tuned for the next post when I'll go over the hamstring connection to the pelvis and lumbar. Click here to browse through the Bandha Yoga book series on anatomy, biomechanics and physiology for yoga.
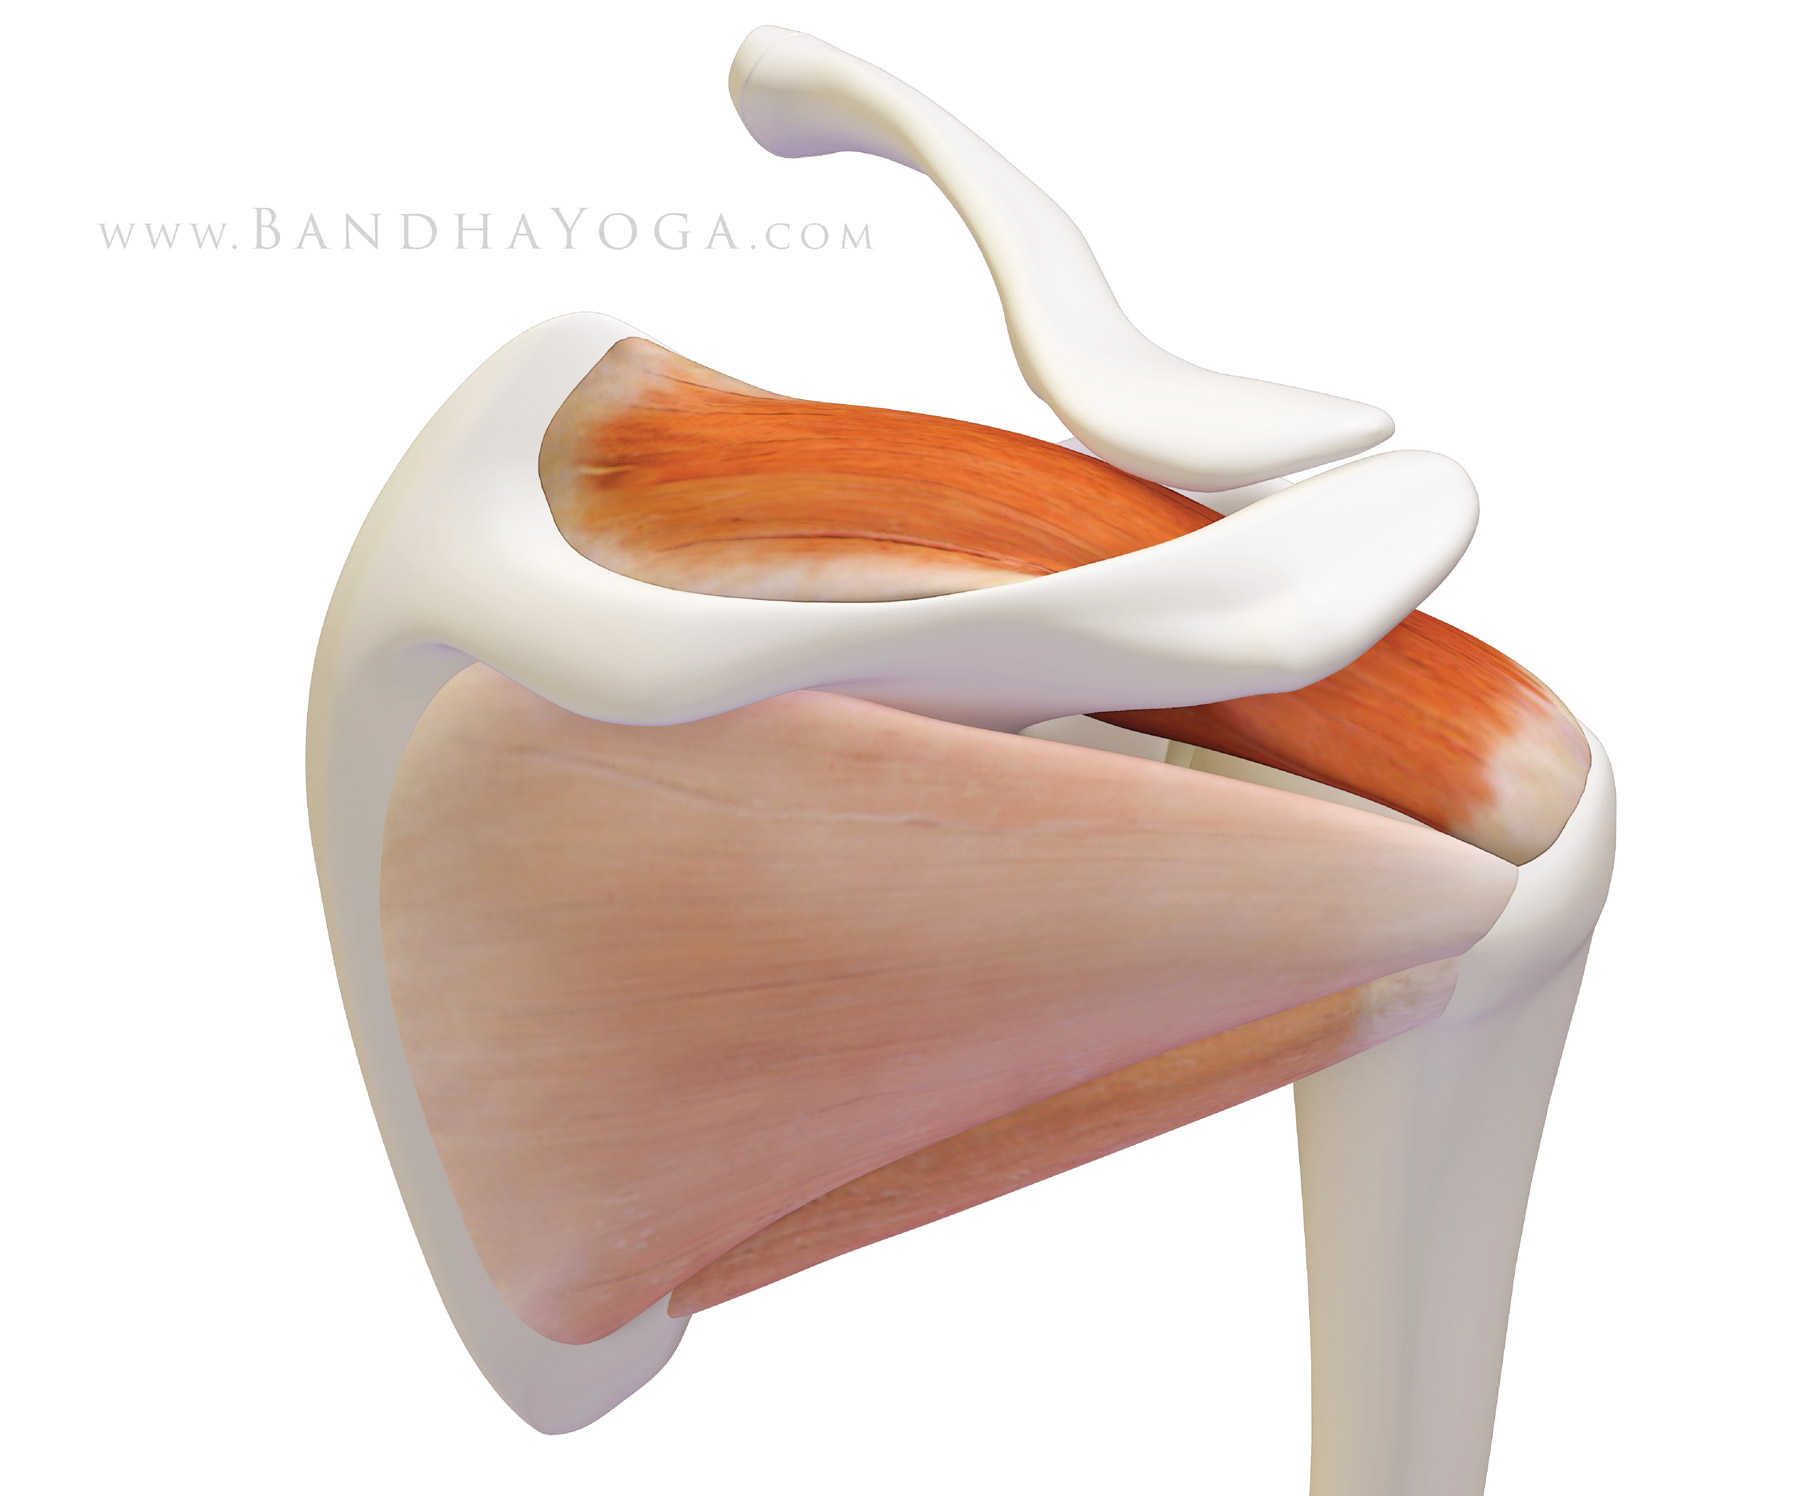
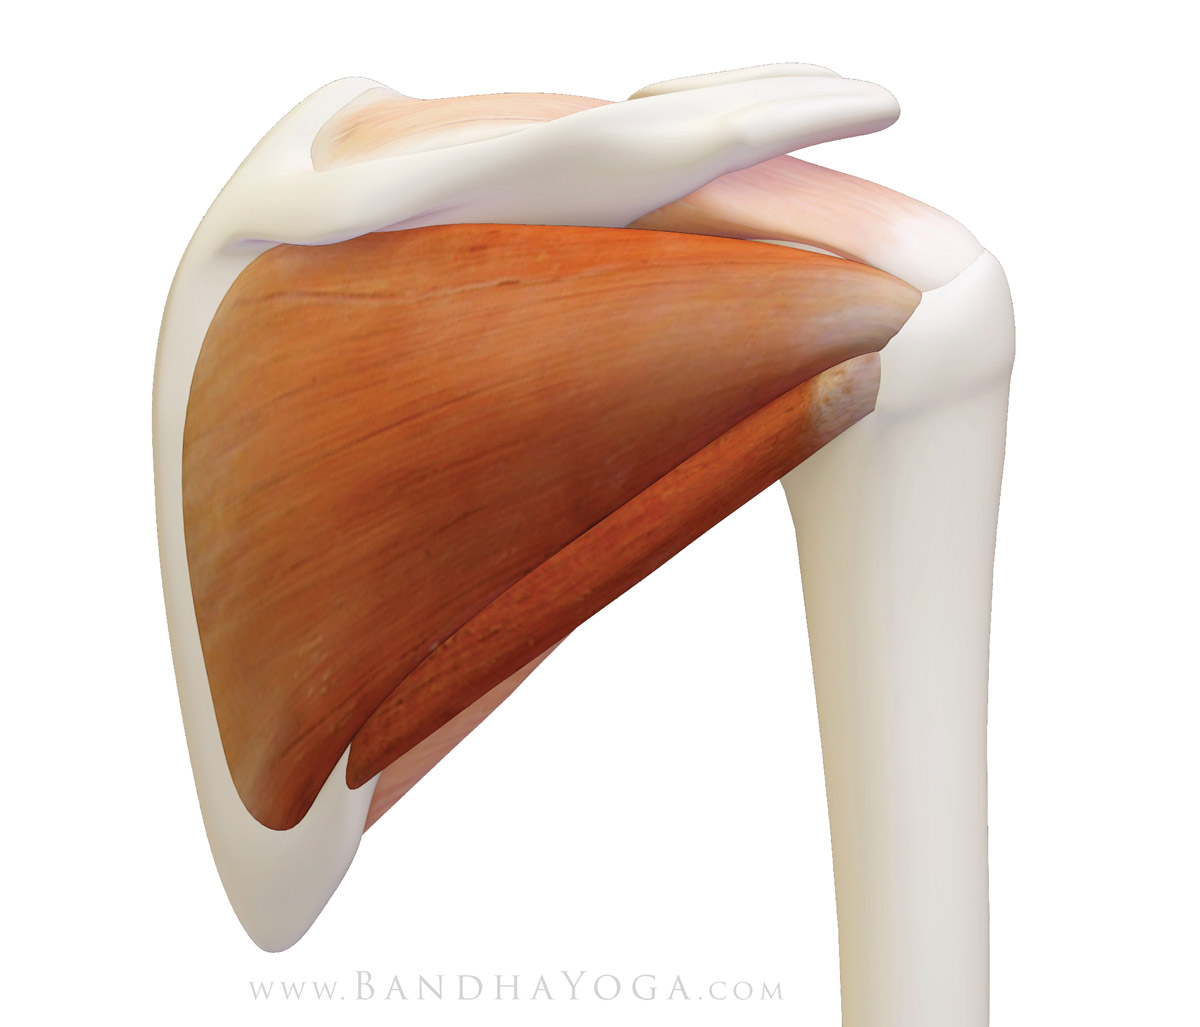
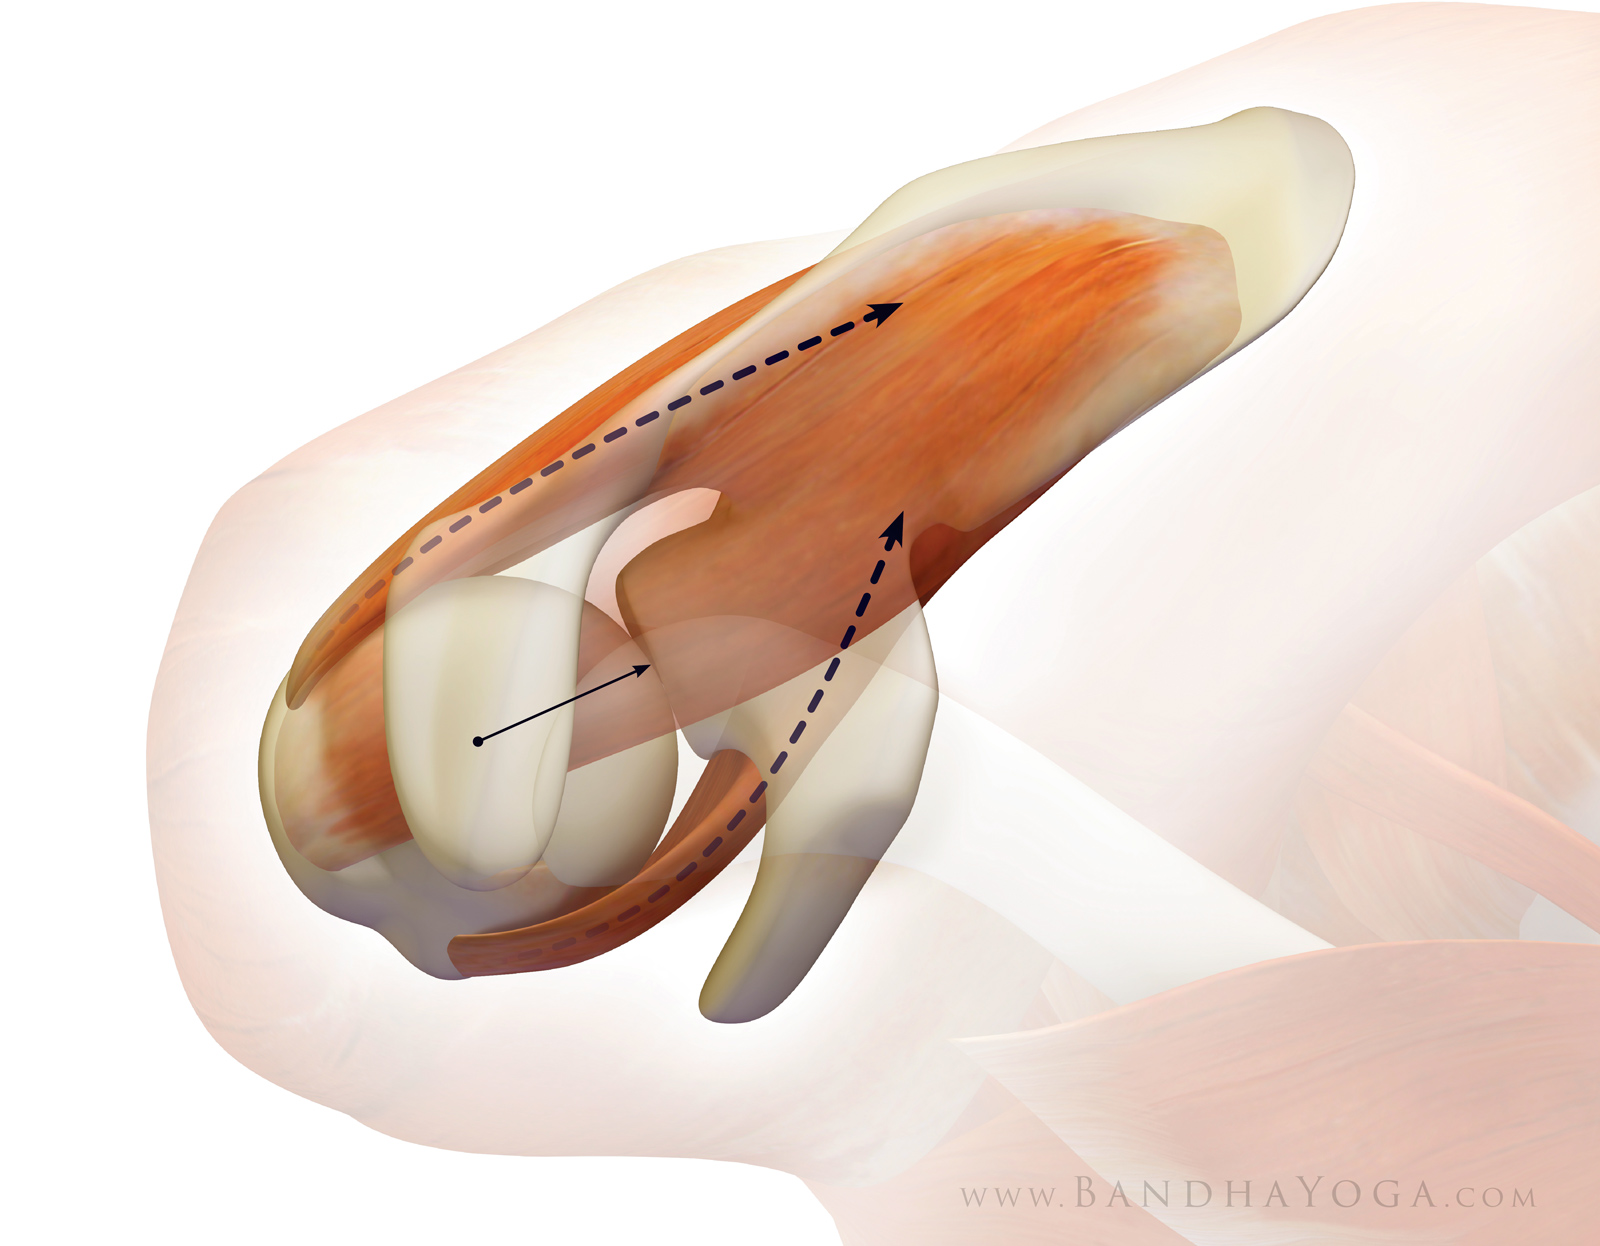
Let’s cap off the muscles of your rotator cuff with the supraspinatus.
This muscle originates in a trough-like area above the scapular spine, hence
its name supra, which means “above”. The supraspinatus then inserts onto the
greater tuberosity just behind where the long head of the biceps enters the
shoulder (figure 1).
Figure 1: The supraspinatus muscle of the rotator cuff (with the infraspinatus and teres minor faded).
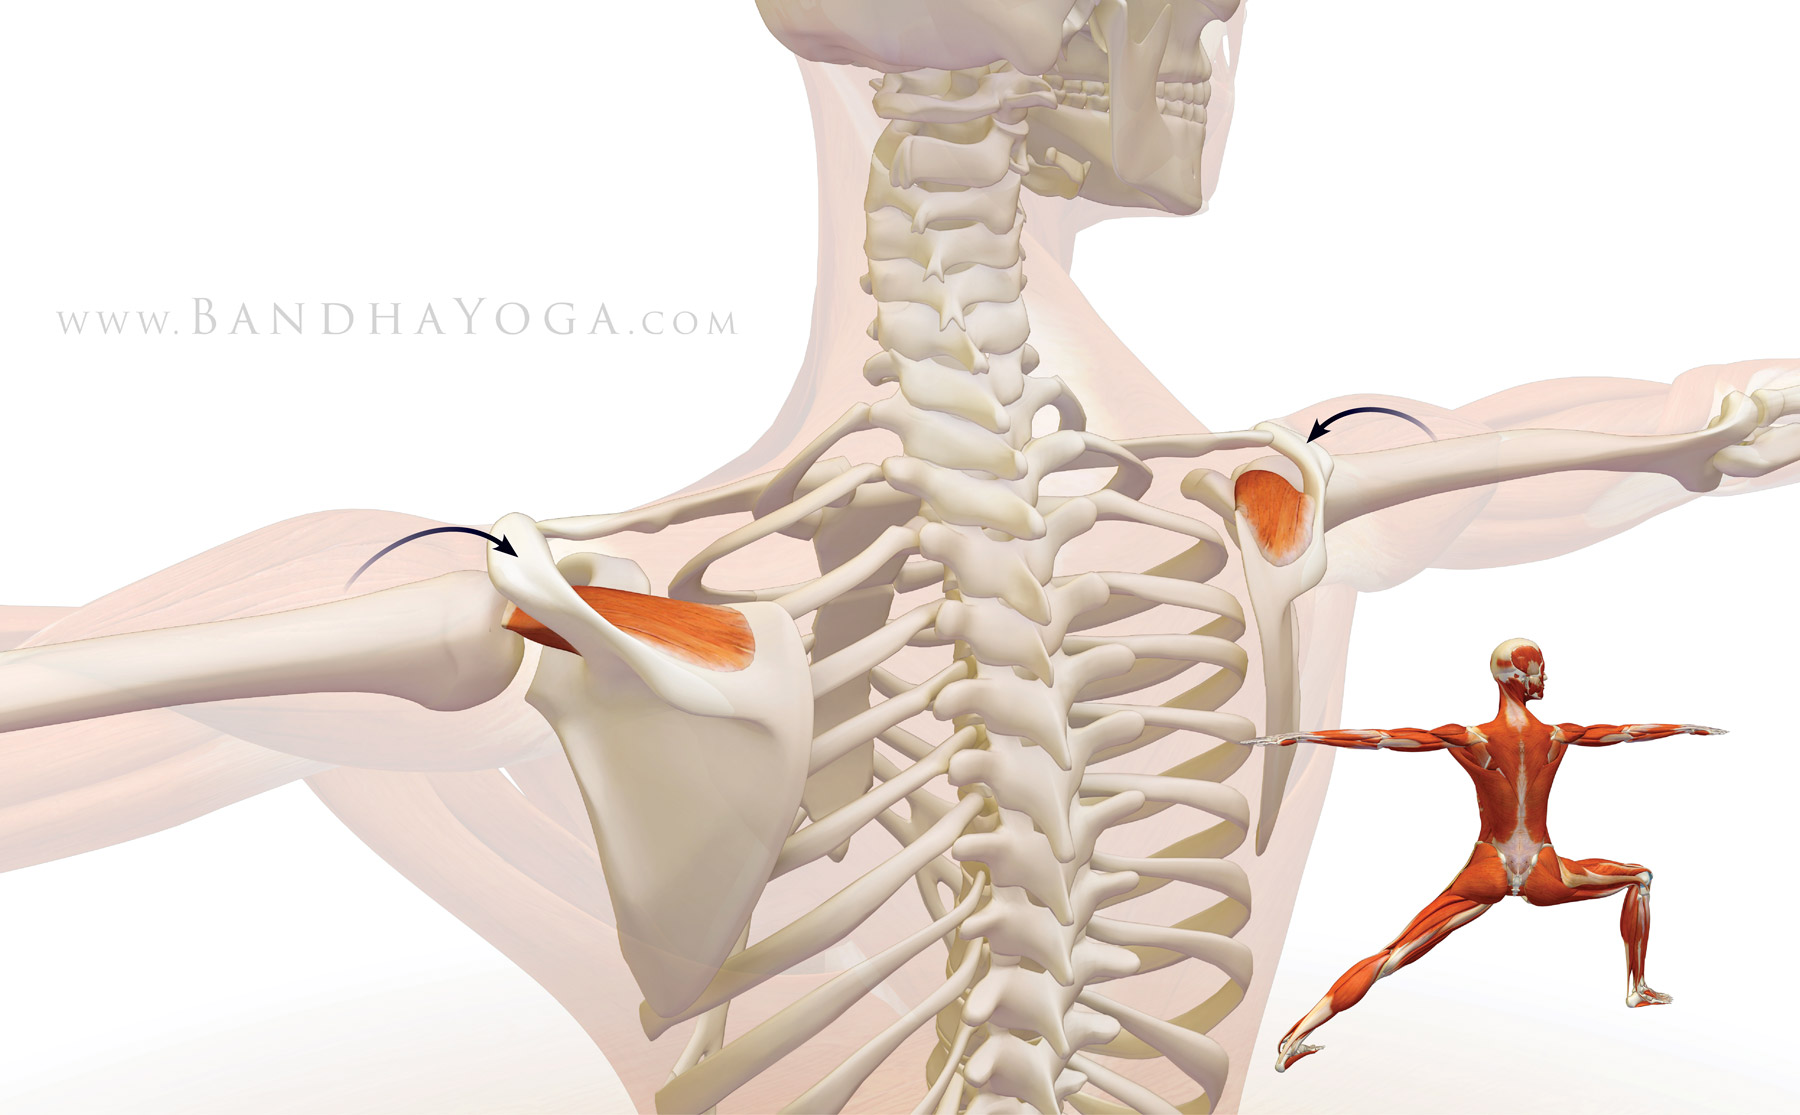
Contracting the supraspinatus abducts the humerus at the
glenoid socket (takes the arm out to the side) for the first 15 degrees. After
that, it becomes a synergist of the deltoid for abduction. As with the other
muscles of the cuff, the supraspinatus also stabilizes the humeral head in the
socket. Figure 2 illustrates this in Warrior II.
Figure 2: The supraspinatus contracting to synergize the deltoid in abducting the shoulders in Warrior II.
The supraspinatus is the rotator cuff muscle that is most frequently torn. Tears start to become common beyond the age of forty, with an increased incidence in each decade of life. Figure 3 illustrates a supraspinatus rotator cuff tear.
Figure 3: Full thickness tear of the supraspinatus muscle (with the long head of the biceps shown in front of the supraspinatus).
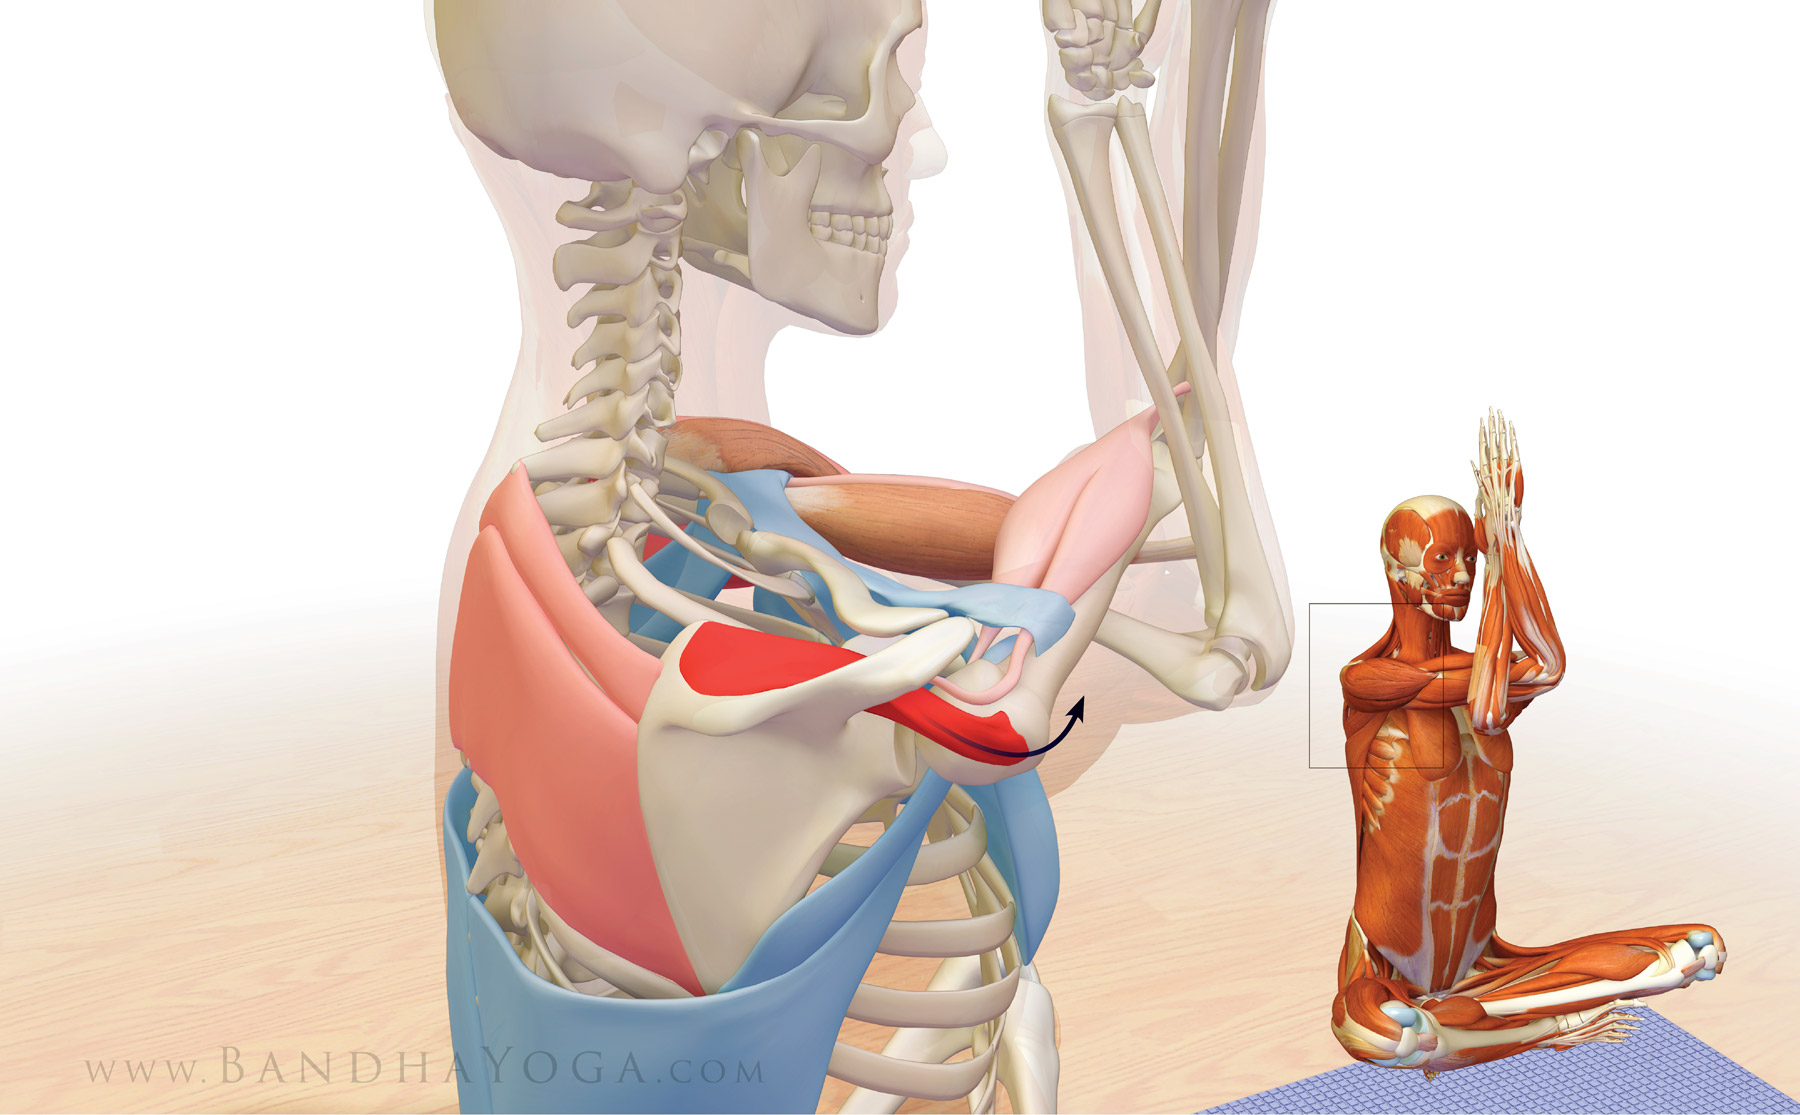
Drawing your arm across the chest (adducting it) stretches
the supraspinatus, as well as the capsule of the shoulder and the deltoid
muscle. Figure 4 illustrates this action in Garudasana. Note the muscles (colored blue) that
contract to stretch the supraspinatus and the muscles that also stretch in this pose (colored red).
Figure 4: The supraspinatus muscle stretching in Garudasana. The muscles in red are stretching and those in blue are contracting.
Thanks for stopping by. Stay tuned for the next post when I'll go over the interaction between the deltoid muscle and the rotator cuff. By the end of this four-post series, you'll have a good understanding of the functional anatomy and biomechanics of the shoulder joint as applied to yoga. Click here to browse through the Bandha Yoga book series on anatomy, biomechanics and physiology for yoga.
Welcome to
the second of the four-part series on the shoulder joint. Last week I discussed
the subscapularis muscle, which is the main shoulder internal rotator. Now
we’re on to the antagonist muscles of the subscap, namely, the infraspinatus
and teres minor. The infraspinatus arises in a trough below the scapular spine,
hence its name (“infra” means below). The teres minor arises back part (dorsum)
of the scapula along its outer (lateral) border. The infraspinatus and teres
minor insert onto the back part of the greater tuberosity of the humerus, as
shown in Figure 1.
These
muscles externally rotate the humerus, with the infraspinatus being the
strongest external rotator of the joint. The infraspinatus and teres minor also
function to stabilize the humeral head in the socket (glenoid).
Figure 1: The infraspinatus and teres minor muscles of the rotator cuff (the supraspinatus is the faded muscle on top).
The Force Couple
These
muscles combine with the subscapularis at the front of the joint to form a
“force couple”. In this manner, antagonist muscles (for rotation) become
synergists (for stability). Therapy (and surgery) for rotator cuff pathology is
directed towards restoring this force couple. Click here to read about concept of antagonist/ synergist combinations for the hip muscles in yoga. Click here for some cues to use this in Dandasana.
Figure 2 illustrates this biomechanical process. This view is looking down on the shoulder with the front of the joint towards the bottom of the page.
Figure 2: The force couple between the infraspinatus and subscapularis muscles. This view is looking down on the shoulder with the front of the joint towards the bottom of the page.
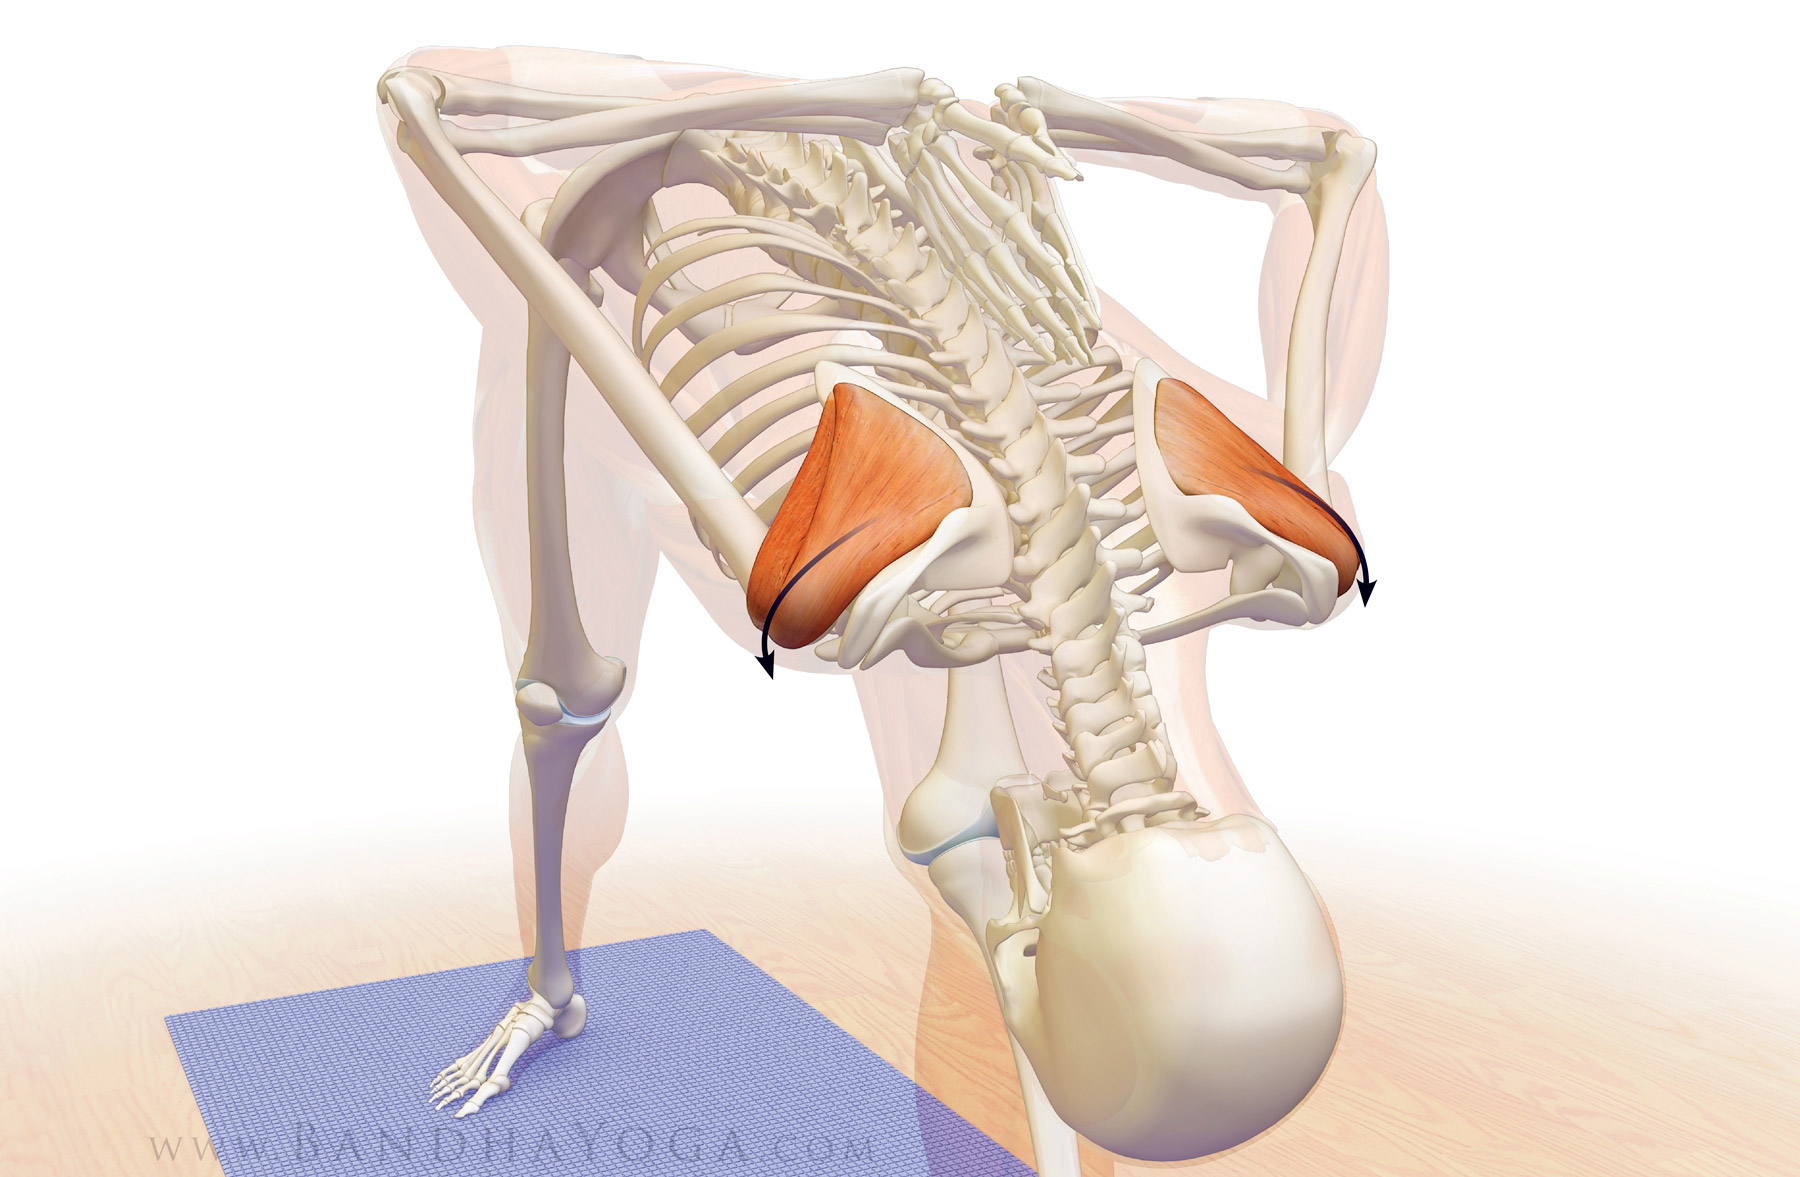
Poses with the arms in reverse Namaste' stretch the infraspinatus and teres minor, as does Gomukhasana. Those of you who are more flexible may gently press the knife edge of the hand into the back to "load" the external rotators. Folks who are tighter may simply grasp the elbows or hands behind the back. Click here for more details and an animation of Gomukhasana stretching these muscles as well as a not so obvious cue for loading and using PNF for this stretch.
Figure 3: Stretching the infraspinatus and teres minor by internally rotating the shoulders in Parsvottanasana.
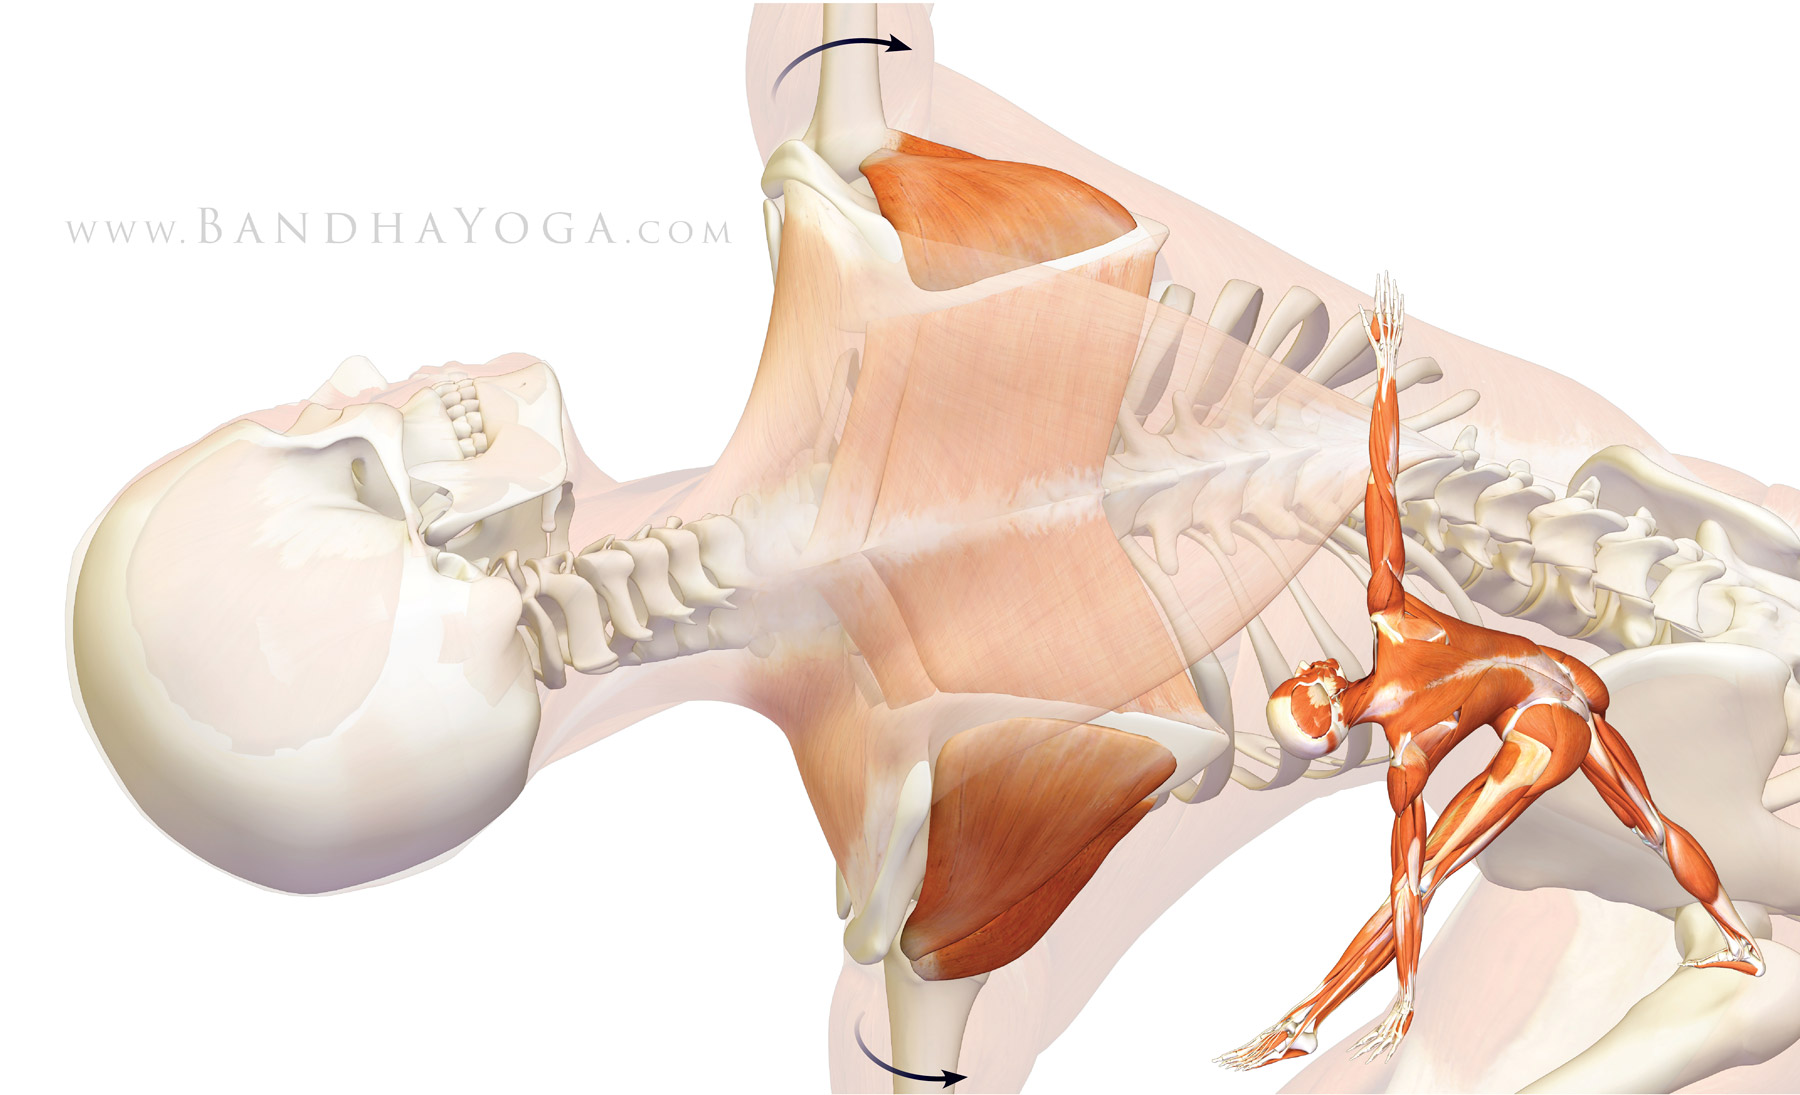
Externally rotating the shoulders in poses like Trikonasana (Triangle) can be used to activate the infraspinatus and teres minor. Figure 4 illustrates this, as well as the myofascial connection between these muscles and the muscles that retract the scapula, namely the trapezius and rhomboids.
Thanks for stopping by--I hope you're enjoying learning about biomechanical concepts like the force couple. Stay tuned for the next post when I'll go over the last muscle of the rotator cuff, the supraspinatus. Then I'll finish up with the relationship between the rotator cuff and the deltoids. By the end of this four-post series, you'll have a good understanding of the functional anatomy and biomechanics of the shoulder joint as applied to yoga. Click here to browse through the Bandha Yoga book series on anatomy, biomechanics and physiology for yoga.
This is the first of a four-part series on the
shoulder joint, focusing specifically on the rotator cuff and its biomechanical
relationship with the deltoid muscle. Let's begin by looking at the muscles
that comprise the rotator cuff, starting with the subscapularis.
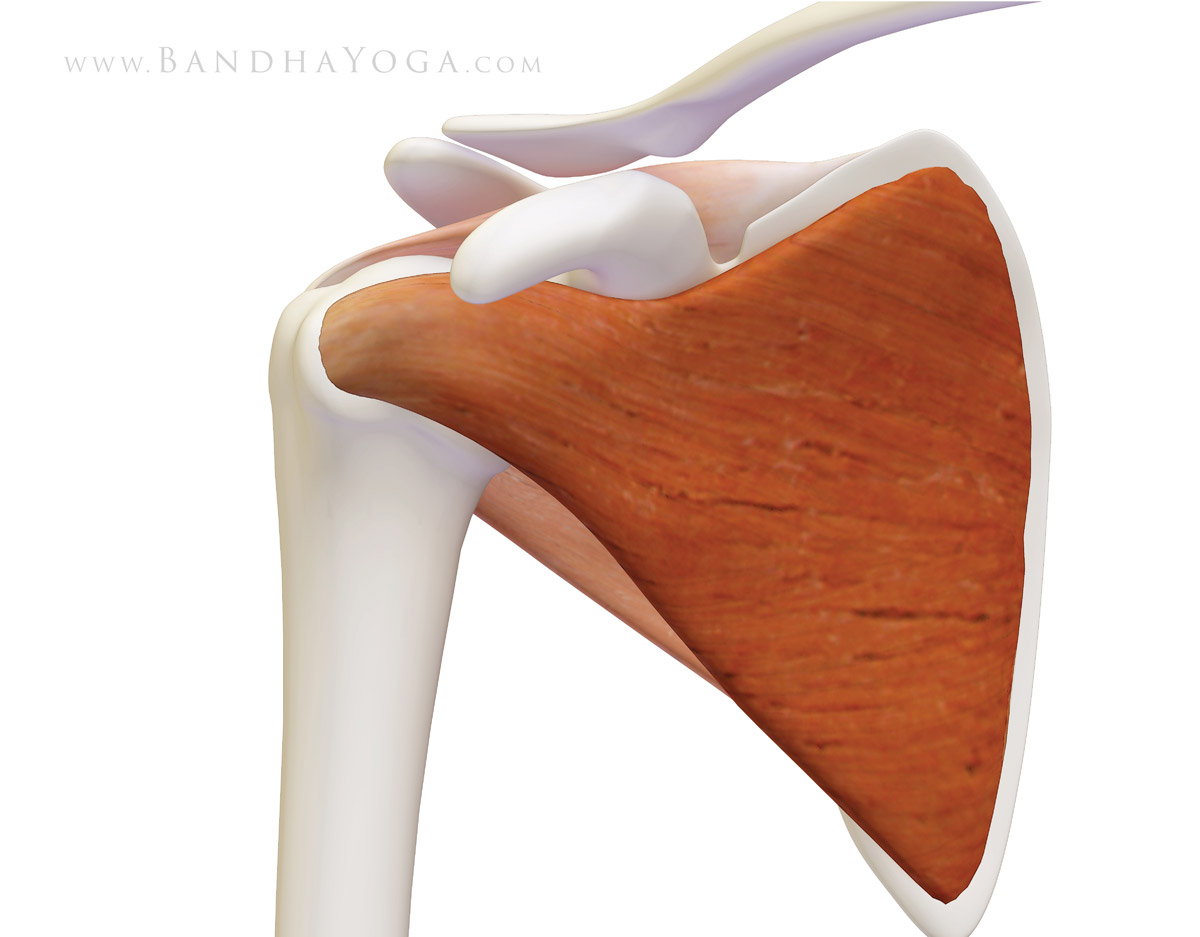
As figure 1 illustrates, the subscapularis occupies the space, or fossa, at the
front of the scapula. From there it attaches to the lesser tuberosity, a
knob-like structure on the humerus bone at the front of the shoulder. Concentrically
contracting the subscapularis muscle (shortening the muscle on contraction)
internally rotates the shoulder. The subscap also acts, in conjunction with the
infraspinatus muscle, as a stabilizer of the humeral head in the socket
(glenoid). We test strength and function of this muscle with the "belly press" test or the "bear hug" test. Tightness in the
subscapularis can limit external rotation of the shoulder.
Figure 1: The subscapularis muscle, illustrating the origin on the inside of the scapula and the insertion on the lesser tuberosity of the humerus.
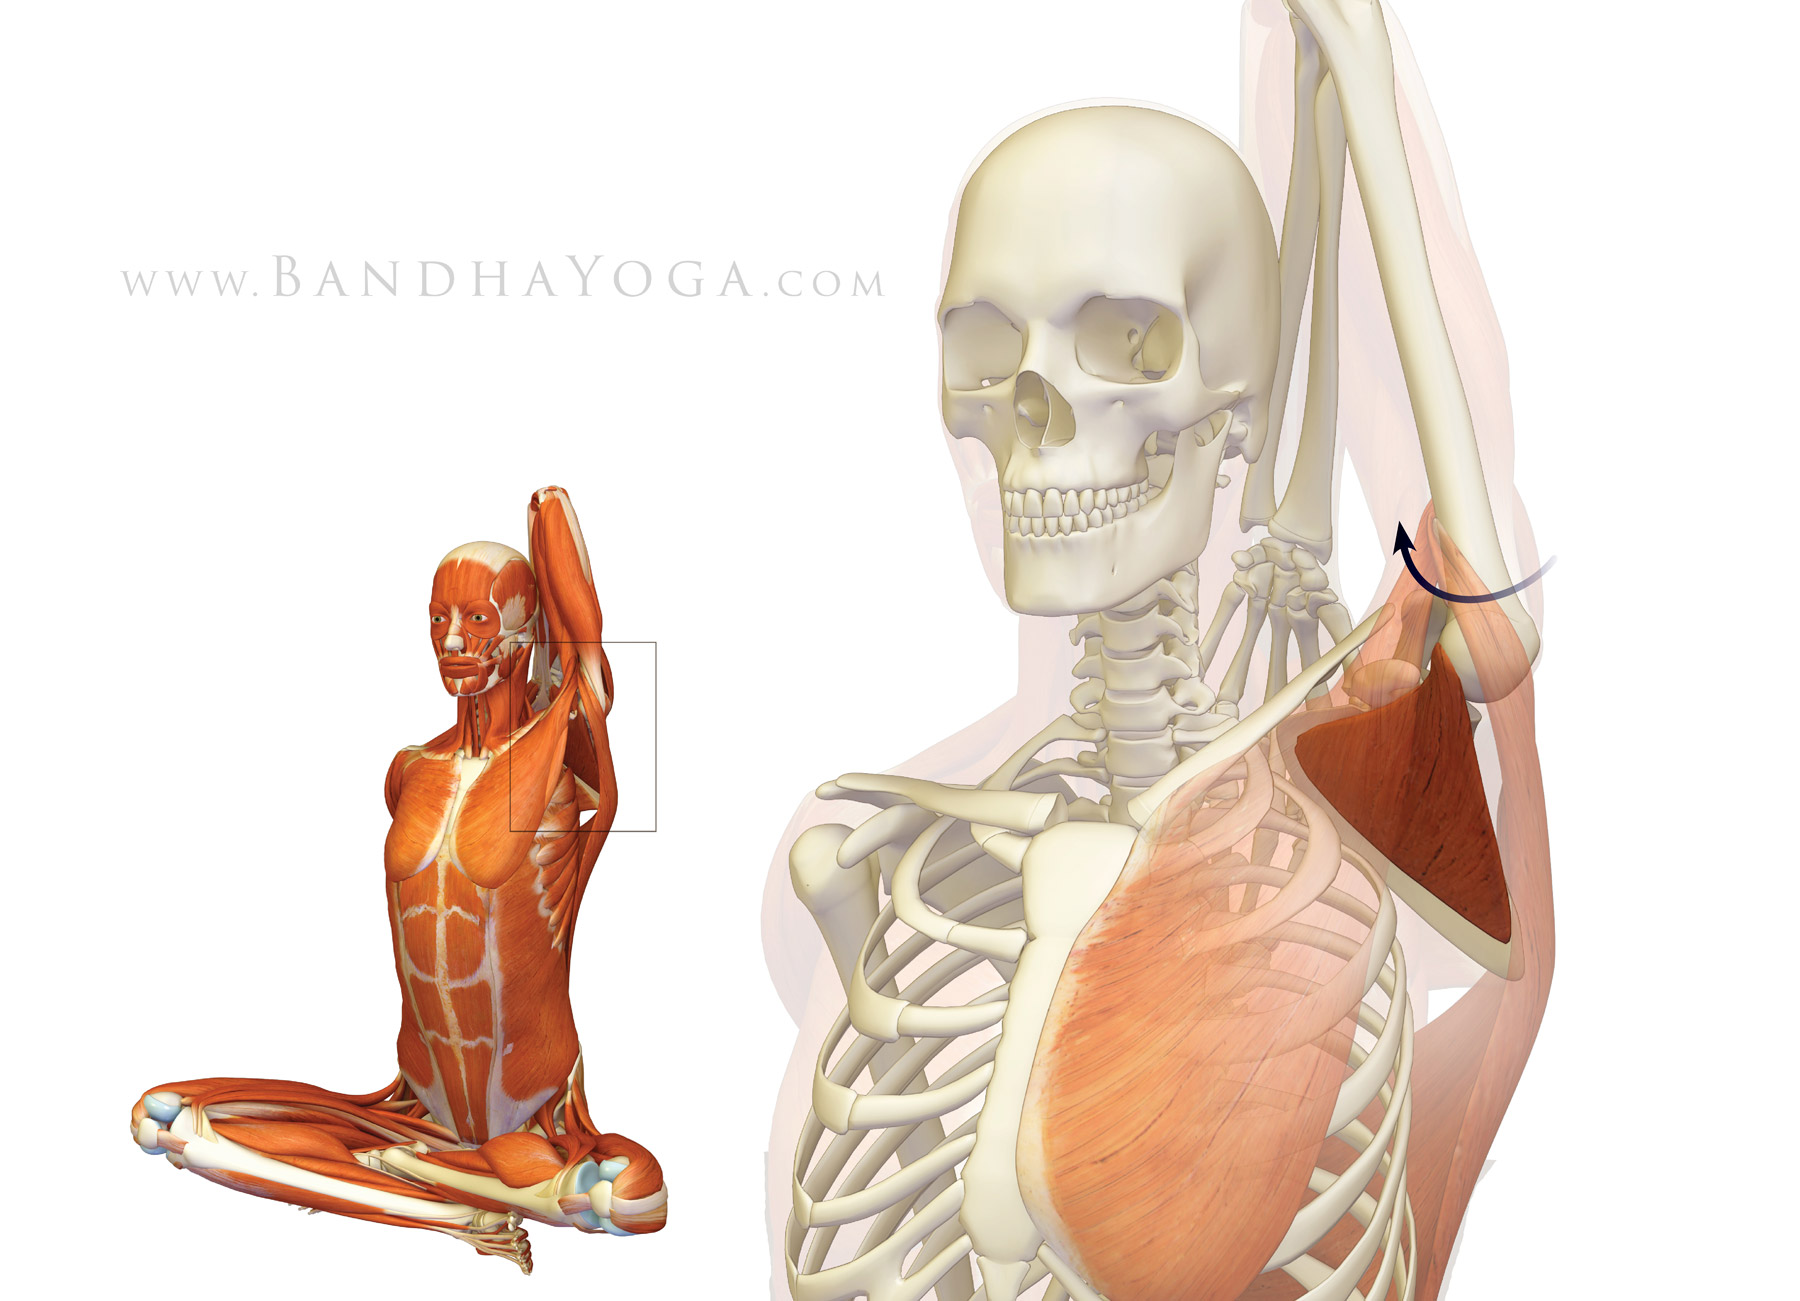
Figure 2 illustrates
one of the poses that stretch the subscapularis muscle, namely, Gomukhasana.
The upper side humerus externally rotates in this pose, thus stretching the
muscle as shown.
Figure 2: This illustrates the effect on the subscapularis muscle of the upper arm in Gomukhasana. External rotation of the humerus stretches the muscle.
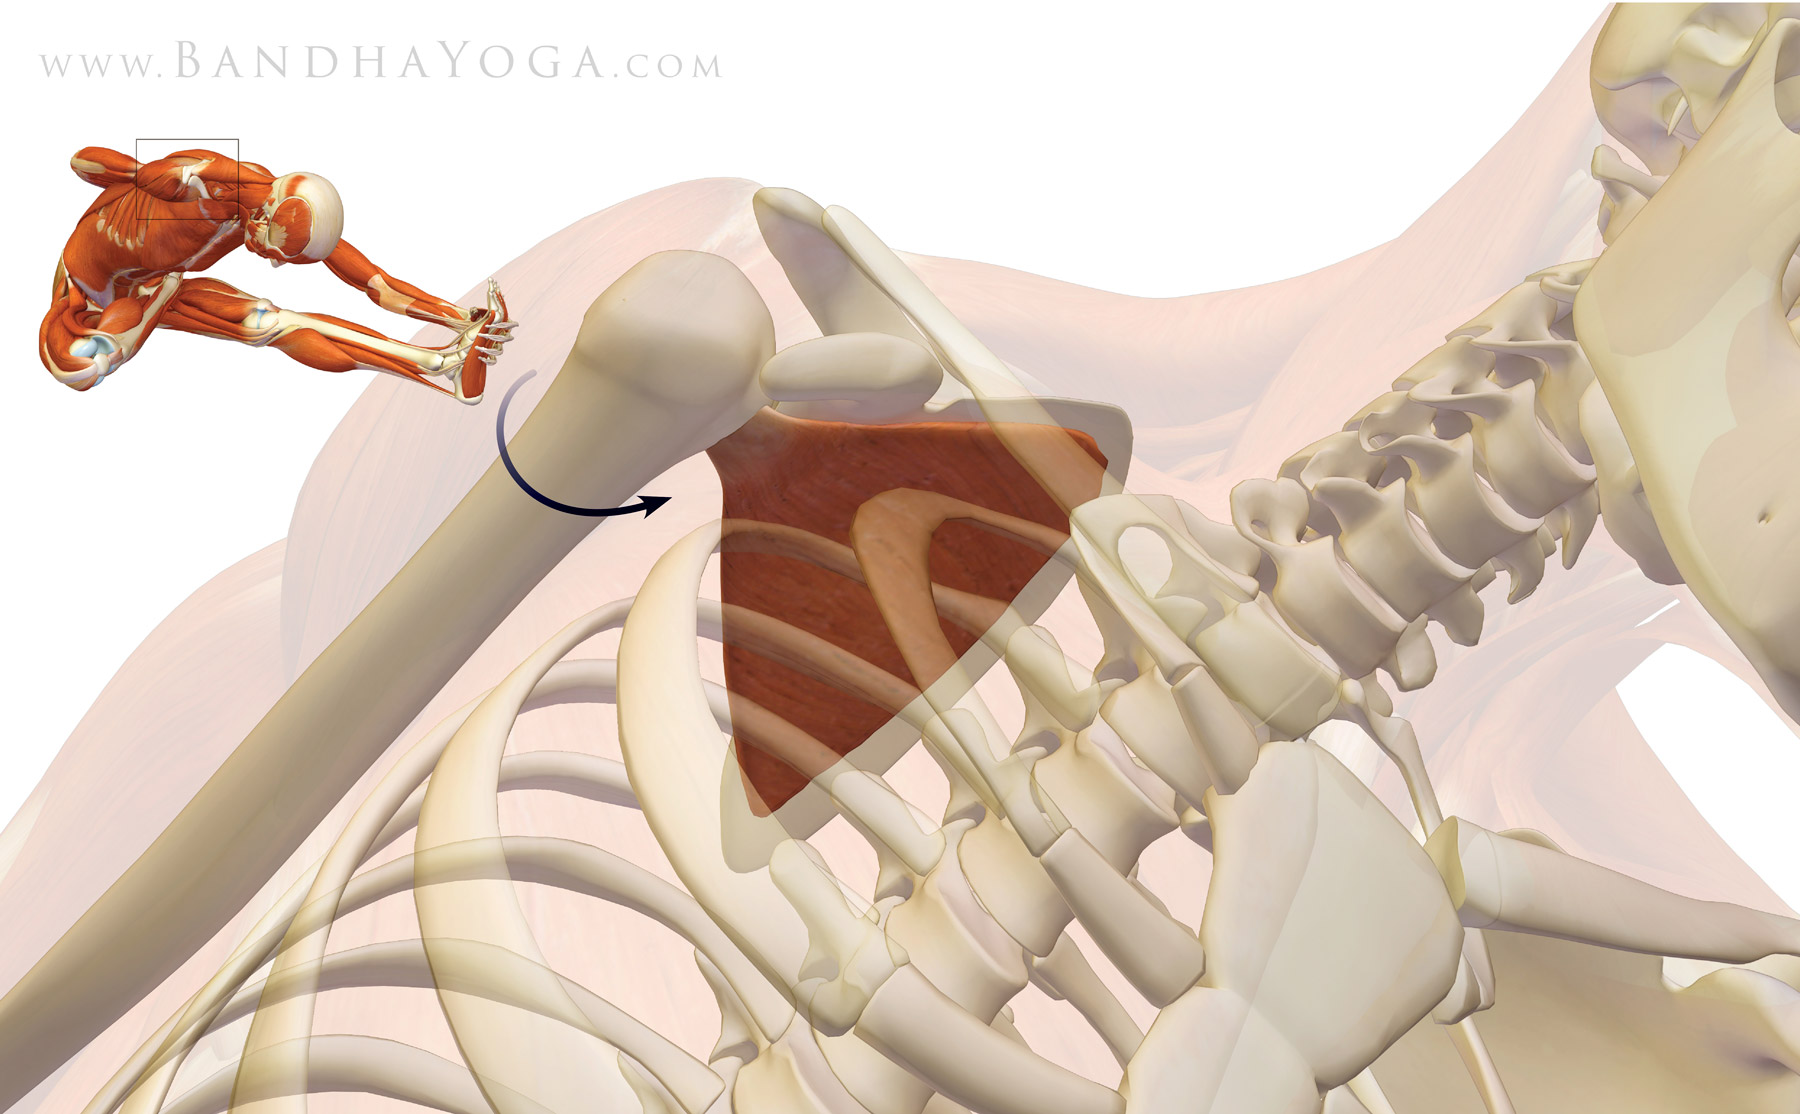
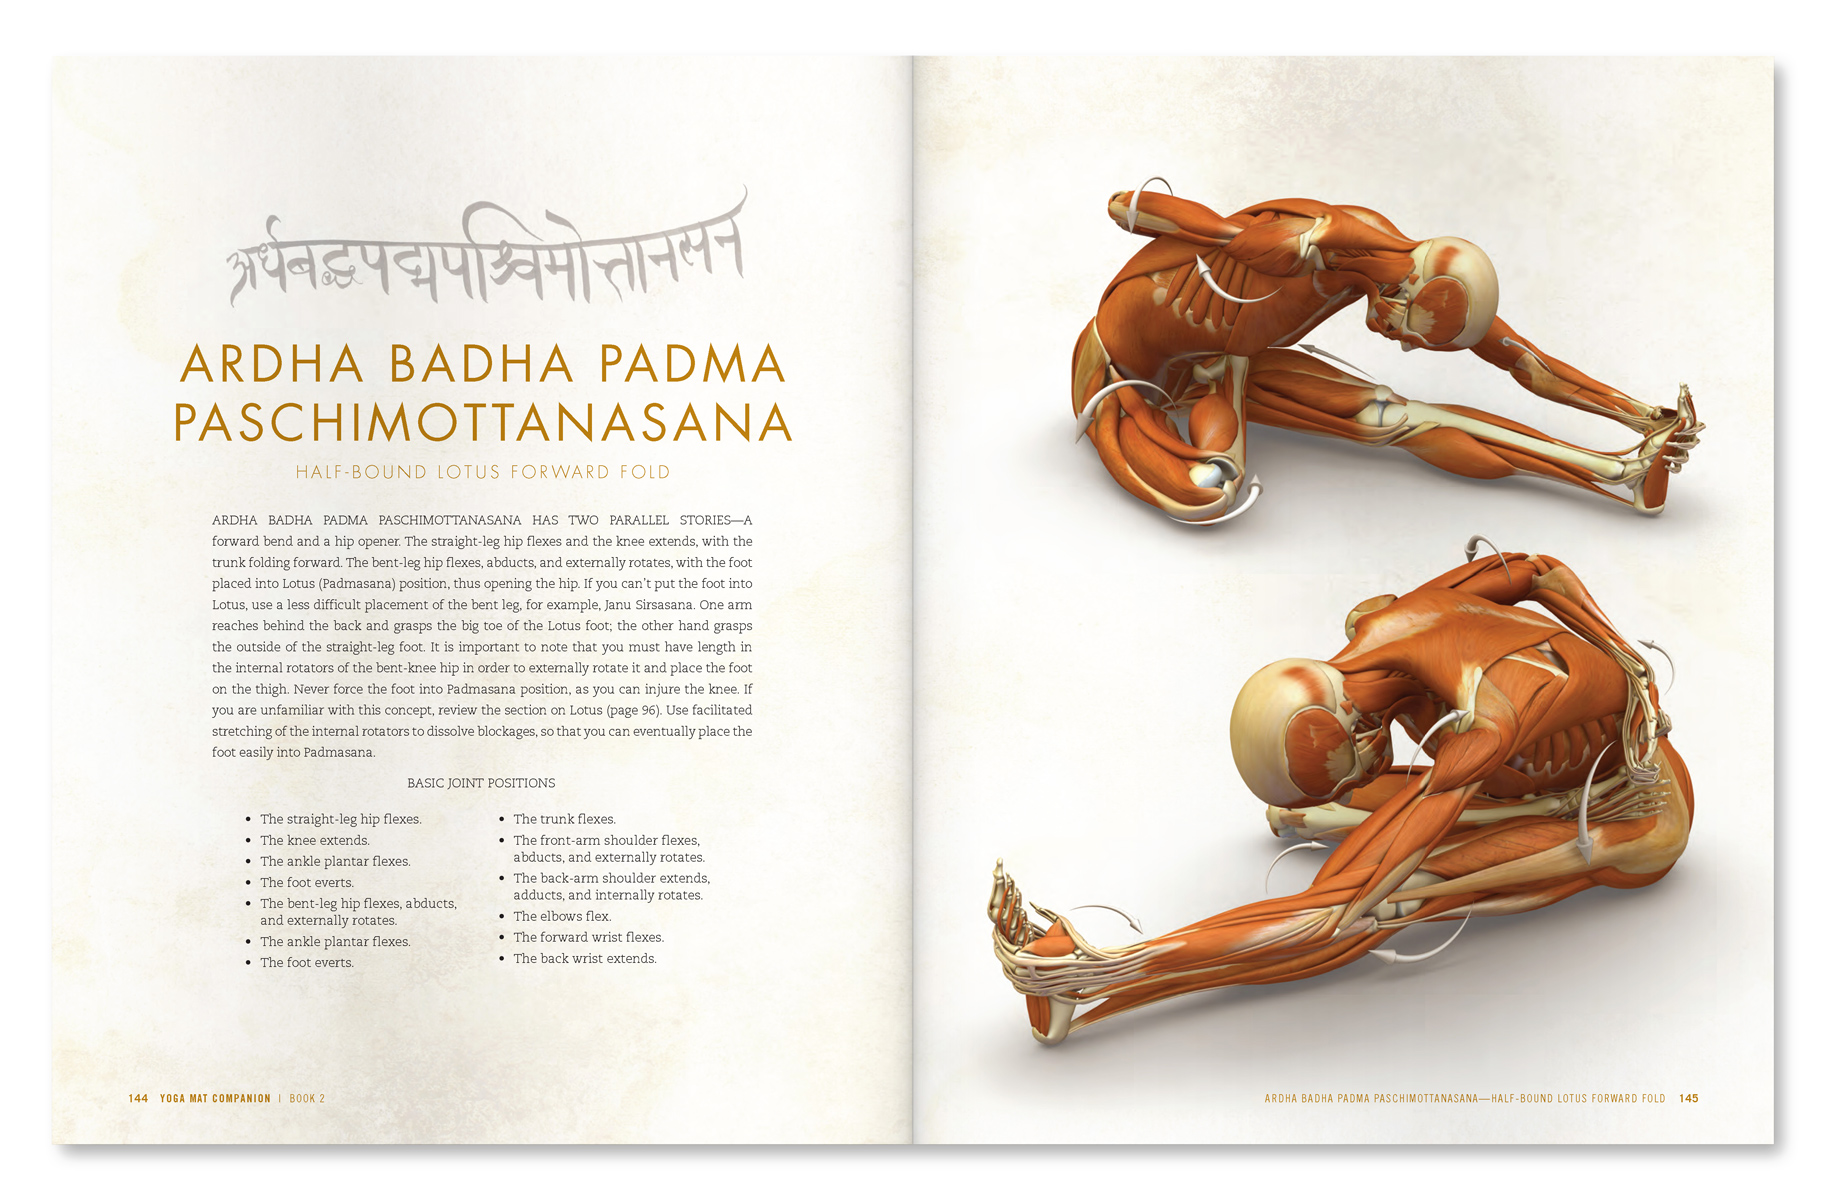
Figure 3
illustrates engaging the subscapularis muscle in Ardha Baddha Padma
paschimottanasana. Advanced practitioners can attempt to lift the hand off the
back to engage the muscle in this pose. This also replicates the "lift off" test, which is used in orthopedics to test the function of the
subscap muscle.
Figure 3: This image illustrates contraction of the subscapularis muscle to internally rotate the humerus.
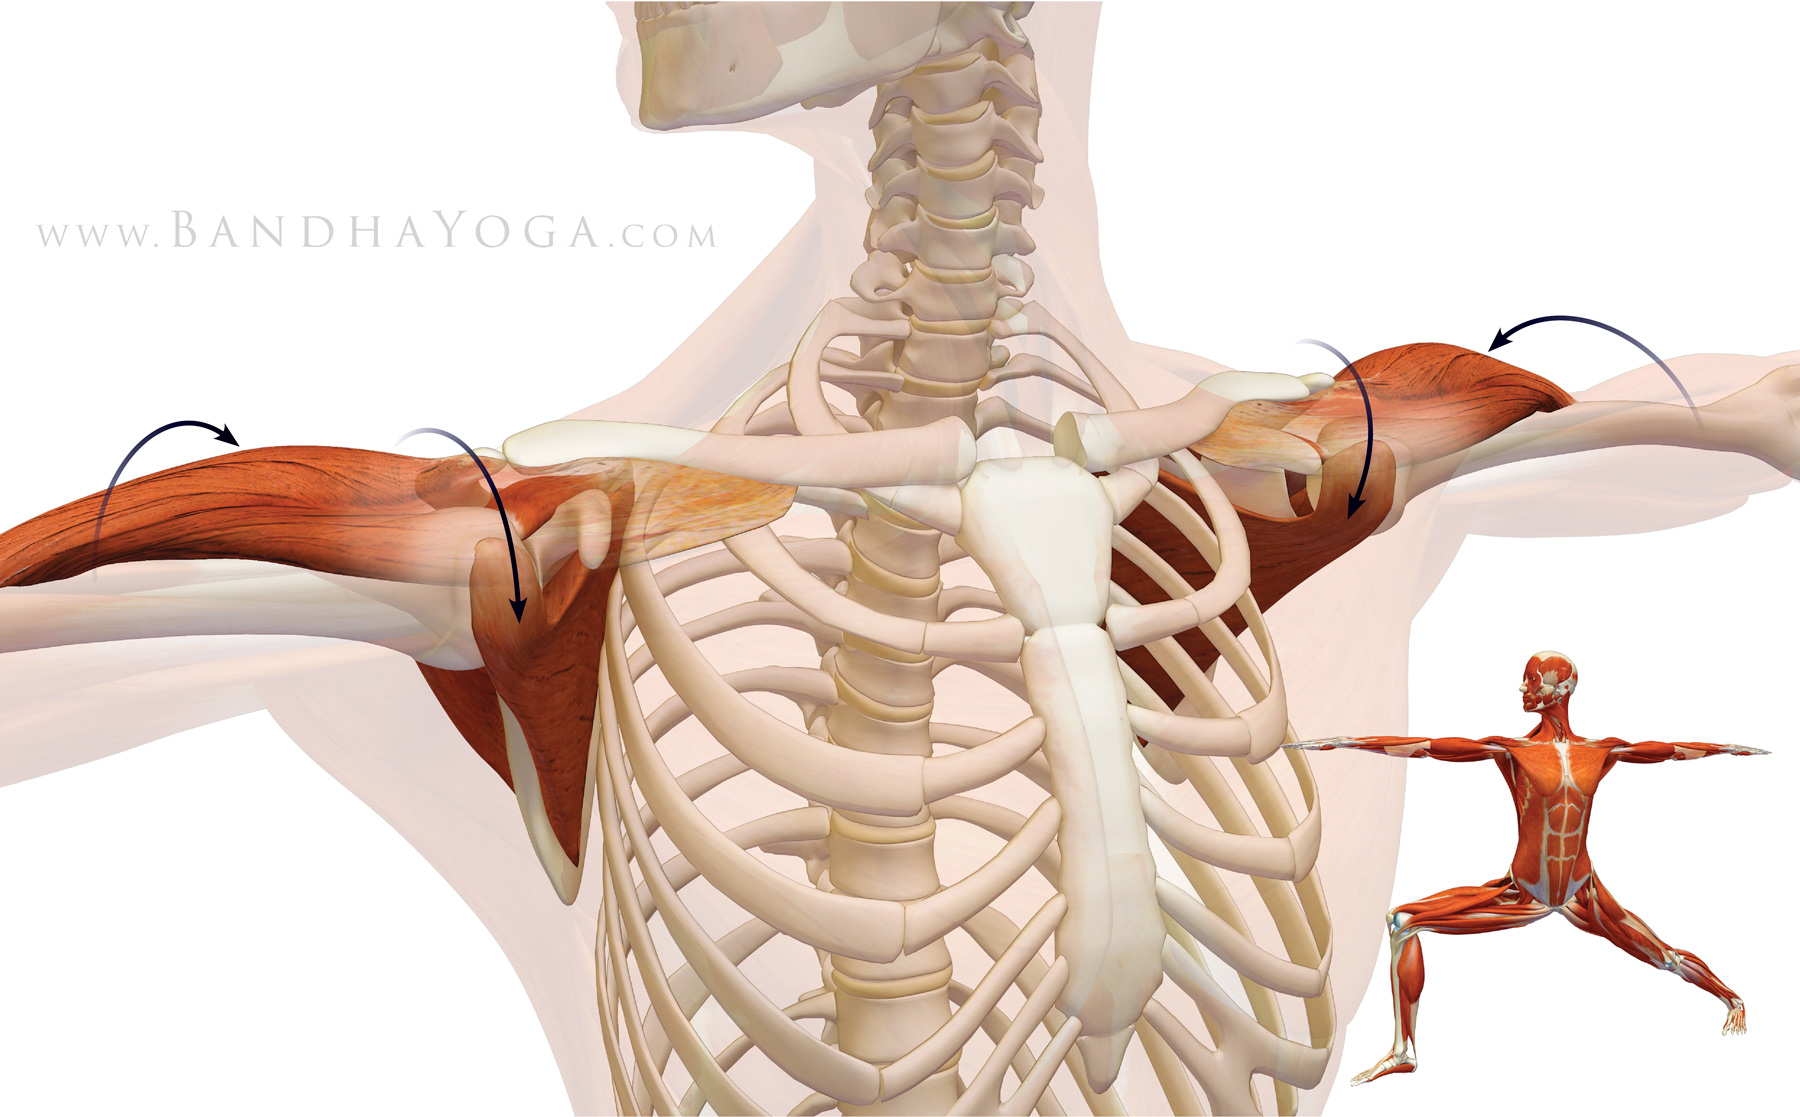
Finally,
we have the subscapularis as a stabilizer during a static position in a pose.
In Warrior II, attempt to internally rotate the shoulders by imagining pressing
the mound at the base of the index fingers down against an object. Resist this
by externally rotating the shoulders at the same time. Co-contracting opposing
muscles--like the subscap and infraspinatus--stabilizes the head of the humerus
in the socket while the deltoid contracts to abduct the humerus. Click here to go into a bit more depth on the subject of stabilizing your shoulders in your Downward dog pose.
Figure 4: Co-contracting the subscapularis and the infraspinatus stabilizes the humeral head in the socket while the deltoid muscle abducts the humerus.
Thanks
for stopping by. Stay tuned for the next post when I'll go over the antagonist
muscle for the subscapularis. By the end of this four-post series, you'll have
a good understanding of the functional anatomy and biomechanics of the shoulder
joint as applied to yoga. Click here to browse through the Bandha Yoga book series on anatomy, biomechanics and physiology for yoga.
In our last post, we discussed joint rhythm for the shoulders. In this blog post I want to share some of my recent investigations on the biomechanics of the shoulder joint, with some specific tips for Down Dog. Shoulder pain is one of the problems that comes up in yoga, especially with folks who are doing Vinyasa based practice. The underlying cause of the pain can be multifactorial, but it is frequently related to impingement of the rotator cuff and subsequent inflammation of the cuff tendon (specifically the supraspinatus muscle). Inflammation of the tendon, in turn, affects function of the shoulder. Weakness or instability in the shoulder can then lead to abnormal pressures at the wrist, causing pain there as well. Thus, stabilizing the shoulders has beneficial effects beyond the shoulders. is a complex process involving strengthening the core and then linking the strong core to the shoulders.
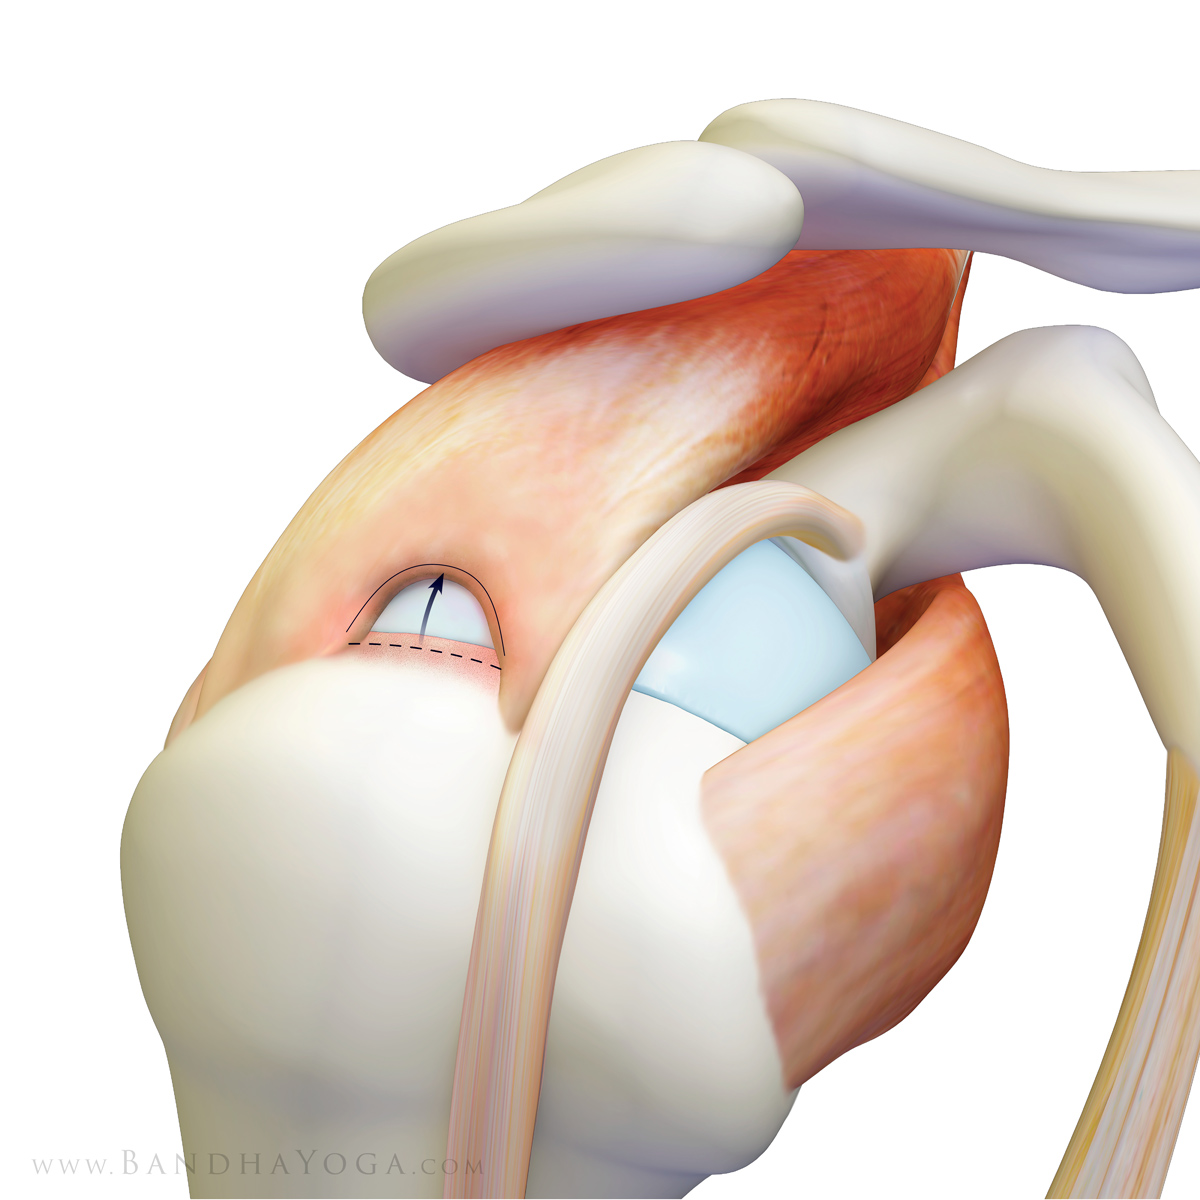
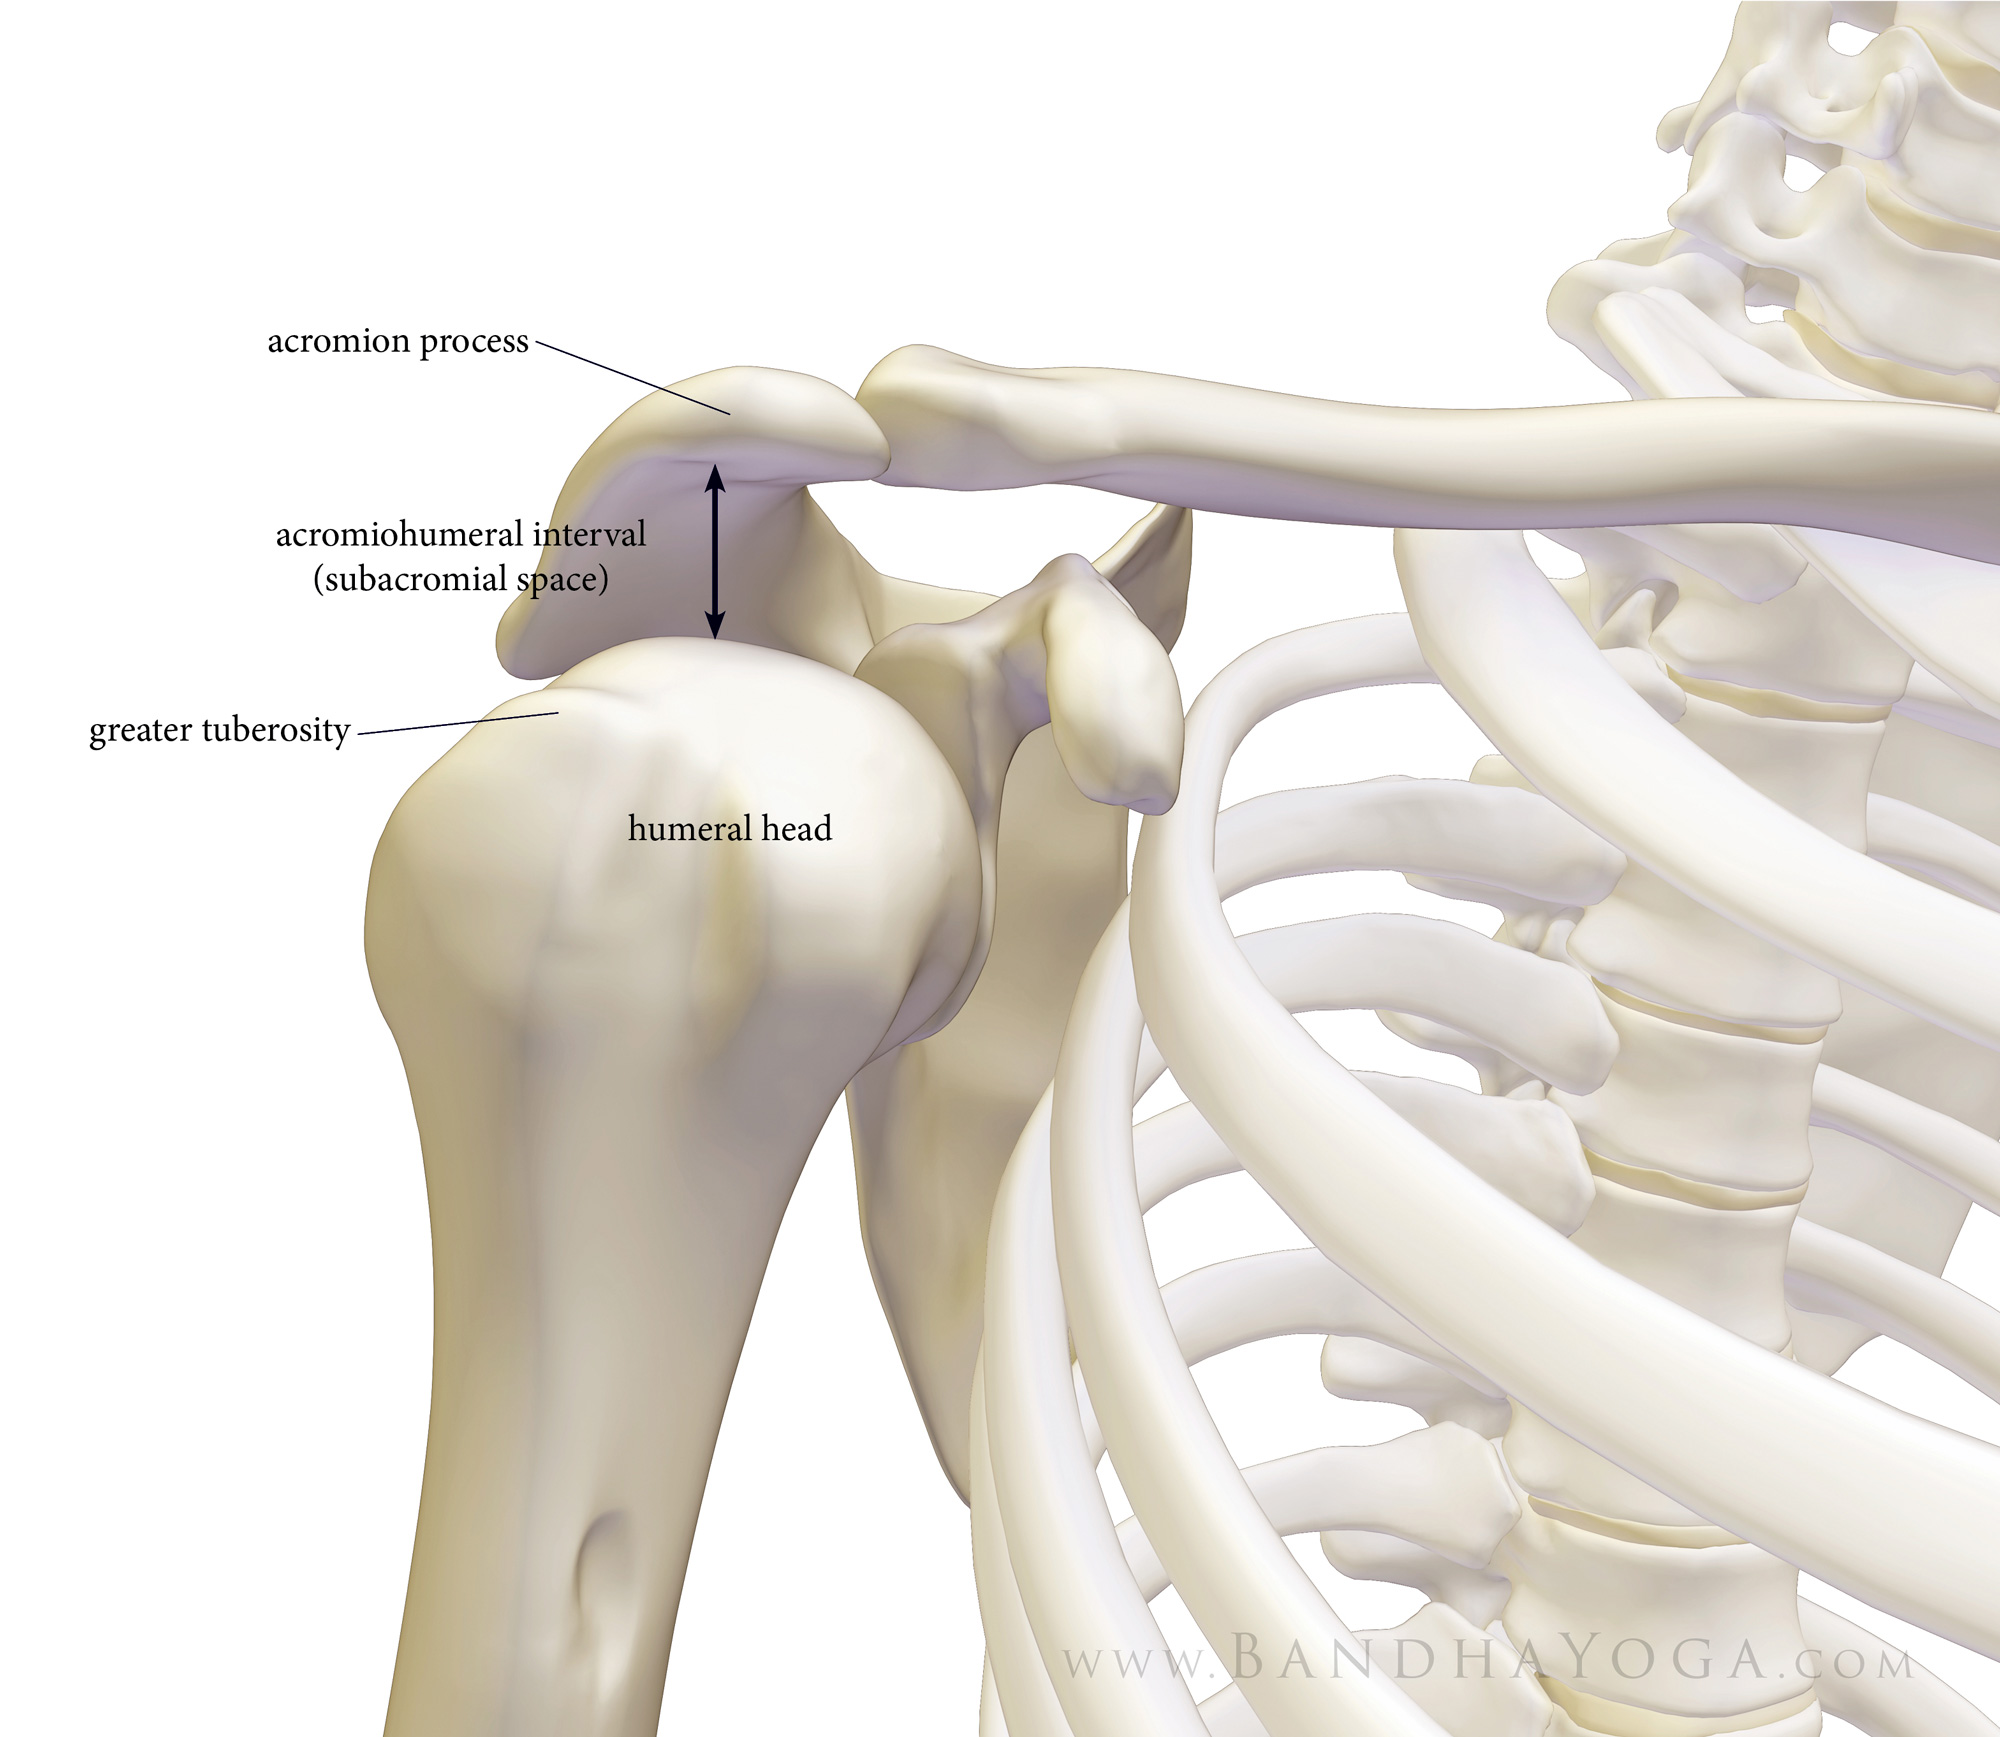
With this in mind, let’s look at one of the key factors in shoulder impingement, namely, the acromio-humeral interval. This refers to the distance between the undersurface of the acromion and the humeral head, as measured using radiology intruments (x-ray, ultrasound, mri). The acromion is a shelf of bone on the scapula, above the spine (seen in Figure 1). It serves as the attachment for the deltoid muscle. The humeral head articulates with the shoulder joint and serves as the attachment for the muscles of the rotator cuff (on the greater and lesser tuberosities). Factors that decrease the space between the acromion and humeral head can lead to inflammation of the cuff tendon due to compression between the two bones.
Figure 1: The acromio-humeral interval.
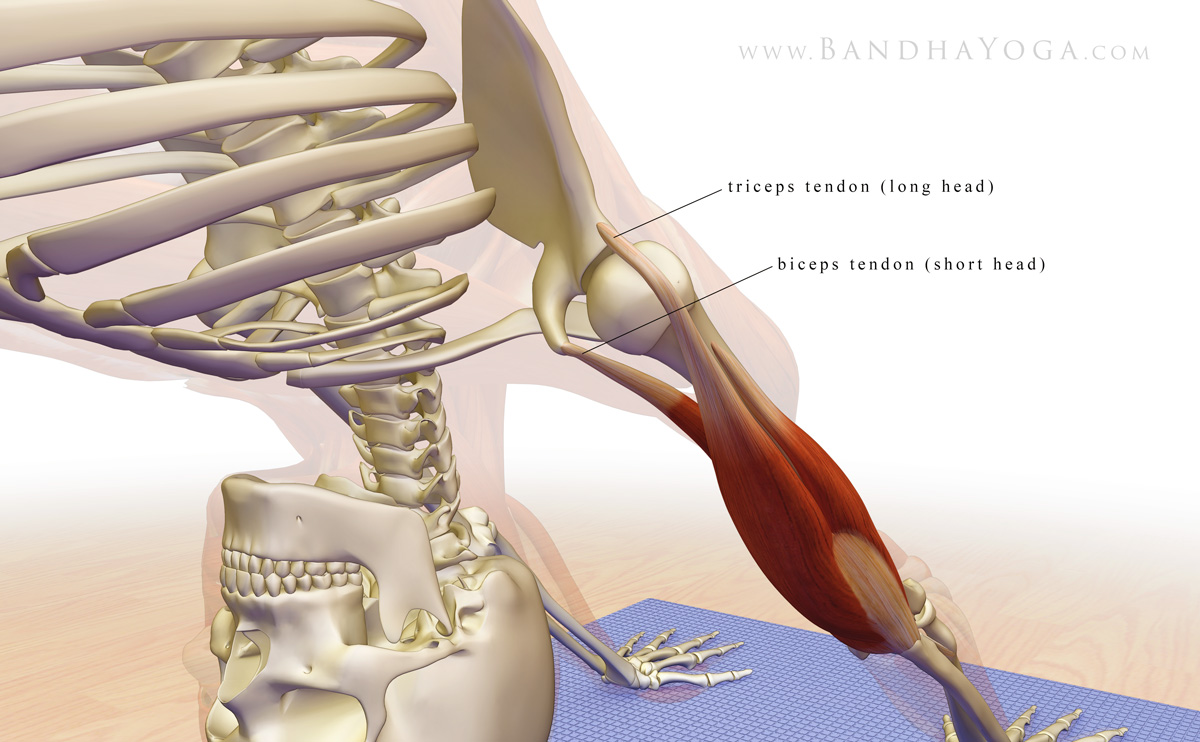
Research has shown that contracting the main adductor muscles of the shoulder serves to increase the acromio-humeral distance. These include the pectoralis major and latissimus dorsi. Co-contracting the biceps and triceps muscles when the arms are overhead can also draw the humerus away from the glenoid, as shown in Figure 2. Finally, externally rotating the shoulder humerus moves the vulnerable area of the supraspinatus tendon away from the area where it would impinge on the acromion (click here to learn more).
Figure 2: The long head of the triceps and short head of the biceps in relation to the gleno-humeral joint with the arms overhead.
Here’s the cue…
Warm up first a bit. Then, take Downward Dog pose. I use three steps for the shoulders. Go slowly and use gentle engagements.
Contract the triceps to straighten your elbows. Then, press the mound at the base of your index fingers into your mat to engage the forearm pronator muscles.
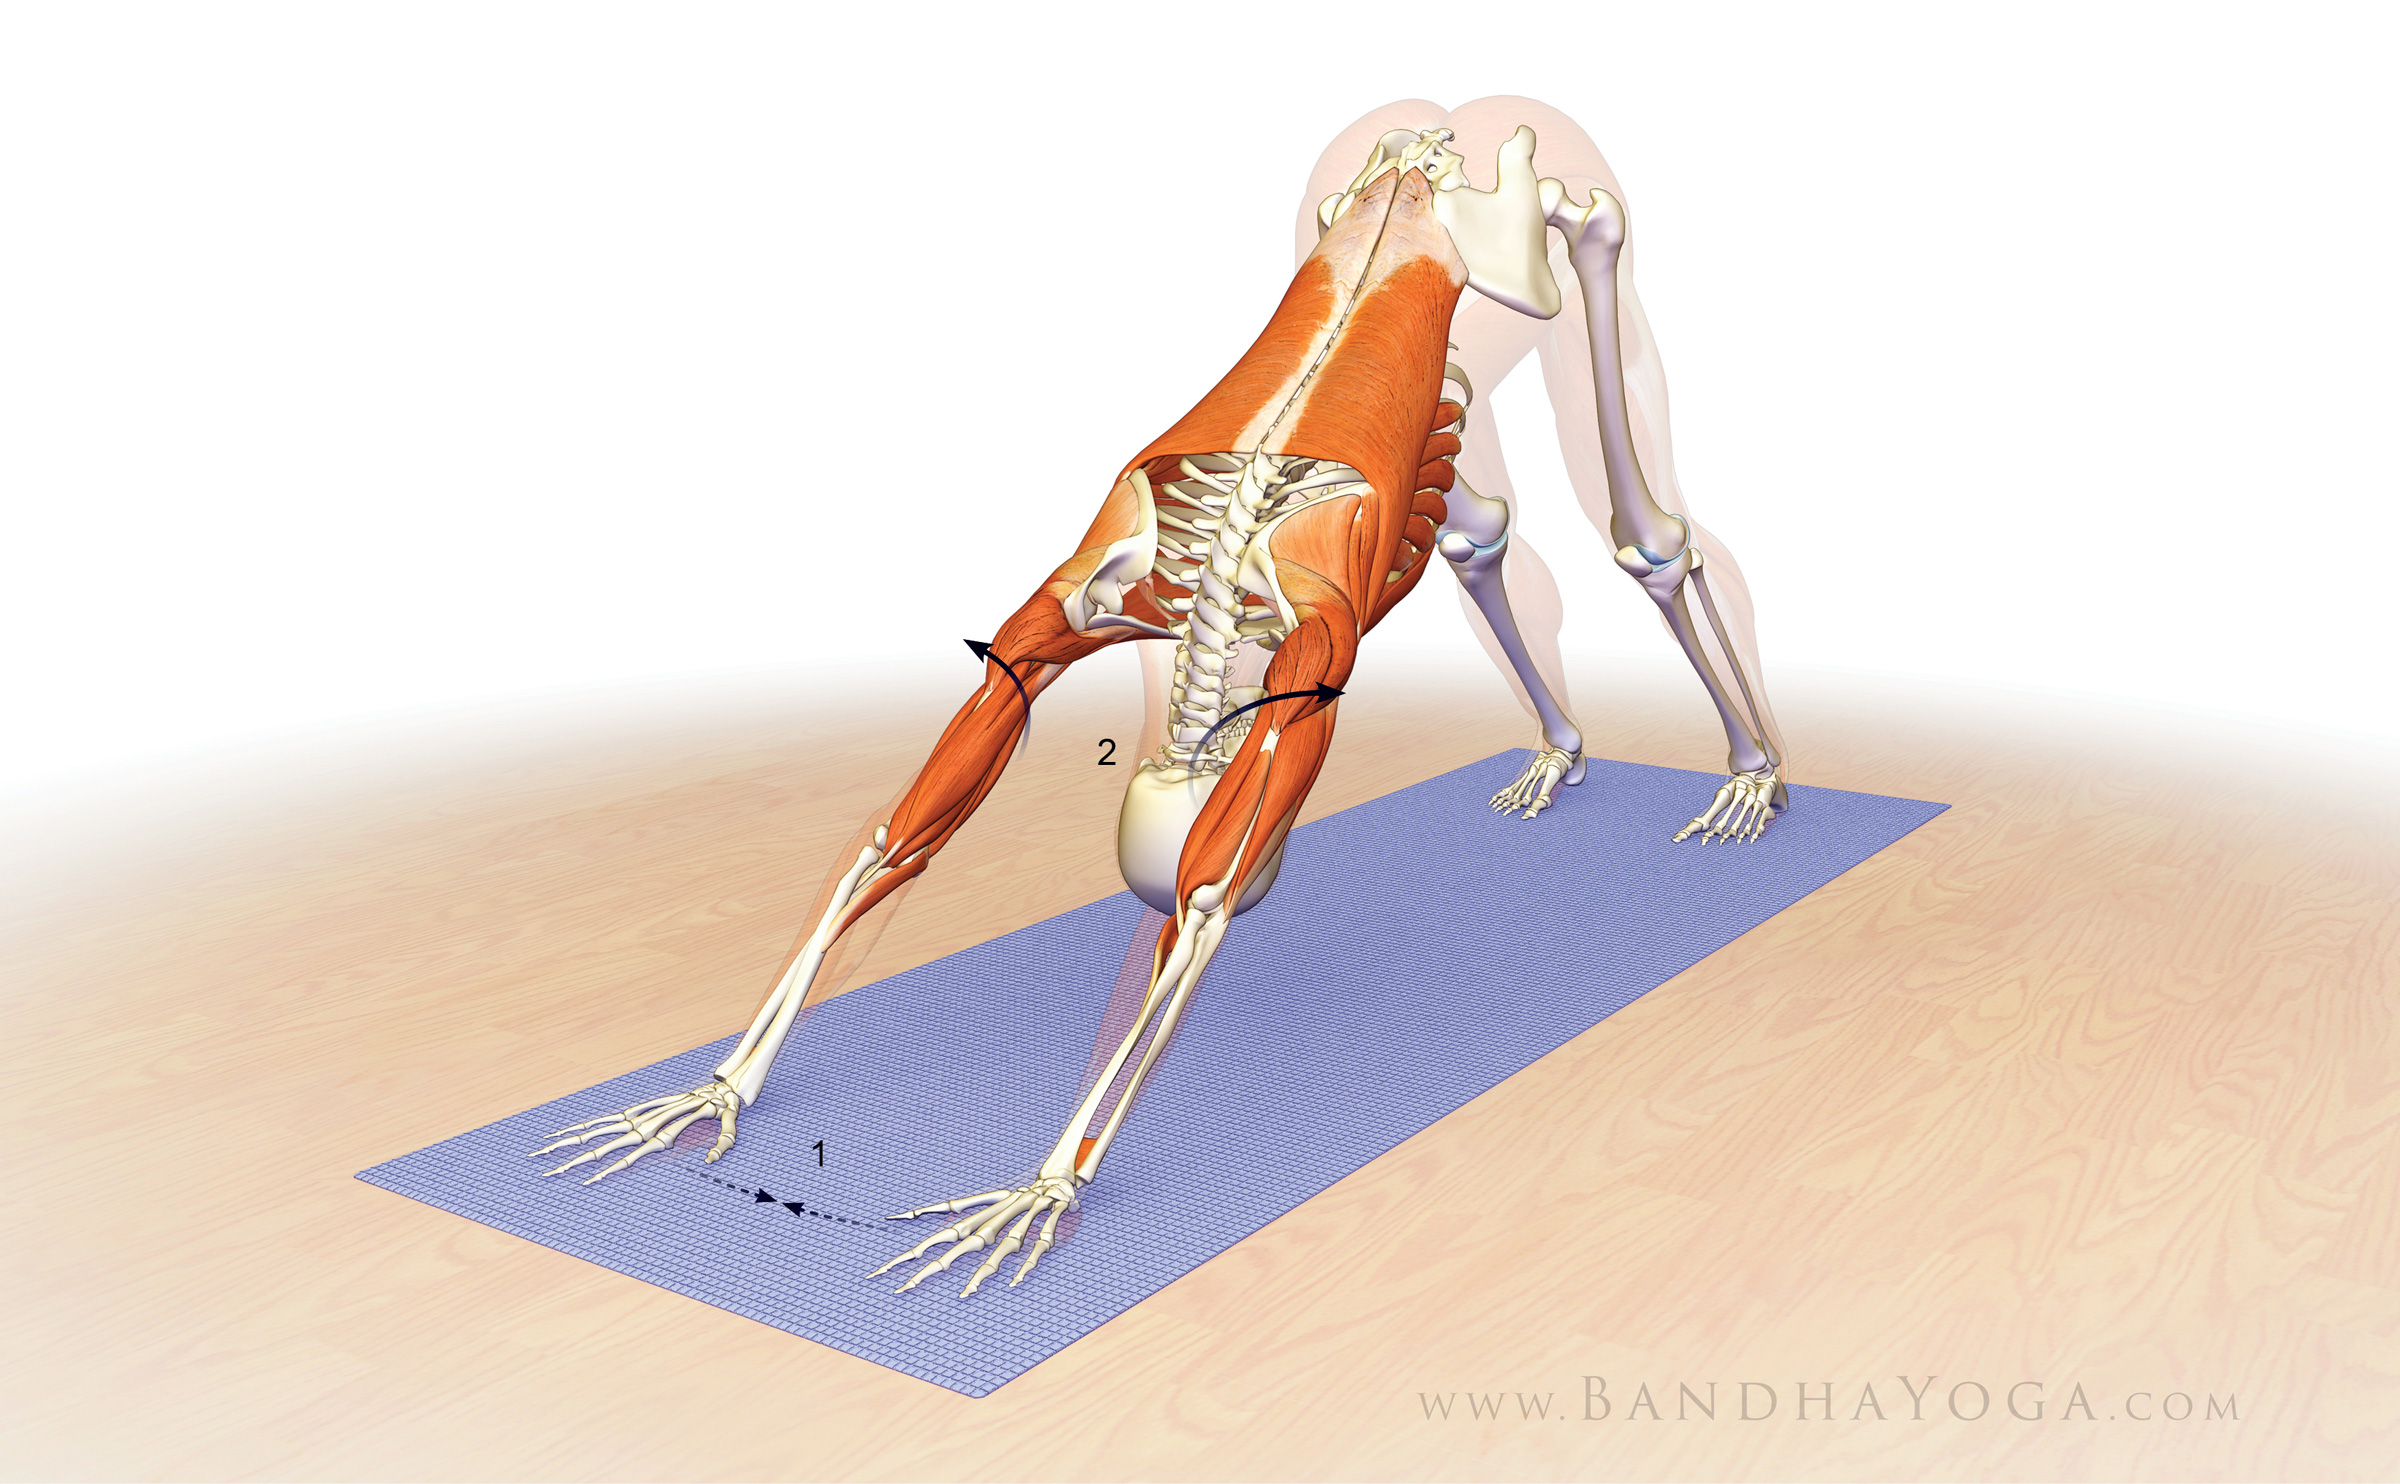
Next, fix your palms into the mat and try to drag the hands towards each other. This engages the adductor muscles of the shoulders as well as the biceps.
Finally, gently roll the shoulders outward. This externally rotates the humerus bone and helps to bring the greater tuberosity away from the undersurface of the acromion.
Figure 3 illustrates the various muscles involved in these cues.
Figure 3: Attempt to drag the hands towards one another. This engages the shoulder adductors. Then externally rotate the shoulders.
As a final adjustment, I like to link the action of the shoulders to the lower extremities. The cue for this is to engage your lower gluteus max and adductor magnus muscles by drawing in with the upper inner thighs and then attempt to drag your feet away from the hands. Feel how this stabilizes your pose. See Figure 4 for the graphics.
Figure 4: Engage the lower parts of the gluteus maximus and adductor magnus as you attempt to drag the feet away from the hands to stabilize the pose.
Bear in mind that shoulder stability is a complex process. The shoulders are linked to the core; so building a strong core leads to stable shoulders. Stable shoulders help to protect the wrists, and so on. Click here to read more on your core. If you would like to learn more anatomic sequencing to improve your poses, click here to take a tour of The Yoga Mat Companion Series.
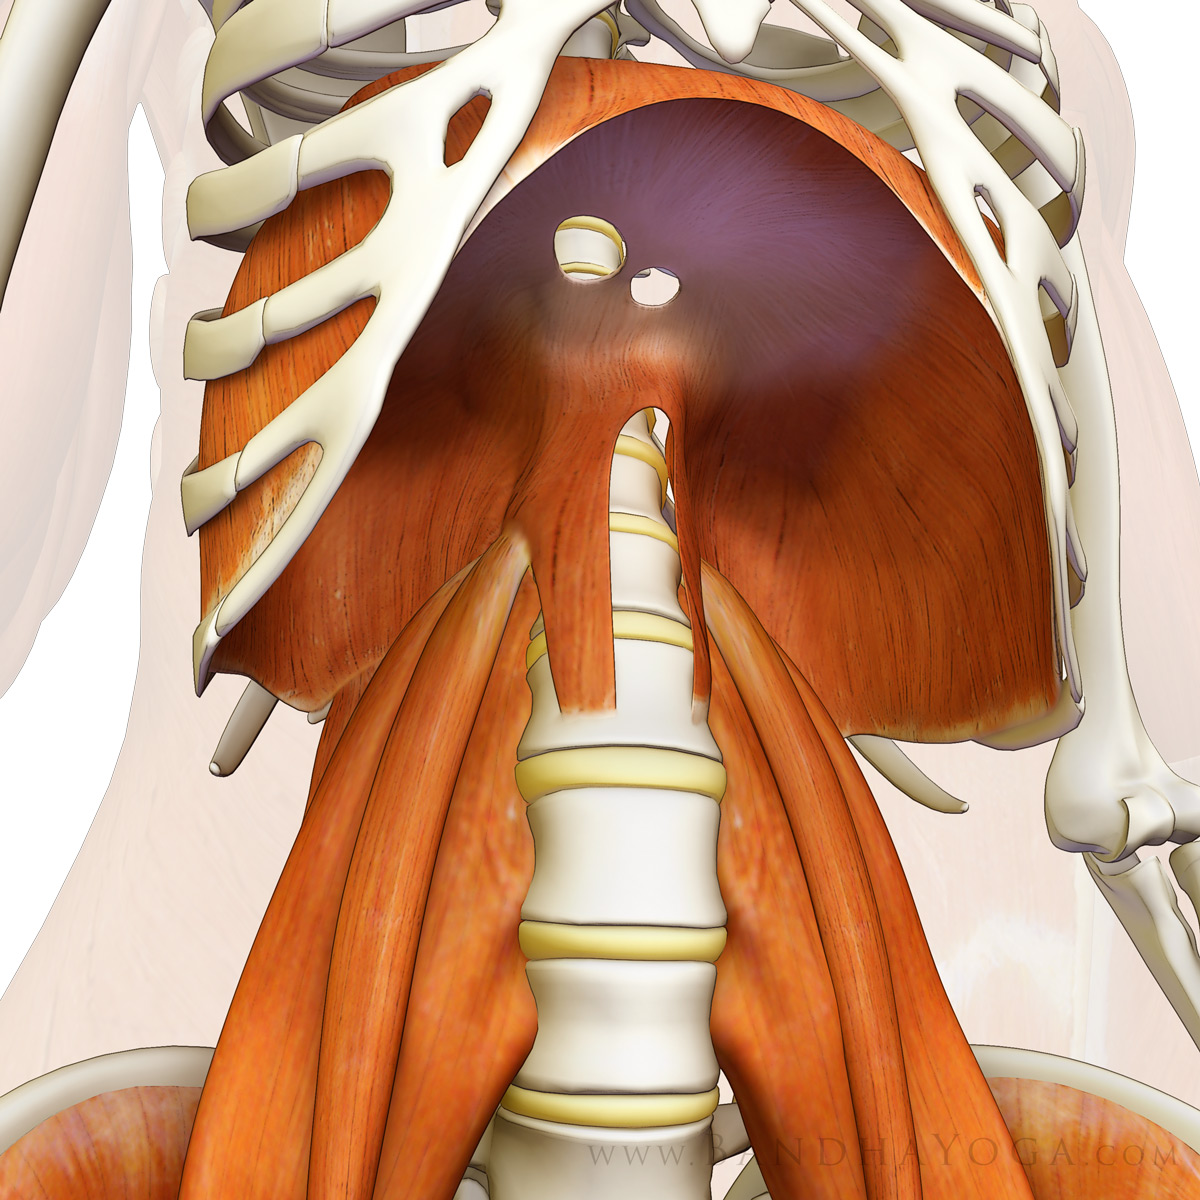
Your thoracic diaphragm is the main engine for breathing, supplemented by the accessory muscles of your chest and abdomen. It is also an important postural muscle with functional connections to your pelvic floor. We'll go over those connections in a future post; in this blog post, let's look at “diaphragmatic” or “belly” breathing.
Figure 1: The thoracic diaphragm (also showing psoas major muscle).
In diaphragmatic breathing, you actively expand the abdomen during inhalation. The abdominal expansion occurs via the diaphragm contracting and pressing down on the abdominal contents. Chest expansion is kept at a minimum in this type of breathing. Exhalation is a relaxed process and occurs through the elastic recoil of the chest wall and lungs.
Regular practice of diaphragmatic breathing draws the mental focus into what is known as the “belly brain”. It has a calming effect on the mind while, at the same time, potentially strengthens the diaphragm. I recommend practicing diaphragmatic breathing for 5-10 minutes per day. We have included a video link below to guide your practice and aid you in visualization of the movement of the diaphragm and abdomen.
Diaphragmatic Breathing Video:
How much does your diaphragm actually move?
The answer to this question depends on how deep of a breath you take and what part of the diaphragm you are asking about. The diaphragm is a sheet like dome-shaped muscle (when it is relaxed). Upon contraction, it flattens out and presses down on the abdomen. The net result is a negative inspiratory pressure, which draws air into the lungs.
Tidal, or resting breathing results in smaller movements of the diaphragm, while vital capacity breathing (as in a deep diaphragmatic breath) results in much larger movement. This is where you take a complete full inhalation.
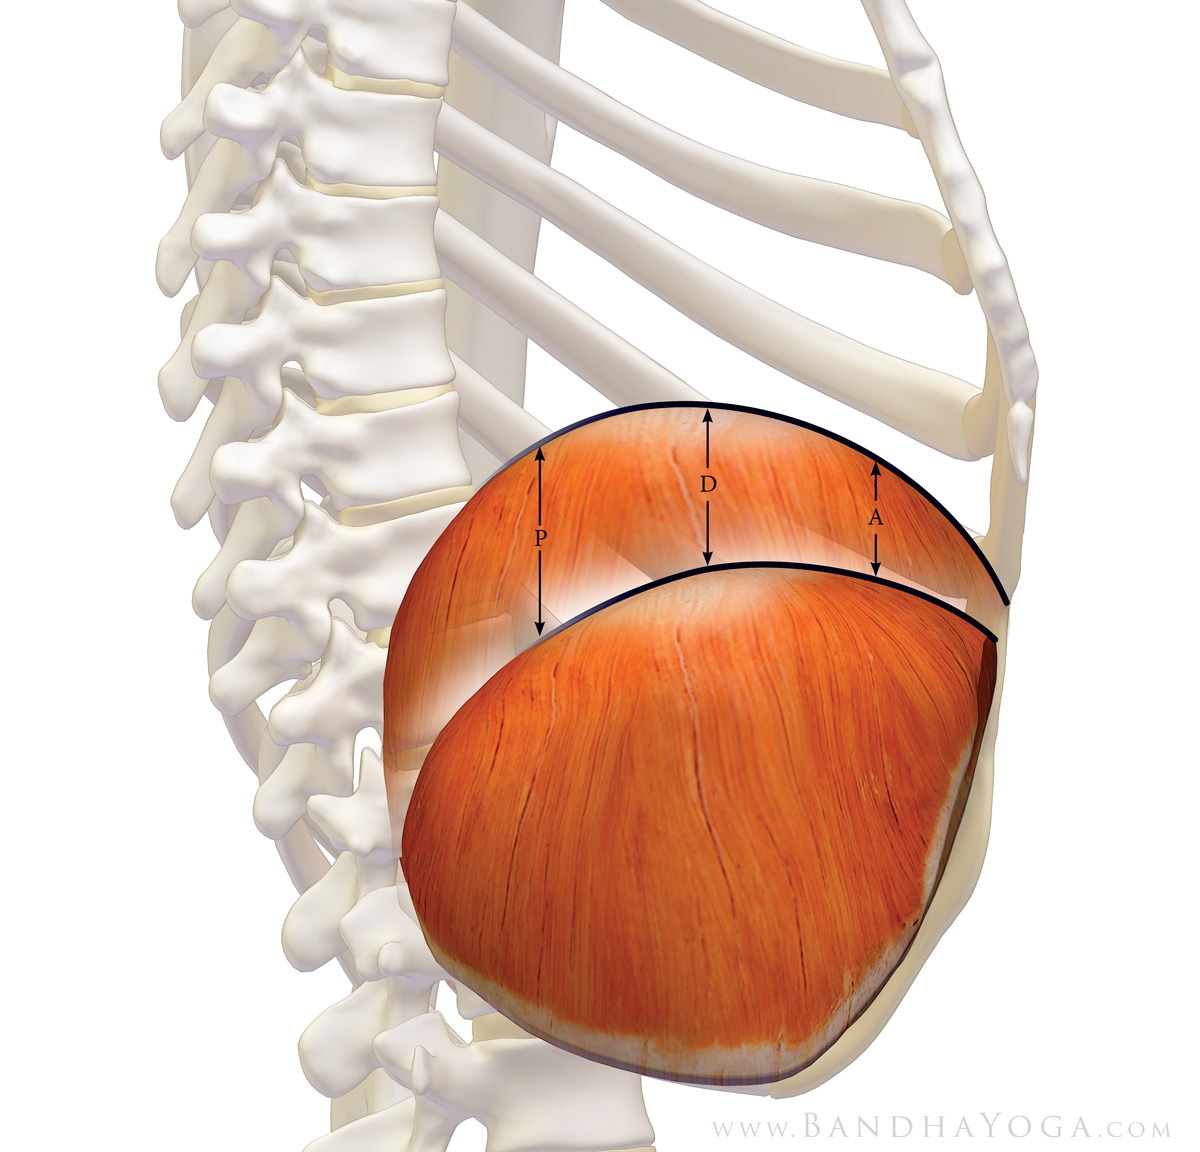
The posterior, or back part of the diaphragm exhibits the greatest excursion; the amount of diaphragmatic motion decreases progressively as we come forward. Figure 2 illustrates this. MRI studies (which are considered the most accurate) have quantified diaphragmatic motion during deep breathing, with the posterior region moving an average of 10 cm (about 4 inches) between inhalation and exhalation. This decreases progressively moving forward, with the most anterior portion moving about half that of the posterior. Diaphragmatic motion decreases by about one-third in the sitting position compared to lying on your back. (see reference below)
Figure 2: Thoracic diaphragm (side view): P= posterior; D= dome; A= anterior. Note that the excursion of the posterior diaphragm is greatest.
Does the heart move with your diaphragm when you breathe?
Yes, but not the full excursion of the posterior diaphragm. The pericardium, which is a sac surrounding the heart, has fascial connections to the diaphragm. Accordingly, the heart does move during breathing. Your heart is located more anterior on the left dome of the muscle, and so it moves less than the full excursion of the posterior portions of the diaphragm, but it moves significantly nonetheless. Click here for a video that illustrates diaphragmatic and cardiac movement during breathing (I recommend you start viewing at about the 40 second point, and later at about 4:00 for deeper breathing). This cineradiography video strikingly illustrates this process. (you may also want to mute the sound :)
Thanks for stopping by. Be sure to have a look at the videos on Youtube. Check back in the next week or so as I have some new info on stretching to share as well.
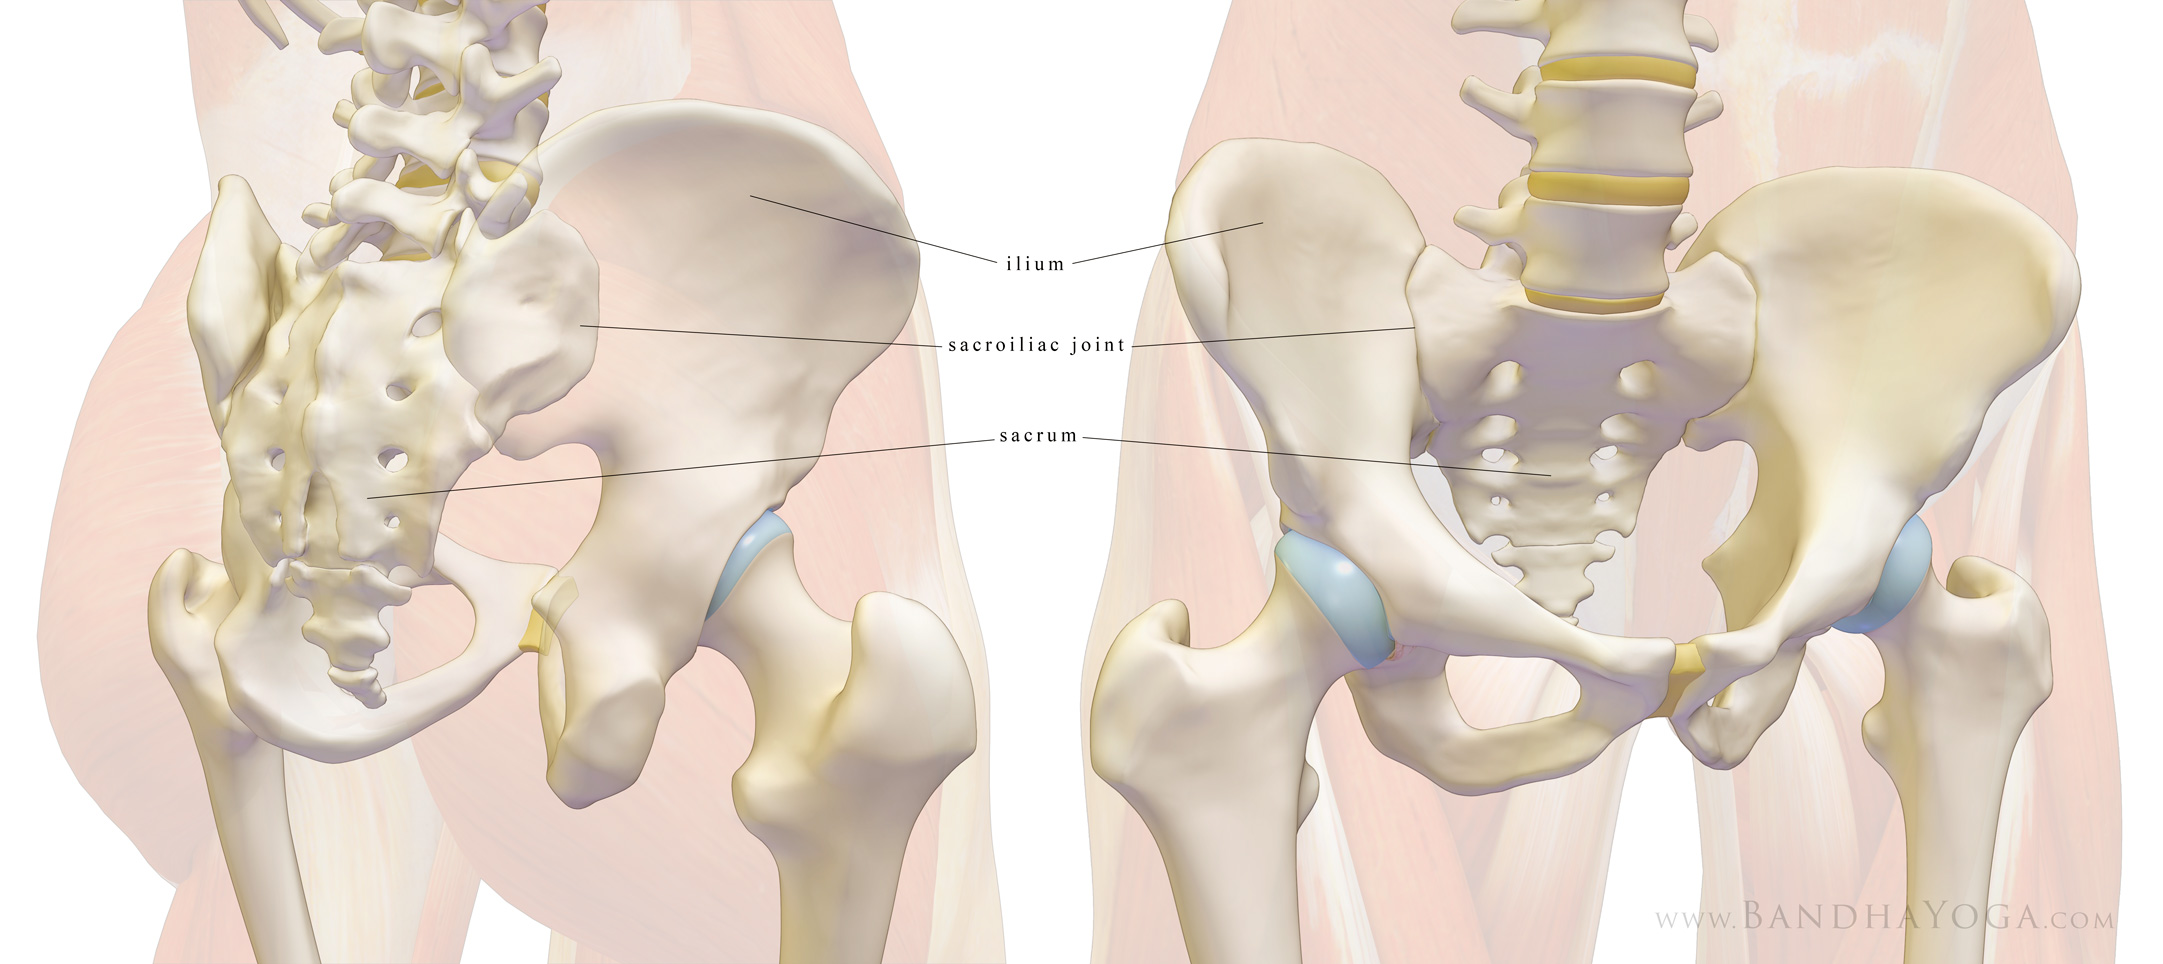
In this blog post we take a look at the fundamental anatomy of the sacroiliac, or SI joint. The SI joint is the articulation between the ilium and the sacrum on each side of the pelvis. As with other joints, it is comprised of the bony stabilizers, the static soft tissue or ligamentous stabilizers, and the dynamic muscular stabilizers. On the surface of the bone is the articular cartilage.
The SI joint depends primarily on the stout ligaments that cross it for stability. The bones also have shallow interdigitations that correspond on each side, thus conferring some bony stability. Finally, there are the muscles (dynamic stability) and fascia—especially the thoracolumbar fascia.
Figure 1 illustrates the bones that comprise the SI joint.
Figure 1: The bones of the sacroiliac joint.
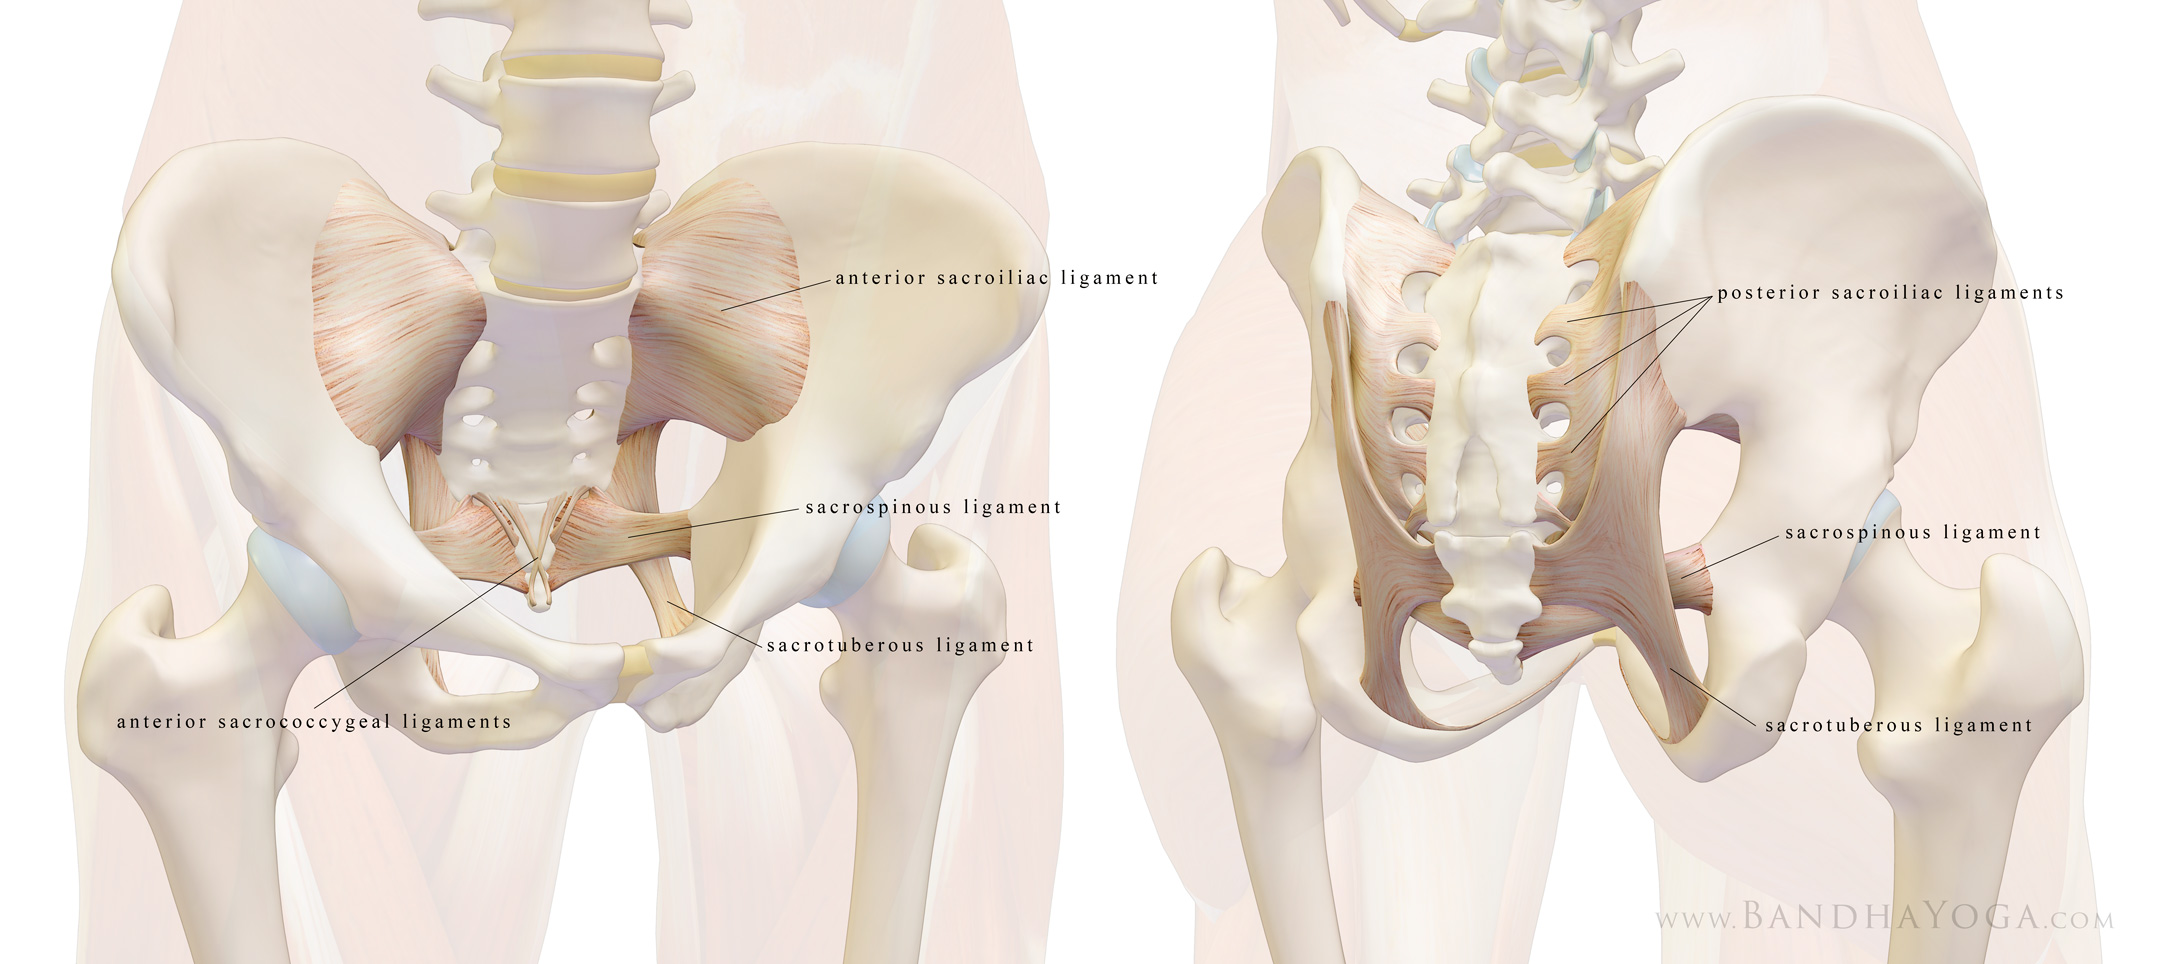
Figure 2 illustrates the stout ligamentous stabilizers of the joint. These include:
The anterior (front) and posterior (back) sacroiliac ligaments running from the sacrum to the ilium;
The sacrotuberous ligaments running from the sacrum to the ischial tuberosity;
The sacrospinous ligaments running from the sacrum to the posterior iliac spine;
Figure 2: The ligaments of the sacroiliac joint.
Movement is very limited for this joint, but includes nutation or anterior tilt (flexion) of the sacrum between the ilia, counter-nutation or posterior tilt (extension) and small movements of the ilia themselves. The stable SI joint thus functions for shock absorption and transfer of torque during ambulation.
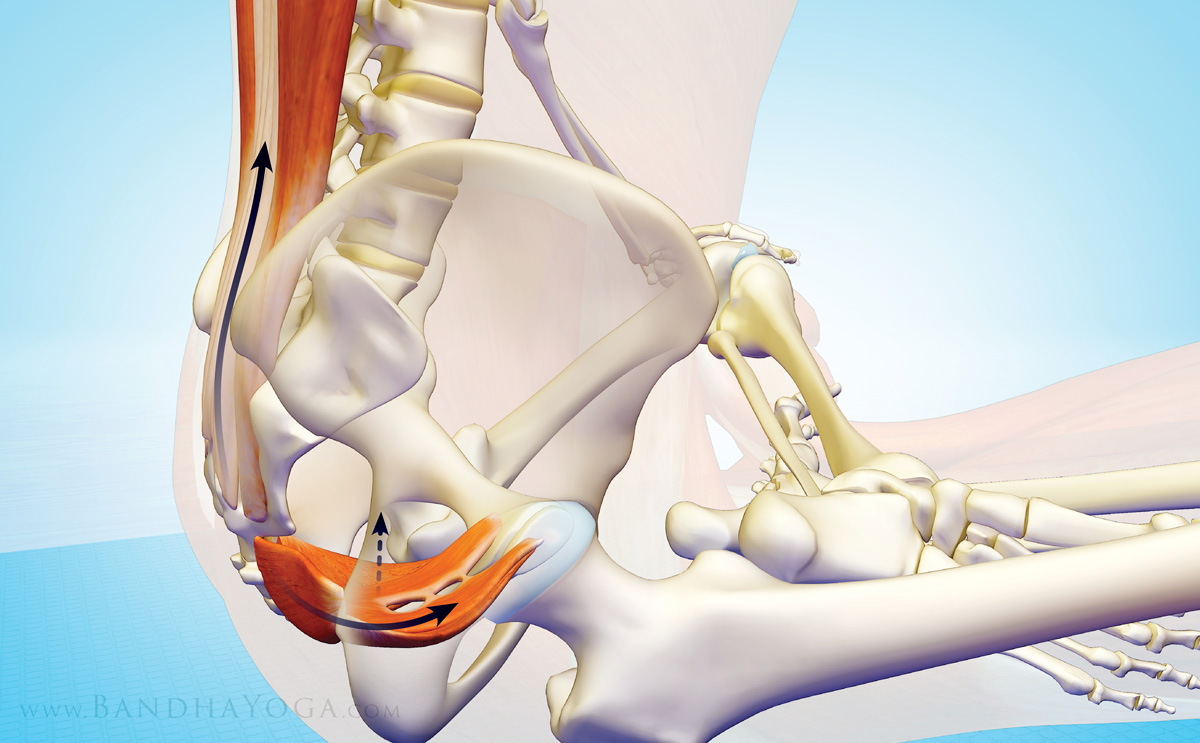
Muscles and fascia also confer stability to the joint. Figure 3 illustrates the relationship between the erector spinae muscles of the back and the muscles of the pelvic floor. You can see that the erector spinae muscles draw the sacrum into flexion (nutation) and the muscles of the pelvic floor (especially the pubococcygeus) draw the bone into extension (counter-nutation). Simultaneously engaging these muscles creates opposing forces that stabilize the joint.
Figure 3: The interaction between the erector spinae and pelvic floor muscles for stabilizing the SI joint.
Figure 4 illustrates the relationship of the latissimus dorsi and gluteus maximus muscles on opposite sides of the body. In between is the thoracolumbar fascia. Note how the fibers of these structures run perpendicular to the joint. Thus, working with core exercises such as Bird Dog Pose can help to strengthen the dynamic stabilizers of the SI joint. These muscles, along with the fascia comprise the “posterior oblique subsystem”.
Figure 4: The posterior oblique subsystem for stabilizing the SI joint.
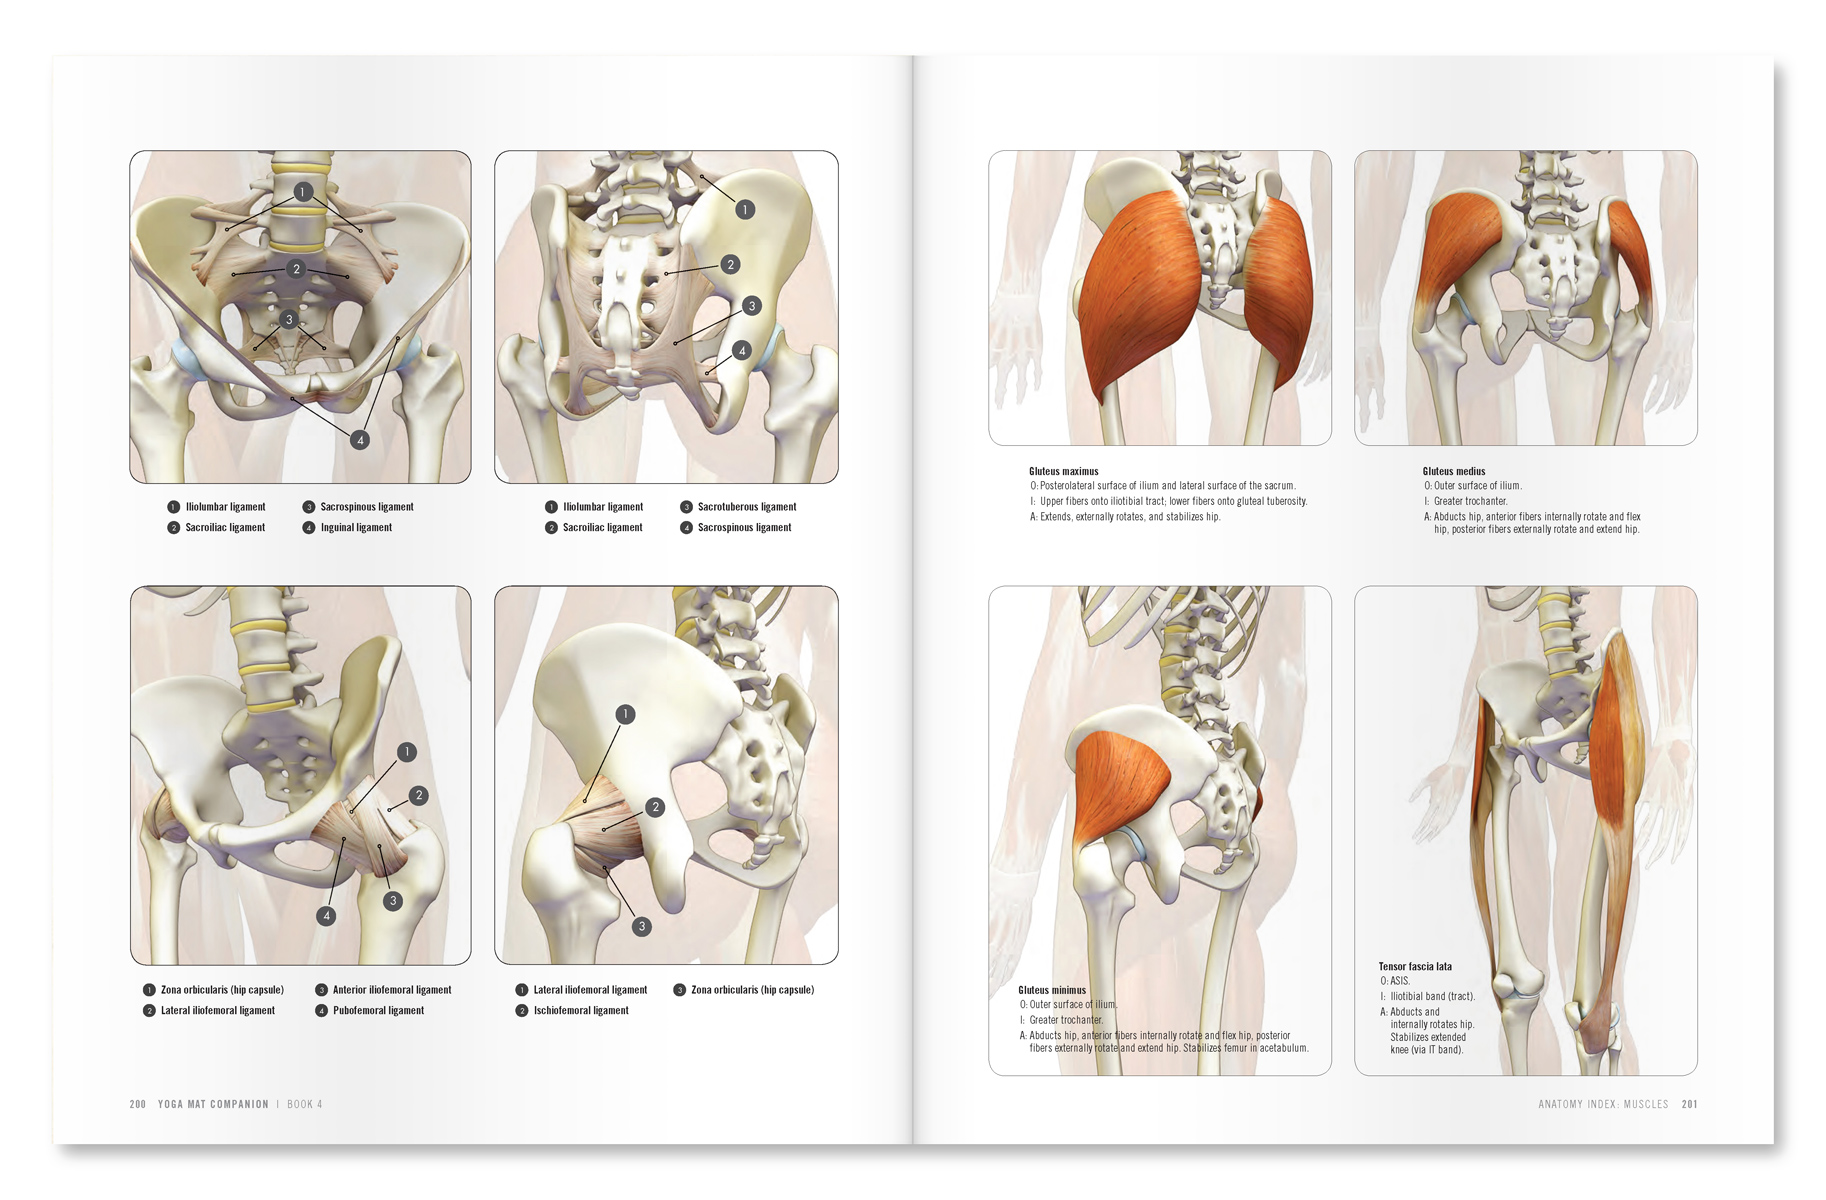
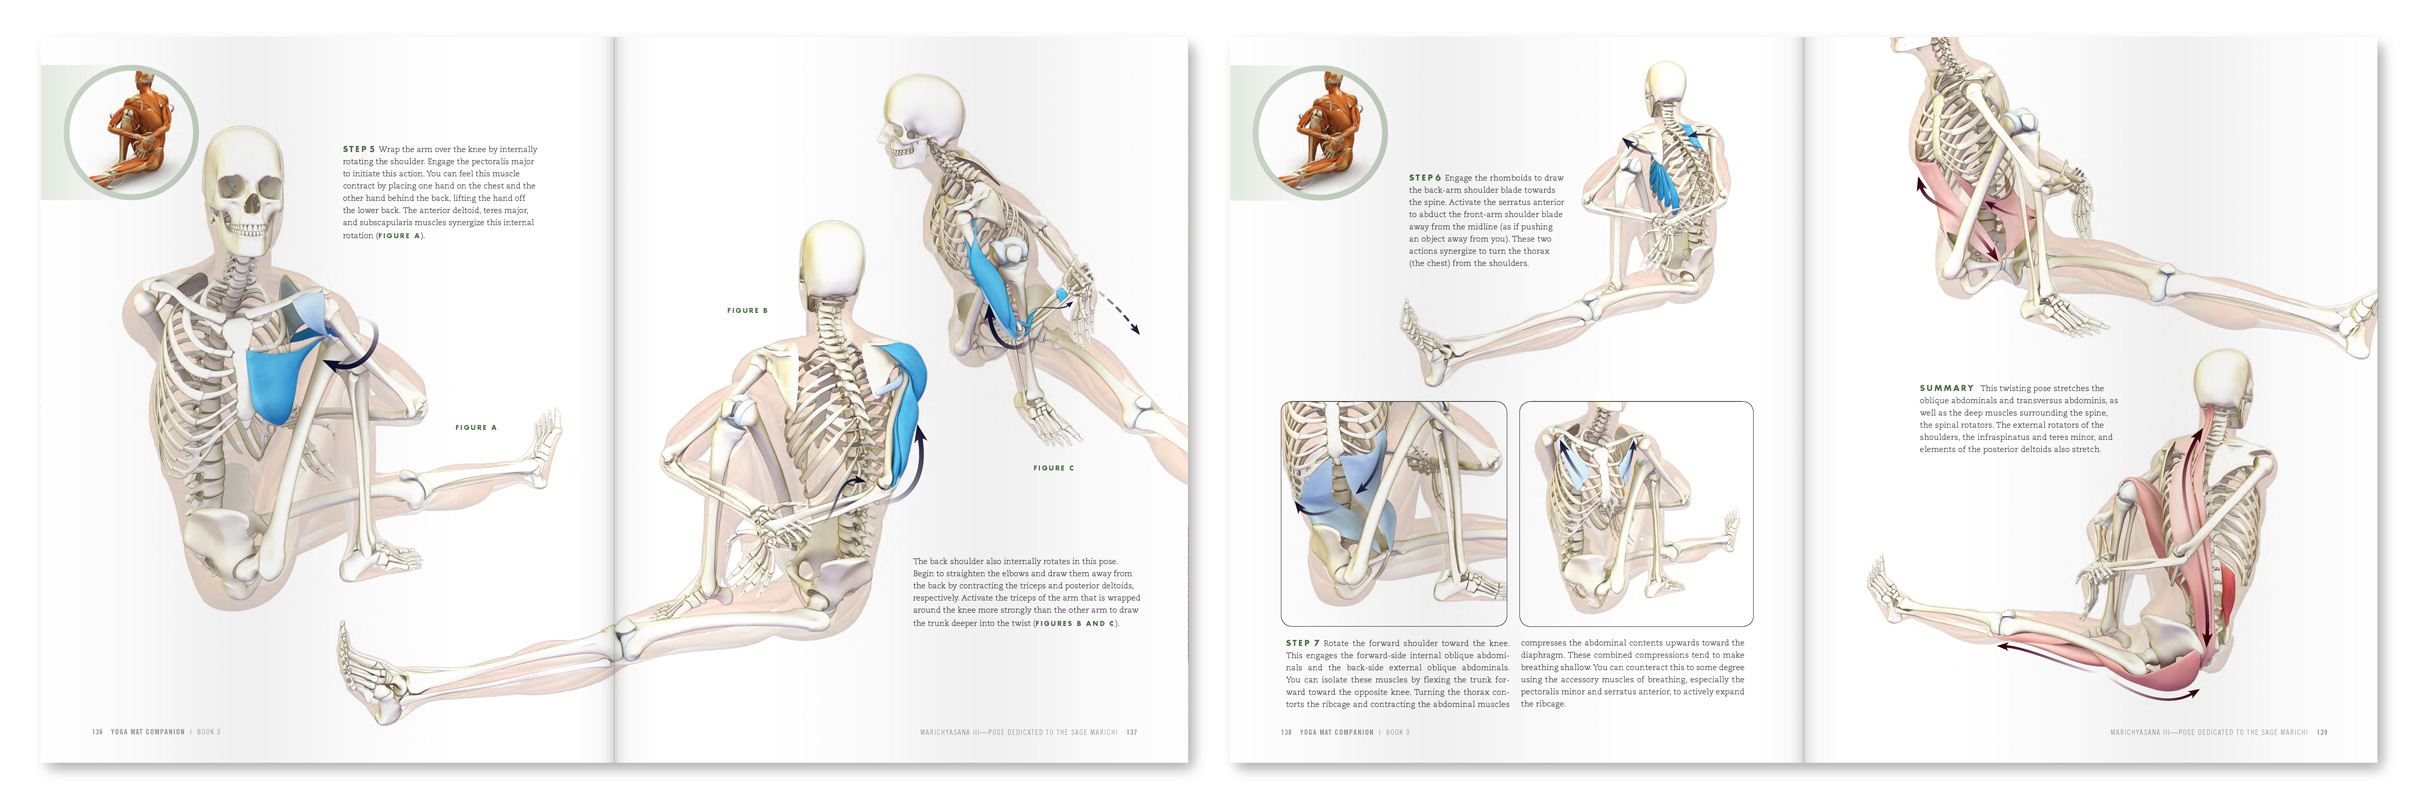
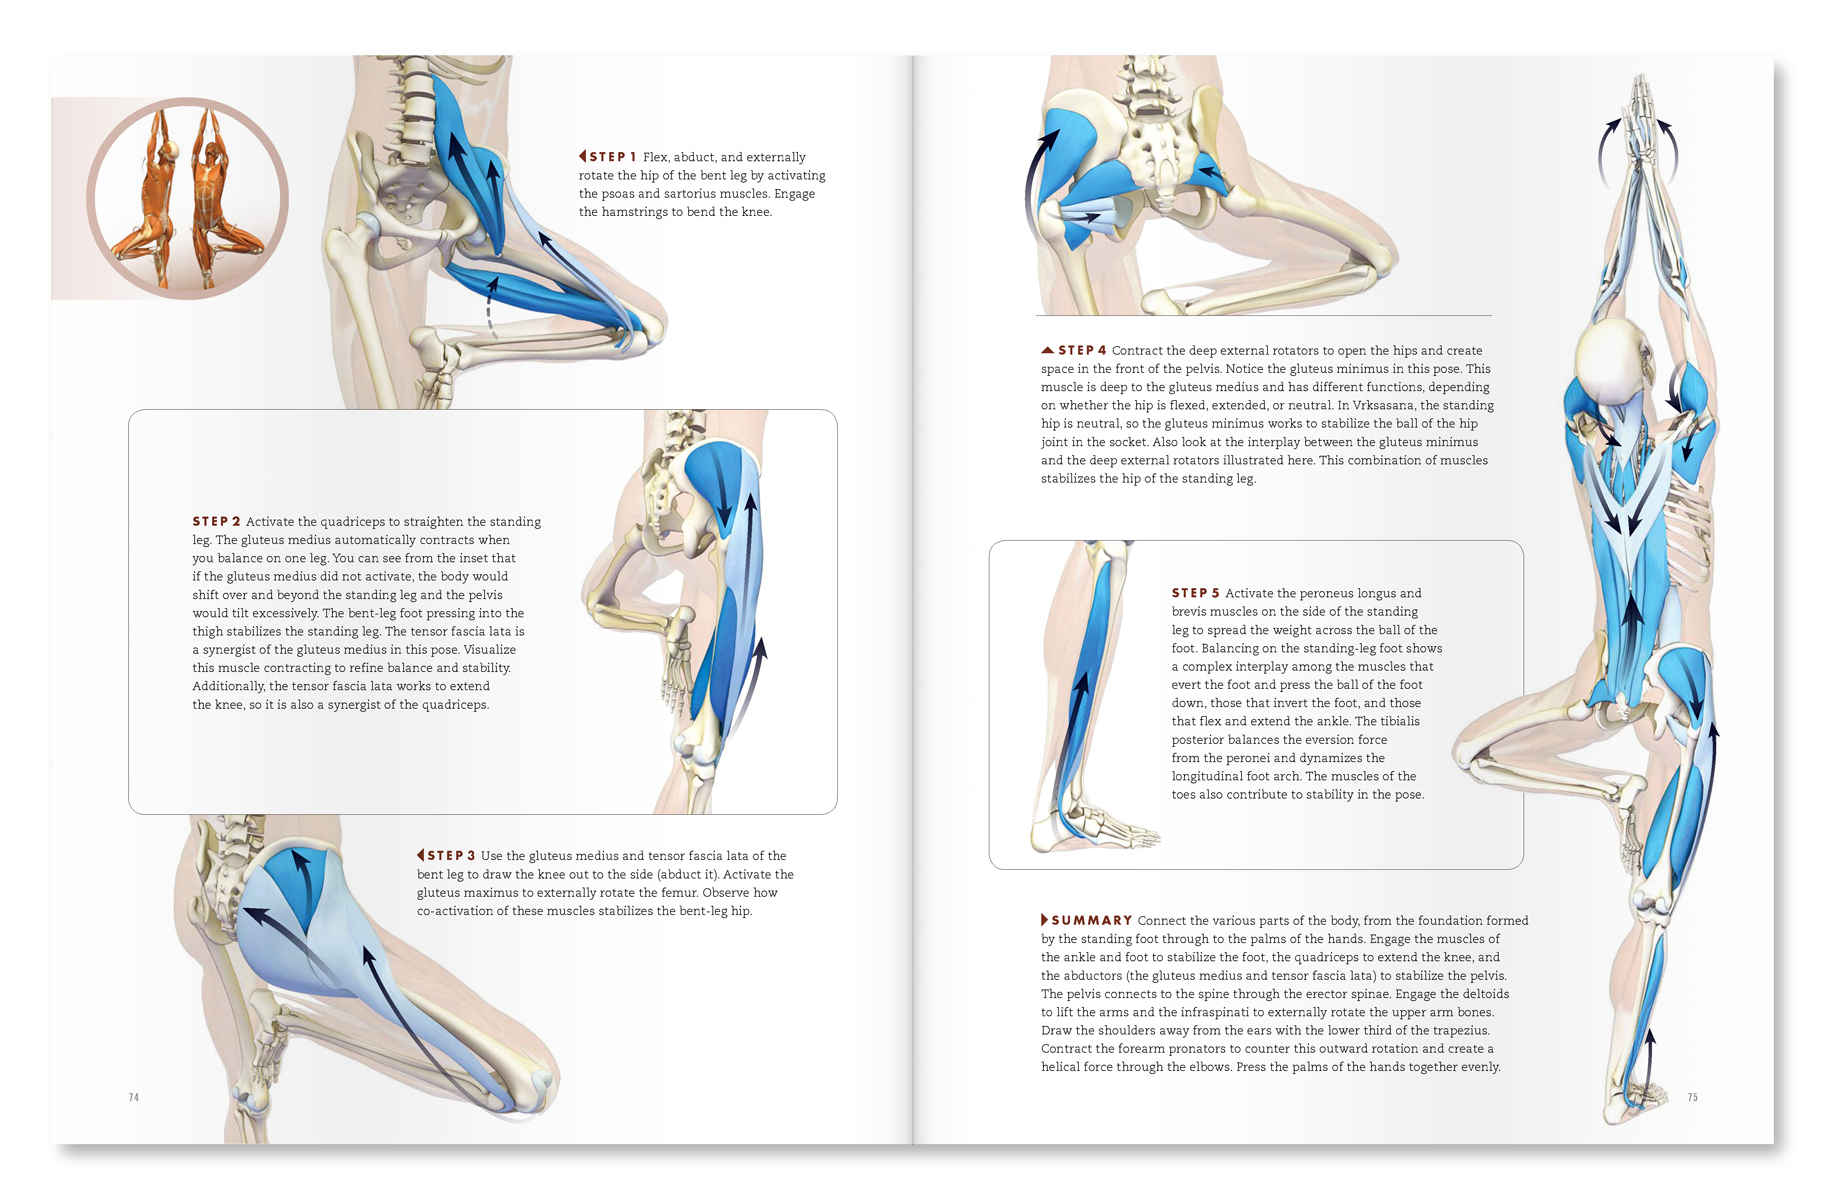
Want to learn more about anatomy and biomechanics for your practice? Click here to check out the Yoga Mat Companion series! Below are some excerpts from these books.
Hope you enjoy this overview of the foundational structures of the SI joint. I’d also like to say to our friends in Florida that I'll be teaching in beautiful Tampa/St Pete on the weekend of September 23--25. This is a special intensive in which I will be presenting the most recent research on stretching biomechanics and physiology in a manner that you can apply to your actual practice. Not to be missed! This intensive is the only course I'll be teaching in the Southeast USA this year--hope to see you there! Click here for more information from Suncoast Yoga Teachers Association…
In this blog post I go over the muscles of the pelvic floor. This is an essential structure for support of the pelvic organs; the muscles involved are also engaged in Moola Bandha.
On to the pelvic floor...
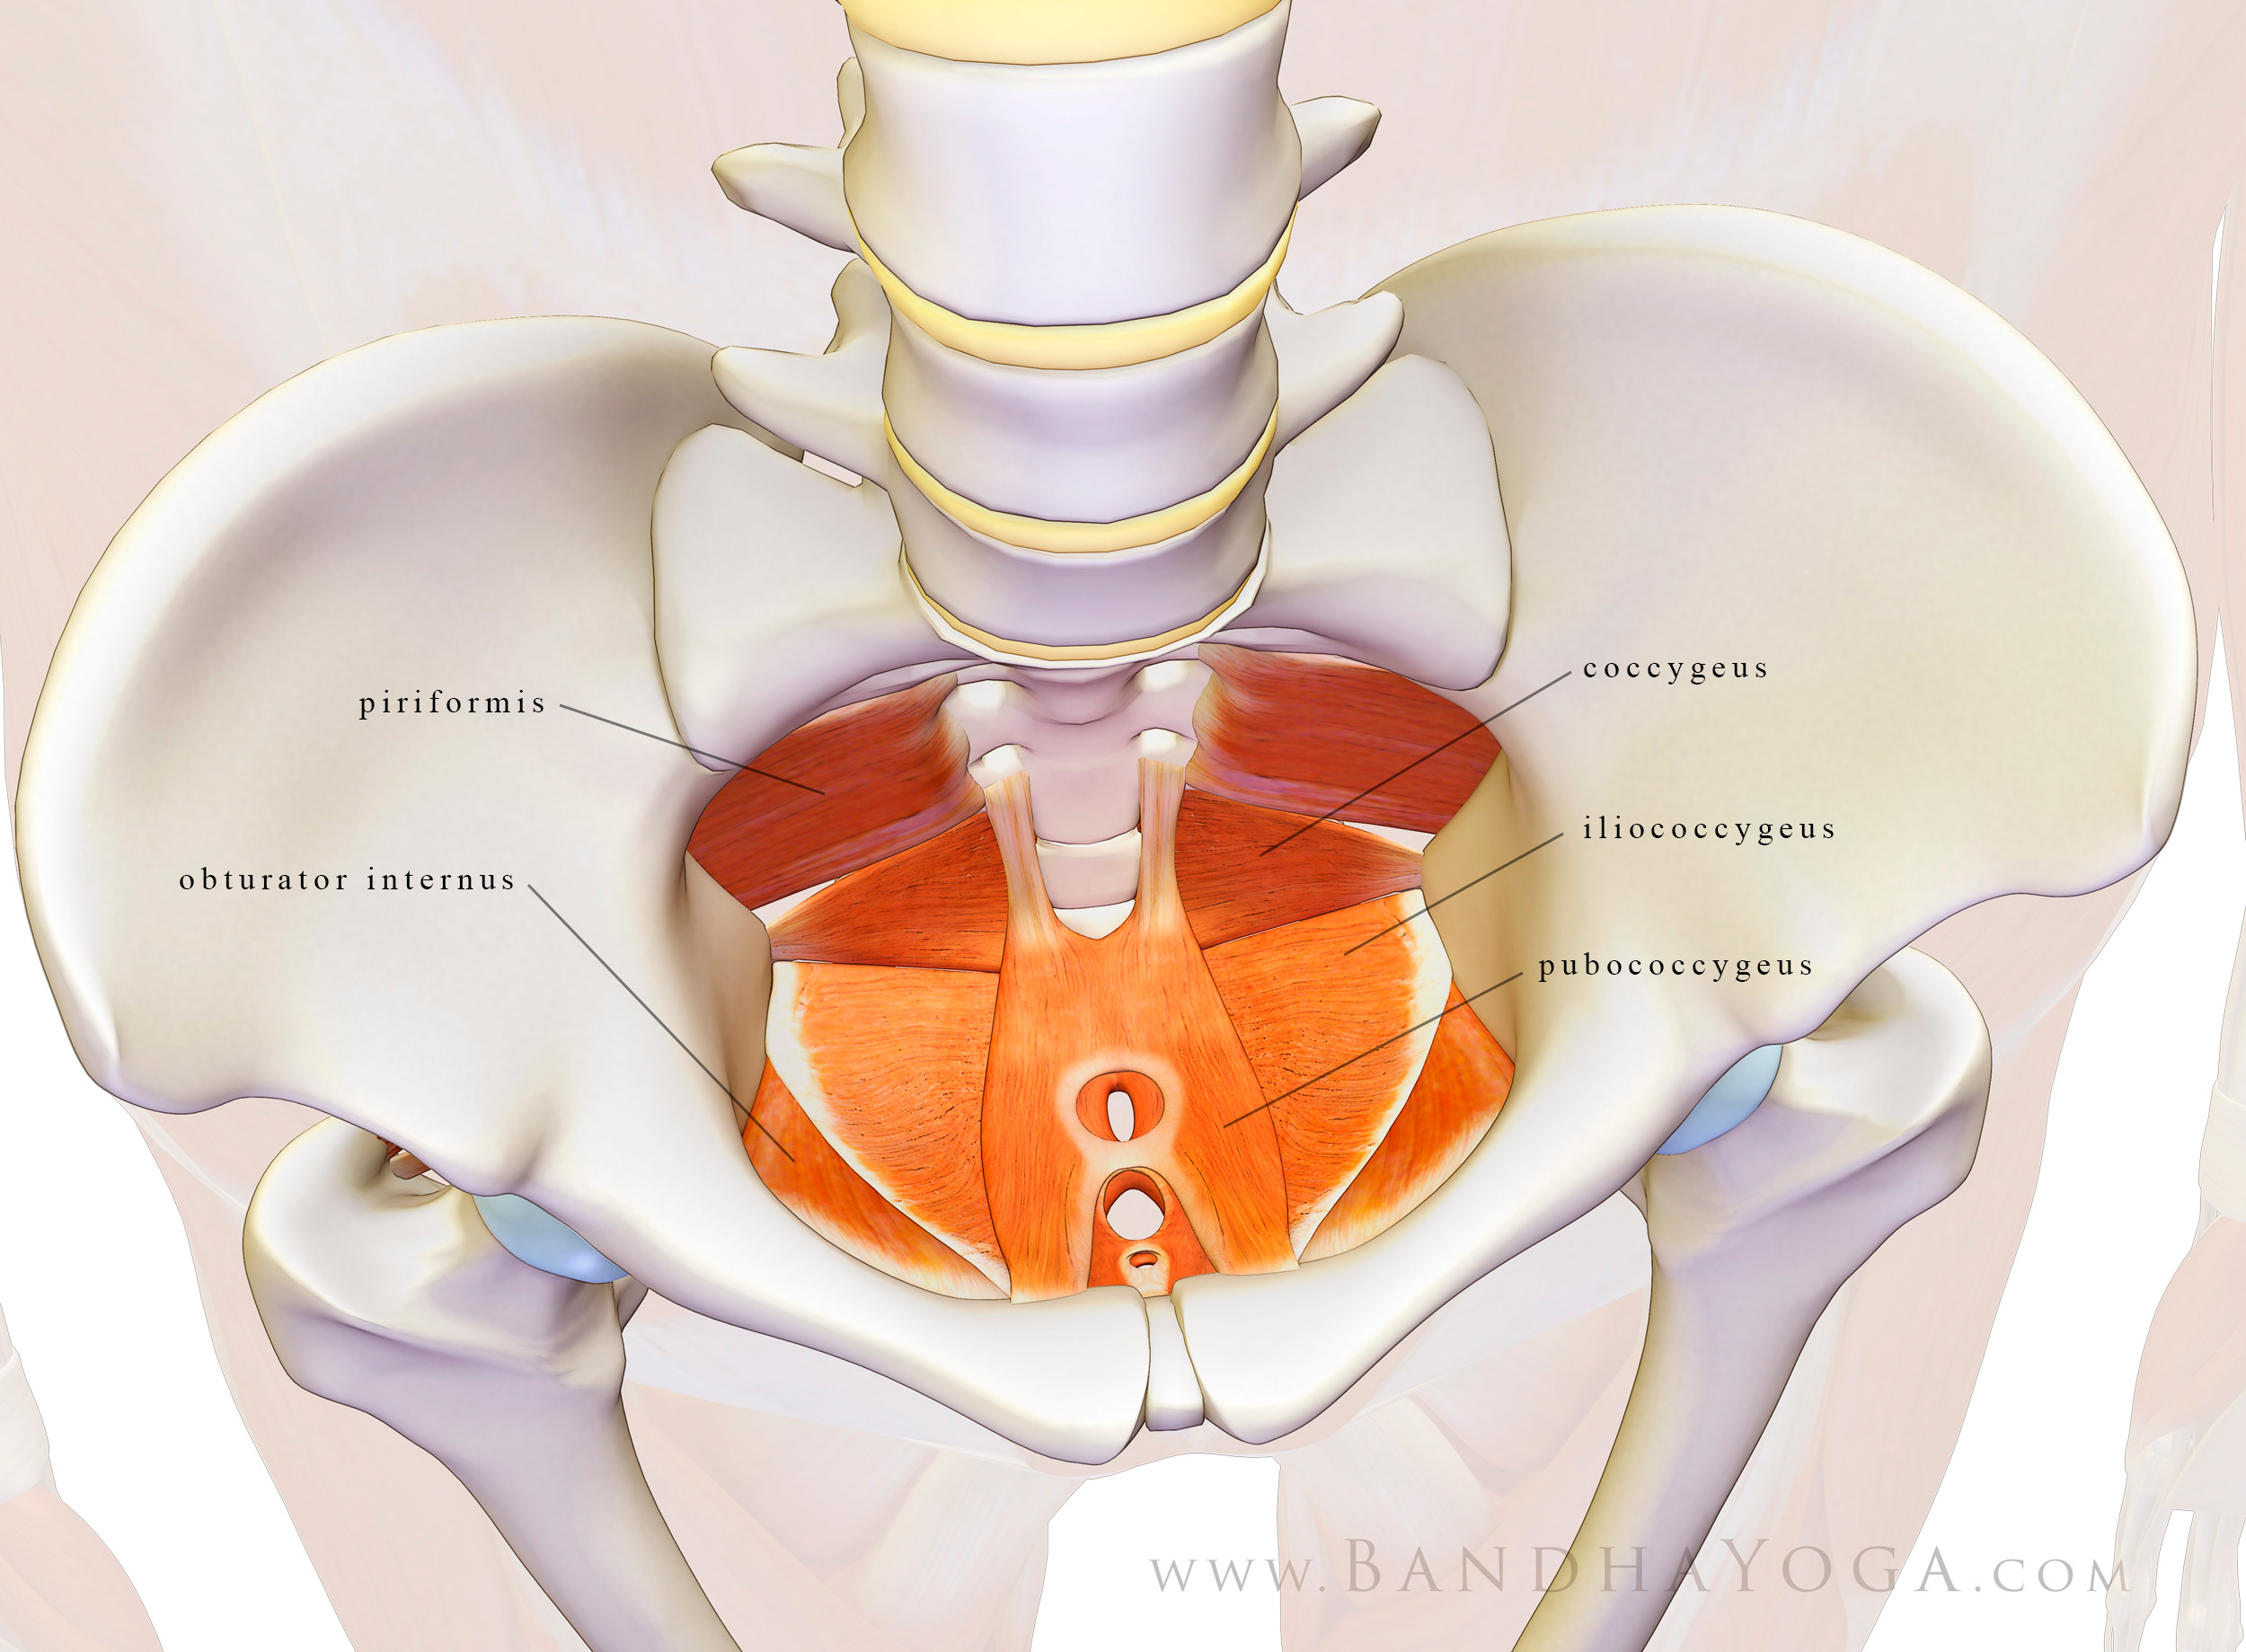
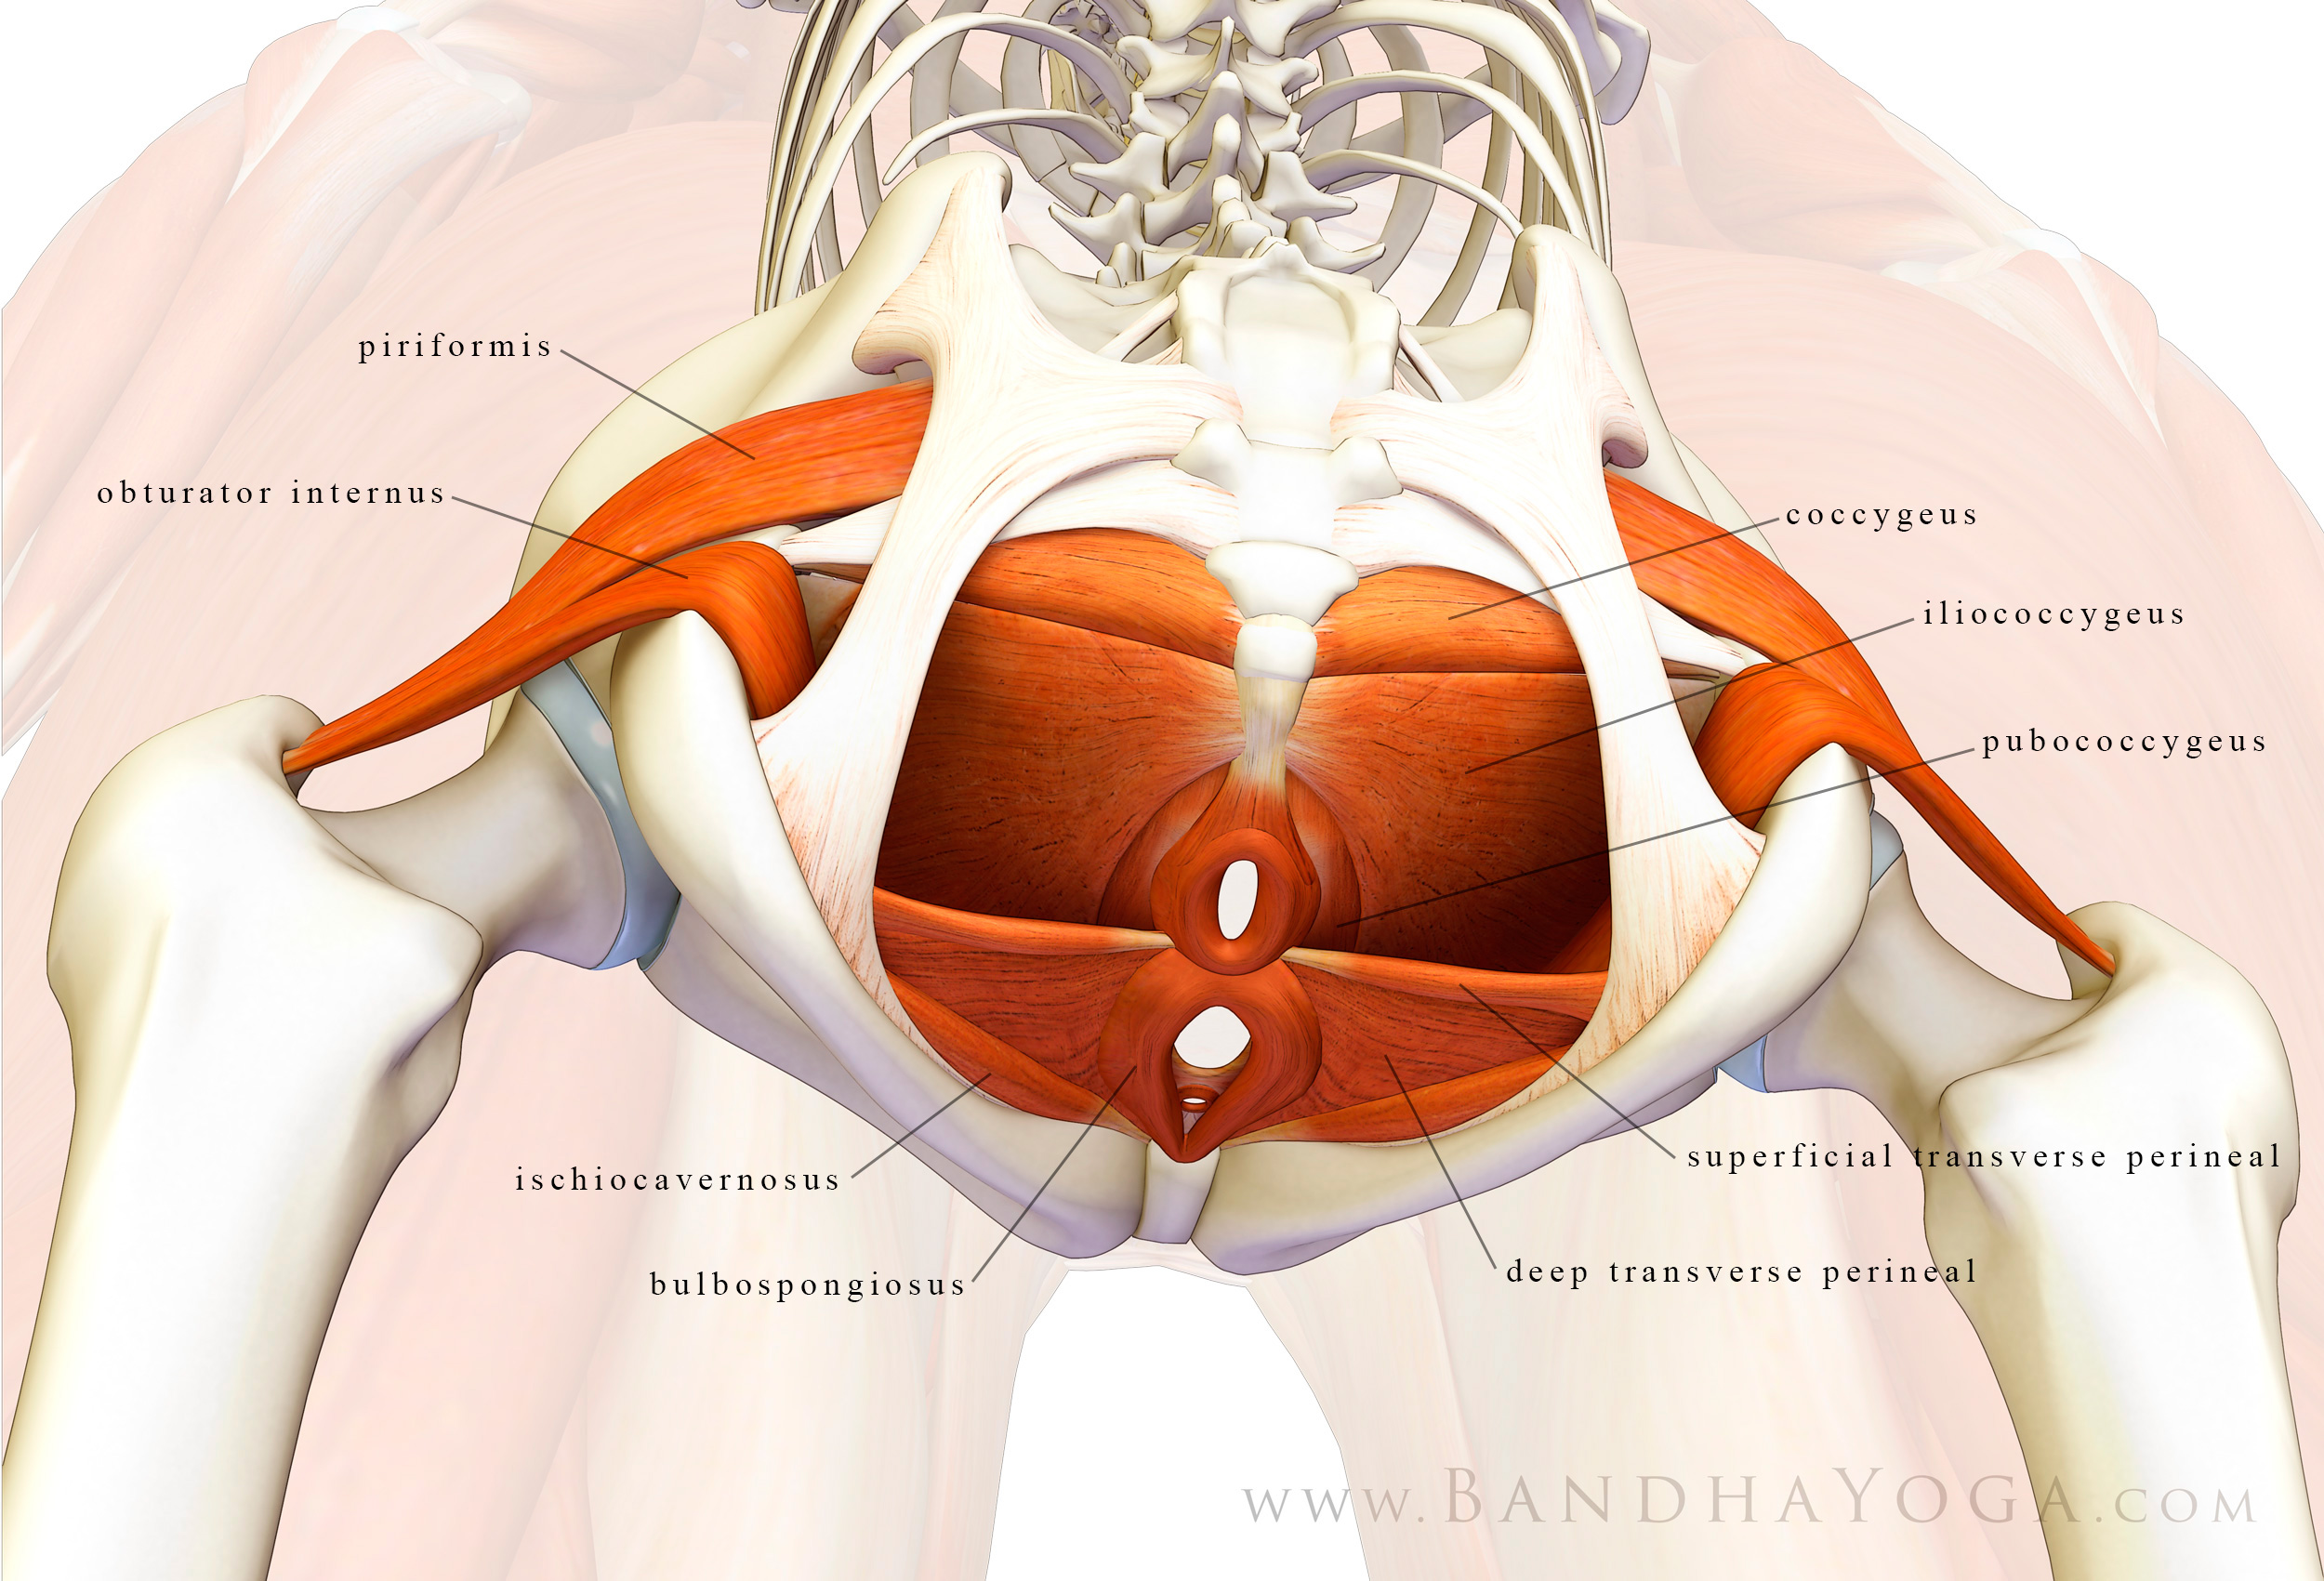
The pelvic floor is comprised of a series of muscles including the piriformis, obturator internus, coccygeus, iliococcygeus, and pubococcygeus. These are illustrated in Figure 1. Other muscles involved include the deep and superficial transverse perineals, the ischiocaveronus and the bulbospongiosus. We illustrate these muscles in Figure 2.
Figure 1: The Pelvic Floor
Figure 2: The Pelvic Floor
Keeping your pubococcygeus strong can help reduce urinary incontinence. All of these muscles provide links to the thoracolumbar fascia, which is linked to the abdominal core. Take a moment to look over these images to get a feel for the attachments of the muscles of the pelvic floor. Kegel exercises and Moola Bandha engage them.
I’ll have more on this next week—just wanted to give an intro to the structure and let you know about the hacking issue. We appreciate all of your support.