
Working with the muscular stabilizers surrounding the individual joints is a central tenet of both injury prevention and rehabilitation. In this blog post we illustrate how to work with myofascial connections to protect your knee in Pigeon and Reclining Pigeon pose.
Let’s begin with an experience I had at one of my recent workshops in helping a student recover from a yoga injury. One of the participants mentioned to me that he had sprained his knee a couple of weeks before while overdoing it in Pigeon pose. I examined him and concluded he had a mild sprain. First, I told him to lose the neoprene sleeve he was wearing (which was doing nothing). Then we began working with the muscular stabilizers of the knee, in particular using a progressive series of postures that culminated in Lotus pose—all while paying close attention to engaging the muscles that provide dynamic stability to the knee joint. By the end of the workshop, his knee was completely pain free and felt normal. At which point he made an insightful comment: “injured my knee doing yoga wrong, healed it doing yoga right.” Put another way, “poses don’t injure people; doing poses incorrectly injures people—and doing them correctly heals.” With this in mind, let’s look at how to engage the muscular stabilizers and myofascial connections on the outside of the leg in Pigeon pose.
Here’s the cue…
Maintain the ankle in a neutral or slightly dorsiflexed position, extend the toes and then press the ball of the foot forward (as shown). This engages the peroneus longus and brevis and tibialis anterior muscles of the lower leg, and activates a myofascial connection between these muscles and the TFL and biceps femoris muscles of the thigh. Slightly externally rotating the ankle activates the hamstrings on the lateral (outside) of the thigh. These actions create a type of dynamic “brace” on the outside of the leg, protecting the inside of the knee. Similarly, the outside of the knee is protected from overstretching. You can experience this opening on the inside of the knee even while you are reading this by crossing one leg over the other and activating these cues.
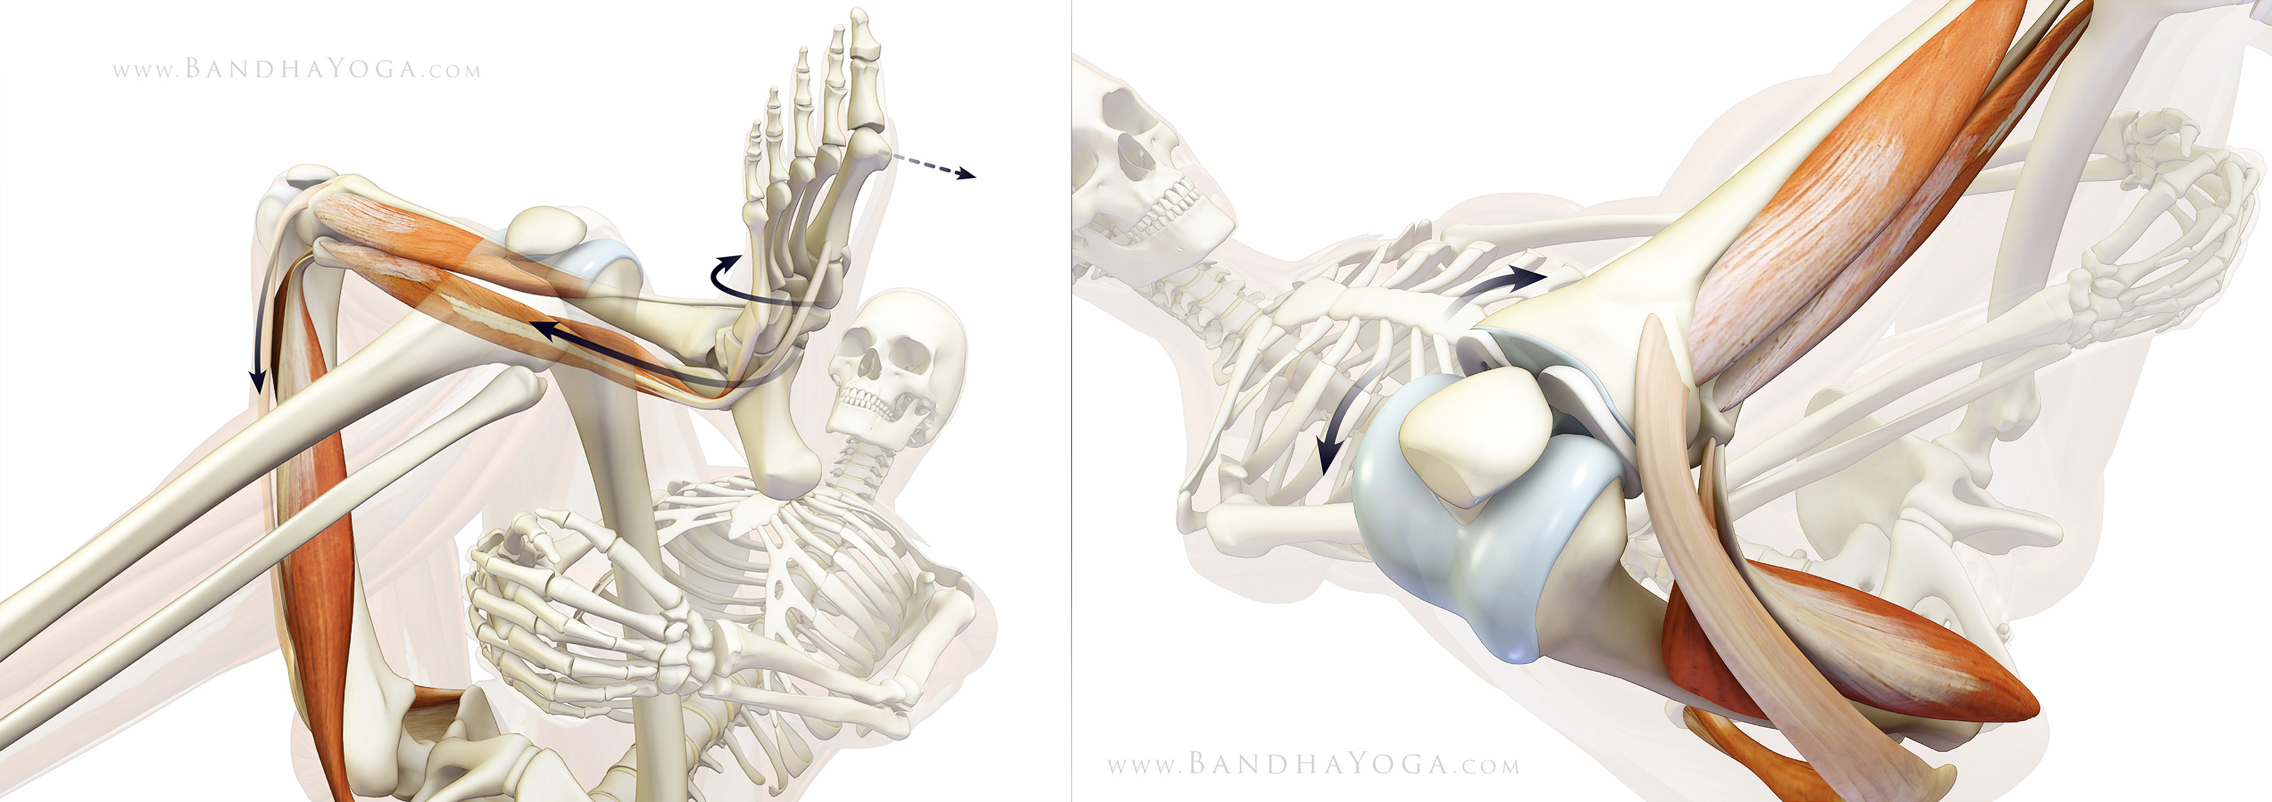 |
| Protecting the knee in Reverse Pigeon: Figure 1 (left) illustrates everting the ankle to access the muscles on the outside of the leg. Figure 2 (right) illustrates the opening on the inside of the knee. |
Figures 1 and 2 illustrate this cue for Reverse Pigeon and figures 3 and 4 for Pigeon Pose. Click here for an animated video of the piriformis muscle in Reverse Pigeon pose and click here for an animated video that illustrates joint reaction forces and the beneficial effect of releasing the internal rotators for Lotus pose.
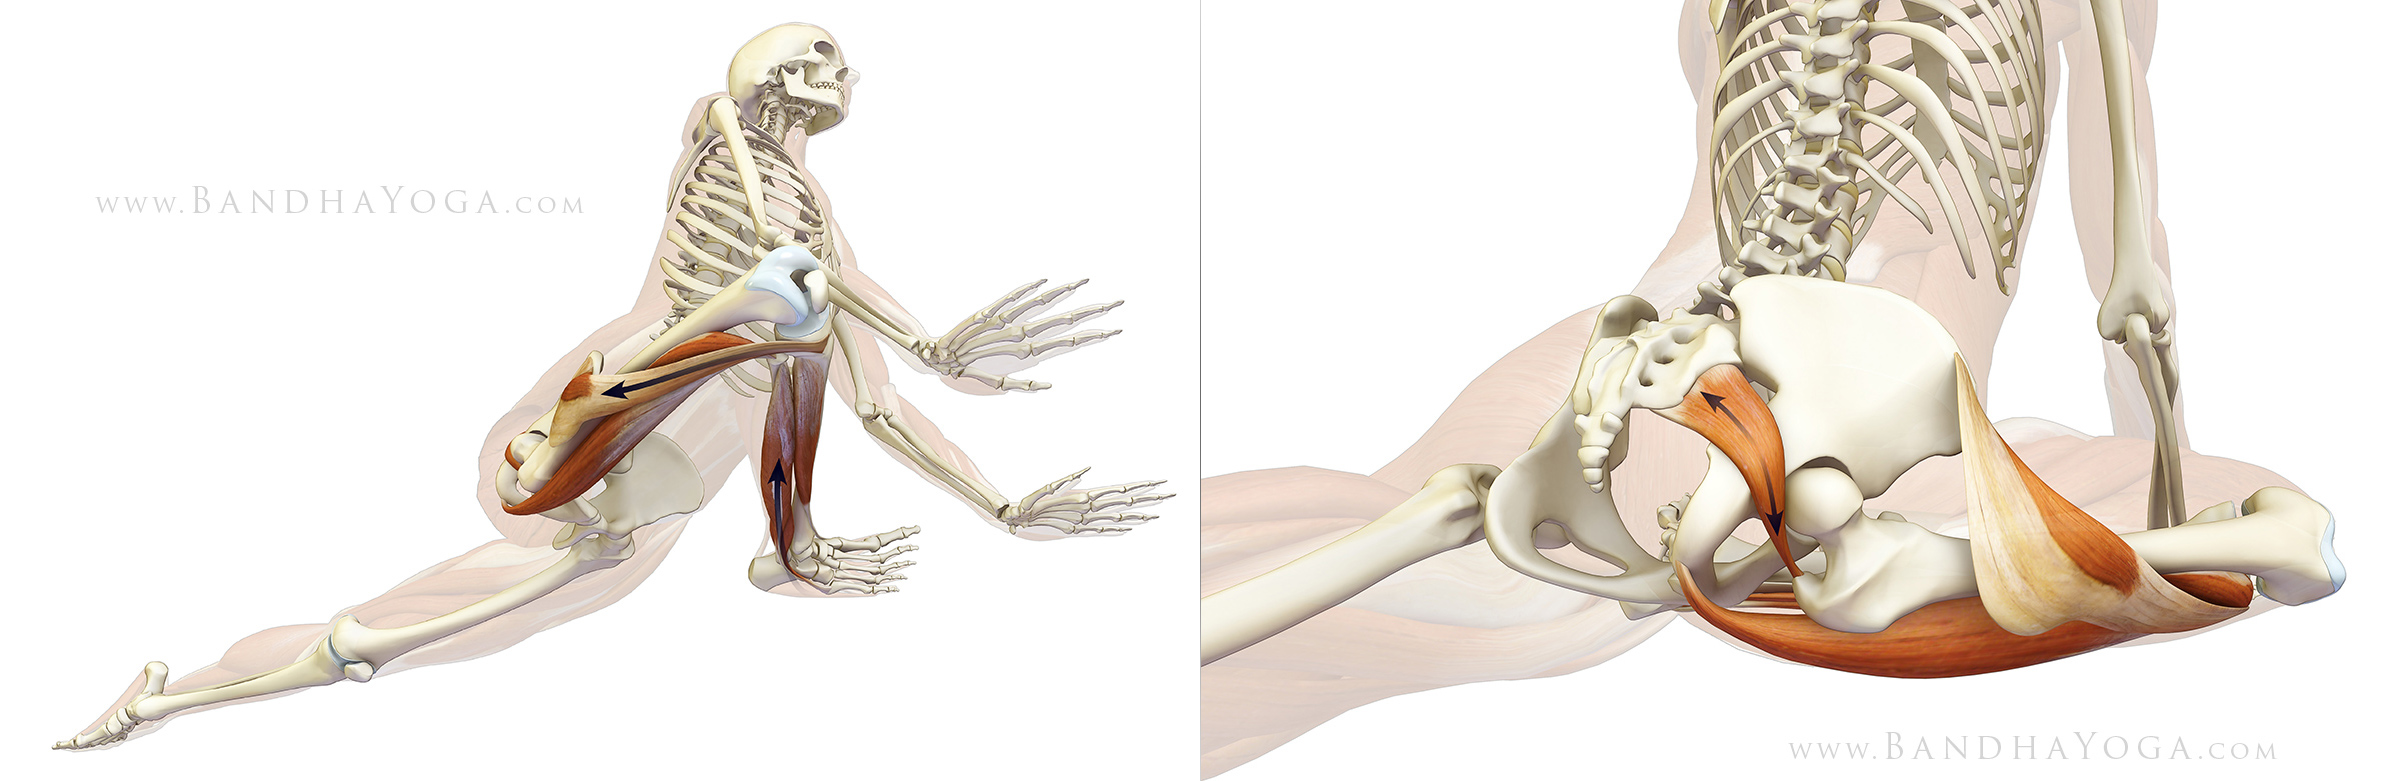 |
| Protecting the knee in Pigeon Pose: Figure 3 (left) illustrates engaging the muscles on the outside of the knee. Figure 4 (right) shows the piriformis muscle stretching in Pigeon Pose. |
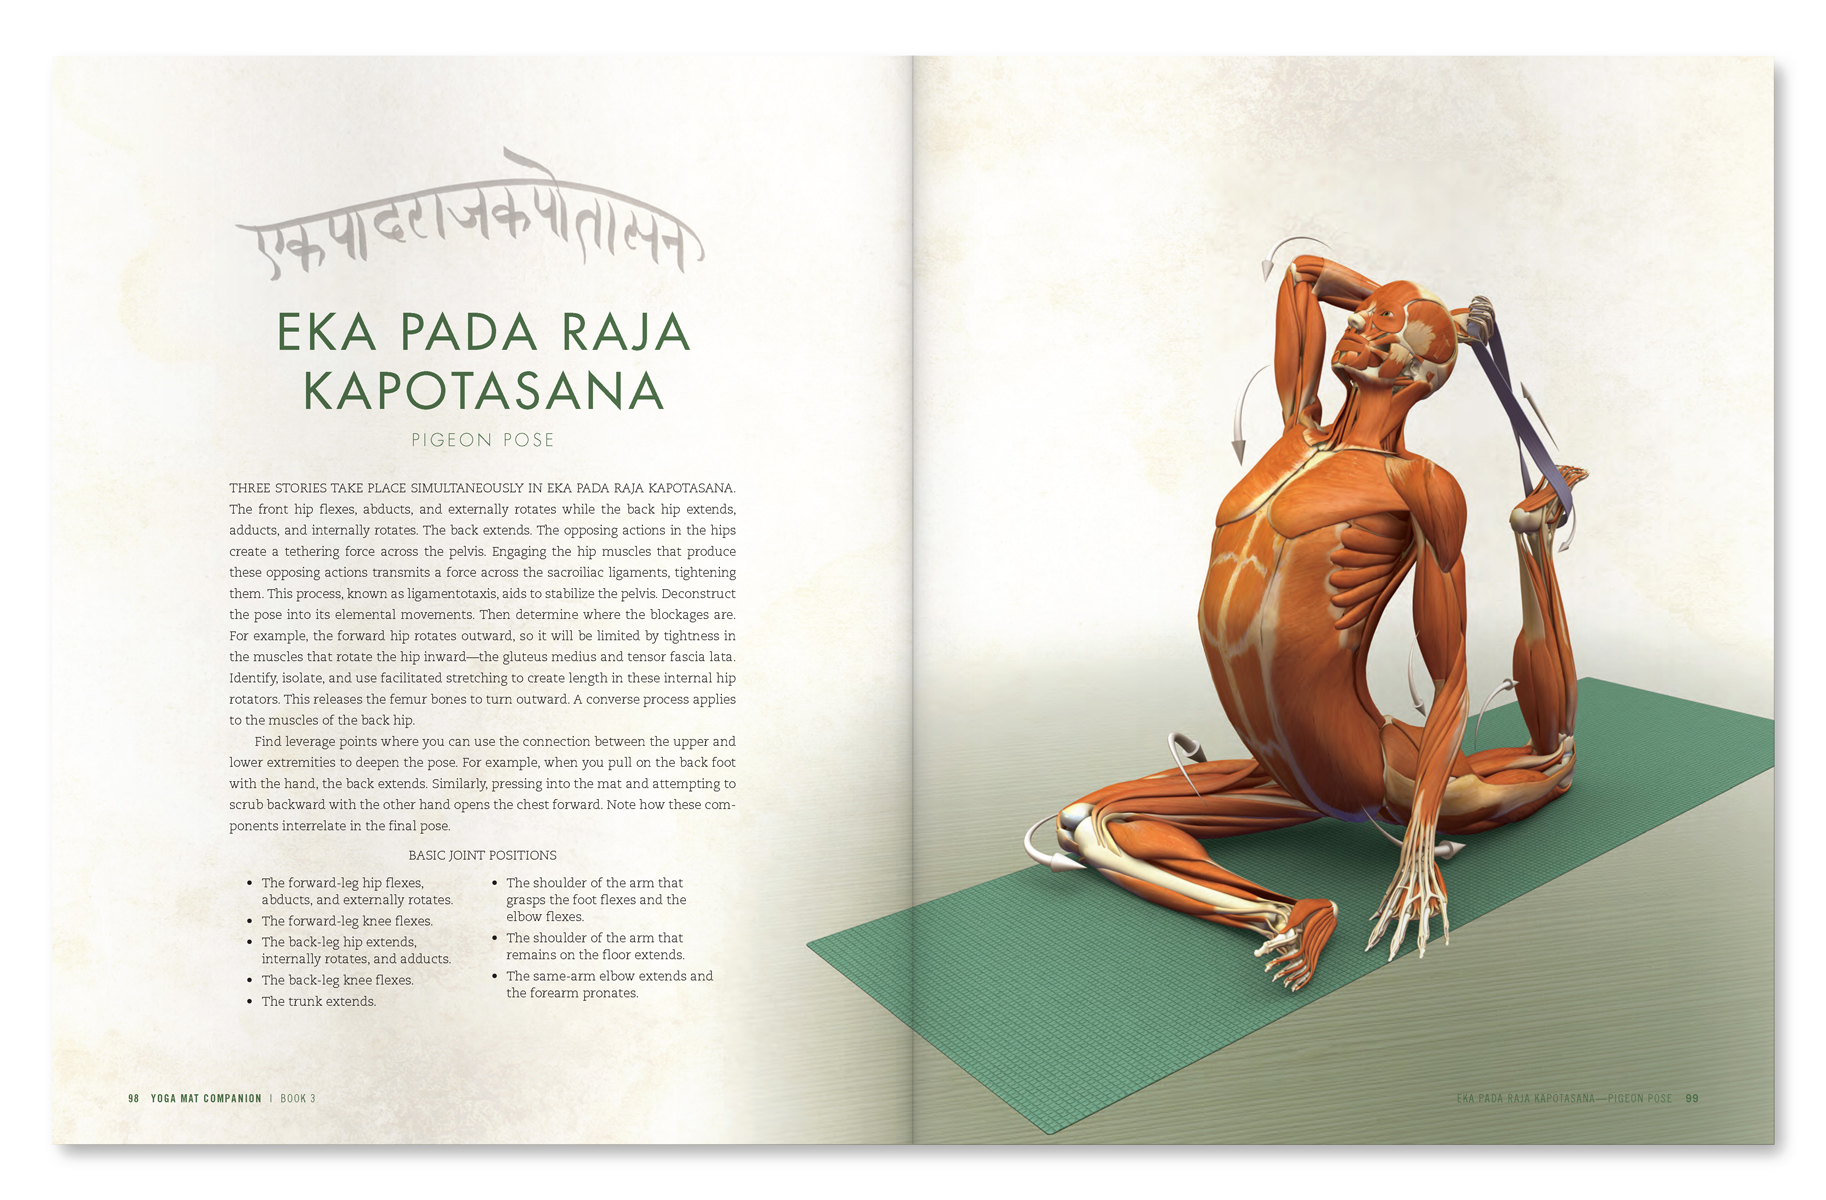 |
| An excerpt from "Yoga Mat Companion 3 - Anatomy for Backbends and Twists". |
 |
| An excerpt from "Yoga Mat Companion 3 - Anatomy for Backbends and Twists". |
Thanks for checking in. We greatly appreciate when you share us on Facebook, Twitter and Google Plus. For many more tips on combining Western science and yoga, check out The Key Muscles and Key Poses of Yoga and the Yoga Mat Companion series (you can page through each book on the right of this page).
All the Best,
Ray Long, MD
All the Best,
Ray Long, MD
This is great. I have also discovered that in Pigeon so many teachers seem to enforce the idea that practitioners should position their leg (fibula and tibia bones) to be parallel to the front of their mat, which causes tremendous strain on the knee especially in average practitioners whose femur head does not have the flexibility (rotation basically) to maintain such alignment. By drawing the ankle back toward the opposite thigh, basically 'closing' the knee, practitioners reduce tension at the knee joint, while increasing rotation and range of motion at the hip joint itself.
ReplyDeleteexcellent point. Thanks for that.
DeleteI had the same question. Ray, could you confirm the thing about the tibia bone alignment ?
DeleteYann
Hi Gabriel,
DeleteThanks for your comment. Basically there are a couple of general variations in this pose, which you describe. My thoughts are similar to my reply to Inna below, so I'll repost here:
Pigeon pose is usually taught one of two ways: the first is the one I illustrate here in this post, in which the lower leg is parallel (or in that direction) to the short side of the mat. This variation produces external rotation at the hip--as does Reverse Pigeon. When you externally rotate the flexed hip, this stretches the piriformis to a greater degree, because the piriformis is an internal rotator when the hip is in flexion. In this variation of Pigeon, you should use the cues illustrated here to create a dynamic brace on the lateral side of the knee. This protects against excessive pressure on the inside of the knee and overstretching on the lateral side.
The other variation of Pigeon has the knee flexed. This variation is not as effective for stretching the piriformis (or other internal rotators) because the hip is in greater internal rotation. In this variation, I recommend engaging the hamstrings by drawing the lower leg towards the thigh and plantar flexing the foot. In this manner, you engage two muscle groups that cross the knee joint (the hamstrings and the gastrocnemius), which helps to maintain congruency via these dynamic stabilizers. You can augment the stretch of the piriformis in this variation by adducting (drawing towards the midline) the femur, because when the hip is flexing the piriformis is an abductor.
Each pose has benefits; the second is easier on the knee.
Best~Ray
Hi Yann--good to see you! Ray
DeleteThank you so much Ray.
DeleteYour site helps provide teachers with awareness to providing cues needed, which in my experience are often left out and students simply 'follow' an image (leg parallel to short end of the mat) without exploring deeper. Though that opens a whole different discussion about yoga teaching styles.
I am glad your site is there to help all teachers and students discover their body and practice safely.
Cheers - Gabriel
You're welcome, Gabriel--I appreciate your feedback as well on our work. Exploring deeper, to me, is a big part of the process. I think that was one of the aspects of Mr. Iyengar's approach that contributed so much to integrating alignment into the practice. With poses like Pigeon, there are (and have to be) variations on the approach, with each having benefits and some being more suitable to certain practitioners. The key, in my view, is to understand the contributions of the musculoskeletal system to each variation, as I point out above. All the Best~Ray
DeleteThe illustrations in both your paper books and on-line are an excellent aid to visualisation which is, I believe, the key to reaching that elusive "stillness" in asanas. Is Chris Macivor still responsible for the illustrations?
ReplyDeleteHi Alan,
DeleteGreat to hear you dig the illustrations. Visualization is powerful for getting there. I find it is one of the keys to mindfulness. Thanks for stopping by! Ray
Yes, Chris is the illustrator.
Delete1st hit on this site. As a Medically oriented professional, impressed with the detail and schematics. Unusually for me, this makes a lot of sense! Will be back and may subscribe.
ReplyDeleteCheers, wiLt
Thanks wiLt, Hope to see you again! Ray
DeleteI have needed to add something to pigeon and the action / rotation of the toes and heel is what I was missing. Especially in regards to releasing the side of the hamstring. I always hear "relax relax" in this pose, missing the turning of the lower foot needed, in order to stabilize the knee and get to those spots.
ReplyDeleteI also got a lot of insight into the reverse pigeon video, I was missing that flattening of the lower spine at the end in order to maximize the stretch.
Much thanks for these.
Hey Jerome,
DeleteThanks for your feedback--delighted to hear it works for you. The flattening of the lower spine is key for the piriformis stretch. Details are the key to yoga. Mr. Iyengar taught me that. Best~Ray
The information about the piriformus muscle was very helpful. I have a question regarding the ankle flexation (if that is a word :)) during Pigeon Pose. It appears from the illustration that the ankle is flexed. Could you suggest ankle placement to best protect the knee?
ReplyDeleteHi Anon,
DeleteI keep the ankle in some dorsiflexion, or neutral in this pose. But, I engage the tibialis anterior (a dorsiflexor) and the peronei (plantar flexors) simultaneously (co-contraction). The cues describe how to do this. In dorsiflexion, you draw the top of the foot towards the shin, in plantar flexion you point the foot down (like when you are pushing off during walking). "Flexation" is not a word ;)) Ray
I have found these actions to also work well in Eka Pada Sirsasana.
ReplyDeleteNo doubt. These work with all of the various poses that have the knee in this position--an example of "portability" of concepts. Thanks~Ray
DeleteI have another question regarding position of the foot in bended leg in pigeon. During 500 hours teaching certification training we were told that if you can bring your lower leg parallel to the short side of your mat then you dorsiflex your foot. If your foot is facing toward opposite thigh( sharp angle in the knee) then the top of your toes should be pressing down toward the floor. Is this correct alignment?
ReplyDeleteHi Inna,
DeletePigeon pose is usually taught one of two ways: the first is the one I illustrate here in this post, in which the lower leg is parallel (or in that direction) to the short side of the mat. This variation produces external rotation at the hip--as does Reverse Pigeon. When you externally rotate the flexed hip, this stretches the piriformis to a greater degree, because the piriformis is an internal rotator when the hip is in flexion. In this variation of Pigeon, you should use the cues illustrated here to create a dynamic brace on the lateral side of the knee. This protects against excessive pressure on the inside of the knee and overstretching on the lateral side.
The other variation of Pigeon has the knee flexed. This variation is not as effective for stretching the piriformis (or other internal rotators) because the hip is in greater internal rotation. In this variation, I recommend engaging the hamstrings by drawing the lower leg towards the thigh and plantar flexing the foot. In this manner, you engage two muscle groups that cross the knee joint (the hamstrings and the gastrocnemius), which helps to maintain congruency via these dynamic stabilizers. You can augment the stretch of the piriformis in this variation by adducting (drawing towards the midline) the femur, because when the hip is flexing the piriformis is an abductor.
Each pose has benefits; the second is easier on the knee.
Best~Ray
I know this is off topic and maybe out of the scope of this blog, but do you think based on the biomechanics that trying to achieve this flexion in your foot while downhill skiing would help protect the knee in that sport? Of course barring an injurious fall. I am a Yogi skier :) I also assume practicing this while in pigeon would benefit skiing regardless, better overall flexibility, proprioception and strength in the joints.
ReplyDeleteFantastic, amazing. I had been experiencing lateral knee pain in pigeon, and had been laying off the pose, hoping that the pain would just go away. I followed this and was able to get into single pigeon with no pain! Thank you.
ReplyDelete