
In The Key Muscles of Yoga, I point out that athletes experience improved performance and fewer injuries when they have a fundamental knowledge of their anatomy and biomechanics. For this reason, I recommend that you add The Daily Bandha to your favorites and return every day or so to review one or two of the concepts presented here. This will allow you to integrate these tools into your yoga practice. After just a few sessions, you’ll begin to apply the techniques unconsciously, improving your poses and aiding to prevent injuries.
In our last post, we discussed the concepts of joint congruency and joint reaction forces as related to yoga. These are among the most important principles to understand for both practitioners and teachers, because many poses can take the articulations to the limits of their range of motion. Take a moment to review this post and look at the new video which shows these concepts in action in Padmasana (Lotus Pose).
Now, on to releasing the internal rotators of the hip . . .
The main muscles that internally rotate the femur at the hip are the tensor fascia lata (TFL) and gluteus medius. The gluteus minimus contributes to this action when the hip is flexed. Conversely, when the internal rotators are tight, they can limit external rotation of the joint, a key component in poses like Lotus. Practicing this asana without releasing the TFL and gluteus medius can lead to excessive joint reaction forces in the knee. This is because the rotational component of the pose is directed into the knee. The key is to use the hip (which is a ball and socket joint) to do the rotation, while protecting the knee by maintaining it as a hinge.
 |
| Tensor fascia lata and gluteus medius stretching. |
To release the TFL and gluteus medius, I use a technique called the “cradle stretch.” In it we lift the lower leg, as shown here. This action externally rotates the hip. Do not allow the knee to sag forward away from the body—this is important. Cradle it in the crook of the elbow so that the knee is maintained as a hinge. Place the outer edge of the foot into the crook of the other elbow and engage the peroneus longus and brevis muscles at the outside of the lower leg to evert the foot. Extending the toes also helps. This aids to maintain the congruency of the knee joint and helps to protect it from injury.
Take the leg to a point where you feel a moderate stretch in the muscles at the outside of the hip—the TFL and gluteus medius. Hold this position by contracting the biceps, pectoralis major, and latissimus dorsi (shown in blue). Then gradually start to press the edge of the foot into the forearm, as if you were trying to bring it away from the body. This activates the stretching TFL and gluteus medius (shown in red). Build the contraction of these muscles slowly to about 20 percent of your maximum force (or less). Take four to five smooth deep breaths, and then stop pressing the foot into the forearm. At this point you will have elicited the relaxation response through stimulating the Golgi tendon organ at the muscle-tendon junction. Then “take up the slack” by gradually lifting the foot a little higher and drawing the knee a bit further across the body. Hold this new position for a few breaths. Continue to protect the knee as you take it out to the side, bend it, and place it on the floor. Feel the difference between the two hips. Repeat on the other side. Contracting and releasing the stretching muscles uses PNF to lengthen the hip internal rotators.
 |
| Cradle stretch with inset of peronei contracting to evert foot. |
If you are unable to cradle the leg as shown, don’t despair, and don’t force it. Use the variation illustrated here with the mannequin. Protect the knee with one hand and press the edge of the foot into the other hand. Work like this for as many sessions as necessary until the TFL and gluteus medius have released enough to move into the full cradle. The lower back can tend to collapse into flexion when practicing this stretch. Engaging the erector spinae and quadratus lumborum muscles (extensors of the lumbar spine) will help to protect against this. Note how slightly extending the lumbar also accentuates the stretch of the TFL and gluteus medius.
 |
| Alternative cradle for tight hips. |
Remember to go slowly with PNF. Allow about 48 hours for recovery before repeating the technique on any given muscle group. It takes a few sessions for the new length to be ingrained in the body, so don’t get discouraged if you feel a bit tight again when you come back to this position.
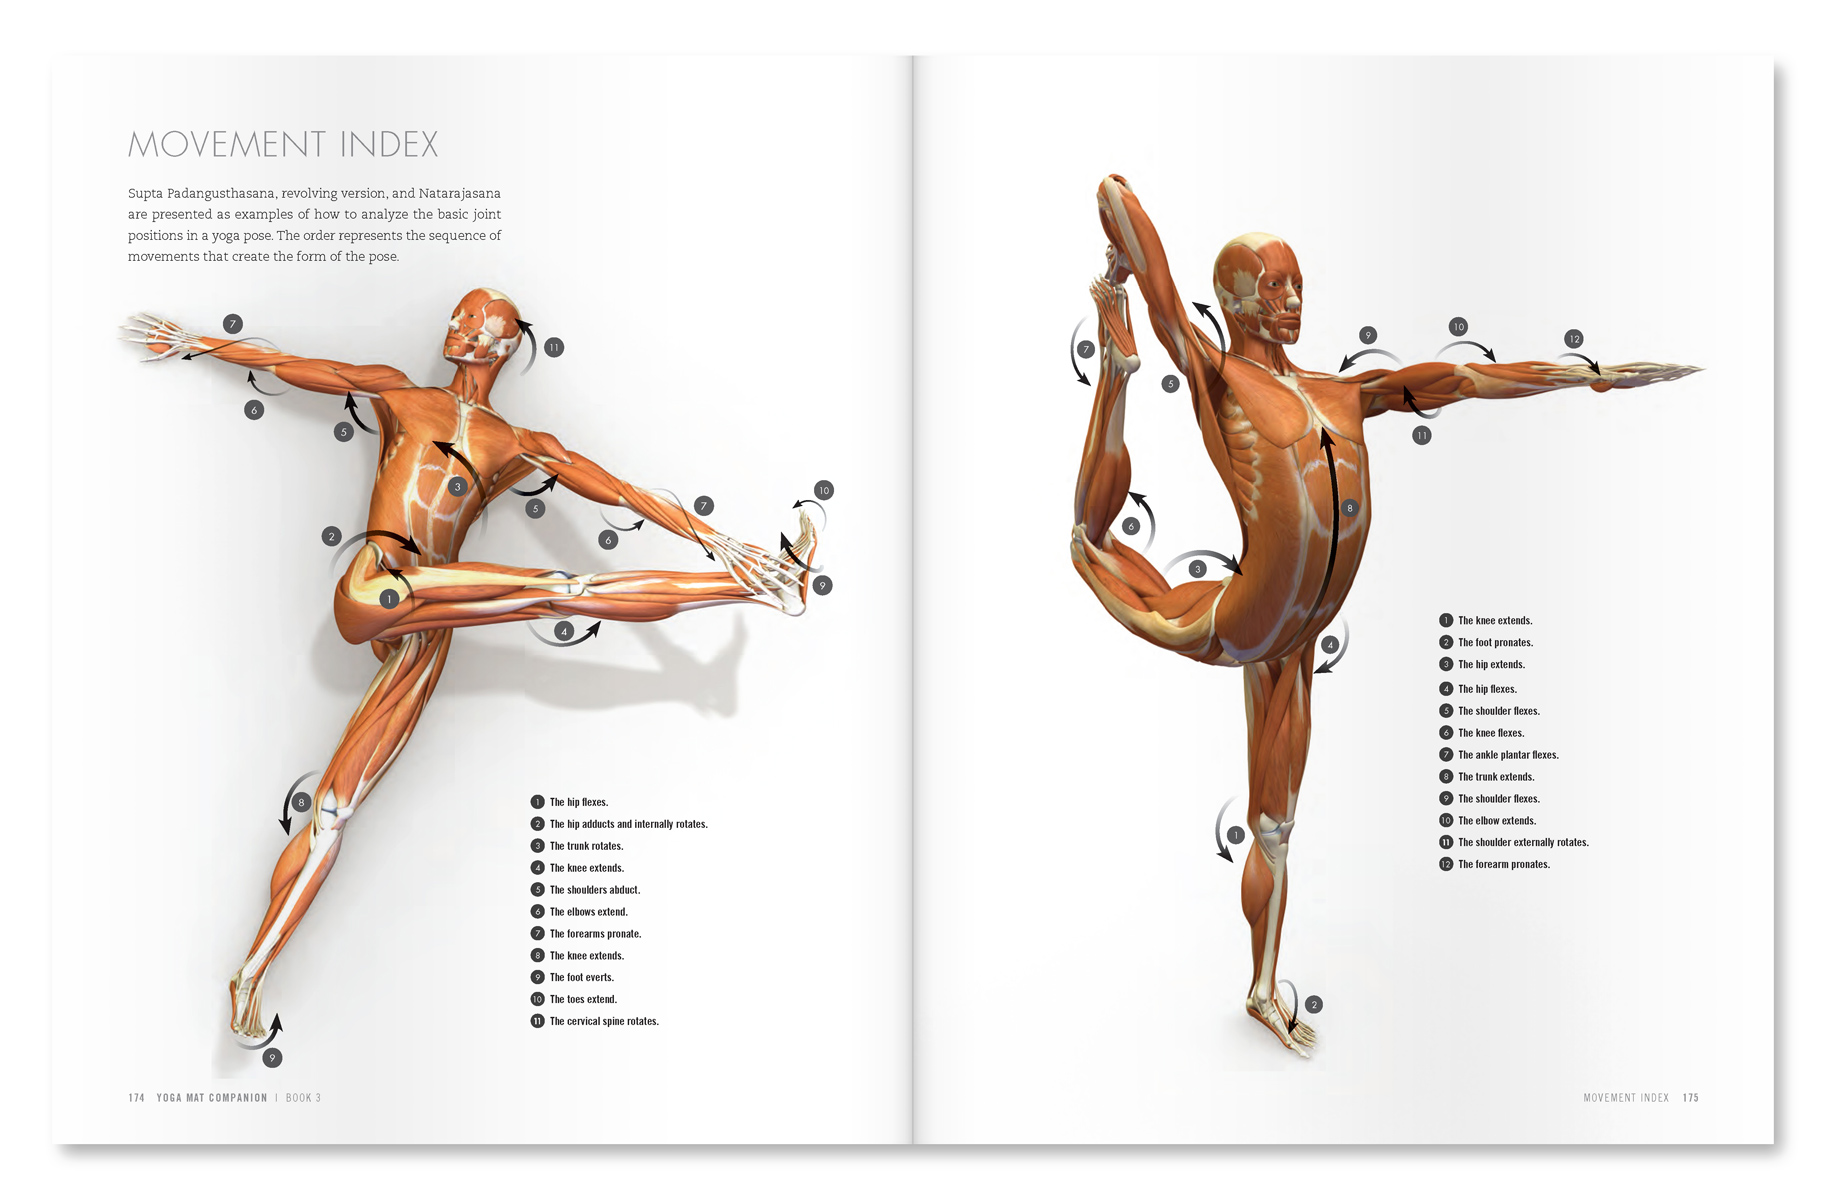 |
| An excerpt from "Yoga Mat Companion 3 - Anatomy for Backbends and Twists". |
 |
| An excerpt from "Yoga Mat Companion 2 - Anatomy for Hip Openers and Forward Bends". |
Thanks for stopping by. To show our appreciation to all of you who visit us on Facebook, we wish to offer a free copy of our iconic chakra poster (we simply ask that you pay for shipping J). Click here for details.
We’ll see you for the next post when we’ll talk about how to lower the knees closer to the floor in Baddha Konasana (Bound Angle Pose).
Namasté
Ray and Chris
re "athletes experience improved performance and fewer injuries when they have a fundamental knowledge of their anatomy and biomechanics"
ReplyDeletei'm gonna assume us regular guys will benefit just as much, based on trying these hip-stretch enhancers ;-)
thanks so much!
Hi Adan,
ReplyDeleteYep, even us ordinary guys can steal a page from the pros! Thanks for stopping by.
Best,
Ray
Curling or Flexing the toes back will protect the knee.
ReplyDeleteHI Gregg,
ReplyDeleteDefinitely helps to extend the toes (draw them towards the shin). In my experience this must also be combined with eversion of the foot as well. If you only extend the toes but allow the foot to sickle or invert then the benefit diminishes. Excellent addition though--thanks for the comment! I'll add it to the post.
Most important is to support the knee in the arm and not allow it to sag forward.
Best,
Ray
Hi Guys!
ReplyDeleteJust want to thank you so much for this wonderful service you are providing for yoga practitioners.
Namaste!
Thanks for your support, Sieglind.
ReplyDeleteNamasté,
Ray and Chris
Hi
ReplyDeletePlease can you give some information re: the sacroiliac joint in Padmasana?
I can lower the left knee near the floor but struggle with the right and after practising this side the right sacroiliac joint is painful.
Thanks
Sarah
Hi Sarah,
ReplyDeleteThis is a great question. Let me think about it a bit and do a few tests and I'll get back to you with an answer in one of the next few posts--be patient with me on this as I need to research it a bit.
Best,
Ray
Owch! That looks painful and it shouldn't be. I must get get back to yoga.
ReplyDeleteFab.
ReplyDeleteThanks.
Sarah
Hello,
ReplyDeleteWhen a muscle is tight, it limits the movement that is opposite of its action. For example, the internal rotators of the hip act to turn the femur inward. Tight internal rotators thus restrict turning the hip outward. Think about them contracting to understand this.
Lotus involves flexing, abducting and externally rotating the hip joint. This means that tightness in the adductors, the muscles that bring the thighs together can limit abducting (bringing the knees apart). This may be what restricts you--can't say for sure. This concept--a muscle limiting movement that is in the opposite direction of its action is sometimes hard to get at first, but once you understand it then you can use it all over the body.
Read this blog post as it may help:
http://www.dailybandha.com/2011/02/how-to-draw-knees-to-floor-in-baddha.html
Best,
Ray
Further to the ex-ballet dancer: I have to think about the part of your question relating to dancer's turning out constantly. Will get back to you on this--want to talk to some of my dancer friends in NY.
ReplyDeleteray
Hello "ex ballet dancer",
ReplyDeleteI checked around on what I could find on dancer's turning out the hips. I'm afraid I came up a bit empty. I did find some material relating to the acetabulum in those who begin at a young age. I suggest you check with your orthopedist and have them examine you before pressing on with lotus.
Good luck~Ray
Wonderful article, thank you for sharing this, have just found your site and will be returning!
ReplyDeleteI'm curious - what is the proposed mechanism by which everting the foot, or extending the toes, is supposed to aid in protecting the knee joint? Neither the peroneal muscles nor the toe extensors cross the knee joint, and it is thus difficult to see how they could stabilise it and (presumably this is the idea) counteract the varus force created on the knee in this position.
ReplyDeleteI'm not saying that everting the foot or extending the toes doesn't help, it's just that I've heard this assertion many times now but without ever hearing an explanation of how it is supposed to work.
Many thanks - Nick
Nick,
ReplyDeleteThe eversion force of contracting the peronei is transmitted to the elbow, which is relatively fixed in space. The other elbow fixes the femur, with the hands connecting the elbows. This creates a valgus force force at the knee, unloading the medial compartment.
Best~ Ray
thank you for such wonderful information.
ReplyDeleteGreat article about stretching. I learn this type of article first time
ReplyDeleteBenefits of stretching
Really really cool stuff. The benefits and the learning curve is enormous. Thank you VERY much!. Of late, you are one among the names that i express my gratitude to before starting my yoga practice.
ReplyDeleteThanks for the great information. This is exactly the stretch needed by a couple of my students.
ReplyDelete