
Years ago I developed sciatica as a consequence of a martial arts injury. I had seen a number of doctors who finally diagnosed it as an entrapment syndrome involving the piriformis muscle and the sciatic nerve. I tried, unsuccessfully, all of the conservative methods to treat it, including physical therapy, massage, manipulation—you name it. Finally, it looked like I would either have to live with the pain or have surgery—for which there was no guarantee of success. As it happened, one day I wandered into a yoga class at the Ann Arbor YMCA.
I remember being impressed by how different (and difficult) a yoga class was, even though I was used to hard physical training from playing sports; we were working with the body in ways I had never experienced and using precise movements and muscular engagements I hadn’t seen in other exercise methods. Not only did I feel great after my first class but also, to my surprise, the next day I noticed that my sciatic pain was greatly improved. Putting two and two together, I started going regularly to classes at YMCA (and later, the basement of a church). As long as I went to class, my sciatica no longer bothered me. With this in mind, let’s take a look at piriformis syndrome.
Piriformis Syndrome:
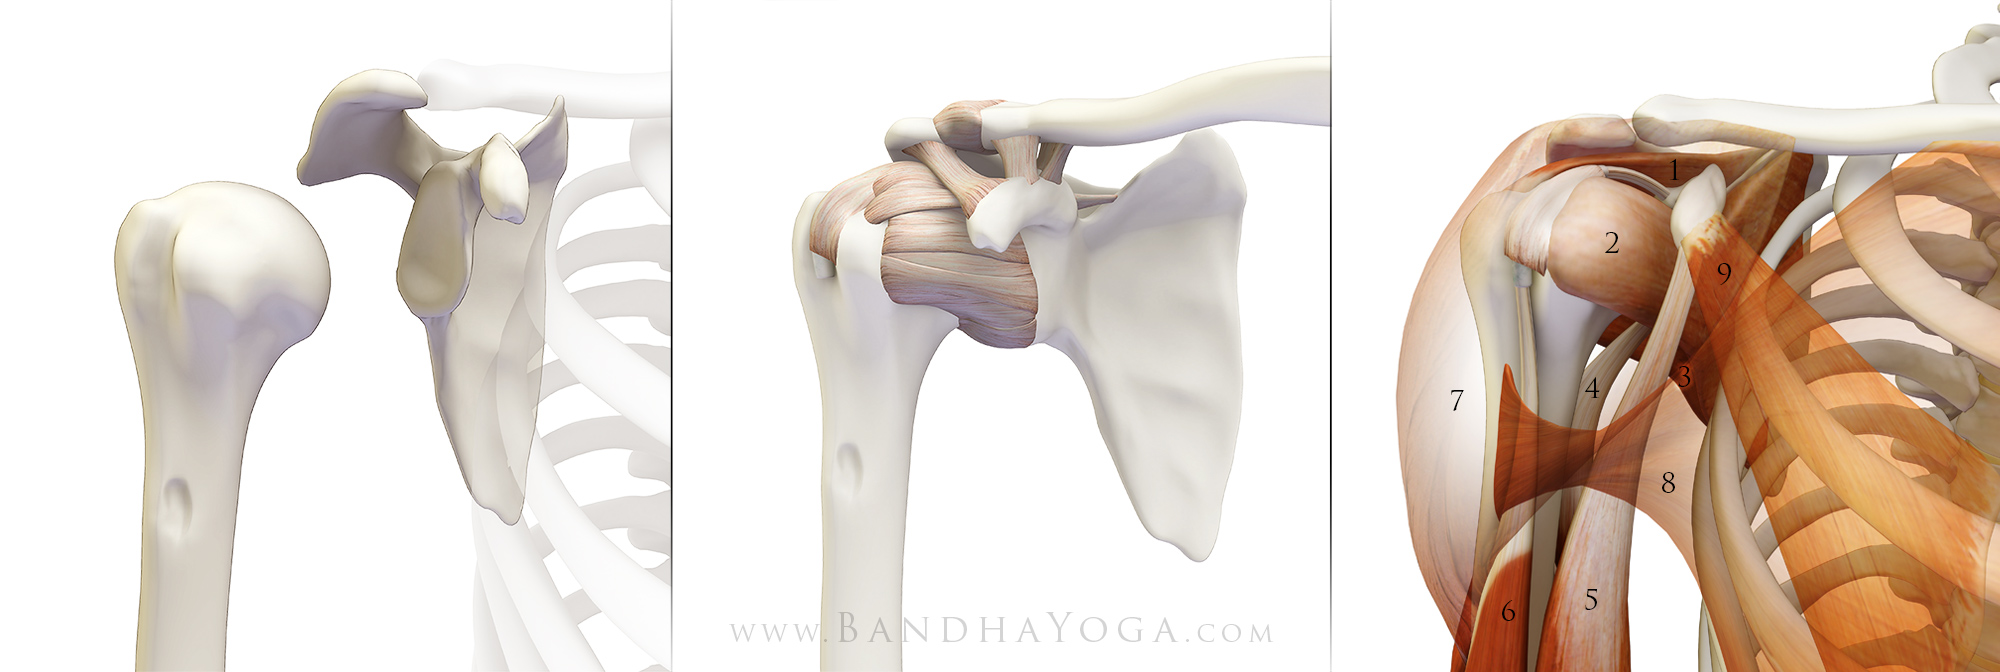
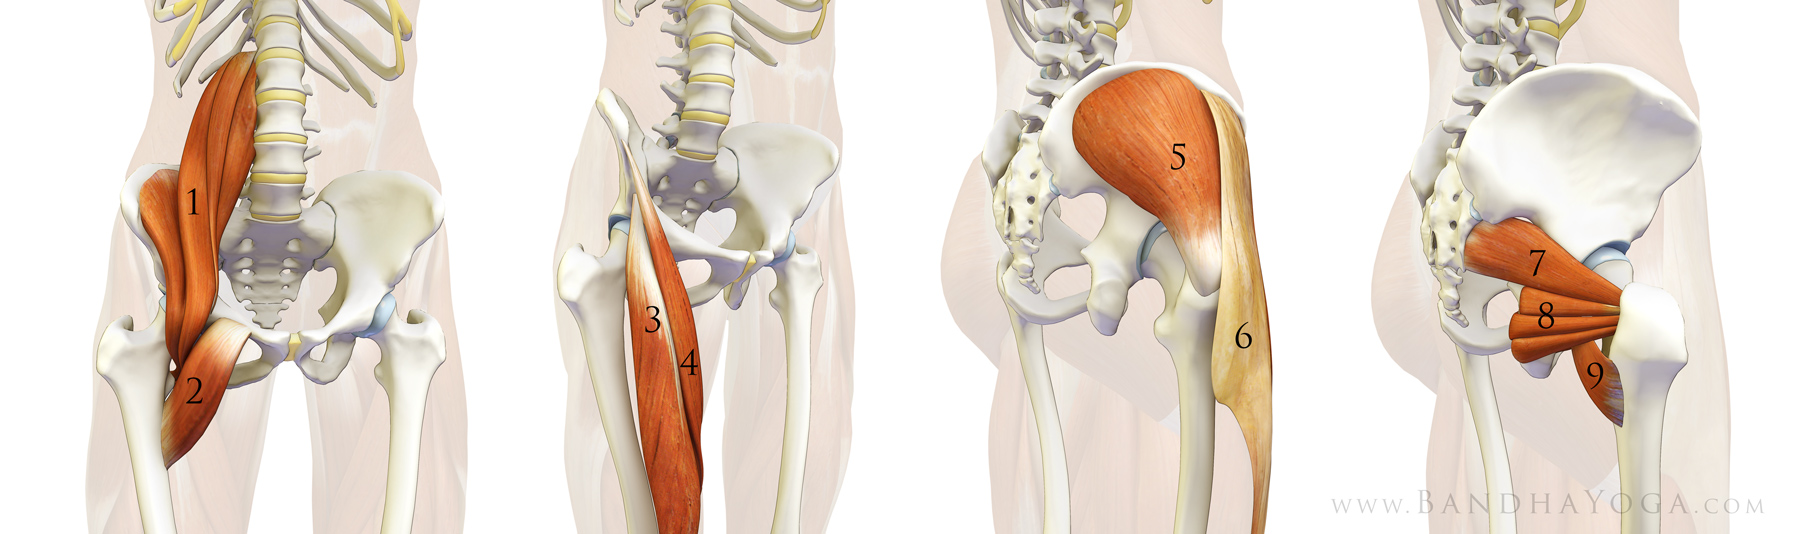
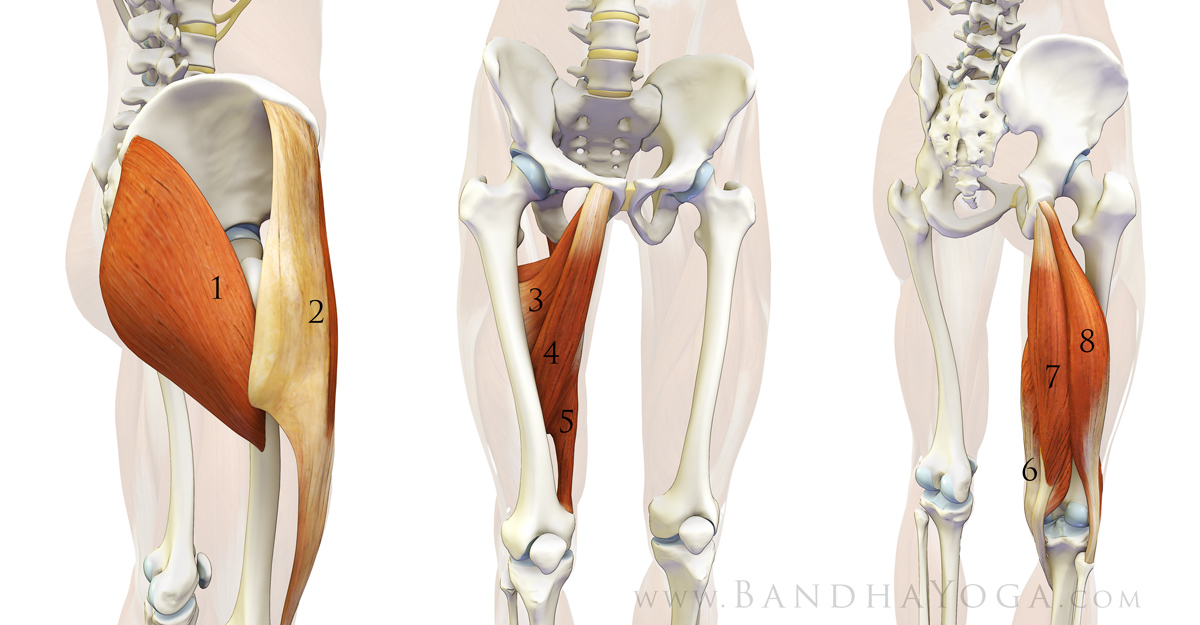
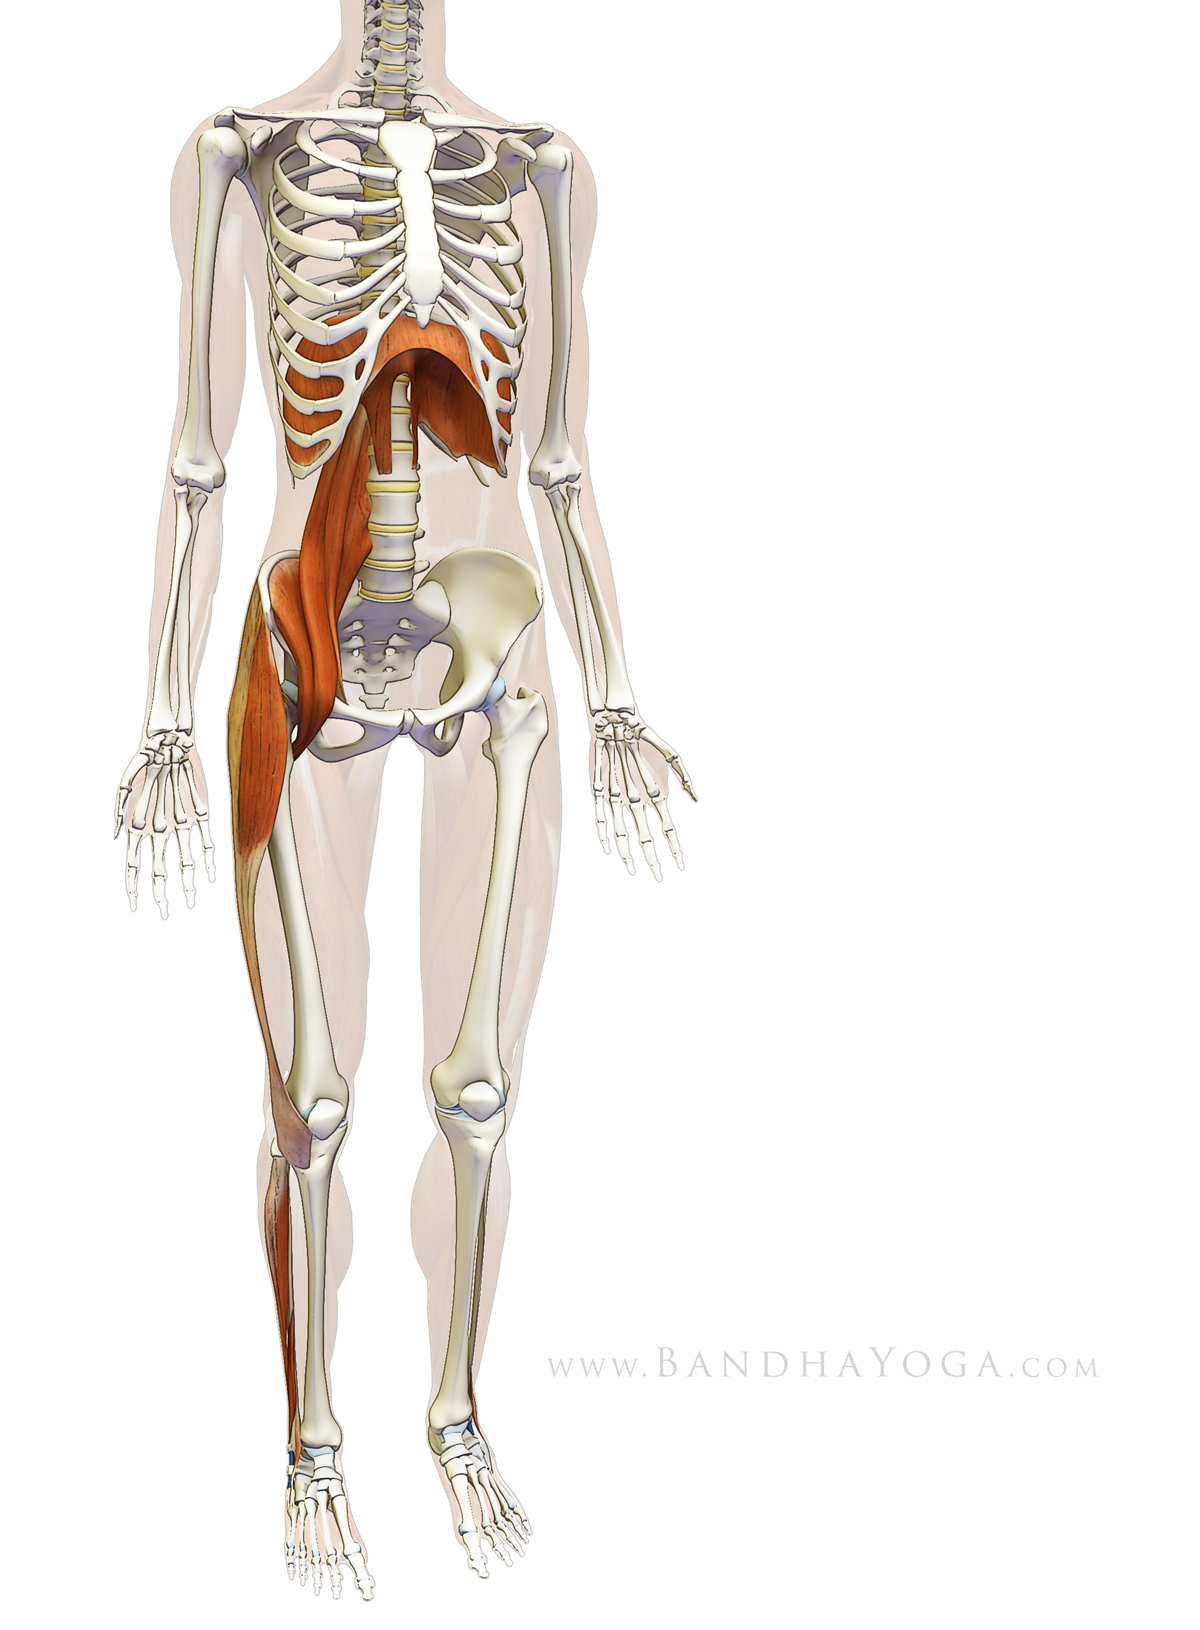
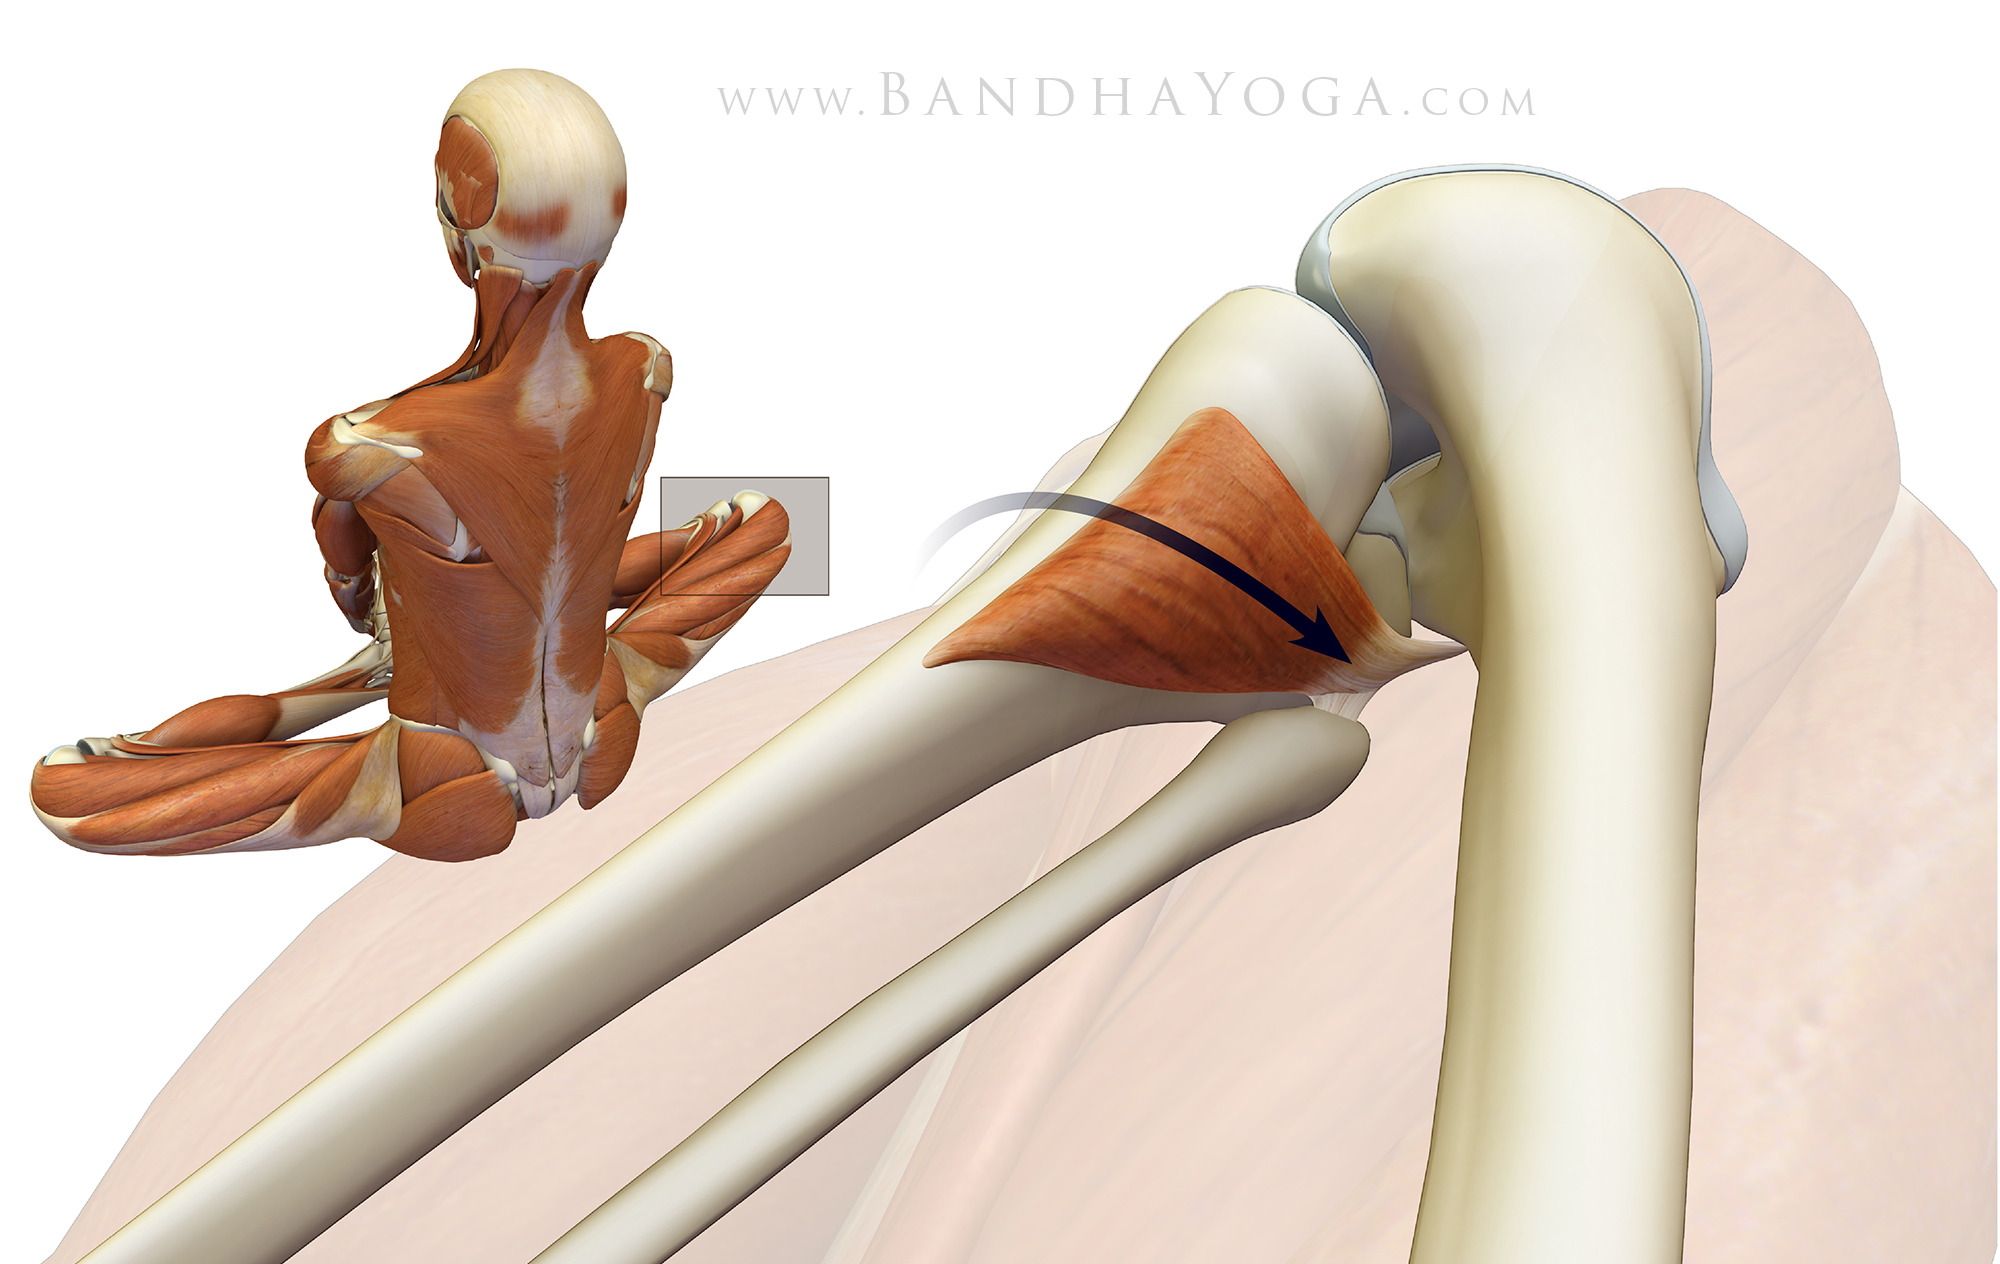
Piriformis syndrome is characterized by buttock and/or hip pain that may radiate into the leg as a form of sciatica. This syndrome is thought to result from spasm of the piriformis which causes irritation of the sciatic nerve as it passes across (or through) the muscle. Spasm in the piriformis can be precipitated by an athletic injury or other trauma. The mainstay of treatment involves stretching the piriformis and its neighboring external hip rotators, with surgery to release the muscle reserved for recalcitrant cases. Click here to review the anatomy and biomechanics of the piriformis muscle.
Tightness or asymmetries in the piriformis muscle can create rotational pelvic imbalances. This, in turn, can lead to imbalances further up the spinal column, through the process of "joint rhythm". Click here to learn more about lumbar pelvic rhythm in our previous blog post on Preventative Strategies for Lower Back Strains. Below in the links is a reference to an article from the Osteopathic literature addressing this subject in relation to the piriformis muscle.
Figure 1 is an illustration of the relationship of the sciatic nerve to the piriformis muscle. Approximately 80% of the time the nerve passes anterior to the muscle, exiting below the piriformis. The sciatic nerve can also divide above the muscle, with one branch passing through the piriformis and another branch passing anterior. This variation occurs about 14% of the time. Other variations include the undivided nerve passing through the muscle and the divisions passing both anterior and posterior to the piriformis (without penetrating the muscle). Note that the sciatic nerve can penetrate the muscle without ever causing pain or other symptoms (as is usually the case). Persons with this variation may, however, be predisposed to developing piriformis syndrome from an injury.
Diagnosis of piriformis syndrome is accomplished through a careful history and physical examination as well as radiological studies. The physical exam includes the FAIR test (flexion, adduction, internal rotation of the hip). Click here for an example of this test.
Note that other causes of sciatica must be excluded before making the final diagnosis of piriformis syndrome. These include a herniated disc causing nerve root compression. Similarly, pathology affecting the hip joint must also be excluded. Accordingly, if you have sciatic type pain, be sure to consult a health care practitioner who is appropriately trained and qualified to diagnose and manage such conditions.
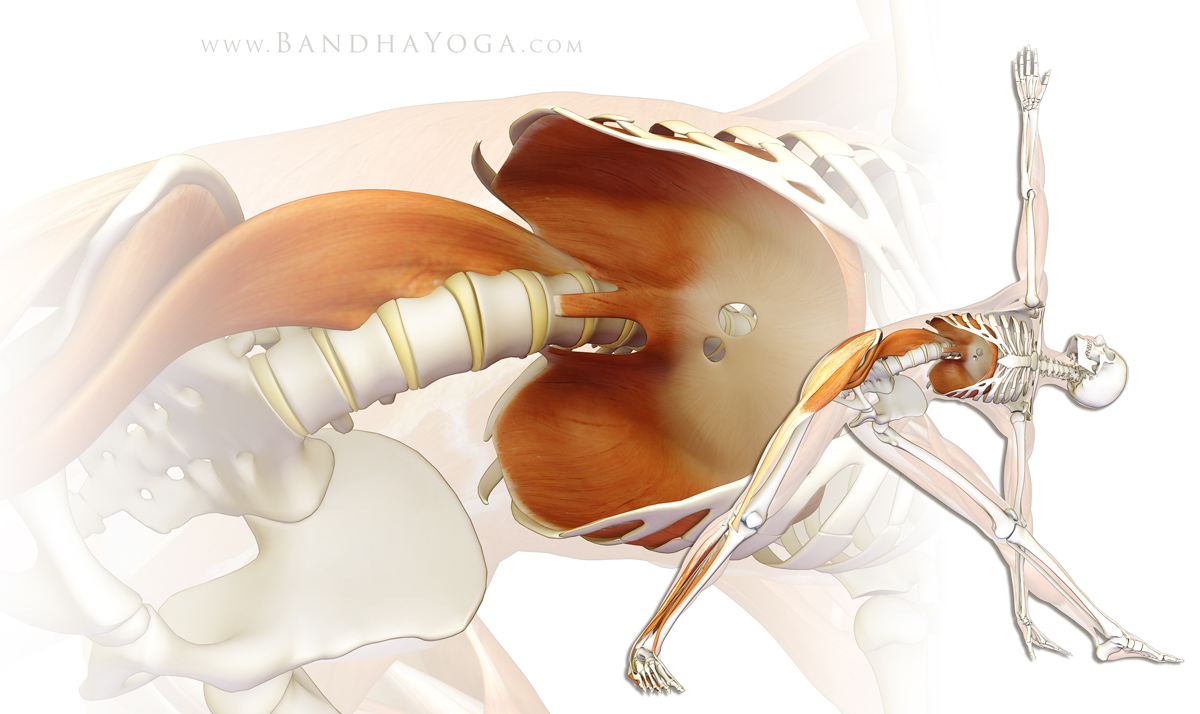
To review, when the hip is in a neutral position, the piriformis acts to externally rotate (turn outward), flex and abduct the hip joint. When the hip is flexed beyond about 60 degrees the piriformis becomes an internal rotator and extensor (and remains an abductor). Muscles stretch when we move a joint in the opposite direction of the action of the muscle. Click here for a review of the piriformis muscle, its attachments and action, and the mechanism of Reverse Pigeon Pose (video below).
Figures 2-5 illustrate several yoga poses that stretch the piriformis. Parvritta trikonasana and the rotating version of Supta padangustasana lengthen the muscle by adducting and flexing the hip. Similarly, Parsva bakasana and Marichyasana III adduct and flex the hip joint, thus stretching the muscle (which an extensor and abductor when the hip is flexing).
Video 1 demonstrates stretching of the piriformis in Reverse Pigeon Pose. This asana stretches the muscle by externally rotating and flexing the hip.
Video 2 illustrates the technique for using mysofascial connections to protect the knee joint in this pose. Click here for the details of this technique.
Now you're ready to take the Bandha Yoga QuickQuiz for the piriformis muscle! Click here to start.
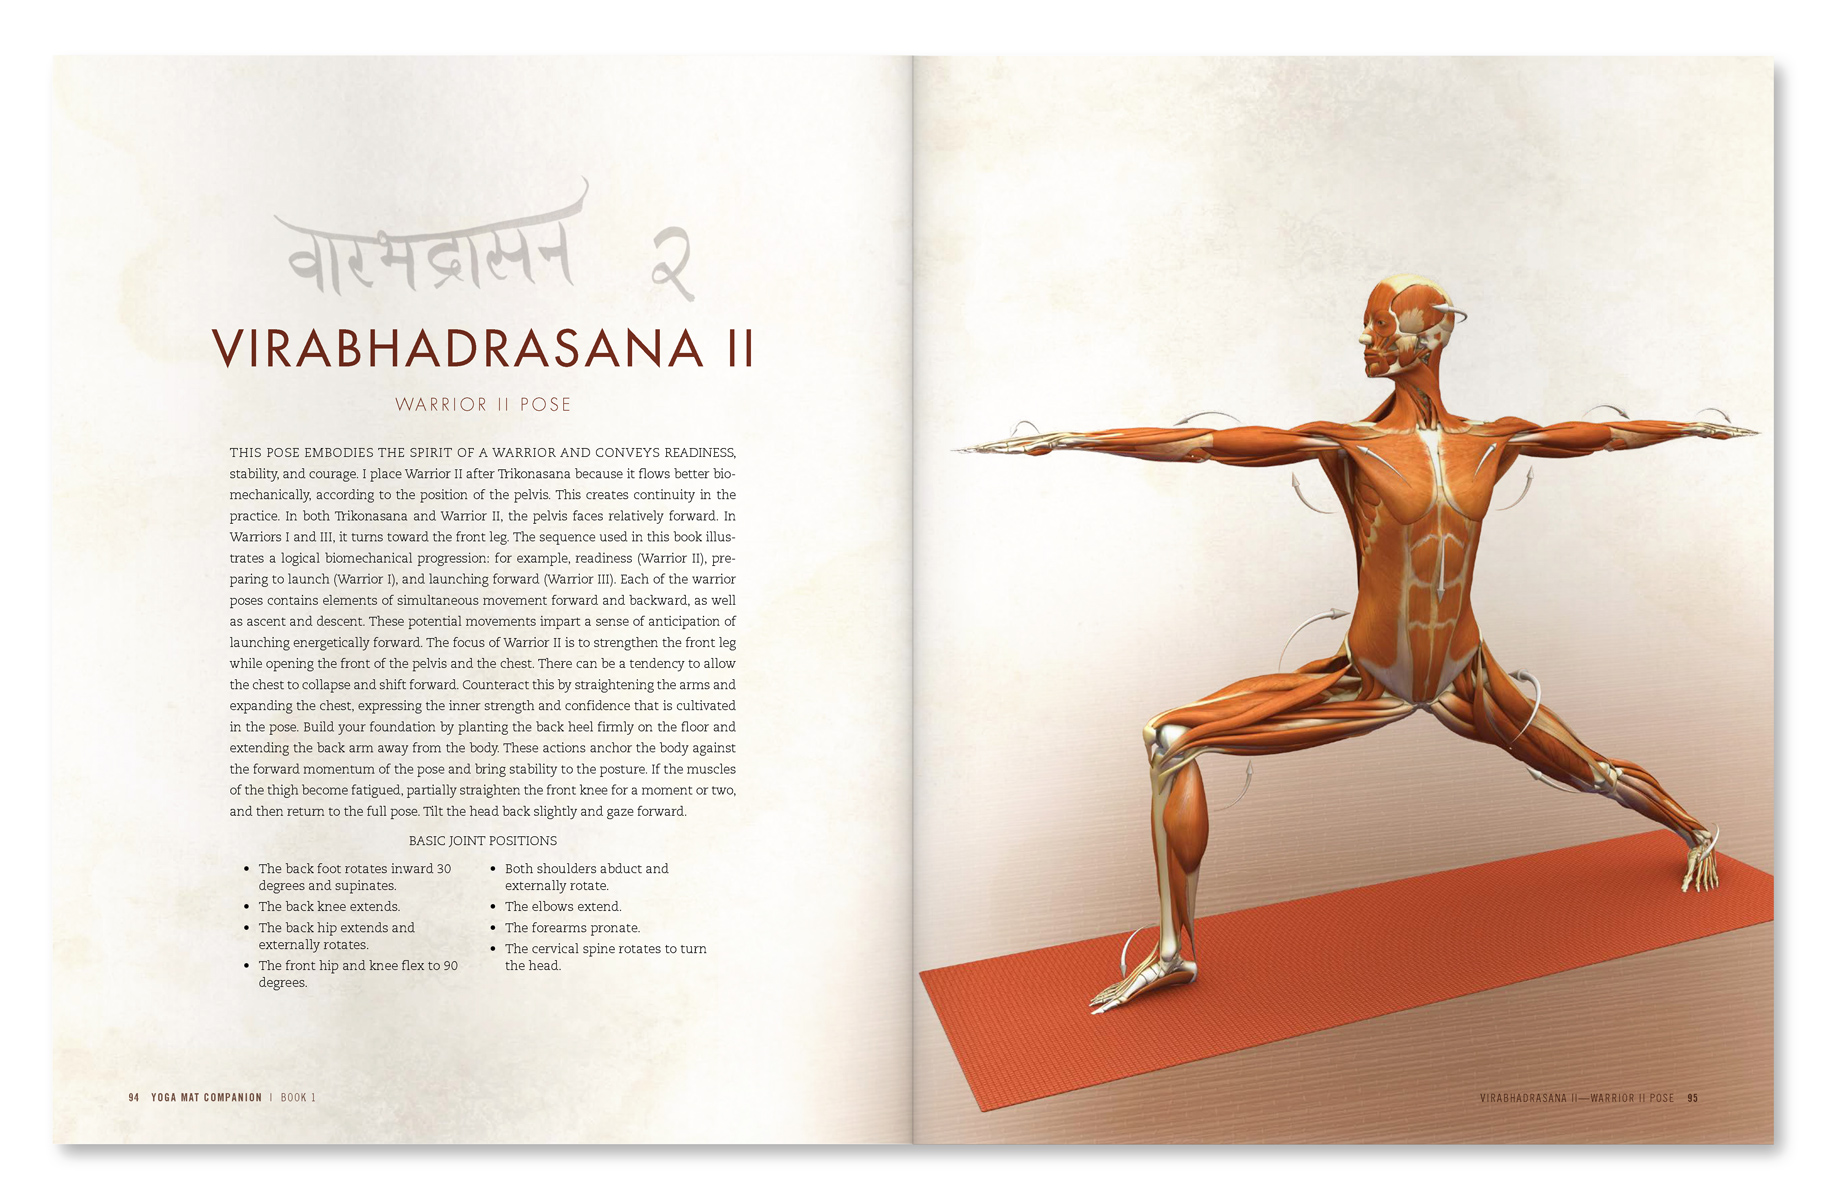
Thanks for stopping by. If you would like to learn more about combining modern Western science and yoga, feel free to browse through The Key Muscles and Key Poses of Yoga, as well as the Yoga Mat Companion series by clicking here. Many thanks for your support in sharing us on Facebook, Twitter and Google Plus!
All the Best,
Ray Long, MD
References:
I remember being impressed by how different (and difficult) a yoga class was, even though I was used to hard physical training from playing sports; we were working with the body in ways I had never experienced and using precise movements and muscular engagements I hadn’t seen in other exercise methods. Not only did I feel great after my first class but also, to my surprise, the next day I noticed that my sciatic pain was greatly improved. Putting two and two together, I started going regularly to classes at YMCA (and later, the basement of a church). As long as I went to class, my sciatica no longer bothered me. With this in mind, let’s take a look at piriformis syndrome.
Piriformis Syndrome:
Piriformis syndrome is characterized by buttock and/or hip pain that may radiate into the leg as a form of sciatica. This syndrome is thought to result from spasm of the piriformis which causes irritation of the sciatic nerve as it passes across (or through) the muscle. Spasm in the piriformis can be precipitated by an athletic injury or other trauma. The mainstay of treatment involves stretching the piriformis and its neighboring external hip rotators, with surgery to release the muscle reserved for recalcitrant cases. Click here to review the anatomy and biomechanics of the piriformis muscle.
Tightness or asymmetries in the piriformis muscle can create rotational pelvic imbalances. This, in turn, can lead to imbalances further up the spinal column, through the process of "joint rhythm". Click here to learn more about lumbar pelvic rhythm in our previous blog post on Preventative Strategies for Lower Back Strains. Below in the links is a reference to an article from the Osteopathic literature addressing this subject in relation to the piriformis muscle.
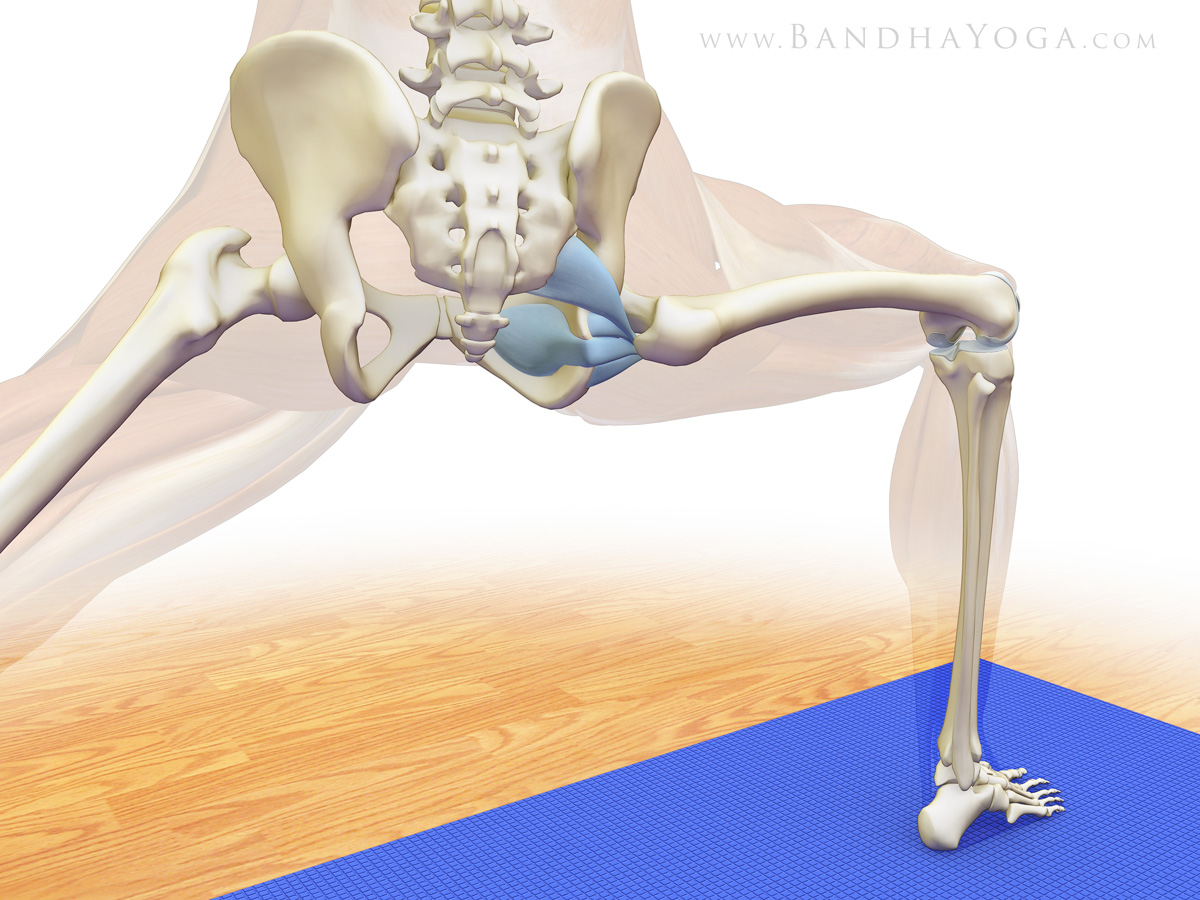
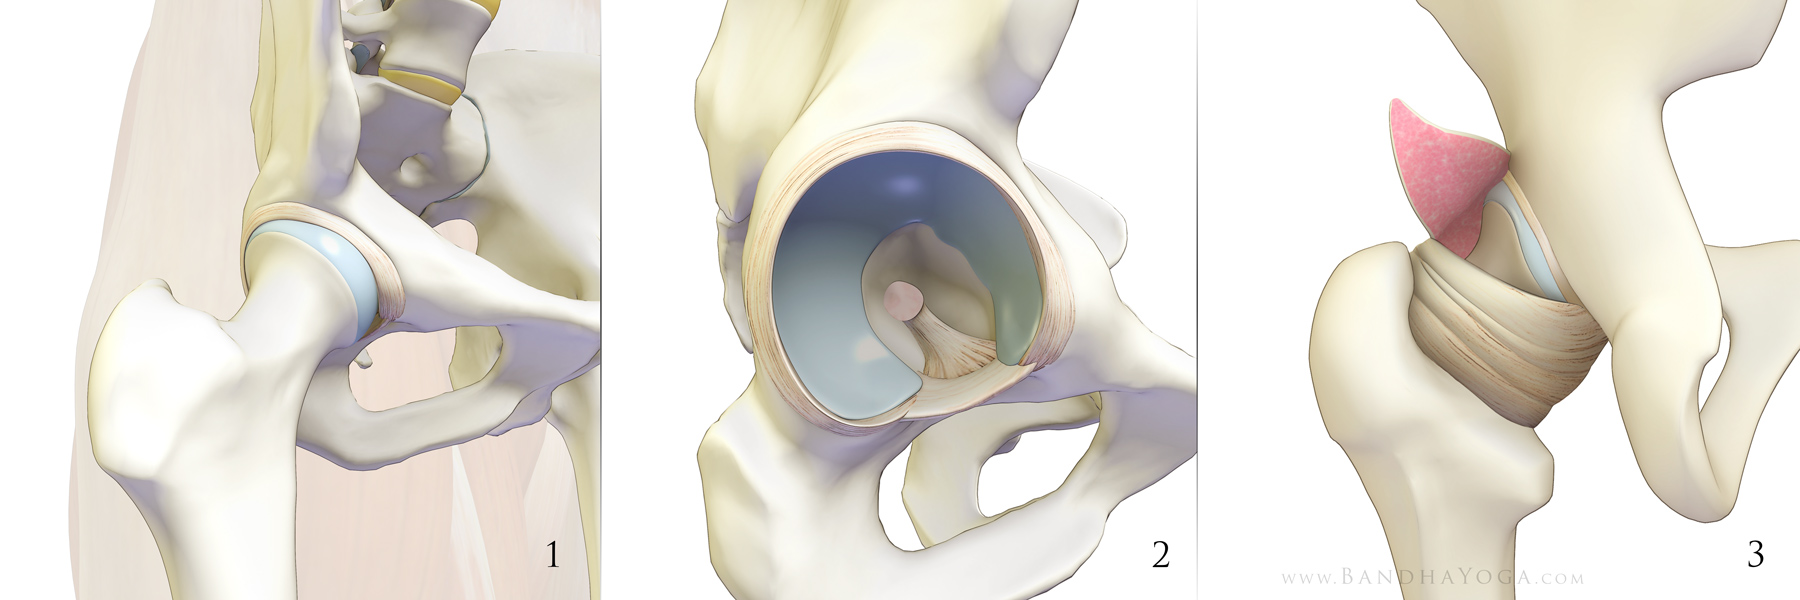
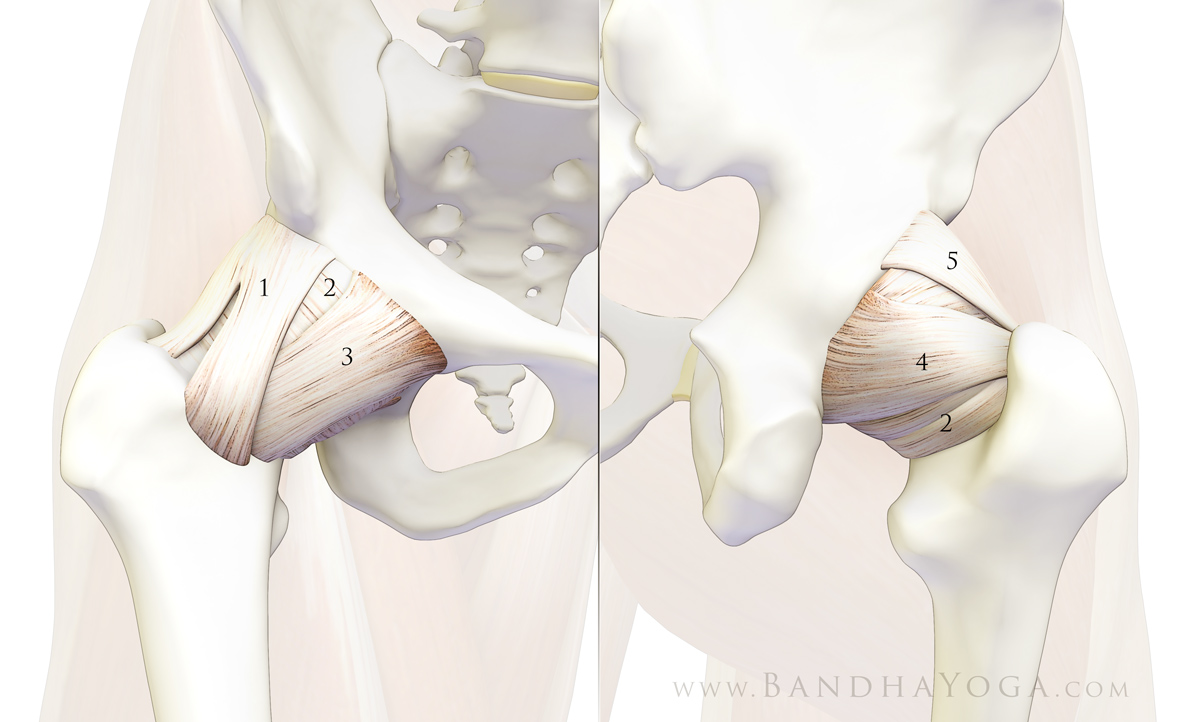
Figure 1 is an illustration of the relationship of the sciatic nerve to the piriformis muscle. Approximately 80% of the time the nerve passes anterior to the muscle, exiting below the piriformis. The sciatic nerve can also divide above the muscle, with one branch passing through the piriformis and another branch passing anterior. This variation occurs about 14% of the time. Other variations include the undivided nerve passing through the muscle and the divisions passing both anterior and posterior to the piriformis (without penetrating the muscle). Note that the sciatic nerve can penetrate the muscle without ever causing pain or other symptoms (as is usually the case). Persons with this variation may, however, be predisposed to developing piriformis syndrome from an injury.
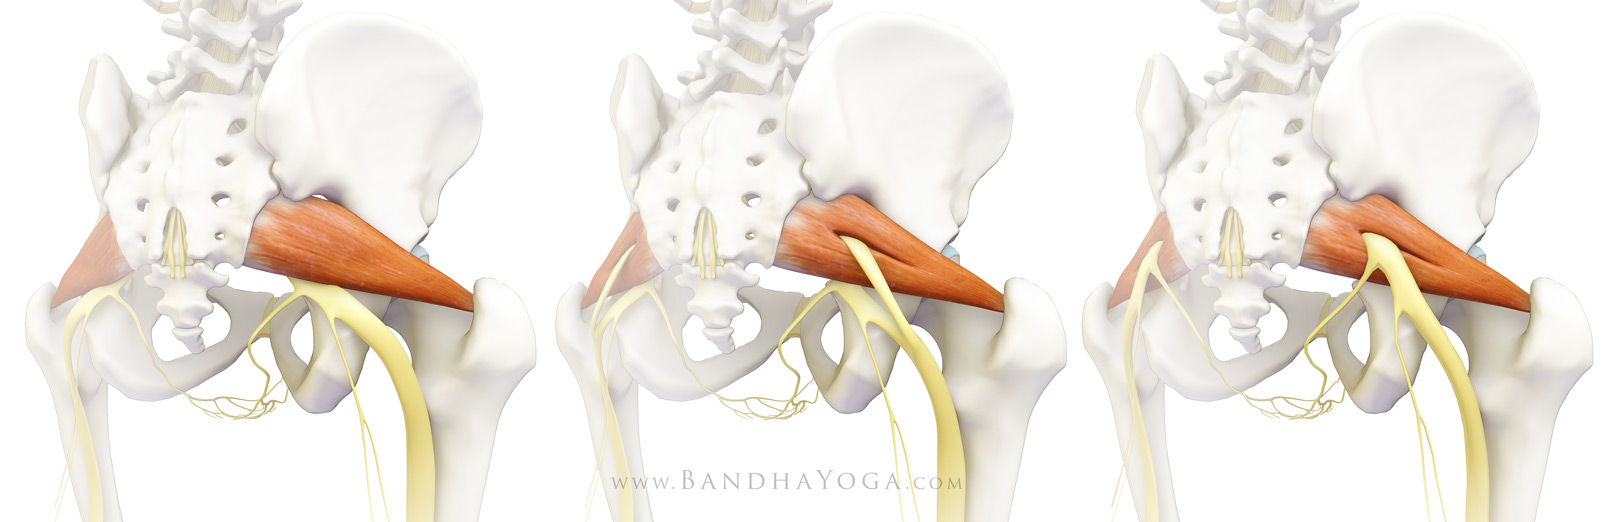 |
| Various relationships of the sciatic nerve to the piriformis muscle. |
Diagnosis of piriformis syndrome is accomplished through a careful history and physical examination as well as radiological studies. The physical exam includes the FAIR test (flexion, adduction, internal rotation of the hip). Click here for an example of this test.
Note that other causes of sciatica must be excluded before making the final diagnosis of piriformis syndrome. These include a herniated disc causing nerve root compression. Similarly, pathology affecting the hip joint must also be excluded. Accordingly, if you have sciatic type pain, be sure to consult a health care practitioner who is appropriately trained and qualified to diagnose and manage such conditions.
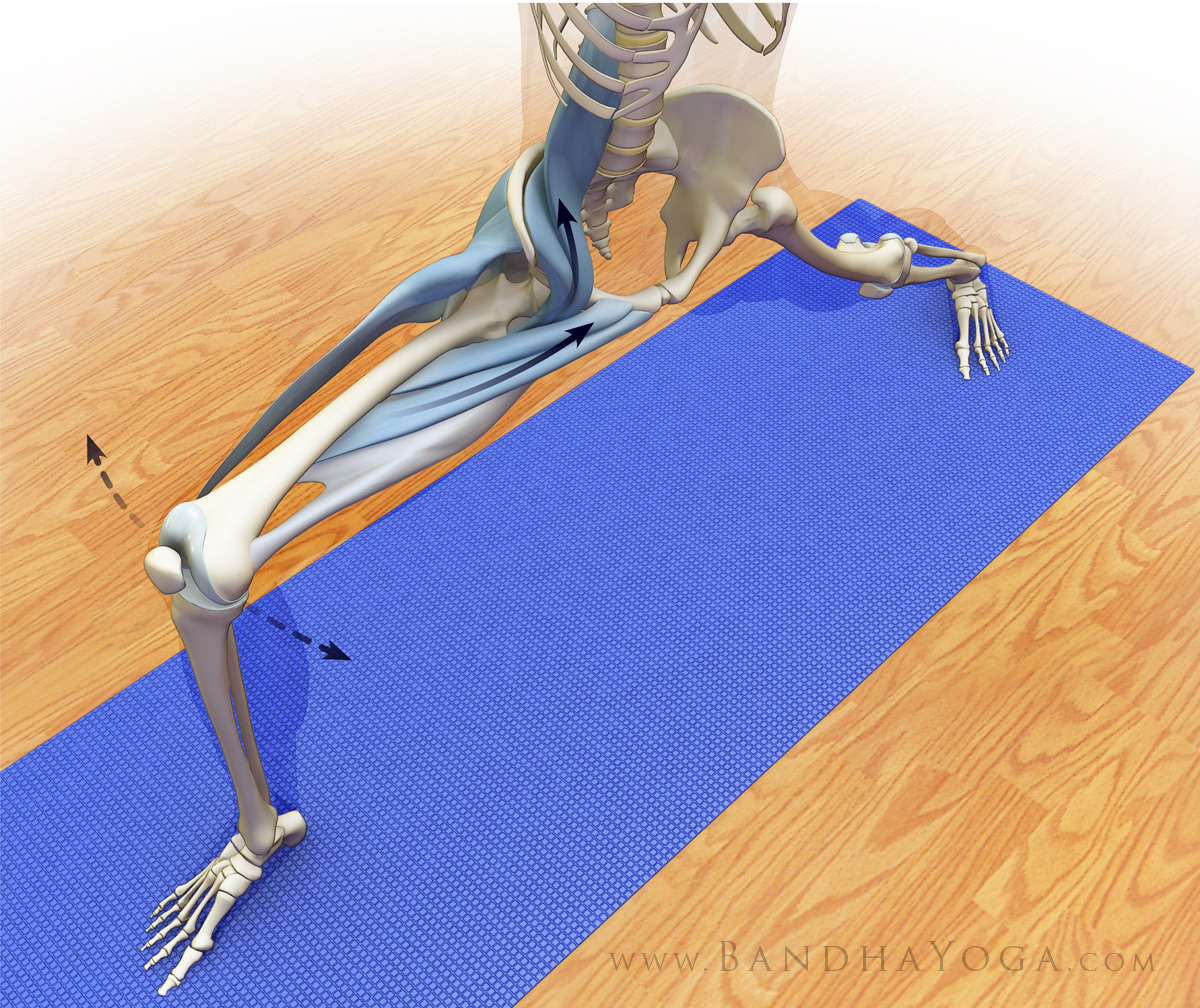
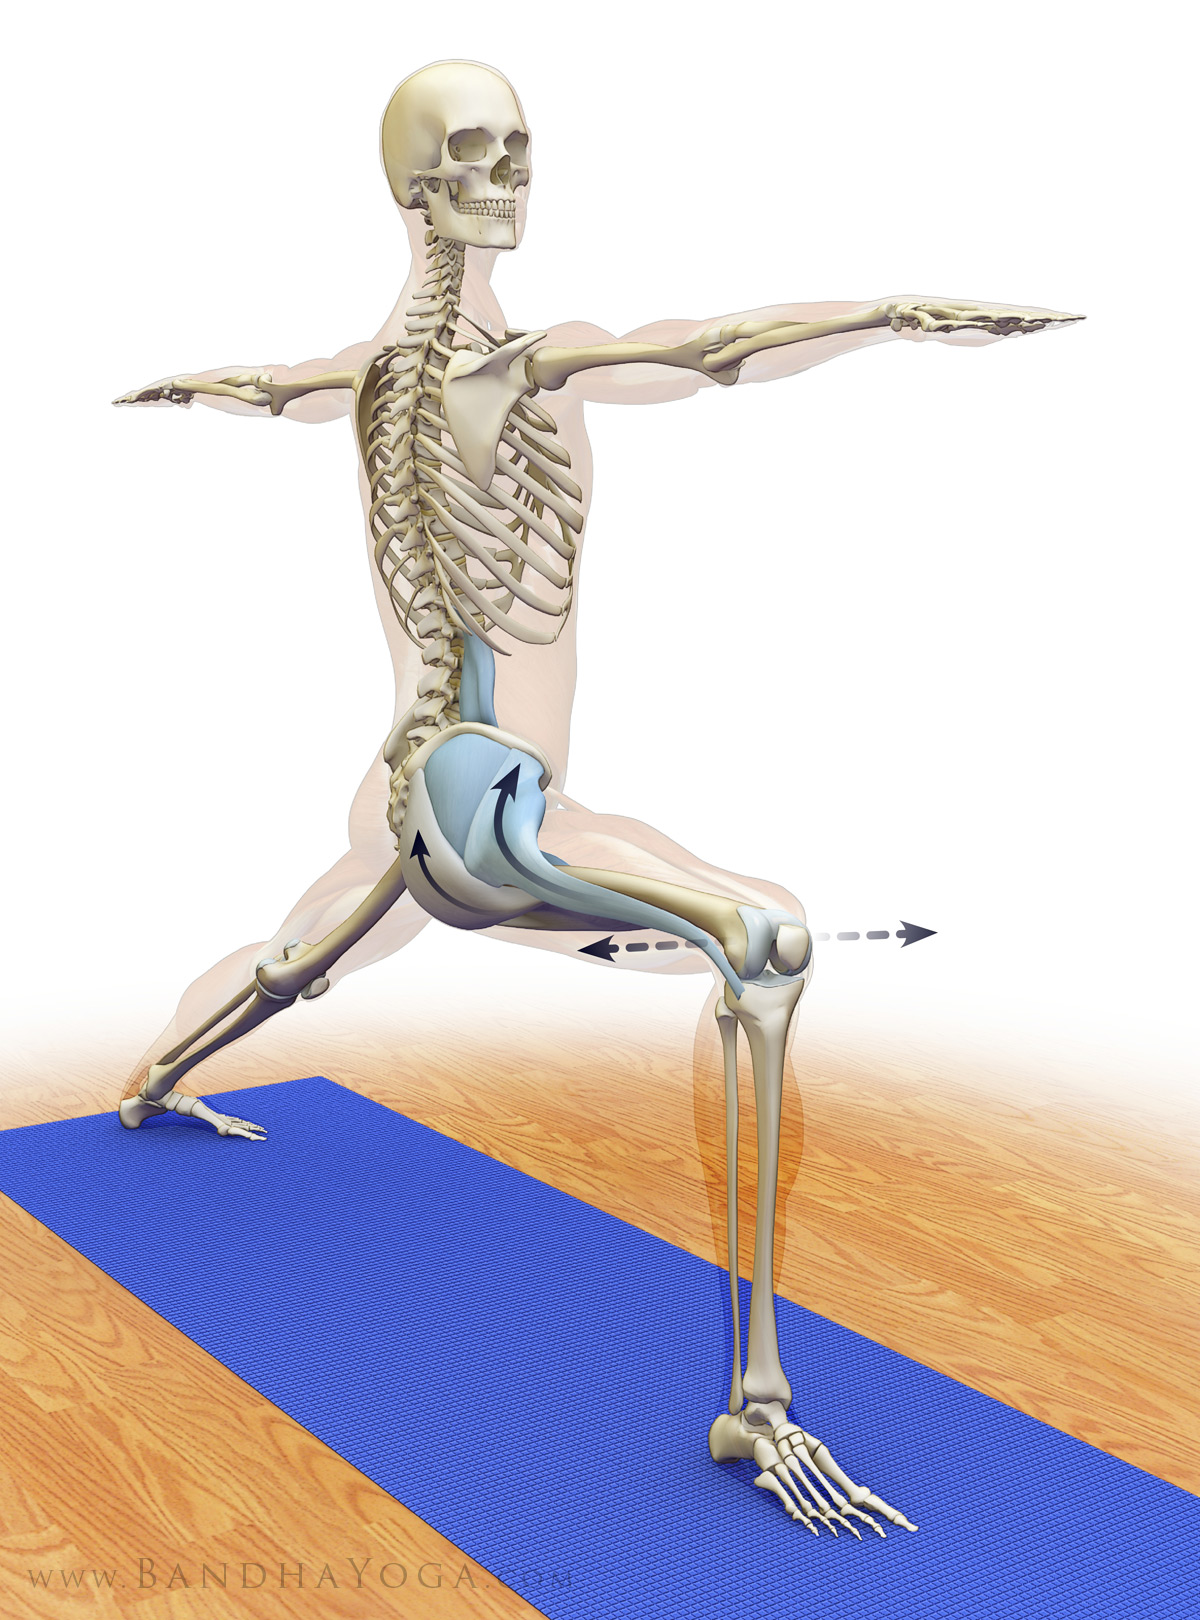
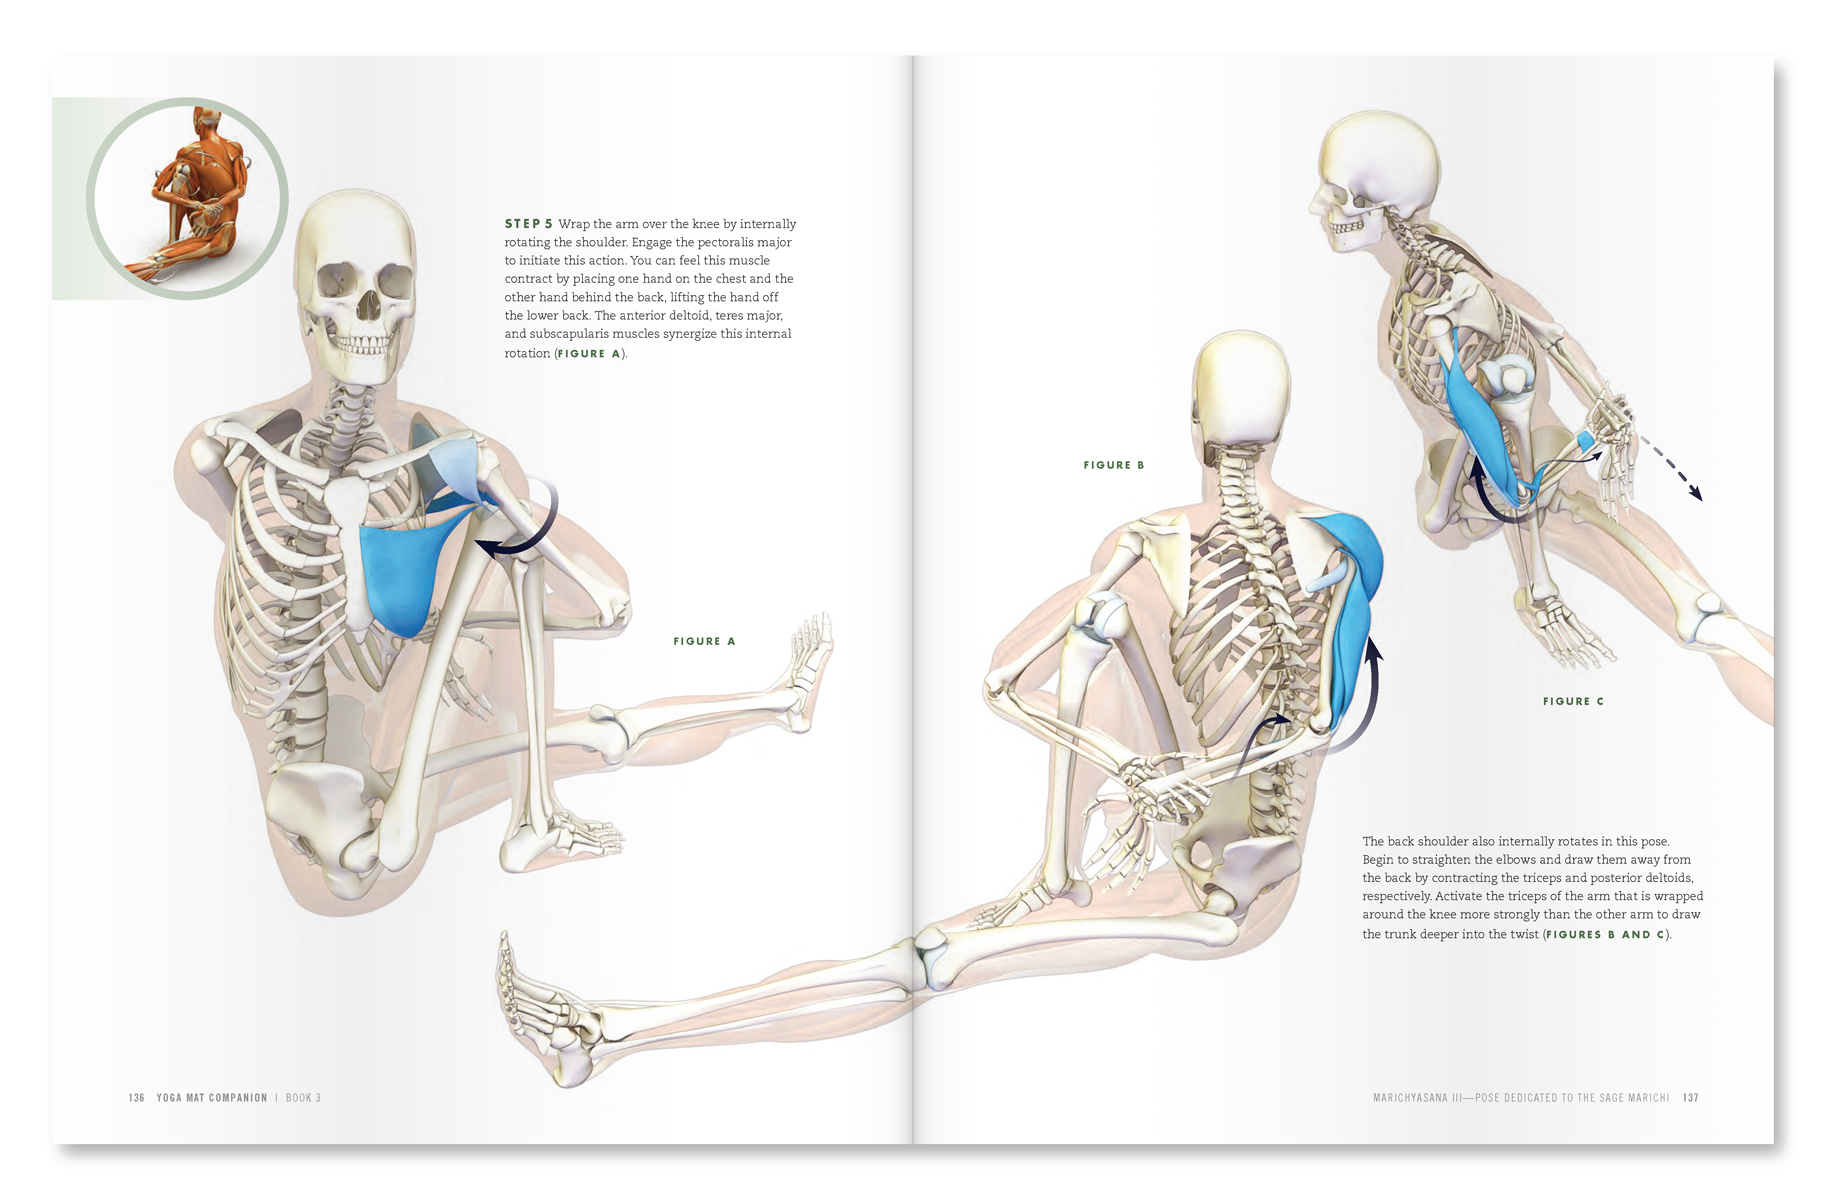
To review, when the hip is in a neutral position, the piriformis acts to externally rotate (turn outward), flex and abduct the hip joint. When the hip is flexed beyond about 60 degrees the piriformis becomes an internal rotator and extensor (and remains an abductor). Muscles stretch when we move a joint in the opposite direction of the action of the muscle. Click here for a review of the piriformis muscle, its attachments and action, and the mechanism of Reverse Pigeon Pose (video below).
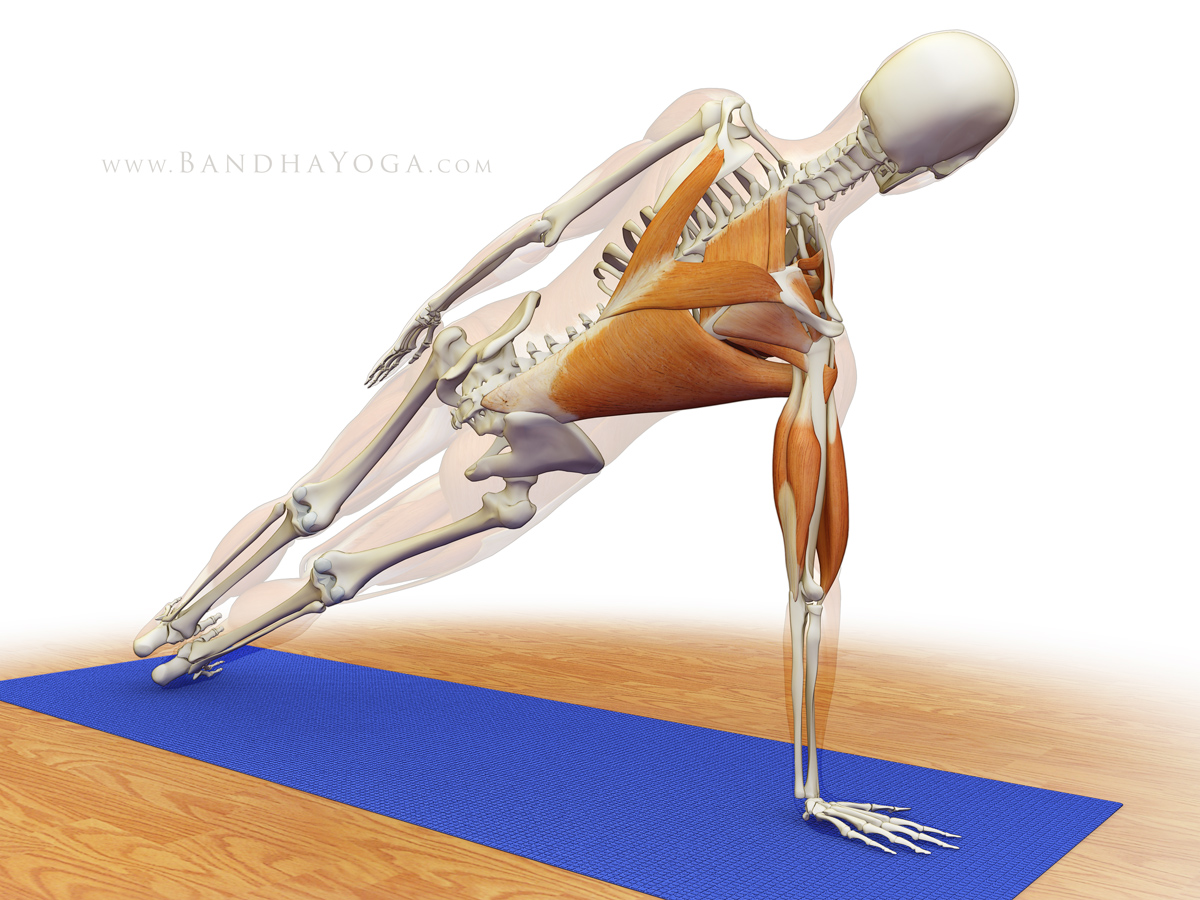
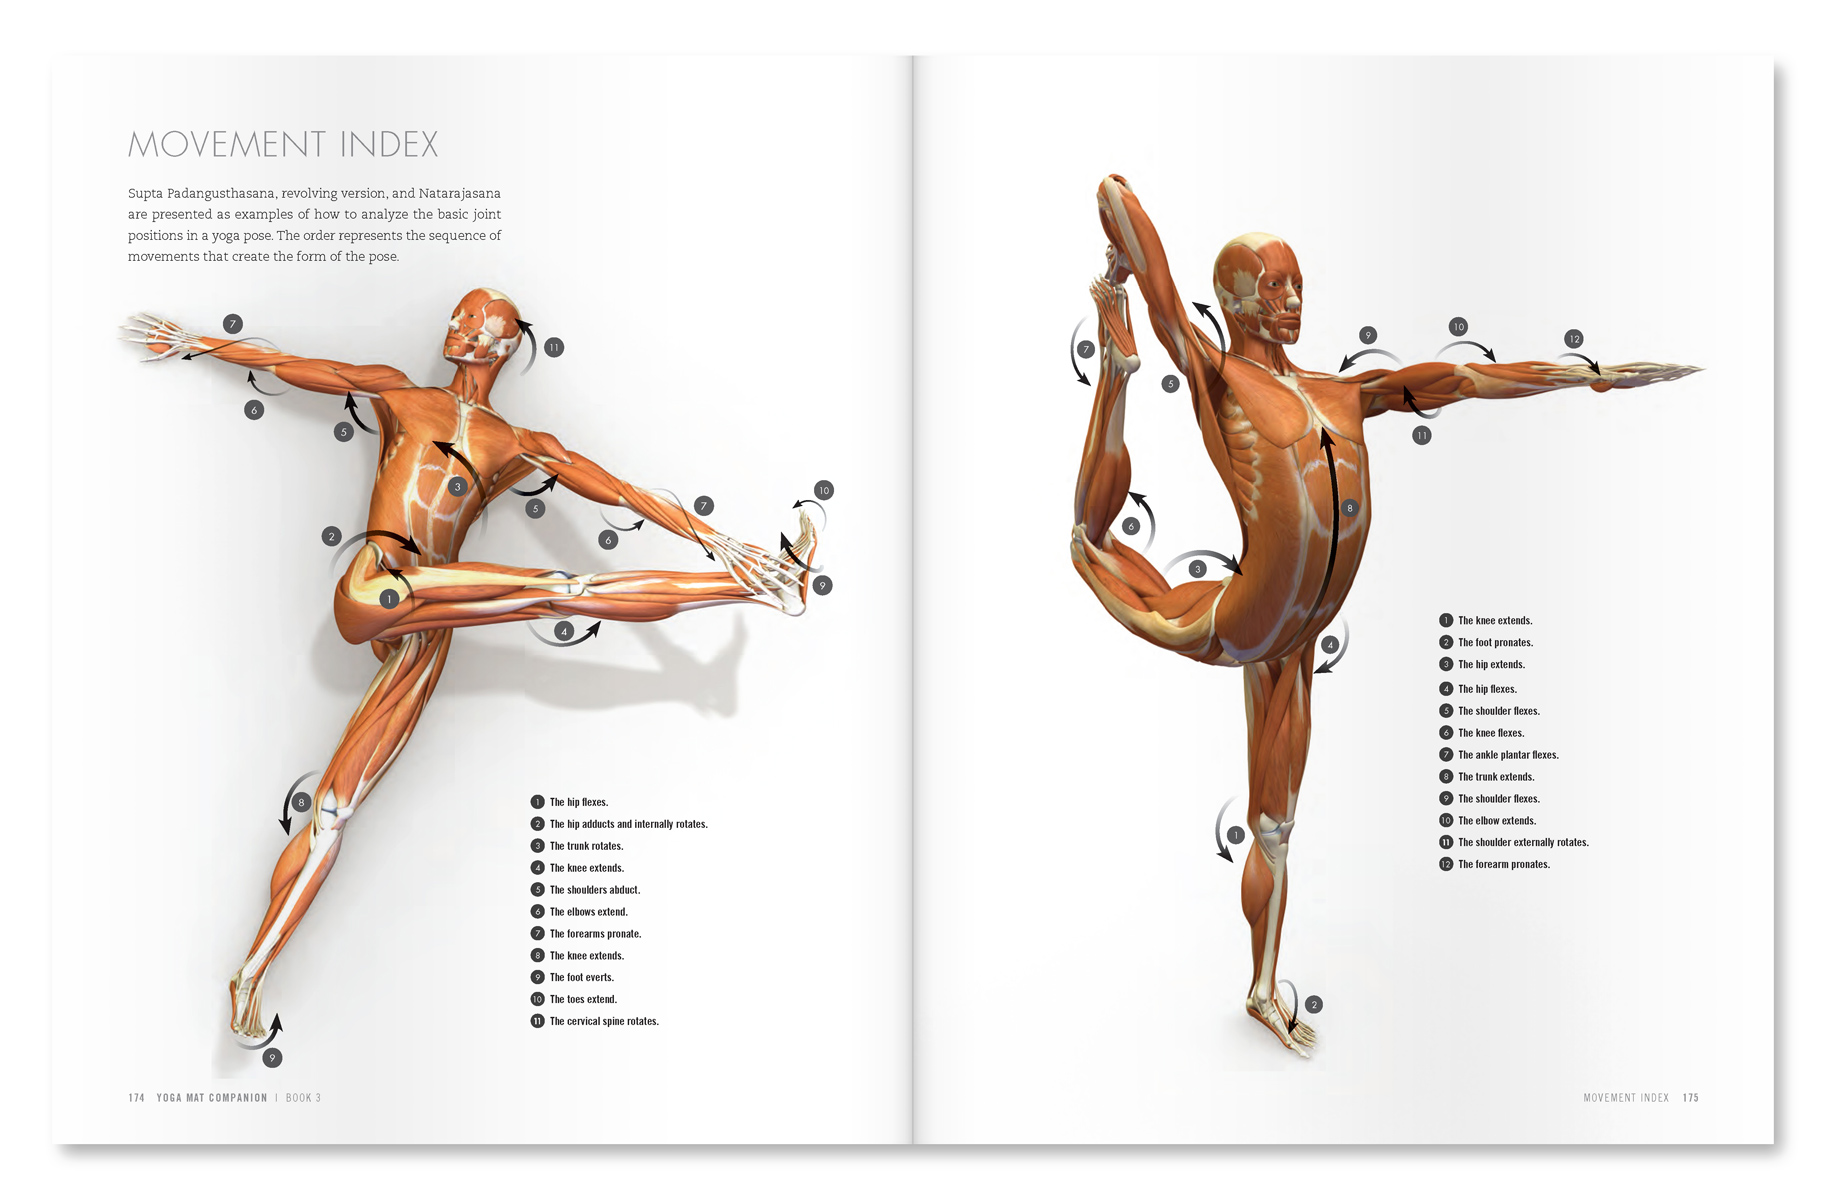
Figures 2-5 illustrate several yoga poses that stretch the piriformis. Parvritta trikonasana and the rotating version of Supta padangustasana lengthen the muscle by adducting and flexing the hip. Similarly, Parsva bakasana and Marichyasana III adduct and flex the hip joint, thus stretching the muscle (which an extensor and abductor when the hip is flexing).
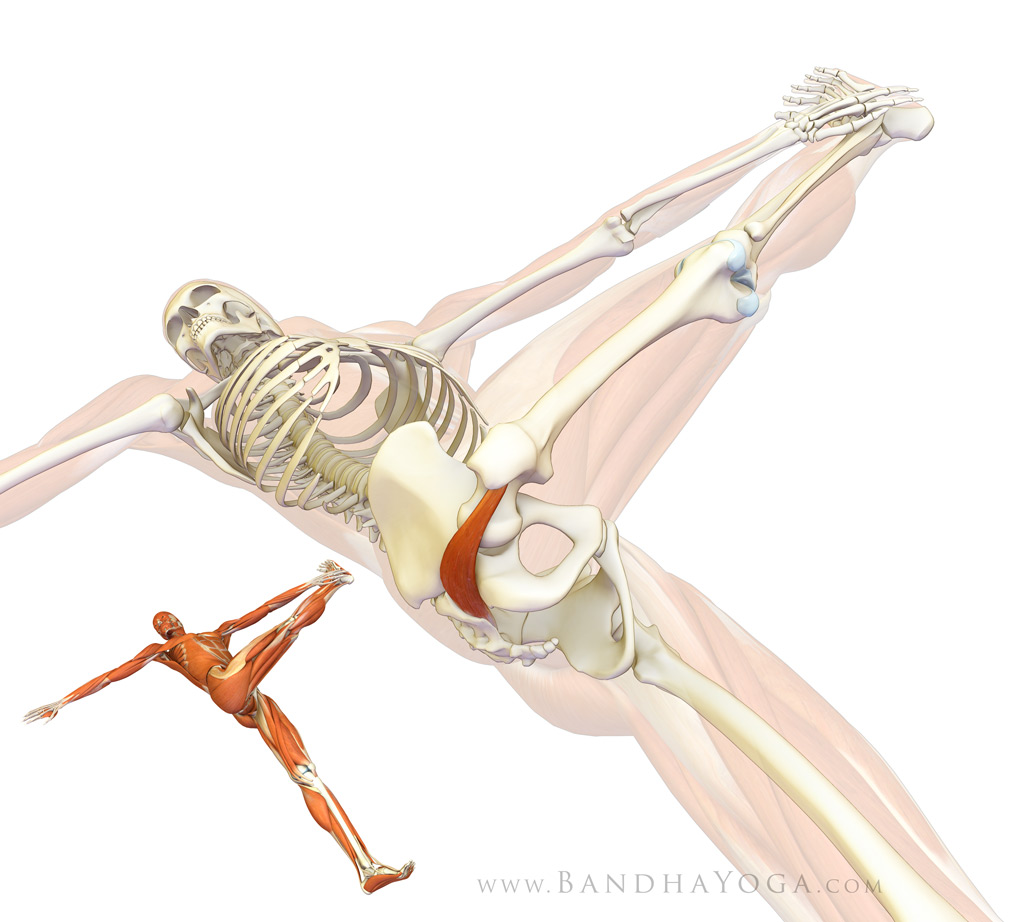 |
| Figure 2. Piriformis stretching in supta padangusthasana. |
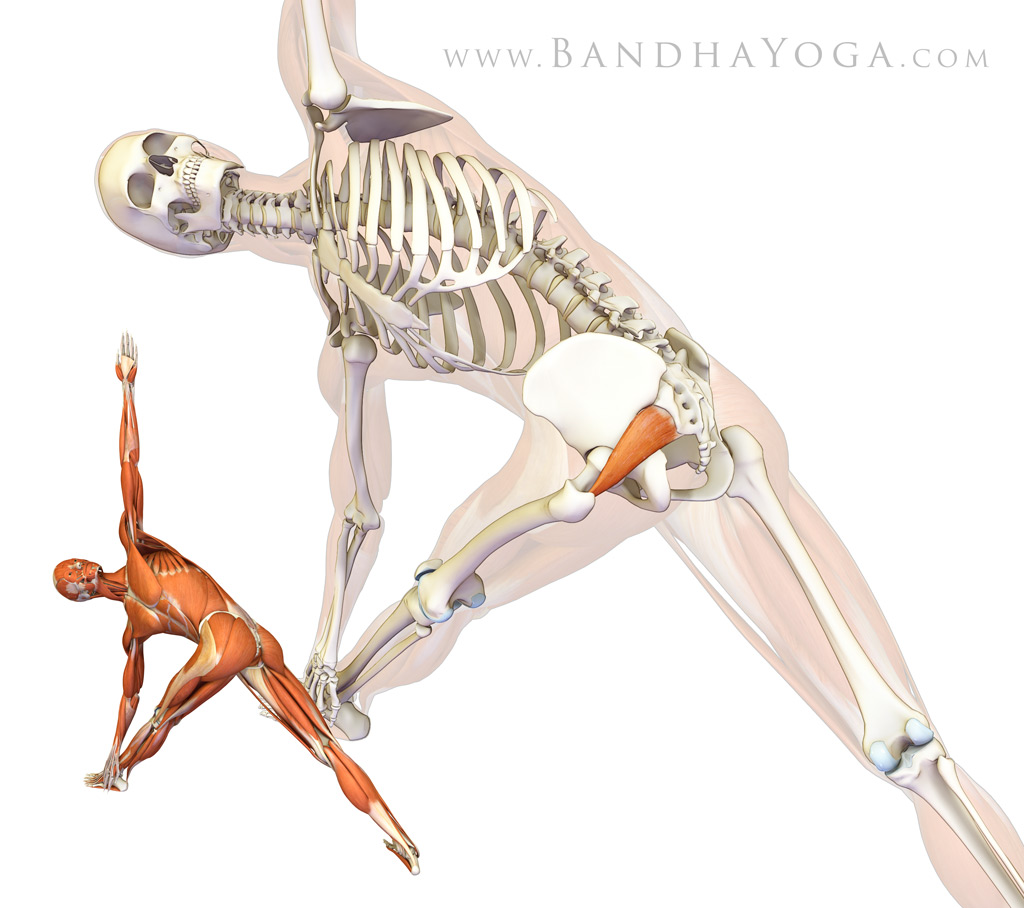 |
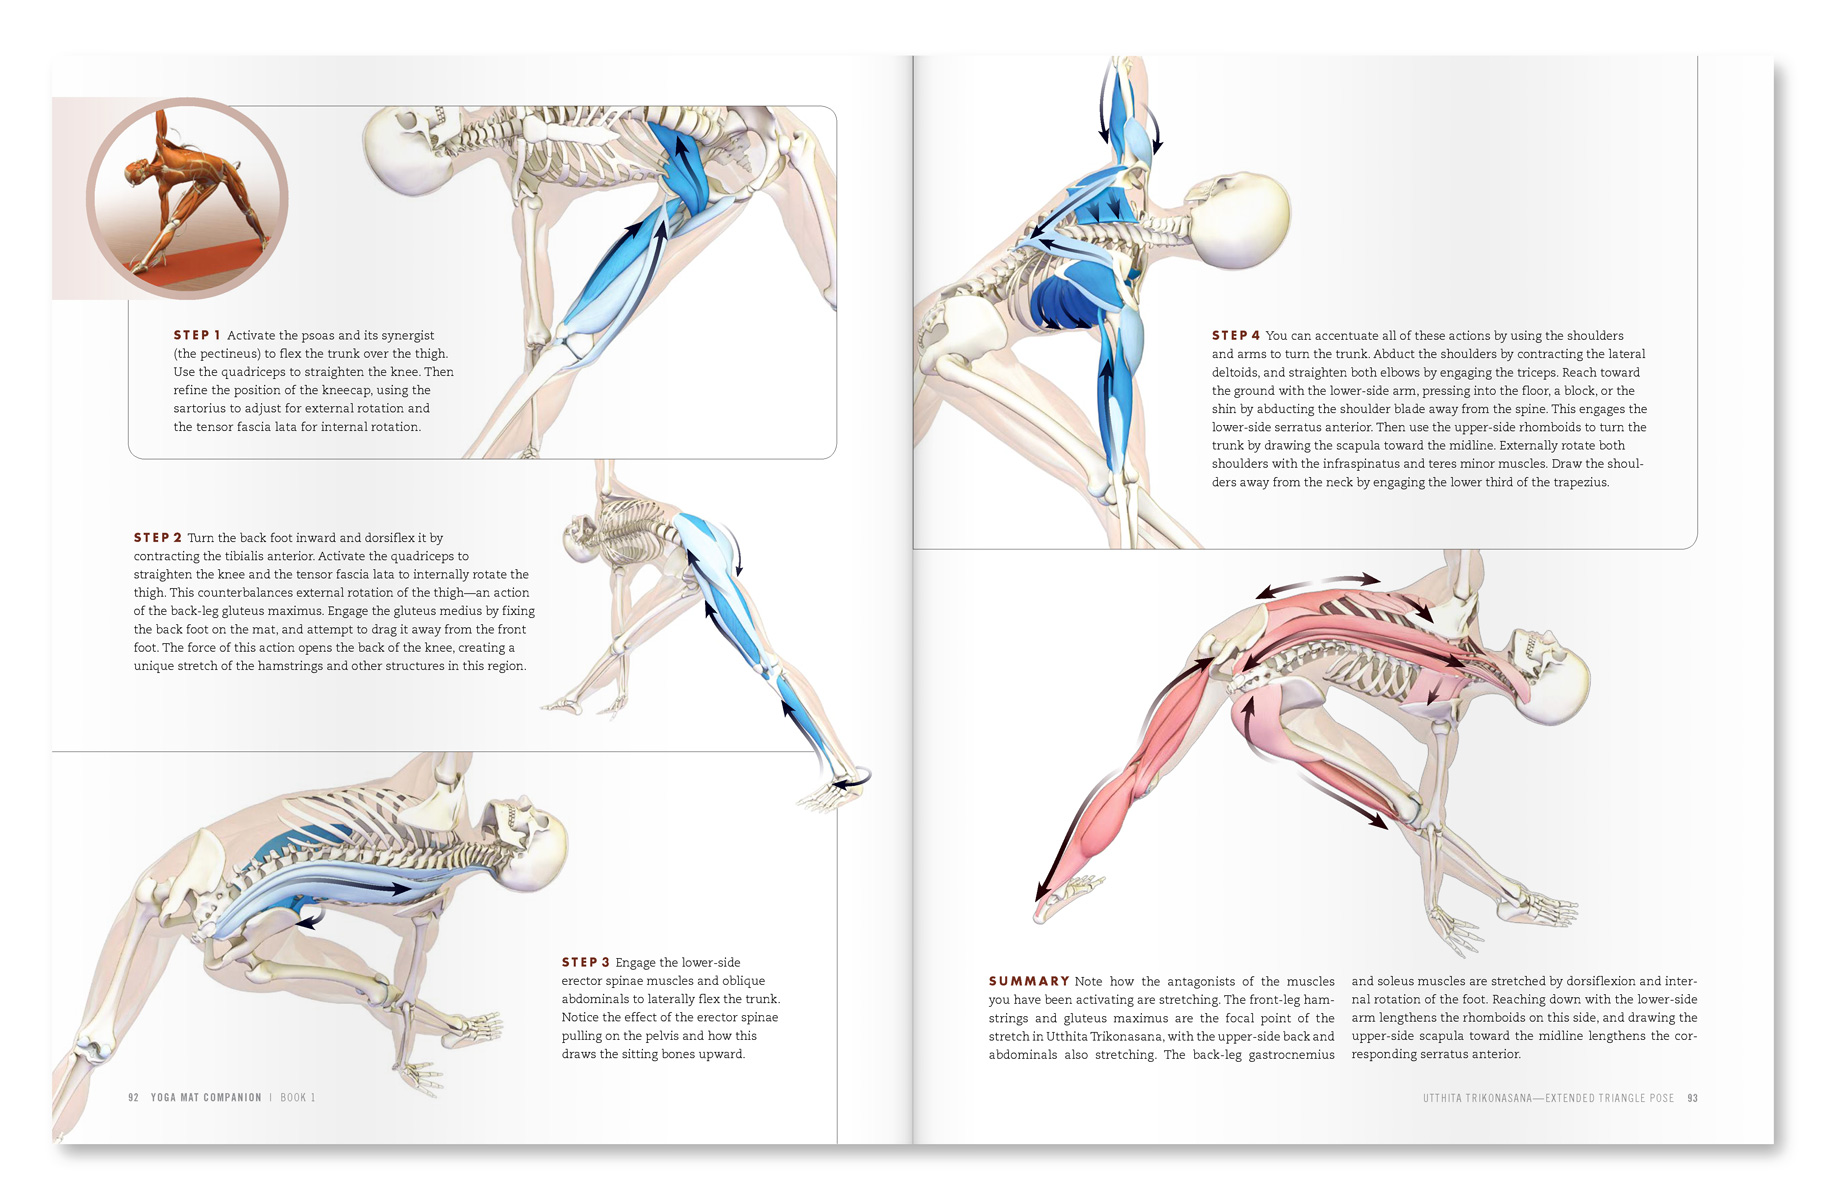
| Figure 3. Piriformis stretching in Parvritta trikonasana. |
 |
| Figure 4. Piriformis stretching in Marichyasana III. |
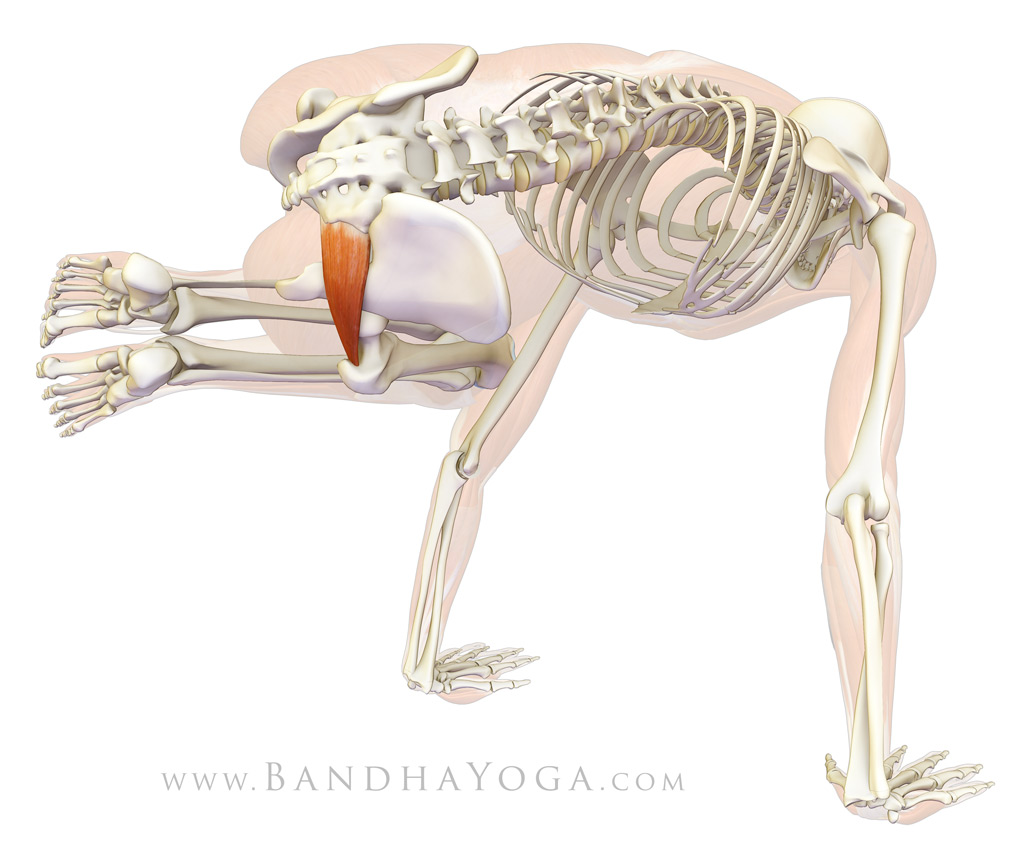 |
| Figure 5. Piriformis stretching in Parsva bakasana. |
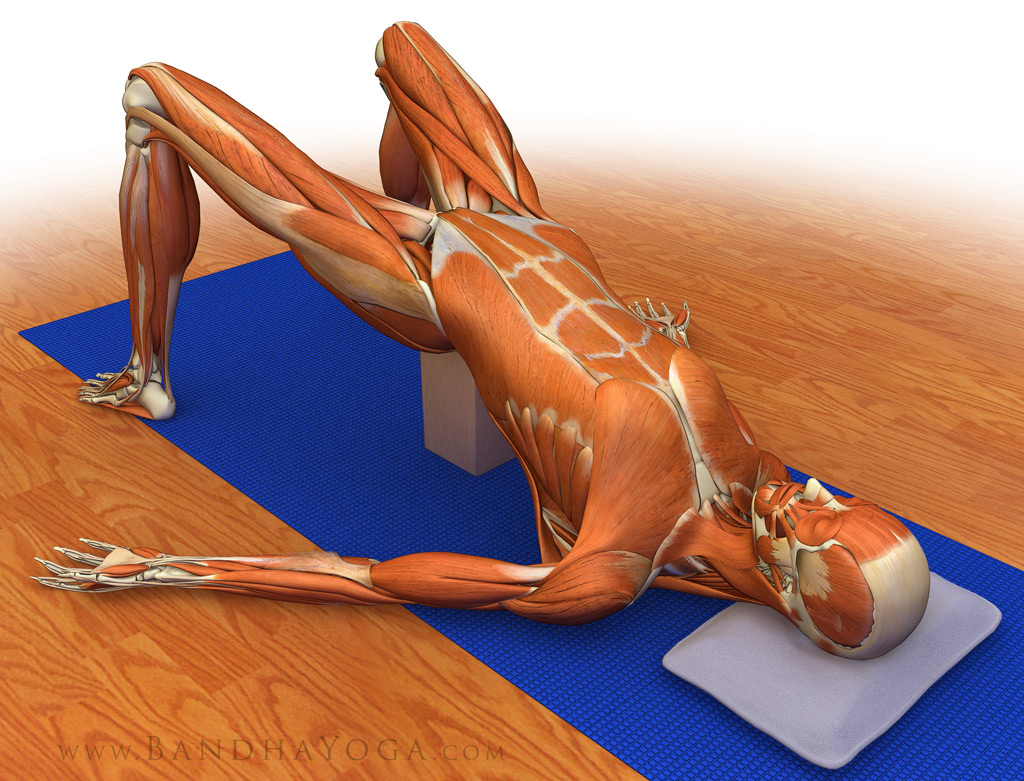 |
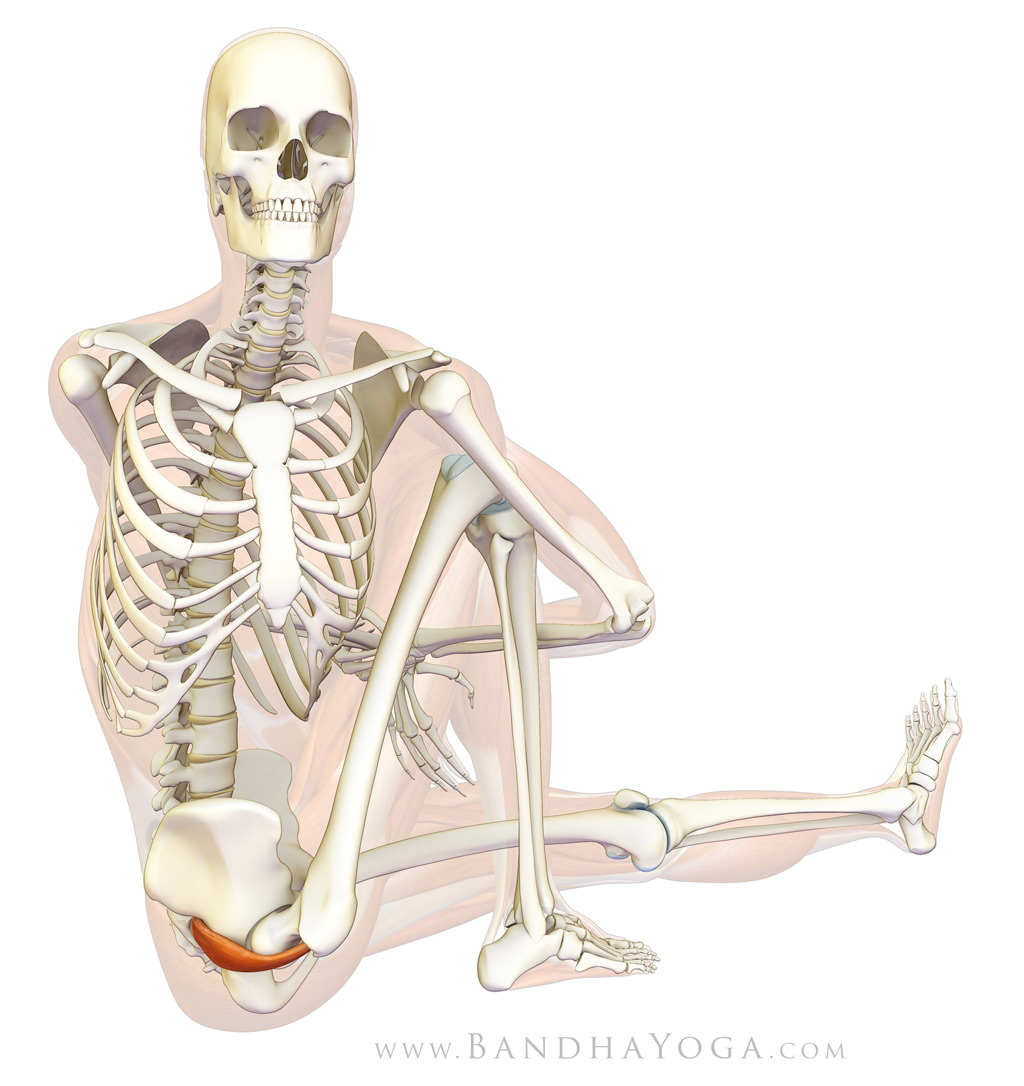
| Figure 6. Supported setu bandha - a recovery pose which maintains the piriformis in a relaxed position. |
Video 1 demonstrates stretching of the piriformis in Reverse Pigeon Pose. This asana stretches the muscle by externally rotating and flexing the hip.
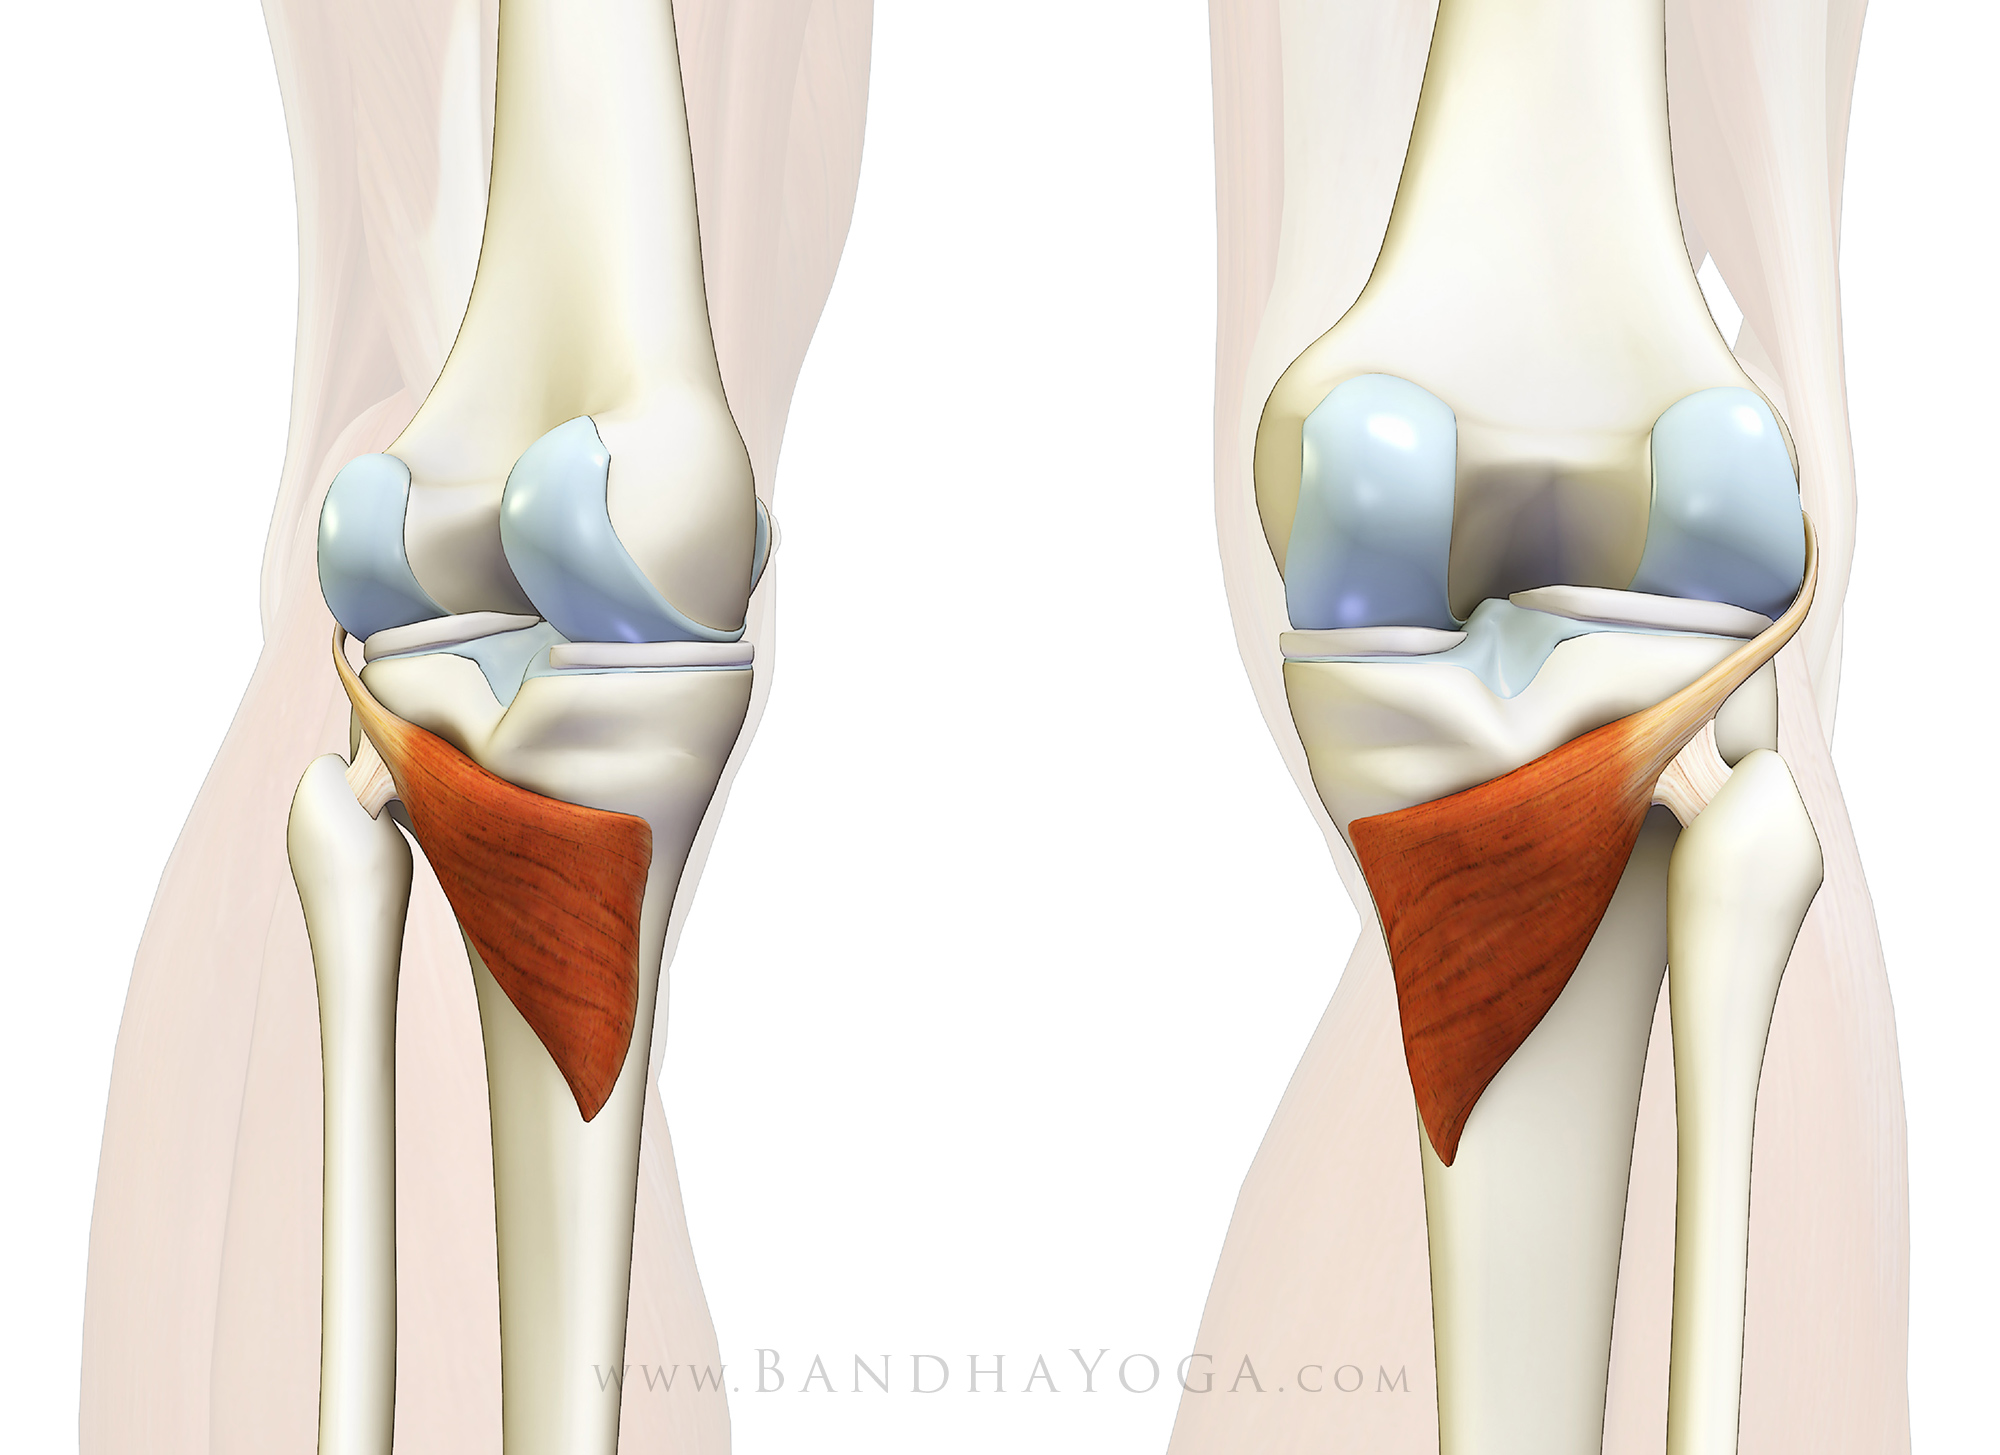
Video 2 illustrates the technique for using mysofascial connections to protect the knee joint in this pose. Click here for the details of this technique.
Now you're ready to take the Bandha Yoga QuickQuiz for the piriformis muscle! Click here to start.
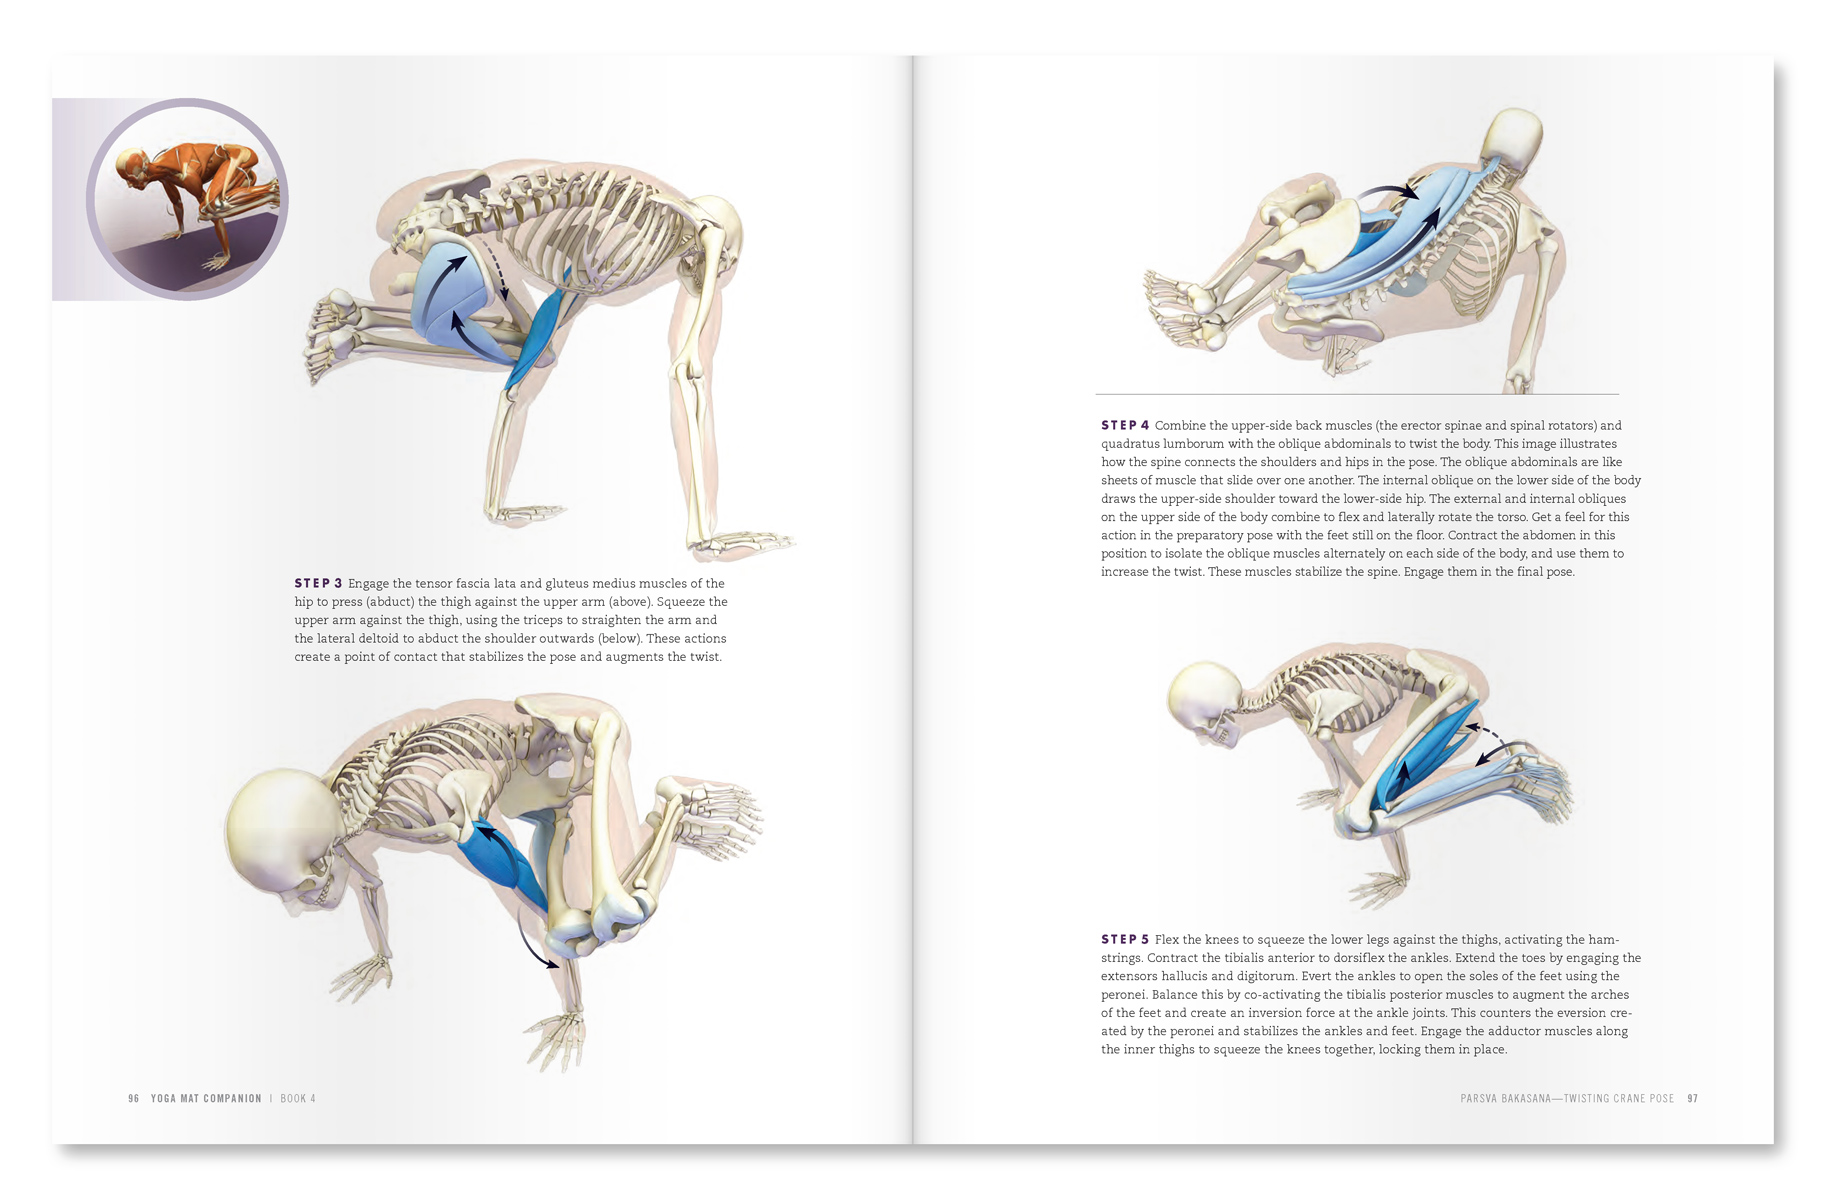 |
| An excerpt from "Yoga Mat Companion 4 - Anatomy for Arm Balances and Inversions". |
 |
| An excerpt from "Yoga Mat Companion 2 - Anatomy for Hip Openers and Forward Bends". |
Thanks for stopping by. If you would like to learn more about combining modern Western science and yoga, feel free to browse through The Key Muscles and Key Poses of Yoga, as well as the Yoga Mat Companion series by clicking here. Many thanks for your support in sharing us on Facebook, Twitter and Google Plus!
All the Best,
Ray Long, MD
References:
- Pokorný D, Jahoda D, Veigl D, Pinskerová V, Sosna A. “Topographic variations of the relationship of the sciatic nerve and the piriformis muscle and its relevance to palsy after total hip arthroplasty.” Surg Radiol Anat. 2006 Mar;28(1):88-91.
- Boyajian-O'Neill LA, McClain RL, Coleman MK, Thomas PP “Diagnosis and management of piriformis syndrome: an osteopathic approach.” J Am Osteopath Assoc. 2008 Nov;108(11):657-64.
- Filler AG, Haynes J, Jordan SE, Prager J, Villablanca JP, Farahani K, McBride DQ, Tsuruda JS, Morisoli B, Batzdorf U, Johnson JP. “Sciatica of nondisc origin and piriformis syndrome: diagnosis by magnetic resonance neurography and interventional magnetic resonance imaging with outcome study of resulting treatment.” J Neurosurg Spine. 2005 Feb;2(2):99-115.
- Rodrigue T, Hardy RW. “Diagnosis and treatment of piriformis syndrome.” Neurosurg Clin N Am. 2001 Apr;12(2):311-9.
- Papadopoulos EC, Khan SN. “Piriformis syndrome and low back pain: a new classification and review of the literature.” Orthop Clin North Am. 2004 Jan;35(1):65-71.


