Yoga poses are "kinetic keys" that unlock and open the mind/body connection. Precise and accurate renditions of the asanas are more effective for unlocking the doors to the yoga experience. For examle, in a previous blog post we illustrate how to draw the front knee back and the pelvis forward in Utthita Parsvakonasana by pressing the outside of the knee into the arm. This engages the abductor muscles of the hip and brings the pelvis, knee, and ankle into alignment while stabilizing the pose. It also aids to open the front of the body and is an example of using a constraint (the knee against the arm) to create freedom.
Just as the knee tends to drift inward in Utthita Parsvakonasana and Warrior I and II, so the pelvis tends to drift away from the midline in Parivrtta Trikonasana. In this post we explore connecting the upper and lower extremities while simulaneously engaging the hip abductors to draw the pelvis into an alignment with the legs.
Here’s the Anatomy . . .
The upper appedicular skeleton is composed of the shoulder girdle and arms. The lower appendicular skeleton comprises the pelvic girdle and legs. The axial skeleton is made up of the pelvic girdle, spine, ribcage, and skull. Consequently, connecting the upper and lower extremities (the hand to the foot or elbow to the knee) can be used to influence the position of the trunk.
Here’s the Cue . . .

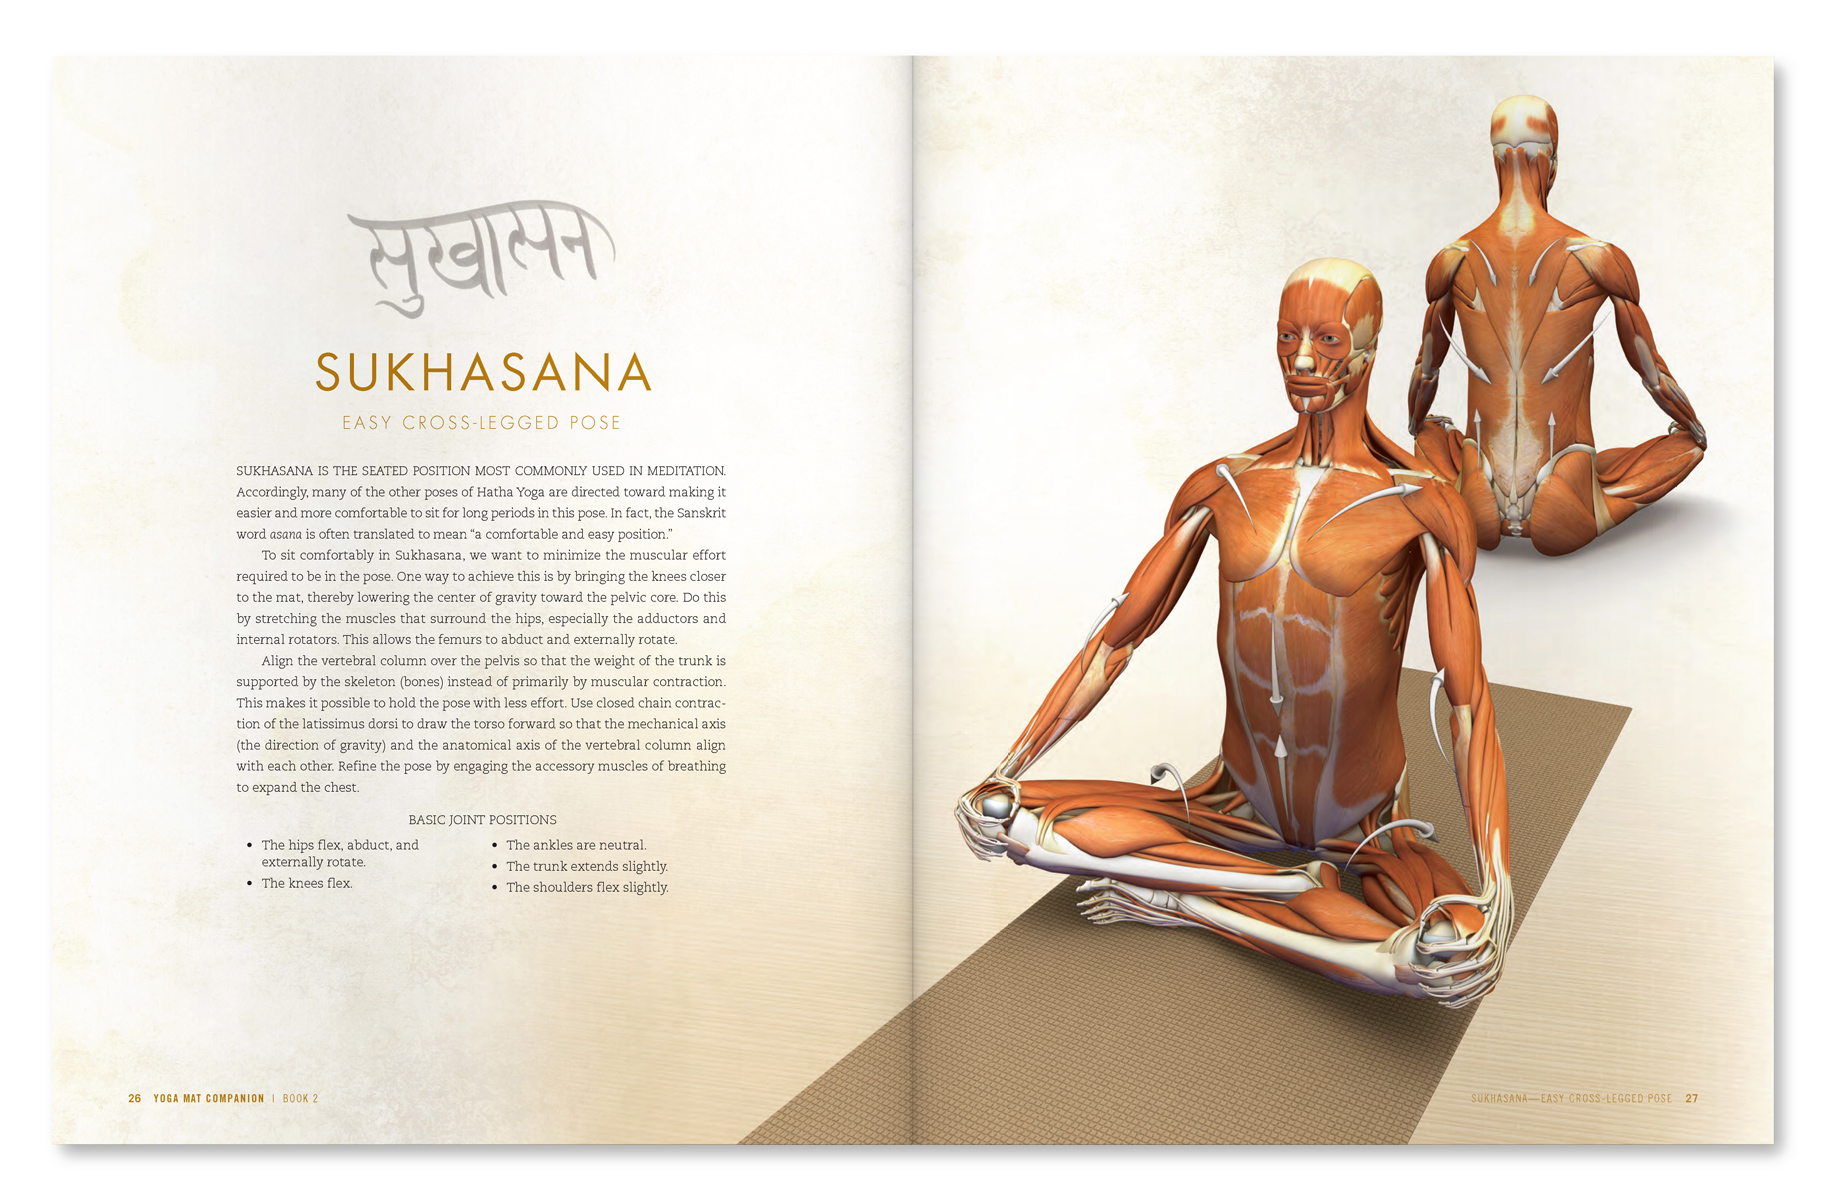
Sitting Up Straight and Expanding the Chest Forward in Sukhasana
Slumping the back and collapsing the chest is a common occurrence in Sukhasana, especially in those who are new to yoga. Factors that can contribute to this posture include fatigue, defeated mental state, and tight muscle groups. Many yoga poses are designed to counteract these factors, Sukhasana being one of them. Sitting up in Easy Cross-Legged Pose aids to bring the spinal column into alignment, so that the vertebral bodies and their discs support the torso; expanding the chest forward enhances breathing. With practice this can lead to a comfortable, easy position that is reflected on the central nervous system—an example of the mind/body connection in yoga.
Here’s the Cue . . .
Place the hands with the palms facing down on the knees in Chin Mudra. Then, while holding onto the knees, attempt to draw the hands back towards the torso. This engages the latissimus dorsi. The hands are constrained, so the force of contracting the latissimus is transmitted to its origin along the midline of the back. The result is what is known in kinesiology as a “closed chain” movement, whereby the origin of the muscle moves (instead of the insertion). Activating the lats in this manner lifts the spine and expands the chest forward. If you tend to hyperextend the lumbar, then engage the abdominals to counteract this. Note the effect.
Slumping tilts the pelvis backwards into retroversion, so that one is sitting on the back part of the ischial tuberosities (the sitting bones). A portion of the latissimus dorsi originates from the back of the iliac crest, so that activating this muscle also tilts the pelvis forward, bringing the sitting bones more upright.
This technique is portable to other poses. In Tadasana, for example, simply fix the palms against the sides of the hips and attempt to drag them backwards. Note how the chest expands forward and the back straightens. See this concept in action for Sukhasana in the video above.
Here’s the Anatomy and Biomechanics. . .
The latissimus dorsi originates from the spinous processes of thoracic vertebrae 6—12, lumbar vertebrae 1—5 (via the thoracolumbar fascia), ribs 9—12, the supraspinous ligament, and the posterior third of the ilium. It inserts onto the intertubercular groove on the humerus and the deep fascia of the arm. The latissimus dorsi extends, adducts, and internally rotates the shoulder (open chain movement). It extends the spine and lifts and tilts the pelvis forward (closed chain movement) and is also an accessory muscle of respiration.
Want to learn more anatomy and biomechanics to improve your yoga? Click here to page through all of our books. Thanks for stopping by. Check back for our next post when we’ll give a finishing touch for Dog Pose.
All the Best,
Ray Long, MD
 |  |
Here’s the Cue . . .
Place the hands with the palms facing down on the knees in Chin Mudra. Then, while holding onto the knees, attempt to draw the hands back towards the torso. This engages the latissimus dorsi. The hands are constrained, so the force of contracting the latissimus is transmitted to its origin along the midline of the back. The result is what is known in kinesiology as a “closed chain” movement, whereby the origin of the muscle moves (instead of the insertion). Activating the lats in this manner lifts the spine and expands the chest forward. If you tend to hyperextend the lumbar, then engage the abdominals to counteract this. Note the effect.
Slumping tilts the pelvis backwards into retroversion, so that one is sitting on the back part of the ischial tuberosities (the sitting bones). A portion of the latissimus dorsi originates from the back of the iliac crest, so that activating this muscle also tilts the pelvis forward, bringing the sitting bones more upright.
 |
| Lats in Tadasana |
This technique is portable to other poses. In Tadasana, for example, simply fix the palms against the sides of the hips and attempt to drag them backwards. Note how the chest expands forward and the back straightens. See this concept in action for Sukhasana in the video above.
Here’s the Anatomy and Biomechanics. . .
The latissimus dorsi originates from the spinous processes of thoracic vertebrae 6—12, lumbar vertebrae 1—5 (via the thoracolumbar fascia), ribs 9—12, the supraspinous ligament, and the posterior third of the ilium. It inserts onto the intertubercular groove on the humerus and the deep fascia of the arm. The latissimus dorsi extends, adducts, and internally rotates the shoulder (open chain movement). It extends the spine and lifts and tilts the pelvis forward (closed chain movement) and is also an accessory muscle of respiration.
 |
| An excerpt from "Yoga Mat Companion 2 - Anatomy for Hip Openers and Forward Bends". |
 |
| An excerpt from "Yoga Mat Companion 2 - Anatomy for Hip Openers and Forward Bends". |
Want to learn more anatomy and biomechanics to improve your yoga? Click here to page through all of our books. Thanks for stopping by. Check back for our next post when we’ll give a finishing touch for Dog Pose.
All the Best,
Ray Long, MD
Antagonist/Synergist Combinations in Yoga
In this post we explore the relationship between the tensor fascia lata (TFL) and the gluteus maximus. In addition I add a cue for engaging the adductor magnus as a synergist of the gluteus maximus. Knowledge of these relationships can be used to refine and stabilize postures with a lunge component, such as Warrior II.
The "Deltoid" of the Hip . . .
You might think of the TFL as akin to the anterior deltoid of the shoulder in that it flexes and internally rotates the joint. The gluteus maximus is similar to the posterior deltoid in that it extends and externally rotates the articulation. Both muscles can abduct the hip. They are thus antagonists for flexion/extension and rotation and synergists for abduction.
 |
| The deltoid of the shoulder and the "deltoid" of the hip. Click image for larger view. |
Balancing Freedom and Restraint in Yoga
The work of legendary furniture designers Charles and Ray Eames has been described as a balance of freedom and restraint. Mr. Eames was once asked: “Have you ever been forced to accept compromises?” He responded: “I don’t remember ever being forced to accept compromises, but I have willingly accepted constraints.”1
Practicing yoga also involves working within constraints--those of the general form of the human body and also our personal limitations. Yoga balances freedom and restraint.
Knowledge of the body shows us where to expand and where to restrict movement. It also allows us to design a practice to fit our individual needs. That’s why working with a modified version of a particular pose is not a compromise—it’s accepting constraints. I don’t abandon a beneficial asana simply because it’s difficult. Rather, I use awareness of my limitations as a guide for determining how to work in the pose.
Using the TFL to Refine Utthita Parsvakonasana
Many of the standing poses have a lunge component; that is, the forward hip and knee flex while the back hip and knee extend. It is not unusual in these types of asanas for the forward knee to drift inward, with the pelvis moving in the opposite direction. An example of this is Utthita Parsvakonasana (Extended Lateral Angle Pose).
Positioning the knee over the ankle aligns the leg bones, especially the femur and tibia. This brings the anatomic and mechanical axes closer together, so that support in the pose is derived more from the strength of the bones than from muscular effort. Additionally, allowing the knee to drift inward can place stress on the lateral compartment of the joint. Adjusting the position of the femur and the tibia aids to distribute the joint reaction forces over a greater surface area.
Here’s the Anatomy . . .
Positioning the knee over the ankle aligns the leg bones, especially the femur and tibia. This brings the anatomic and mechanical axes closer together, so that support in the pose is derived more from the strength of the bones than from muscular effort. Additionally, allowing the knee to drift inward can place stress on the lateral compartment of the joint. Adjusting the position of the femur and the tibia aids to distribute the joint reaction forces over a greater surface area.
 |
| Click for larger image. |
Shoulder Kinematics in Yoga Part II: The Lower Trapezius and Serratus Anterior
Our last blog post used a video to illustrate shoulder kinematics in 3D and reviewed how to externally rotate the humerus to protect against impingement. This week we look at the scapular motion on the ribcage and the role of the lower third of the trapezius in drawing the shoulders away from the neck. This motion is called scapular depression, and it is frequently used in yoga, especially when the arms are overhead. Scapular depression helps to maintain freedom of movement in the cervical spine, either to lift the head and look up (in Urdhva Hastasana) or to relax the head down (as in Dog Pose).

Here’s the Anatomy . . .
When you raise the arms overhead, the scapulae elevate, protract, and rotate. This is through the action of several muscles, including the upper trapezius and the levator scapulae. Scapular rotation occurs through sequential actions of the upper, middle, and lower thirds of the trapezius and the serratus anterior. Protraction is mainly through the work of the serratus anterior.
Shoulder Kinematics in Yoga, Part I
The shoulder is the most mobile joint in the body. It is a combination of several articulations: the glenohumeral, scapulothoracic, sternoclavicular, and acromioclavicular joints. Each of these contributes to shoulder and arm movement via a process known as joint “coupling.” For example, when you raise the arms over the head in Urdhva Hastasana, the clavicle pivots on the sternum (breastbone), the scapula rotates on the chest wall, and the head of the humerus moves within the shoulder joint. All of these work together simultaneously in what is known as scapulohumeral rhythm. In general, 60 degrees of this action comes from movement of the shoulder blade on the chest wall (scapulothoracic motion) and 120 degrees from the ball and socket of the shoulder (glenohumeral motion). During this process, the clavicle rotates on its long axis approximately 25 degrees and the humerus externally rotates about 45 degrees. Scapulohumeral rhythm is illustrated in the video below, with a breakdown of scapulo-thoracic and gleno-humeral contributions to the entire movement.
So we can see that the shoulder is a complex structure, with many factors contributing to movement, or potentially restricting it. It’s easier to understand a complex structure by breaking it down into its component parts and then reconstructing them into the whole. This gives a new understanding of their function. For the shoulder, we’ll begin by focusing on the skeletal anatomy of the glenohumeral joint.
So we can see that the shoulder is a complex structure, with many factors contributing to movement, or potentially restricting it. It’s easier to understand a complex structure by breaking it down into its component parts and then reconstructing them into the whole. This gives a new understanding of their function. For the shoulder, we’ll begin by focusing on the skeletal anatomy of the glenohumeral joint.
How to Use the Adductor Muscles to Refine Downward Dog
In our blog post, "Strong Thigh Muscles Benefit People with Knee Osteoarthritis,” we gave a tip for activating the tensor fascia lata in Downward Facing Dog. This synergizes the quadriceps for extending the knees, aids in flexing and internally rotating the hips, and helps to align the kneecaps to face forward. You can further refine alignment in this pose by using the adductors longus and brevis and their synergist, the pectineus. Co-activating these muscles and the TFL balances external and internal rotation of the femurs while at the same time synergizing hip flexion.
 |
| Co-activation in Downward Facing Dog pose. |
First the Anatomy . . .
The adductors longus and brevis originate from the superior and inferior pubic rami, respectively. The longus inserts onto the middle third of the linea aspera, a ridge of bone on the inside of the femur. The brevis inserts onto the upper third of this ridge. Both muscles act to adduct (draw the thighs together), flex, and externally rotate the hip joint. They also stabilize the pelvis.
Satya, Biomechanics, and Yoga
“One who shows a high degree of right communication will not fail in his actions.”
(T.K.V. Desikachar’s translation of Yoga Sutra II.36)
Patanjali’s Yoga Sutras have much practical wisdom that can be directly applied to life. In fact, evolution of a civilization (or its destruction) can usually be traced to satya (truthfulness) or asatya (untruthfulness). A similar dynamic exists for an individual’s personal evolution.
Satya and asatya also have practical benefits and consequences for sustainable design of the practice and teaching of yoga, because truth and theory go hand in hand. Base your teaching on sound theory (satya) and the benefits will automatically manifest in your practice. By the same token, if your theory is based on falsehoods (asatya), the benefits won’t manifest. You can see examples of both satya and asatya in our posts on “The Importance of Theory” and “Strong Thigh Muscles Benefit People with Knee Osteoarthritis.”
Satya is also said to be "that which has no distortion." Relating to yoga instruction, this means clarity of expression. Precise cues elicit a predictable response. Vague or distorted cues elicit confusion. And no matter what your personal style of communication, you can always benefit from knowing the biomechanical basis for what you’re teaching.
Balancing the Forearms, Wrists, and Hands in Dog Pose
A starting point for combining Western science with yoga lies in the term Ha/Tha. This Sanskrit word means Sun/Moon or Yin/Yang and implies a balancing of energies or forces. Balance creates stillness. Apply this concept in your yoga practice by examining the various forces operating around a given joint in a pose, for example, the feet and ankles in Downward Facing Dog. You can also use it to correct hyperextending knees and elbows.
So, look at the elements that contribute energy or force throughout the body—including gravity and muscular effort—and the transmission of those forces from the muscle-tendon unit to the bones. Focus on those you can consciously affect—contracting and lengthening skeletal muscles, for example. In general, once you have the form of a pose, you want to minimize the muscular effort required to be in the asana and maximize the use of the inherent strength of the bones by aligning them. For an example of this, look at how to use the big toes to align the bones of the legs in Uttanasana.
What about poses where a particular movement predominates, for example, in Urdhva Dhanurasana where the hip joints are more extended than flexed? Consider a recipe for food. You wouldn’t necessarily use equal portions of salt and pepper to create the final taste. In Urdhva Dhanurasana, contraction of the hip extensors predominates while the hip flexors lengthen. Balance in a pose such as this is the right amount of engagement combined with the right amount of release. All of this produces a motor and sensory imprint on the brain and establishes the mind—body “connection” of yoga.
Now, let’s look at how to use this principle for the forearms, wrists, and hands.
A Tip for Helping to Correct Alignment in Hyperextended Elbows and Knees in Yoga
Aligning the bones accesses their inherent strength so that yoga poses ultimately require less muscular effort to maintain. For example, in our last post we gave a tip on using the big toes to correct the tendency for the pelvis to drift back in standing forward bends and one-legged standing poses like Warrior III. This correction brings the leg bones upright and perpendicular to the floor, which better supports the body weight. Aligning the bones in this manner also has the benefit of increasing joint congruency and spreads the joint reaction forces more evenly across the articular cartilage. Conversely, engaging the muscles that align the bones has been demonstrated to have a protective effect on the joint cartilage.
 |
| Dog Pose showing the direction of force through hyperextended elbows vs aligned elbows. |
Hyperextending the knees or elbows in yoga poses can be disadvantageous because it misdirects the forces that create the form of the asana. For example, if the elbows are hyperextending in Dog Pose, then the force of the hands pushing into the mat is angled inward. Ideally this force should be directed through the long axes of the forearm bones, humerus, and shoulders and then through to the trunk and pelvis. Aligning the bones of the arms helps to create the proper form of Downward Facing Dog. Pressing the body back in this manner then synergizes the stretch of the muscles at the backs of the legs.
A Benefit of Using the Big Toes in Yoga
Have you ever noticed how the pelvis seems to drift backwards in standing forward bends, especially Uttanasana? Sometimes you get an assist from a teacher who pushes the pelvis forward from the sacrum to align the hips and leg bones back over the ankles. Oftentimes, however, when they remove this assist, your pelvis drifts back again . . .
 |
| Pressing the big toes into the mat in Uttanasana. |
If you’ve had this experience, here’s a cue you can use (for yourself and your students) to align the pelvis and the bones of the lower extremities perpendicular to the floor. As always, warm up with Surya Namaskaras. Then take Uttanasana. Engage the quadriceps to straighten the knees. This aids to release the hamstrings through reciprocal inhibition and helps to align the bones that form the knee joint. Now press the fleshy part of the big toes firmly into the mat. Feel how this brings the pelvis forward and the legs upright—the desired position of the pose.
Strong Thigh Muscles Benefit People with Knee Osteoarthritis (and a Tip for Engaging the TFL)

“In summary, in men and women with symptomatic knee OA [osteoarthritis], we found no association between quadriceps strength and cartilage loss at the tibiofemoral joint, including in malaligned knees. However, greater quadriceps strength, which may prevent lateral offset and tilt of the patella, protected against cartilage loss at the lateral compartment of the patellofemoral joint, a frequent site of symptom generation in knee OA. Subjects with greater quadriceps strength were also more likely to have less knee pain and better physical function. Our results suggest that strong quadriceps muscles have an overall beneficial effect on knee OA.”1 For Science Daily’s composite of this article, click here.
Also, see Mayo Clinic researcher Dr. Amin’s comments at The American College of Rheumatology Annual Meeting on Nov. 15, 2006:
“A stronger quadriceps muscle helps keep the patella from moving laterally and tracking abnormally with movement... Our study results emphasize that it’s important to encourage people with knee osteoarthritis to maintain strong quadriceps muscles as recommended by their physician.”
How to Balance Opposites in the Foot and Ankle
I think that one of the keys to a unified theory lies in the name Hatha—sun/moon and balancing opposites. Here’s a tip on balancing them for the foot and ankle.
The peroneus longus originates from the head and upper two thirds of the fibula. It then runs down the outside of the lower leg and under the foot to insert onto the medial cuneiform and base of the first metatarsal at the inside of the foot arch. It acts to evert the foot, plantar flex the ankle, and support the transverse arch of the foot. The peroneus brevis originates from the lower half of the outside of the fibula and inserts onto the base of the fifth metatarsal (on the outer edge of the foot). It acts to evert the ankle (and assists in plantar flexing the ankle).
First, the Anatomy . . .
 |
| Peroneus longus (and brevis in light blue). |
The Importance of Theory (and Another Cool Tip for Deeper Breathing)
First, I want to thank Ashtanga instructor Robin Feinberg for her comment in which she states: “…‘when the going gets tough, Ashtangis breathe deeper’; ‘as your control and depth of Ujjayi grows, so grows your practice’; and to quote Sri K. Pattabhi Jois, ‘Ashtanga yoga is 99% practice, 1% theory. Practice and all is coming.’”…
I would like to focus on the theory part of Master Jois’ iconic statement, because it is theory that informs practice. As I mentioned in the last post, for a scientific principle to be valid, it has to be reproducible by other scientists. Now, take a moment and look at our Facebook page. Go to the “people who like this” section and look at the awesome pictures of yoga on display. Some of the most amazing are Ashtanga practitioners—from all over the world. This is clear evidence of sound theory informing a practice. Master Iyengar’s alignment principles have a similar scientific foundation. Aligning the joints maximizes joint congruency. This decreases the incidence of joint reaction forces being concentrated over a small region of cartilage and helps to prevent injuries in yoga. The same goes for his advice on pranayama (see below).
Here’s a Tip to Help You Lower Your Heels Down in Dog Pose
Say you’ve been working hard on your Downward Facing Dog and still can’t get your heels to the floor. This cue can give you and your students that extra bit of length in the calf muscles and enable you to lower the heels.
First, warm up a bit with five or six Sun Salutations (Surya Namaskar A). This has the physiological effect of acclimating the muscle spindle stretch receptors of the muscles that lengthen, including the calves. Then take Dog Pose and attempt to draw the top surface of the feet towards the shins. This contracts the tibialis anterior muscle (and its synergists), dorsiflexing the ankles. It also signals the muscles at the backs of the calves, the gastroc/soleus complex, to relax through reciprocal inhibition, enabling the heels to lower to the floor. At the same time, engage the quadriceps to straighten the knees and the triceps to straighten the elbows. These actions synergize lowering the heels. We illustrate stepwise tips like this for all kinds of poses in the Mat Companion series. Click here to page through the books.
 |
| Tibialis anterior dorsiflexing the ankles to lower the heels (gastroc/soleus lengthening). |
A Cool Tip for Deeper Breathing in Yoga
First, heartfelt thanks for all of your “likes” and comments on our Facebook page. We’ve heard from practitioners all over the world on how these techniques have enhanced their practice and teaching. This is music to our ears. To show my appreciation, I want to offer a tip that can help you dramatically expand the chest. This cue on engaging the accessory muscles of breathing can provide a quantum leap in the global effect of your yoga practice. First, a little background . . .
As many of you know, I studied yoga for an extended period at the Ramamani Iyengar Memorial Yoga Institute in Pune, India. The Iyengars are true world experts in yogic breathing. During my time there, I was exposed to great teachings of pranayama from Yogacharya Iyengar, his daughter Geeta, and son Prashant. These classes were amazing; their effect would last for days.
I continued to practice pranayama when I returned from India and gradually developed an understanding of the art. During this process, I used my medical training to analyze the breathing techniques. I found that I could use Western science to amplify the effects of pranayama.
Now, part of pranayama involves breathing deeply. The body has a group of muscles that it recruits when we need to take deeper breaths, say after running a sprint. Recruiting these muscles expands the chest to a greater extent than when using the diaphragm alone. The result is increased inspiratory volume and improved lung ventilation (on the alveolar level). It occurred to me that intentionally engaging these breathing muscles would augment the volume of my inhalations during pranayama and asana practice. So I developed a series of cues to activate the various accessory muscles and incorporated them into my practice. The effect was immediate and amazing. After my practice was finished and throughout the day, my breathing felt effortless, leaving me energized.
How cool is that?
How cool is that?
 |
| Activating the serratus anterior to expand the lungs. |
Combining Science and Yoga—Some Personal Reflections (and a FREE E-Book!)

Also, click here to read Eryn Kirkwood’s account of using the Mat Companion series in her personal practice, and visit German instructor Ursula Wenzel’s blog detailing her experience with our work (and see her excellent asana practice).
On to the Post . . .
Folks sometimes ask what prompted me to analyze the asanas from a biomechanical perspective. Well, I’m of an inquisitive mind, and I like to know the scientific basis for why I do something. When I began practicing yoga back in the day, it was not as accessible as it is now. I would travel far and wide to take classes wherever I could. During this process, I noticed that the instructions for a given asana seemed to vary among different teachers and were at times contradictory. Sometimes both instructors were “correct” but for different reasons, which was confusing to me as well. Through it all, I met some great teachers and enjoyed the experience of yoga expanding throughout the world.
How to Draw the Knees to the Floor in Baddha Konasana
In Yoga Mat Companion Book 2 (Anatomy for Hip Openers and Forward Bends), I mention an old Chinese proverb that says, “If you are unable to attain a goal, do not abandon the goal. Rather, change your strategy to reach it.” A specific example of this would be working to bring the knees closer to the floor in Baddha Konasana (Bound Angle Pose). Say you have tried pressing on the knees, putting weights on them, etc., and you can’t get the results you want. Perhaps it’s time for a change of strategy . . .
I teach the following technique in my workshops, both to illustrate how spinal cord reflex arcs function and to help practitioners bring their knees closer to the floor.
Analyze Your Pose
We’ll use the Bandha Yoga Codex to analyze the asana. This is a simple process that you can apply to any pose to improve flexibility, strength, and precision—no matter what style of yoga you practice. Let’s focus on the lower extremities in Bound Angle Pose. Begin by looking at the general form of the pose. The hips flex, abduct, and externally rotate and the knees flex. Next, look at the muscles that engage to produce this position. The hip abductors (and their synergist, the sartorius) draw the knees apart and towards the floor. The external rotators turn the thighs out, and the hamstrings flex the knees. I usually start my work on a pose by gently engaging these muscles—I call them the synergists of the asana. This stimulates the brain centers associated with the muscles and joints and creates an imprint on the homunculus. It essentially says to the brain, “Baddha Konasana.” This is an example of the mind—body connection in yoga. Next, determine which muscles are stretching. These will be the antagonists of the muscles that produce the form of the asana. Click here to better understand agonist/antagonist relationships. The muscles that stretch in a pose are the same ones that can limit openings. In the case of Baddha Konasana, tight adductors of the hips (muscles that act to draw the knees together) can restrict lowering the knees towards the floor.
Once you have identified the muscle group that is stretching, apply your knowledge of physiology to create length in those muscles. Below is the technique for using PNF to stretch the adductors in Baddha Konasana. This works nicely to bring the knees closer to the floor (some students say it’s like magic).
 |
| Engage the biceps to constrain the thighs. Engage the adductors for PNF. |
How to Release the Hip Internal Rotators for Padmasana (Lotus Pose)
In The Key Muscles of Yoga, I point out that athletes experience improved performance and fewer injuries when they have a fundamental knowledge of their anatomy and biomechanics. For this reason, I recommend that you add The Daily Bandha to your favorites and return every day or so to review one or two of the concepts presented here. This will allow you to integrate these tools into your yoga practice. After just a few sessions, you’ll begin to apply the techniques unconsciously, improving your poses and aiding to prevent injuries.
In our last post, we discussed the concepts of joint congruency and joint reaction forces as related to yoga. These are among the most important principles to understand for both practitioners and teachers, because many poses can take the articulations to the limits of their range of motion. Take a moment to review this post and look at the new video which shows these concepts in action in Padmasana (Lotus Pose).
Now, on to releasing the internal rotators of the hip . . .
The main muscles that internally rotate the femur at the hip are the tensor fascia lata (TFL) and gluteus medius. The gluteus minimus contributes to this action when the hip is flexed. Conversely, when the internal rotators are tight, they can limit external rotation of the joint, a key component in poses like Lotus. Practicing this asana without releasing the TFL and gluteus medius can lead to excessive joint reaction forces in the knee. This is because the rotational component of the pose is directed into the knee. The key is to use the hip (which is a ball and socket joint) to do the rotation, while protecting the knee by maintaining it as a hinge.
 |
| Tensor fascia lata and gluteus medius stretching. |
To release the TFL and gluteus medius, I use a technique called the “cradle stretch.” In it we lift the lower leg, as shown here. This action externally rotates the hip. Do not allow the knee to sag forward away from the body—this is important. Cradle it in the crook of the elbow so that the knee is maintained as a hinge. Place the outer edge of the foot into the crook of the other elbow and engage the peroneus longus and brevis muscles at the outside of the lower leg to evert the foot. Extending the toes also helps. This aids to maintain the congruency of the knee joint and helps to protect it from injury.
Joint Reaction Forces, Padmasana, and the Knees
First, thanks to Julia for the following question: “As a yoga teacher, I often see students in Uttanasana with hyperflexion in the lumbar spine. Aside from helping them work on hamstring flexibility over time, what do you suggest in the moment to help them take the flexion out of the lumbar spine?”
Click here for a simple technique on how to use the science behind the muscle spindle to address this common situation.
Click here for a simple technique on how to use the science behind the muscle spindle to address this common situation.
Now on to Padmasana (Lotus Pose) . . .
Yoga poses such as Padmasana can take your knees to the limit of their natural mobility. The idea is to do this without injuring yourself. Knowledge of anatomy and biomechanics can help. While it’s true that an injury can teach you a lot, I’ve been through that and those are hard lessons. For the rest of this incarnation, I’m opting for the easier lessons (at least with my yoga). We can learn a lot about how to avoid injuries in yoga from the vast fund of information available from sports science.
 |
| Hip joint and knee joint with meniscus and ligaments. |
The Mind—Body Connection in Yoga
Many of the benefits of practicing yoga cannot be explained by modern Western science—especially the mystical aspects. Nevertheless, an advantage of approaching yoga scientifically is that we can often identify elements of the practice that produce a benefit and then use our knowledge of science to amplify the effect.
In today’s post we’ll take a look at the neuroscience behind the way the brain “sees” the body. Our video illustrates the “motor homunculus.” This is a visual map of the proportionate representation of the body in the brain. It is derived from the work of Dr. Wilder Penfield, a renowned Canadian neurosurgeon. He developed this map by stimulating regions of the brain in epileptic patients during surgery and then documented what parts of the body were affected. Dr. Penfield’s work was a pioneering contribution to medical science. It was original, elegant in its simplicity, and has stood the test of time.
How to Lengthen the Hamstrings in Janu Sirsasana
In our previous post, we discussed how tight hamstrings can produce hyperflexion of the lumbar spine in forward bends such as Uttanasana. We also illustrated how releasing the hamstrings can aid to prevent this problem. Today we’ll show you a simple, yet powerful technique for using a spinal cord reflex arc to create length in the hamstrings.
Spinal Cord Reflex Arcs
Spinal cord reflex arcs are composed of a sensory nerve receptor located at or near the muscle, its connection via a nerve to the spinal cord, an interneuron within the spinal cord, and an afferent nerve back to the muscle. The reflex arc we want to use to gain length involves the Golgi tendon organ. This receptor is located at the muscle-tendon junction and senses changes in muscle tension. The Golgi tendon organ signals the spinal cord when tension increases. The spinal cord then tells the muscle to relax. In essence, this reflex arc creates “slack” to relieve tension at the muscle-tendon junction and helps to prevent the tendon from tearing.
Spinal cord reflex arcs are composed of a sensory nerve receptor located at or near the muscle, its connection via a nerve to the spinal cord, an interneuron within the spinal cord, and an afferent nerve back to the muscle. The reflex arc we want to use to gain length involves the Golgi tendon organ. This receptor is located at the muscle-tendon junction and senses changes in muscle tension. The Golgi tendon organ signals the spinal cord when tension increases. The spinal cord then tells the muscle to relax. In essence, this reflex arc creates “slack” to relieve tension at the muscle-tendon junction and helps to prevent the tendon from tearing.

Proprioceptive Neuromuscular Facilitation (PNF)
Sports medicine experts long ago perceived that this particular reflex arc could be carefully manipulated to lengthen muscles. Using this knowledge, they invented a technique called proprioceptive neuromuscular facilitation (PNF), or facilitated stretching. It is the most powerful method for gaining length in muscles to improve flexibility. Yoga uses stretching, so why not use PNF in our practice to deepen the asanas?
How Tight Hamstrings Affect Your Lumbar Spine
Hello Friends,
Here's a quick 2016 update from the science literature on your hamstrings...
Biomechanically speaking, tight hamstrings can affect the position of your pelvis, especially in forward bends. This can, in turn, affect your lumbar spine because tight hamstrings produce a pull on the ischial tuberosities and tilt your pelvis back (as shown below in figure 2).
Adjacent joints move in what is known as a “coupled” fashion. When the pelvis tilts back, the lumbar vertebrae flex forward. This means that if the hamstrings are tight and we bend forward in Uttanasana, more of the flexion comes from the lumbar spine. Conversely, when the hamstrings are flexible, the pelvis can tilt forward, allowing the forward bend to come from the hip joint, rather than the lumbar spine.
This interaction is known as spino-pelvic rhythm and is how the pelvis and lumbar spine move in relation to each other. Ideally, we want to have have a forward bend come predominantly from pelvic movement (pelvic dominance) rather than from the lumbar (lumbar dominance).
To this end, I wanted to share a couple of articles from the recent science literature relating to how tight hamstrings affect your pelvis and lumbar spine. The first one discusses spino-pelvic rhythm in relation to the hamstrings. These researchers investigated forward bends (essentially Uttanasana) in subjects with tight hamstrings vs flexible hams.
What they found was...
"The lumbo-pelvic-rhythm comprises 2 patterns—lumbar dominant and pelvis dominant. In flexible subjects, pelvis movement was dominant. In conclusion, improving tight hamstrings may reduce lumbar loading thereby reducing low back pain."
And in a subsequent article they concluded that:
"Dynamic stretching could change the spino-pelvic to a pelvis-dominant motion, indicating that flexible hamstrings are important for preventing low back pain."
Yet another article reported that:
Hamstring stretching exercises performed in the working place are effective for increasing hamstring muscle extensibility. This increase generates a more aligned thoracic curve and more anterior pelvic inclination when maximal trunk flexion is performed."
(click on the references below to read the articles)
Figure 1 shows what happens with flexible hamstrings...
 |
| Figure 1: This illustrates how stretching the hamstrings releases the pull on the ischial tuberosities, permitting the pelvis to tilt forward into anteversion. This is known as femoral pelvic rhythm. |
Figure 2 illustrates what happens when your hamstrings are short or tight...
 |
| Figure 2: Uttanasana: tight hamstring drawing pelvis into retroversion and coupled movement of lumbar spine into flexion. This is lumbar pelvic rhythm. |
As the research demonstrates, stretching your hamstrings can help take the strain off of the ligaments and disks of the lumbar spine. Click here to read more on this subject. Click here to read about the role of the thoracolumbar fascia and the core muscles in protecting the lumbar. Click here for some cool information on gaining flexibility in your hamstrings as well as the myofascial connections between your hammies and your feet. (This shows how everything is connected...)
Figure 3 illustrates the intervertebral discs bulging during lumbar flexion.
Figure 3 illustrates the intervertebral discs bulging during lumbar flexion.
 |
| Figure 3: Lumbar spine in hyperflexion illustrating bulging discs. |
Here's a quick review of the anatomy of your hamstrings...
The hamstrings comprise three separate muscles—the semimembranosus, semitendinosis, and biceps femoris. The biceps has a long and short head. The semimembranosus, semitendinosis, and long head of the biceps originate from the ischial tuberosities (sitting bones). The short head of the biceps originates from the back of the femur (thigh bone). The semimembranosus and semitendinosus insert on the inside of the tibia (lower leg). The two heads of the biceps join into one tendon that inserts onto the head of the fibula at the outside of the knee. The main action of the hamstrings is to flex the knee. Secondary actions include extending the hip and rotating the knee.
 |
| An excerpt from "Yoga Mat Companion 1 - Anatomy for Vinyasa Flow and Standing Poses". |
 |
| An excerpt from "Yoga Mat Companion 1 - Anatomy for Vinyasa Flow and Standing Poses". |
Thanks for stopping by. Click here to browse through our books for more key information on anatomy, biomechanics and physiology related to your yoga practice! See you later this week for a QuickQuiz on your hamstrings...
Namasté,
Ray Long, MD
1) Hasebe K, Sairyo K, Hada Y, Dezawa A, Okubo Y, Kaneoka K, Nakamura Y. “Spino-pelvic-rhythm with forward trunk bending in normal subjects without low back pain.” Eur J Orthop Surg Traumatol. 2014 Jul;24 Suppl 1:S193-9.
2) Hasebe K1,Okubo Y, Kaneoka K, Takada K, Suzuki D, Sairyo K. "The effect of dynamic stretching on hamstrings flexibility with respectto the spino-pelvic rhythm." J Med Invest. 2016;63(1-2):85-90.
3) Muyor JM1, López-Miñarro PA, Casimiro AJ. “Effect of stretching program in anindustrial workplace on hamstring flexibility and sagittal spinal posture ofadult women workers: a randomized controlled trial.” J Back Musculoskelet Rehabil. 2012;25(3):161-9.
How to Use the Abdominals to Release the Back in Uttanasana
I used to quote the writer, Emily Dickenson, as saying, “See the world in a grain of sand…” Then a friend of mine explained that, actually, the quote was by William Blake.
So much for this surfer dude acting cultured . . .
Anyway, the point is that many of the things we learn in one pose can be applied to another. Similar muscles work in Paschimottanasana as in Uttanasana (with variations). Physiological principles, such as reciprocal inhibition between agonist and antagonist muscles, also apply across the board for other skeletal muscles. I find that when we approach learning in this way, it makes what appears to be a daunting subject like anatomy more manageable.
For example, let’s look at using the abdominals in Uttanasana. The abs are composed of four muscles. Moving from the surface inward, we have the rectus abdominis in the front and the external obliques on each side. Deep to these are the internal obliques, with the deepest layer being the transversus abdominis. Contracting these muscles flexes the trunk forward and increases intra-abdominal pressure (by squeezing the abdominal organs). Bending forward from the trunk stretches the erector spinae of the posterior kinetic chain. The erector spinae comprise three columns of muscles that lie parallel to the spine. From medial to lateral, these are the spinalis, longissimus, and iliocostalis.
 |
| Abdominal muscles contracting to produce reciprocal inhibition of the erector spinae. |
For example, let’s look at using the abdominals in Uttanasana. The abs are composed of four muscles. Moving from the surface inward, we have the rectus abdominis in the front and the external obliques on each side. Deep to these are the internal obliques, with the deepest layer being the transversus abdominis. Contracting these muscles flexes the trunk forward and increases intra-abdominal pressure (by squeezing the abdominal organs). Bending forward from the trunk stretches the erector spinae of the posterior kinetic chain. The erector spinae comprise three columns of muscles that lie parallel to the spine. From medial to lateral, these are the spinalis, longissimus, and iliocostalis.
How to Use Nutation to Refine Uttanasana, Part III—A Fringe Benefit
In our last post, Part II of this series on Uttanasana, we gave a trick for engaging the tensor fascia lata (TFL) and gluteus medius. Contracting these muscles allows us to access movement at the sacroiliac joint and aids to protect against hyperflexion of the lumbar spine.
 |
| Countering external rotation of the femurs with the gluteus medius and tensor fascia lata. |
Now, when we do a forward bend from the hips, the gluteus maximus stretches. This produces a pull on the femurs that can externally rotate them and turn the kneecaps slightly outwards. Ideally we would like the kneecaps to face directly forward. An added benefit of engaging the TFL and gluteus medius is that it internally rotates the thighs. The gluteus minimus contributes to this action when the hips are flexing. This counteracts the pull of the stretching gluteus maximus and brings the kneecaps to face forward—the optimal form of the pose. Access this fringe benefit by fixing the feet on the mat and gently attempting to drag them apart. Feel how this internally rotates the thighs.
How to Use Nutation to Refine Uttanasana, Part II—the Tensor Fascia Lata and Gluteus Medius
In the last post, I talked about how masters of various disciplines are continuously refining their art—even though they are masters. I followed the anecdote with some background information on sacral nutation. In this post I will give you a tip on how to use the tensor fascia lata and gluteus medius muscles to create some opening for movement that can incrementally deepen your forward bends, especially Uttanasana.
The tensor fascia lata (TFL) and gluteus medius are muscles at the sides of the pelvis. The TFL originates from the front of the iliac crest and inserts onto the iliotibial band and from there onto the outside of the front of the tibia. The gluteus medius originates a bit farther back on the iliac crest and inserts onto the greater trochanter at the top of the femur (thigh bone). The main action of these muscles
 |
| Freeing the sacroiliac joint using the gluteus medius and tensor fascia lata. |
How to Use “Nutation” to Refine Uttanasana—Part I
Many moons ago I had the privilege of spending an extended period studying yoga at the Ramamani Iyengar Memorial Yoga Institute in Pune, India. During my time there I made it a point to watch Yogacharya Iyengar practice whenever possible. I not only observed the form of his body but also the way he practiced, how he moved from one pose to another, and the way he worked in the individual asanas. I was fascinated by how he continued to refine his art. Bear in mind that B.K.S. Iyengar is the author of Light on Yoga, and he had been practicing for over 50 years at the time. Still, like a master artist, he polished his poses as if his body were a dynamic sculpture.
 |
| Sacral nutation - exaggerated for effect. |
One day, as fate would have it, I was the only other person in the practice hall and Master Iyengar was going through his backbend sequence (picture the most advanced backbends from Light on Yoga to get an idea). I sat on the staircase and watched. He finished, and as he was getting dressed asked if I would like to go with him to visit some people around the city. The next thing I knew, I was in the back of a car speaking with Mr. Iyengar. I mentioned that he still worked to improve his poses, even though he was a master of the art. He gave me a somewhat surprised look, as if to say, “Of course I am!”
How to Use Your Shoulders to Deepen Uttanasana
In Uttanasana, fix the hands onto the mat and attempt to drag them forward. This contracts the anterior deltoids and draws the upper body deeper into the pose. If you can’t reach the floor, grasp the lower legs or backs of the knees and attempt to pull the hands forward. Activating the anterior deltoids with the hands fixed in place connects the upper appendicular skeleton (the arms and shoulder girdles) to the lower appendicular skeleton (the lower legs and hips). In a forward bend, engaging the anterior deltoids in this manner stretches the posterior kinetic chain, including the hamstrings.
The deltoids are large muscles on the surface of the shoulders that produce many of the major movements about this joint. They are divided into three parts—the anterior, middle, and posterior thirds. The anterior portion originates from the front part of the clavicle (collarbone) and the acromion process and inserts onto the outside of the upper humerus. The main action of the anterior deltoids is to raise the arms in front of the body.
 |
| Uttanasana illustrating the anterior deltoids and quadriceps contracting to stretch the posterior kinetic chain |
The deltoids are large muscles on the surface of the shoulders that produce many of the major movements about this joint. They are divided into three parts—the anterior, middle, and posterior thirds. The anterior portion originates from the front part of the clavicle (collarbone) and the acromion process and inserts onto the outside of the upper humerus. The main action of the anterior deltoids is to raise the arms in front of the body.
Subscribe to:
Posts (Atom)